Magento Currencies Tutorial
How to manage currencies in Magento
After you install Magento by default there's only one allowed currency which is used for pricing and payment transactions. From the admin panel of your Magento you can add more allowed currencies, change the default display currency and configure other currency-related settings.
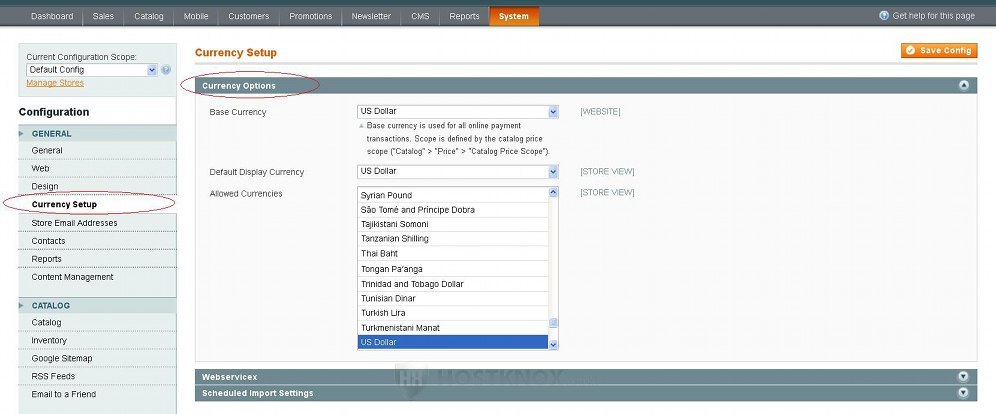
To add and edit the basic currency options, log in to the admin panel of your Magento and go to System menu>Configuration>Currency Setup button in the General section on the left. This will display a few panels on the right. The first one is Currency Options. Click on it to expand it and configure the basic currency settings:
Let's go over the options in this panel:
- Base Currency this is the base currency used for payment transactions. This is the currency that's directly associated with the price of products as set in the admin panel, and if you change the base currency the price will stay the same; it will not be re-calculated using the rate of the knew base currency. Let's explain this with an example. For instance, your base currency is US dollars and you have a product with a price set to 20. If you change the base currency to British pounds, the price of the product will not change. It will still be 20 regardless of the fact that twenty British pounds are actually more than twenty US dollars. If you have more than one currency allowed and you change the base one, make sure that you go to System menu>Manage Currency>Rates and you fix the currency rates. We'll come to currency rates and symbols further down in this tutorial.
By default, the base currency is configured only globally. This means that, for example, if you have a multistore with a few websites, the base currency is set for all websites. If you want to, however, you can have a different base currency per website. To do this go to System menu>Configuration>Catalog button in the Catalog section on the left>Price panel on the right (the Current Configuration Scope drop-down menu in the upper left corner should be set to Default Config). In the Price panel there's a drop-down menu labeled Catalog Price Scope, set it to Website and click on the Save Config button in the top right corner.
Then set the Current Configuration Scope drop-down menu in the top left corner to the website for which you want to change the base currency, after that click on the Currency Setup button in the General section on the left, expand the Currency Options panel on the right, unmark the Use Default checkbox next to the Base Currency setting and use the drop-down menu to select the currency (don't forge to click on the Save Config button). - Default Display Currency from this drop-down menu you can select which is to be the default currency that is used to show the prices of products on the frontend. When a customer initially visits your store that's the currency that will be displayed. You can select a default currency only from those that you have enabled from the Allowed Currencies option. A default currency can be set per store view.
- Allowed Currencies this option provides a long list from which you can choose which currencies should be available on the frontend. To select more than one currency, press and hold the Ctrl button on your keyboard and click with the left mouse button on the currencies that you want to allow. If there's more than one allowed currency, there will be a drop-down menu on the frontend from which customers can select one of the allowed currencies. When they do that the prices of products will be shown in the selected currency. The prices will be re-calculated based on the rates that you've set in the admin panel. We'll come to this later. Keep in mind that if the rate of a currency (in relation to the base one) is not specified, the currency will not be available on the frontend even though it's enabled.
Currency Rates and Symbols
After you allow more currencies you need to set their rates. Otherwise, they will not be available on the frontend. To do this go to System menu>Manage Currency>Rates. On the page that opens you'll see a table row labeled with the base currency. In this row there's a text field for each of the allowed currencies (the label is above the text field):
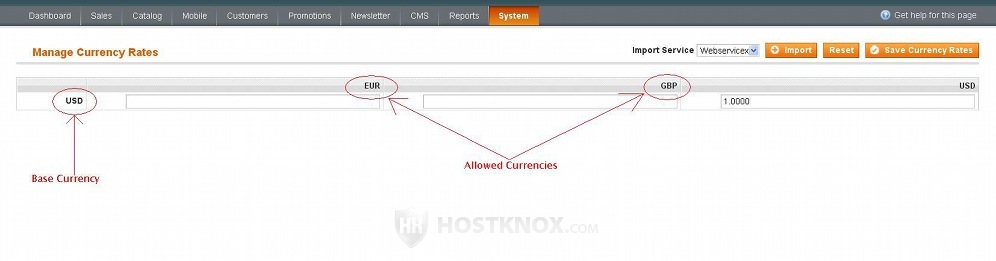
There's also a text field for the base currency itself, and it should be set to 1. In our example screenshot above the base currency is the US dollar and the allowed currencies are the euro and the British pound.
You can configure the rates in a couple of ways. One way is to type in the field for each of the allowed currencies the rate of the particular currency in relation to the base currency. This means, of course, that you have to know the conversion rate. This rate will stay the same until you type a new one (unless you've configured rates to be updated automatically from System>Configuration>Currency Setup>Scheduled Import Settings panel, as described in the section about updating currency rates with cron jobs).
An easier way is just to click on the Import button in the upper right corner. All rates will be set/updated with the most current currency rates (fetched from Webservicex):
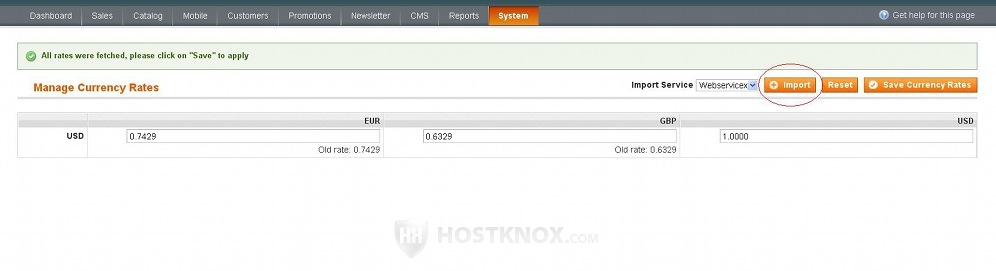
When you click on the Import button all existing rates, regardless of whether they were imported or typed manually, will be updated. After that don't forget to click on the Save Currency Rates button.
When you allow currencies from System>Configuration>Currency Setup the common symbol associated with the particular currency will be used on the frontend. You can, however, change the default currency symbols with any of your choice. To do this go to System>Manage Currency>Symbols. On the page that opens you'll see a table with each allowed currency and its corresponding symbol:
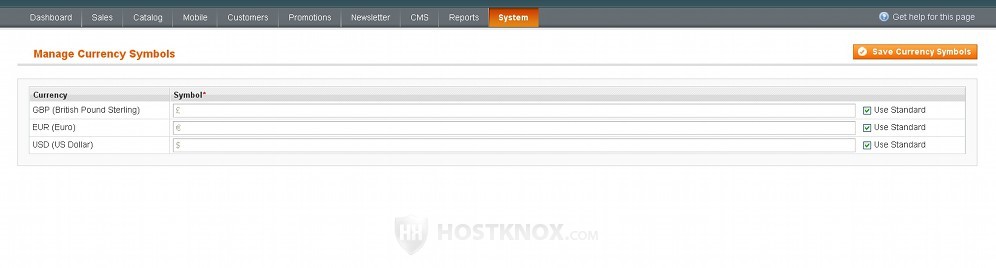
To change the symbol for a currency unmark the Use Standard checkbox for that currency and type (or copy/paste) the symbol in the field. Don't forget to click on the Save Currency Symbols button.
After you allow the currencies that you want and you set their rates a block with a drop-down menu will appear on the frontend from which customers can select one of the allowed currencies:
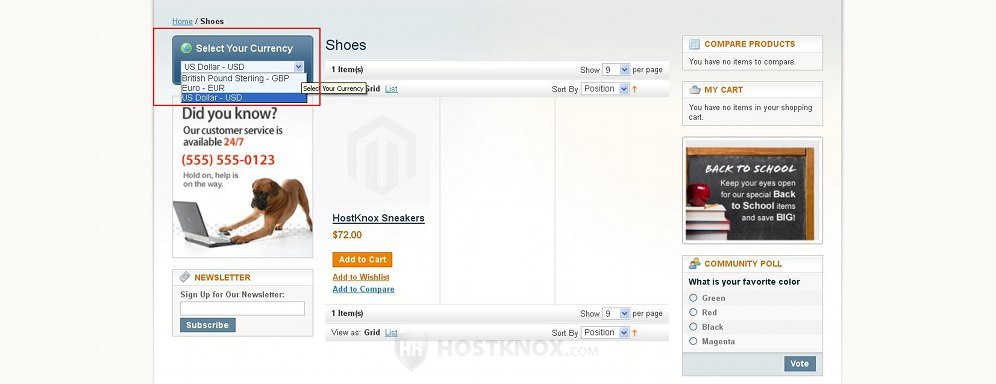
If the customer chooses a different currency than the default one, the prices will be adjusted using the rate set in the admin panel.
Updating Currency Rates with Cron Jobs
As we explained in the previous section you can set fixed rates manually or you can import current rates from a web service. Both of these methods can be performed from System menu>Manage Currency>Rates. You can also import current rates from a web service automatically. You can enable and configure this method using the settings in the Scheduled Import Settings panel. This is one of the panels displayed when you go to System>Configuration>Currency Setup:
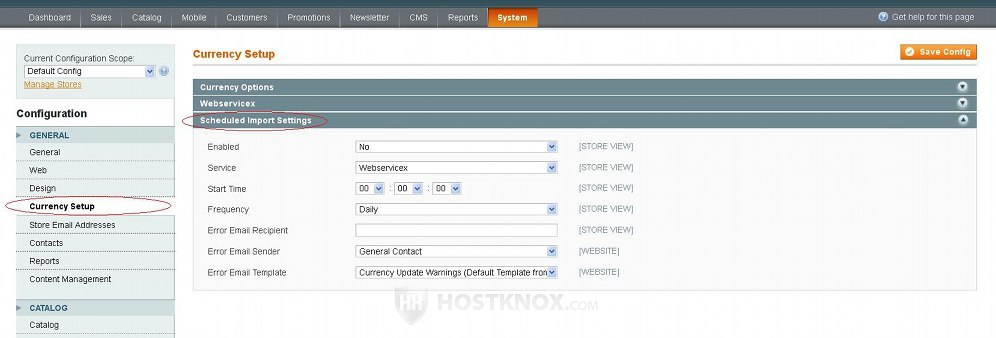
To update currency rates automatically set the Enabled drop-down menu to Yes. Magento is preconfigured to use the web service Webservicex which is the only choice for the Service setting. From the Frequency drop-down menu you can select how often should the rates be updated. You can select Daily, Weekly and Monthly. By default, it's set to Daily which when it comes to currency rates is the most sensible choice. If you want to receive email messages in case something happens and the automatic update can't be performed type an email address in the field for Error Email Recipient. If you want to, from the Error Email Template option you can change the email template that's used for these messages. For more information on email templates check out the Magento tutorial on email templates. If you make any changes to the settings in this panel don't forget to click on the Save Config button.
Note, however, that enabling this feature will not be enough in order for the currency rates to be updated automatically. You'll also have to set up a cron job. It's performed with the help of the file cron.php that comes with every Magento installation package. You can set up the cron job from the Cron Jobs section of the HostKnox control panel. Just click on the Add Cron Job button that's in the black area on the right. On the page that opens there's a Frequency drop-down menu from which you can select how often should the file cron.php be executed. Under it there's a field labeled Command; in that field you have to type the command followed by the full path to the Magento cron.php file on your account. If, for example, Magento is installed directly in the public_html folder on your Magento hosting account, making the site accessible at yourdomain.com, then the whole command that you have to type in the field should look like this:
php -f /home/username/public_html/cron.php
Of course, you need to replace username with your actual username. Then just click on the Add Cron Job button that's under the settings.
Keep in mind that even if you set the cron.php file to be executed every hour the currency rates can be scheduled to be updated automatically only as often as once a day. This frequency, as we mentioned, above is changed from the admin panel from System menu>Configuration>Currency Setup>Scheduled Import Settings panel. Note that when using cron jobs to update currency rates you also have to take into account some additional cron settings in the admin panel of your Magento. To edit them go to System menu>Configuration>System button in the Advanced section on the left>Cron (Scheduled Tasks) panel on the right. In particular you'll probably need to change the setting Missed If Not Run Within. It's set to 15 minutes by default. If, for example, the cron is executed once every hour, the currency rates might not be updated because the task will be abandoned after fifteen minutes. In this case just set the setting Missed If Not Run Within to 60 so that it can overlap with the execution of the cron.php file.
On the page displayed when you go to System>Configuration>Currency Setup there's also another panel connected with the settings that we described for updating rates automatically. That's the Webservicex panel:
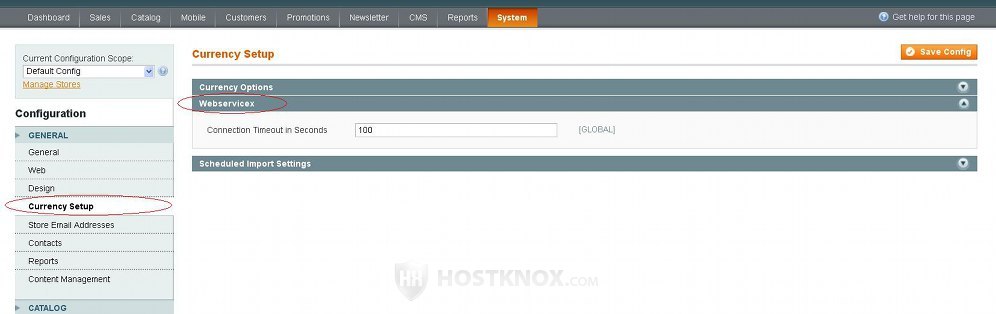
This panel contains an option which you can use to change the timeout when connecting to Webservicex for updating the currency rates. It's in seconds and it's set to 100 by default.