Magento System Catalog Settings Tutorial
How to configure and manage the system catalog settings in Magento
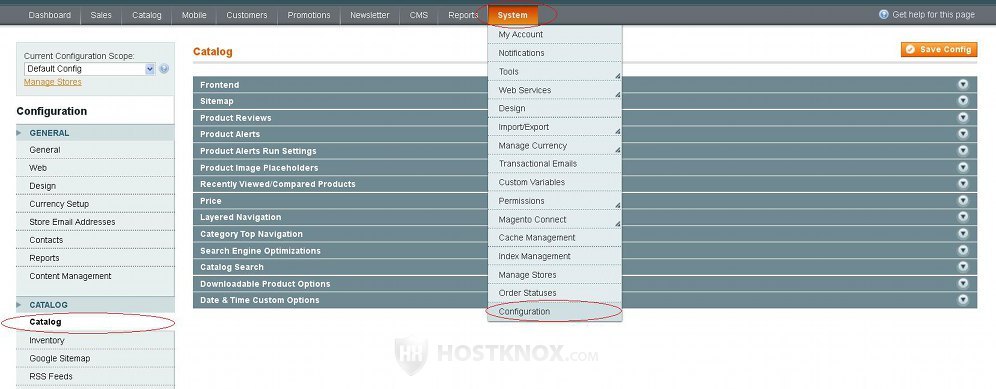
In the admin panel of Magento there are many system configuration settings related to the catalog. In this tutorial we'll go over these settings in more details. To access and configure the system catalog settings, log in to the backend of your Magento and go to System menu>Configuration>Catalog button in the Catalog section on the left:
This will display on the right more than a dozen panels with settings. These panels are:
- Frontend
- Sitemap
- Product Reviews
- Product Alerts
- Product Alerts Run Settings
- Product Image Placeholders
- Recently Viewed/Compared Products
- Price
- Layered Navigation
- Category Top Navigation
- Search Engine Optimizations
- Catalog Search
- Downloadable Product Options
- Date & Time Custom Options
We'll review the settings in each panel.
Frontend
From the settings in the Frontend panel you can configure how products are displayed on category pages on the frontend:
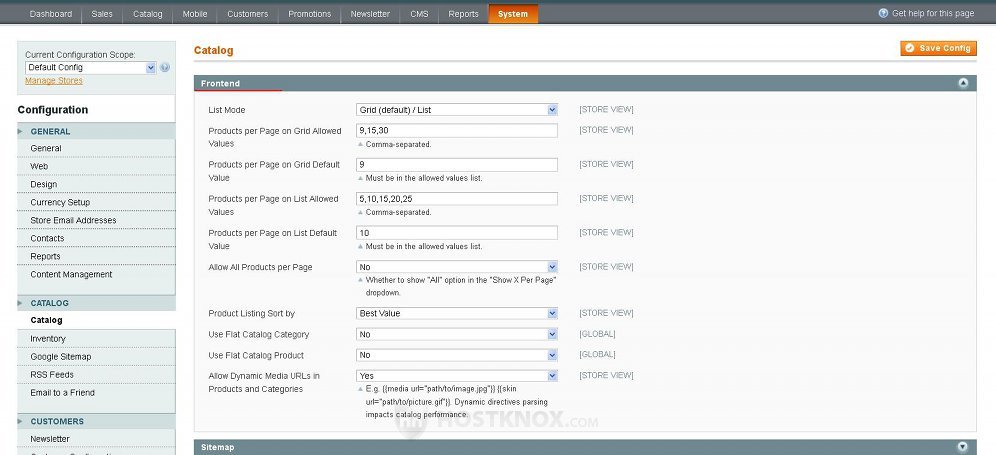
The settings included in that panel are:
- List Mode - by default, products are listed on category pages in a grid view (three columns with products), and above the table with the products there's a link with which customers can switch into list view (products are listed in a single column). With this option you can change that. You can select the list view to be the default one and customers to be allowed to switch to grid view. If you want to, you can enable only the list view or only the grid view, so that customers cannot switch from one view to another.
- Products per Page on Grid Allowed Values - this option is available only if the grid view is allowed from the List Mode option. In the grid view on category (product list) pages there's a drop-down menu at the top and at the bottom of the page with which customers can select how many products should be displayed per page. By default, this is set to 9,15,30 which means that customers can set the page to show nine, fifteen or thirty products. If you want to change that, just put the numbers you want (separate them with a comma). You can put more than three numbers.
- Products per Page on Grid Default Value - this option is also available only if the grid view is allowed. You can use it to specify the default number of products shown per page in the grid view. By default, it's set to 9 which means that when a customer visits a product list page, nine products will be shown on the page (provided there are that many products in the category). If you want to change the default number, the number should be listed in the previous option for the allowed values. For example, if the option Products per Page on Grid Allowed Values is set to 6,12,24, then you can set the option Product per Page on Grid Default Value to one of these three numbers.
- Products per Page on List Allowed Values - this option can be configured if the list view is allowed from the List Mode option. As with the corresponding option for the grid view, from this setting you can configure the number of products that the customer can choose to be displayed in the list view on category/product list pages. Just type the numbers that you want and separate them with commas.
- Products per Page on List Default Value - an option that is available if the list view is allowed. You can use it to specify the number of products shown by default on category pages in the list view. The number has to be one of the allowed numbers in the option Products per Page on List Allowed Values.
- Allow All Products per Page - by default, the maximum number of products that can be displayed on a category page is specified by the Products per Page on Grid Allowed Values and Products per Page on List Allowed Values options for the grid view and list view respectively. If, however, you want the customer to be able to see all products in the category on a single page, set the drop-down menu Allow All Products per Page to Yes. When you do this customers can select a value All from the drop-down menu from which the number of products per page can be specified.
- Product Listing Sort by - on category/product list pages on the frontend there's a Sort By drop-down menu from which customers can select how the products should be ordered (e.g. based on name, price, etc.). From the Product Listing Sort by option you can select the default attribute to be used for sorting, so that when a customer visits your site the products on category pages will be listed according to that default sort by attribute. If the customer wants to, they can then select another attribute from the allowed ones in the Sort By drop-down menu.
The default value that you select from the Product Listing Sort by option will be used for all categories. However, from the settings of each category you can override the default configuration, and choose another attribute to be used as the default value for sorting the products in that particular category. To do this go to Catalog menu>Manage Categories, edit the category that you want, on the page with the category settings click on the Display Settings tab, unmark the Use Config Settings checkbox for the option Default Product Listing Sort By and select the value from the drop-down menu.
In addition to the preconfigured values that can be used to sort the products on category pages, you can enable (or disable) other attributes to be used for sorting products. To do this, in the admin panel go to Catalog>Attributes>Manage Attributes, edit the attribute that you want, on the page with the attribute settings set the option Used for Sorting in Product Listing to Yes. - Use Flat Catalog Category and Use Flat Catalog Product - by default, these two options are disabled. Their purpose is to improve/speed up the performance of the frontend. They are intended for bigger shops (e.g. over 1000 products). Product and catalog data is stored in different tables in the database. By enabling these two options the product data will be compiled stored in a single database. This in terms means less SQL queries to the database and hence faster loading of category and product pages. If you enable these options, you should go to System menu>Index Management and reindex the data.
- Allow Dynamic Media URLs in Products and Categories - by default, this option is enabled which means that you can put code for dynamic media URLs in product and category descriptions.
Sitemap
The Sitemap panel contains a couple of options related to how the sitemap links should be displayed on the frontend of your site:
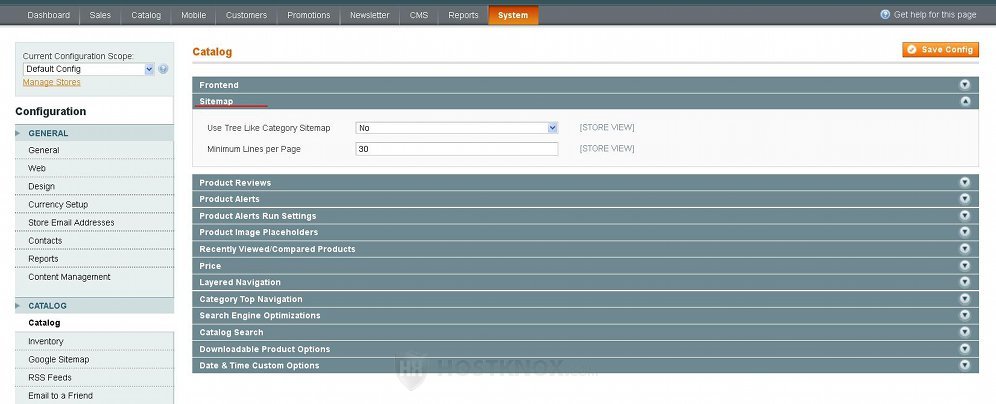
These settings are:
- Use Tree Like Category Sitemap - this is set to No by default. This means that the links on the sitemap page on the frontend are displayed in a simple straightforward list. If you set this option to Yes, the links will be shown in a tree like structure indicating which links are for category pages and which links are for subcategory pages.
- Minimum Lines per Page - with this setting you can choose the minimum number of lines per sitemap page. By default, it's set to 30.
Product Reviews
The Product Reviews panel has an option for allowing guests to write product reviews:
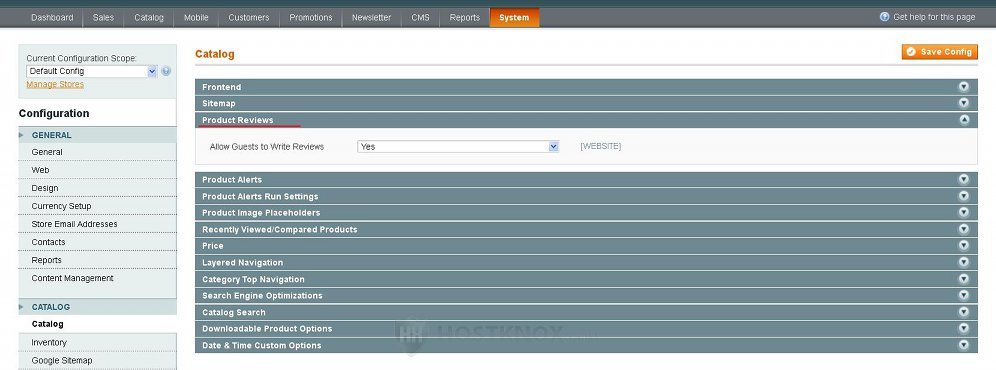
By default, the option Allow Guests to Write Reviews is set to Yes. If you want to disable this function for guests, just set it to No. For more information on product reviews and ratings check out the tutorial on reviews and ratings in Magento.
Product Alerts
Magento has a function that allows customers to sign up for a couple of product alerts. Customers can sign up for a product price alert so that they receive an email message when the price of a product changes (a product for which they have signed up), and they can also sign up to be notified when a product is back in stock. The settings related to product alerts can be managed from the panels Product Alerts and Product Alerts Run Settings. From the settings in the Product Alerts panel you can enable product alerts for product price changes and back-in-stock changes, and you can change the email templates used for those messages:
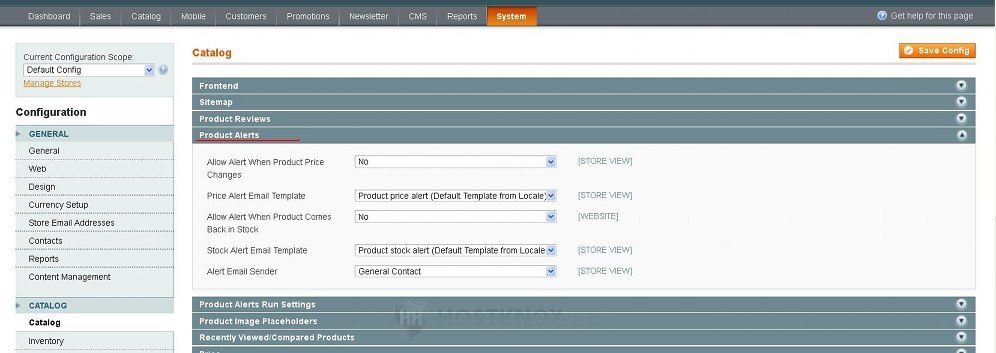
These settings include:
- Allow Alert When Product Price Changes - if you set this option to Yes, a link for signing up for price alerts will be displayed on the product details page of each product. If a registered customers clicks on that link, they will be signed up and will be notified via email when the price of that particular product is changed.
- Price Alert Email Template - from this drop-down menu you can change the email template that's used to display price alert email messages. You can add/edit email templates from System menu>Transactional Emails. For more information on how to do it check out the tutorial on adding and editing email templates in Magento.
- Allow Alert When Product Comes Back in Stock - if you enable this option by setting it to Yes, on product pages of products that are currently out of stock there will be a link with which customers can sign up so that they get notified via email once the product is back in stock. Note that as with the price alert function this one can also be used only by registered customers.
- Stock Alert Email Template - when a product is back in stock the email template selected from this drop-down menu will be used to notify those customers that have signed up to be informed that a particular product is back in stock. For more information on managing email templates check out the tutorial on adding and editing email templates in Magento.
- Alert Email Sender - from this option you can select one of the store email addresses. This is the email address that will be shown in the From field of the alert emails sent to customers. If you need more information on the store email addresses, read the tutorial on managing the store email addresses in Magento.
The panel Product Alerts Run Settings also contains options related to product alerts. Check out the next section in this tutorial to find out more about these settings.
Product Alerts Run Settings
The Product Alerts Run Settings panel contains options that are connected with the product alerts functionality. Product alerts can be enabled from the Product Alerts panel that's on the same page. The Product Alerts Run Settings panel has options for setting the frequency of product alerts and for changing the error email recipient, sender and template:
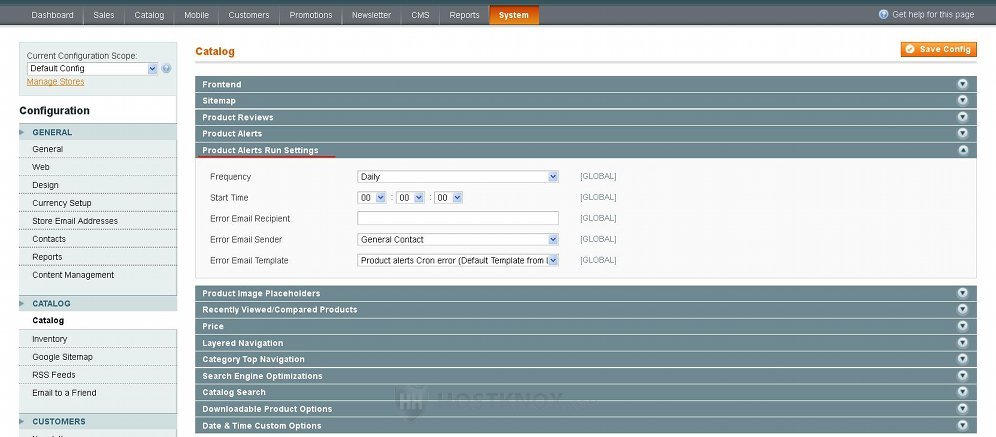
The settings in this panel are:
- Frequency - from this drop-down menu you can select how often should email messages for product alerts be sent. Of course, messages will be sent only for those products for which there has been a change since the last update. By default, product alerts are updated daily and if in that period there's been a change in terms of product prices or re-stocking out-of-stock products, then customers who have signed up for those products are notified. You can change the update frequency to weekly or monthly.
- Start Time - in addition to the frequency you can also set the start time for sending product alert emails.
- Error Email Recipient - in this field you can specify an email address for error messages. If for some reason a product alert email message(s) could not be sent, you'll be informed with a message sent to this error email address.
- Error Email Sender - you can select one of the store email addresses to be displayed in the From field of error email messages associated with product alerts.
- Error Email Template - you can use this option to change the email template that's used for error email messages.
Something very important when it comes to using product alerts is that you also need to set up a cron job. Otherwise, even if you enable product alerts and customers sign up to be notified no emails will be sent. You need to set up a cron job that executes the cron.php file that's in the root directory of your Magento hosting account. You can add a cron job from the Cron Jobs section of the HostKnox control panel. The cron job command that you need to add looks like this:
php -f /home/username/public_html/cron.php
Of course, you have to replace username with the actual username of your hosting account. In the above example it's assumed that your Magento is installed directly in the public_html folder on your hosting account, so the path points to the cron.php file in that folder. If your Magento is installed in a subfolder on your account, you'll have to modify the path. In any case you need to type the full path to the cron.php file of the particular Magento installation.
Depending on how often you set the cron job to be executed, you may need to modify some additional settings in the admin panel of your Magento. They can be accessed by going to System menu>Configuration>System button in the Advanced section on the left>Cron (Scheduled Tasks) panel on the right. If, for example, the cron job is executed once every hour, to make sure that the emails are sent you should set the option Missed If Not Run Within to 60.
Product Image Placeholders
You can use the settings in the Product Image Placeholders panel to upload images to be used as placeholders for the different sizes of product images:
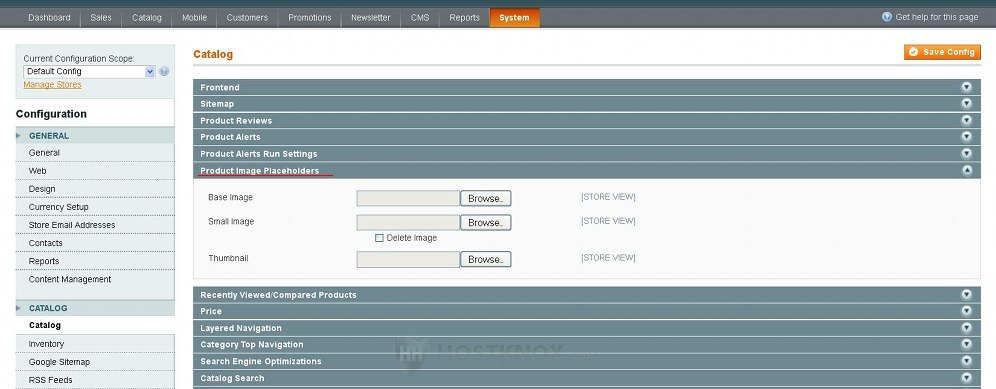
Just click on the Browse button for the particular image size, find the picture on your local computer and click on the Save Config button in the upper right corner of the page. If you want to delete an image mark the Delete Image checkbox and click on the Save Config button. The placeholders are used as product images when you haven't uploaded an image(s) for the particular product(s). As you know, from the settings of each product you can upload images to be associated with that product.
Recently Viewed/Compared Products
As you know, in Magento there is a sidebar that shows the most recently viewed products and a sidebar that displays the most recently compared products. From the settings in the panel Recently Viewed/Compared Products you can set the scope for the recently viewed/compared products, and you can set the maximum number of products to be listed in the sidebars for the recently viewed and for the compared products:
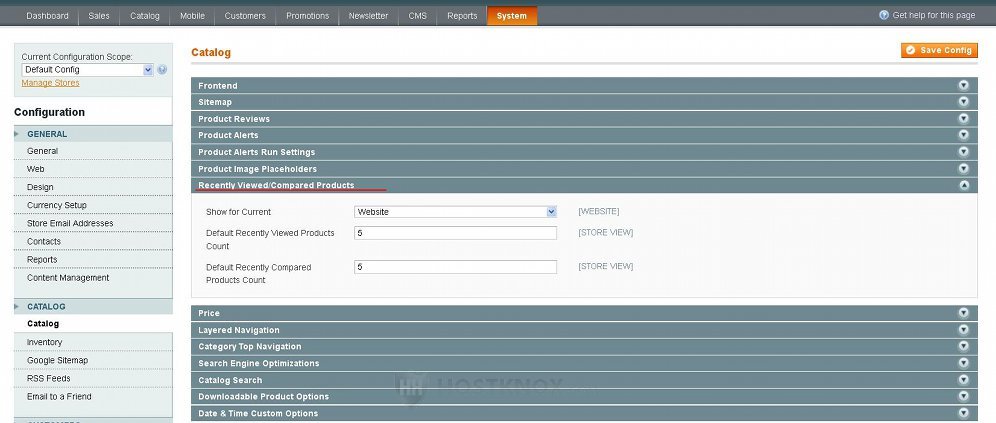
- Show for Current - by default this is set to Website. If you want to, you can change it to Store or Store View.
- Default Recently Viewed Products Count - with this option you can set the maximum number of products displayed in the sidebar for the recently viewed products. By default, it's set to 5 which means that if a customer views a sixth product, the most outdated (in terms of viewing history) product will be removed from the list with the recently viewed products.
- Default Recently Compared Products Count - you can use this option to set the maximum number of products to be shown in the sidebar with the recently compared products. Note that the sidebar for comparing products and the one listing the most recently compared products are different sidebars. As you know on product list pages there's an Add to Compare button for each product. When a customer clicks on that button the particular product is added to the Compare Products sidebar. Then the customer can compare the products listed in that sidebar by clicking on the Compare button that's in the sidebar. After some products have actually been compared they are listed in the sidebar for the recently compared products. The option Default Recently Compared Products Count affects only that sidebar for the recently compared products and not the Compare Products sidebar.
Price
The Price panel has an option from which you can define the scope for the base currency option:
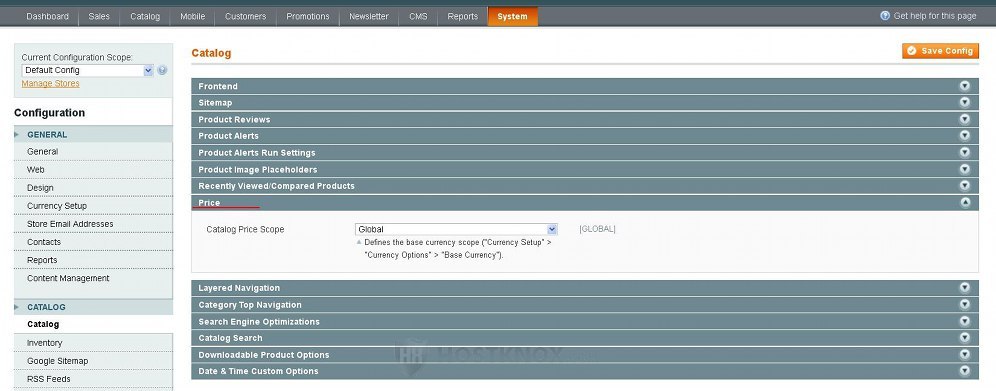
By default, the Catalog Price Scope option is set to Global which means that the base currency can be set only globally (it will be the same for all websites, if you have more than one). If, for example, you have a multistore with several websites and you want to be able to set a different base currency for each, set the Catalog Price Scope option to Website. To change the base currency option itself you have to go to System menu>Configuration>Currency Setup button in the General section on the left>Currency Options panel on the right. For more information on this check out the tutorial on managing currencies in Magento.
Layered Navigation
The Layered Navigation panel contains some settings related to the layered navigation block:
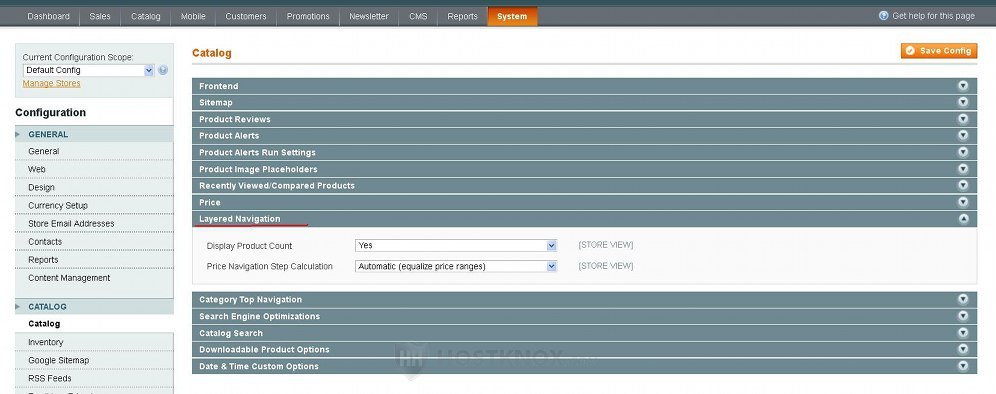
As you know, the layered navigation block is displayed in one of the columns on the frontend and can be used to filter the products in a category based on different attributes (e.g. price, color, etc.).
By default, there are a couple of options in the Layered Navigation panel but this changes depending on the what you select from the drop-down menu Price Navigation Step Calculation. These two default options are:
- Display Product Count - by default, this is set to Yes. This means that the number of products in a category that match a particular attribute value (e.g. the color green) are listed in brackets after that value. If you don't want the product count to be shown, set this option to No.
- Price Navigation Step Calculation - by default, this option is set to Automatic (equalize price ranges) which means that the price steps that are shown in the layered navigation are divided and calculated automatically based on the prices of the products. So, for example, if you have a category with several products and some of them are below $100 and the others are a bit over $100, Magento will likely divide them into two price steps. One from $0 to $99 and the other above $100. This means that there will be two links in the layered navigation. When the customer clicks on the first one the products that cost less than $100 will be shown, and the other will display those that are above $100.
br />The Price Navigation Step Calculation option can also be set to Manual and to Automatic (equalize product counts). Each of these two values will display two additional settings. For example, if you set it to Manual, this will display two settings with which you can configure the price steps yourself:

The two options that you can configure after you set the drop-down menu Price Navigation Step Calculation to Manual are:
- Default Price Navigation Step - in this field you can type the number that corresponds to the sum which you want to be used as a price step. For example, if you put 50 in this field, the price steps will be $0.00 - $49.99, $50.00 - $99.99, etc.
- Maximum Number of Price Intervals - with this option you can set the maximum number of price steps into which products can be grouped. For example, if you have products that cost less than $50, some that are between $50 and $100, others that are above $100, you have set the price step to 50 and you want all three ranges to be displayed in the layered navigation, then you can put 3 (or more) in this field. If we use the same example and you put 2 for this option, then the products will be grouped into two price steps ( $0.00 - $49.99 and above $50).
From the option Price Navigation Step Calculation you can also select Automatic (equalize product counts). When you do that a couple of options will appear:
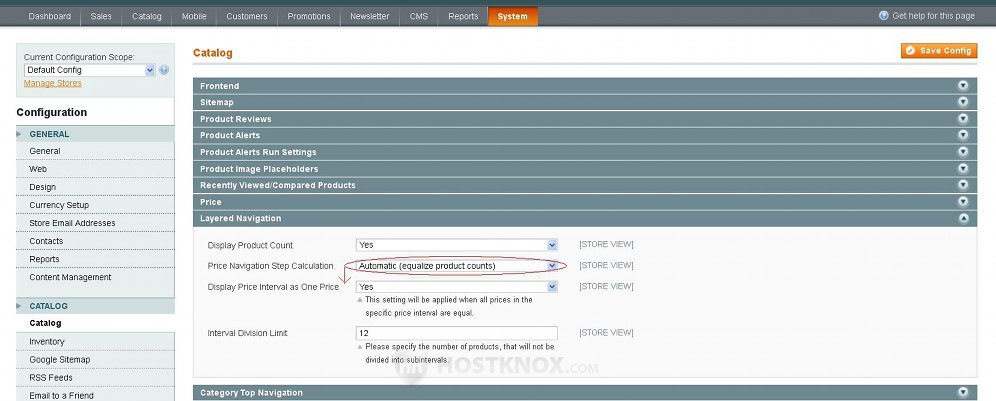
With Automatic (equalize product counts) the price ranges are configured automatically but this time the number of products is taken into account. Magento tries to form price ranges with equal number of products in each range. For example, let's say that you have a category with eight products. Four of these products cost less than $30 dollars and the other four cost $30 or more. Then Magento will split the products into two price ranges ($0.00 - $29.99 and $30 and above) with four products in each price range.
If you set the option Display Price Interval as One Price to Yes, then a price range that consists of products with the same price will be displayed in the layered navigation not as a range ($0.00 - $29.99) but just as a single price (e.g. $20.00). With the option Interval Division Limit you can set a limit to the number of products that can be divided into subintervals.
The layered navigation settings that we described above affect all categories that use layered navigation. However, from the settings of each particular category you can override the system price step calculation settings. For more information on this and on layered navigation in general check out the tutorial on managing layered navigation in Magento.
Category Top Navigation
The panel Category Top Navigation has an option with which you can limit how many levels of subcategories can be displayed by the top navigation bar:
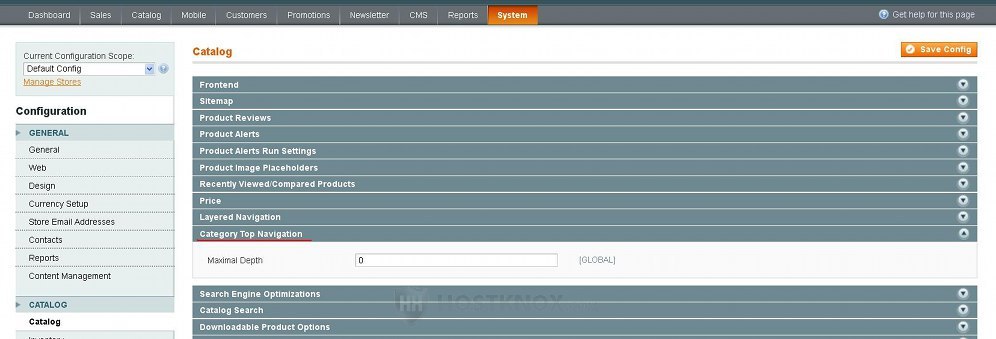
By default, the Maximal Depth option is set to 0 which means that there are no limits. The categories that are displayed in the top navigation bar are first level categories (they are all subcategories of the main root category). You can add subcategories to each of these categories, you can add subcategories to the subcategories, etc. So when there's no limit to the depth and a customer hovers the mouse pointer over a category in the top navigation menu all the subcategories within that category are shown in a pop-out window. If the customer hovers the mouse pointer over one of these subcategories and it in its turn has subcategories, then they are shown too. If you want to limit the depth to which subcategories are shown, put the number in the field for Maximal Depth. For example, if you put 1, only the first level categories will be shown; if there are subcategories they will not be displayed when the mouse pointer is hovered over the categories.
Search Engine Optimizations
As the name suggests the panel Search Engine Optimizations has options related to SEO:
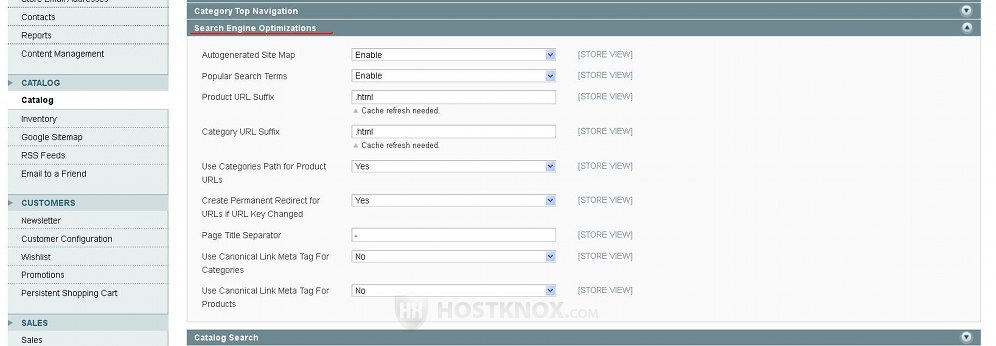
Let's go over these settings:
- Autogenerated Site Map - by default, this option is enabled so Magento generates automatically a sitemap page that contains links to all the categories and products that you have created. This page can be accessed by customers either by using directly the URL of the sitemap page or the link to the sitemap page that's displayed in the footer on the frontend of the site. If you disable this option, the sitemap page will not be accessible and the link will be removed from the footer.
- Popular Search Terms - this option is also enabled by default. This means that on the frontend of your site there's a page that lists the popular search terms that visitors have executed. There's a link to that page in the footer of the site. If you disable this option, the page will not be accessible and the link will be removed. For additional information on search terms read the tutorial on managing search terms in Magento.
- Product URL Suffix - in the field for this option there's .html typed by default. This means that all product URLs end with the extension .html (e.g. yourdomain.com/category/product-name.html). If you want to, you can change the suffix or just delete it. For example, if you delete it, product URLs will be yourdomain.com/category/product-name.
- Category URL Suffix - this option functions in the same way as the previous one but it affects category URLs. So, for example, if you delete the .html suffix from the field and you save the change, category URLs will have the form yourdomain.com/category-name instead of yourdomain.com/category-name.html.
- Use Categories Path for Product URLs - by default, this option is enabled. This means that the category name of the category with which the particular product is associated is added to the URL address of the product (e.g. yourdomain.com/category-name/product-name). If the product is associated with more than one category, the product page can be accessed with URLs that include any of the category names with which the product is associated. (e.g. yourdomain.com/category-name1/product-name, yourdomain.com/category-name2/product-name, etc.). Of course, when the product is accessed from a particular category, the name of that category is used in the product's URL.
If you disable the option Use Categories Path for Product URLs, then the name of the category is not included in the URL of the product. It doesn't matter whether the product is associated with more than one category and whether it's accessed from one or the other categories to which it's associated; in any case the URL that's displayed in the web browser will not include the name of the category (e.g. yourdomain.com/product-name).
Note that even when this option is enabled each product has an URL address without any category name. It can be typed directly in the web browser and the product page will be displayed. When a link to the product from a category page is used, however, the URL includes the name of the category (this, of course, is not the case if the option is disabled). - Create Permanent Redirect for URLs if URL Key Changed - the URL key is the part of the URL address that corresponds to the name of the category or product (e.g. category-name in yourdomain.com/category-name). When you add categories and products Magento automatically creates the URL key based on the name of the category or the product. There's an option, however, with which you can specify the URL key that you want and you can also change it at any time. You can do that from the settings of the particular category or product.
The option Create Permanent Redirect for URLs if URL Key Changed is enabled by default. This means that when you change the URL key of a category/product the old URL address will be redirected to the new one. This will ensure that old links are redirected to the new URL address. That's why it's recommended to keep this setting enabled. - Page Title Separator - the page title separator is used in the page titles of product pages for those products that don't have a meta title specified. When you add/edit products there's a tab on the left side of page with the product settings in the admin panel that's called Meta Information. When you click on it you can configure a setting on the right called Meta Title. It's not required and if you leave it blank Magento will use the name of the product for the meta title. This meta title is actually the page title that's displayed at the very top of the web browser (it's NOT the URL address). You can also add a specific page title/meta title to a category page. When you add/edit a category in the admin panel click on the General Information tab at the top and use the Page Title option; if you don't type anything, the name of the category will be used.
So if a product doesn't have specific page title (meaning you've left the Meta Title option blank), then at the top of the browser the page title is displayed as a combination of the name of the product and the category name. This is where the page title separator comes in. It's inserted between the product name and category name. If the product has a specific page title, that's the only thing that's displayed as the page title (without the title of the category), and so in this case no page title separator is needed. By default, the page title separator is a hyphen. This means that if, for example, the name of the product is Product Name and that of the category is Category Name, then the page title of the product page will be Product Name - Category Name. - Use Canonical Link Meta Tag for Categories and Use Canonical Link Meta Tag for Products - by default, these two options are disabled. Enabling them should have a positive effect in terms of SEO. After you enable them a meta tag with the canonical URL address of the page will be inserted into the source code of each category and product page respectively. This, for example, can be especially useful for products that are associated with more than one category which in turn means that there's a different URL address for the product page associated with each category (e.g. yourdomain.com/category1/product-name, yourdomain.com/category2/product-name, etc.). When you enable canonical link tags the source code of the each of these duplicate product pages will contain a link to the base product page (yourdomain.com/product-name).
This link tag, of course, is not visible on the actual frontpage; it's in the source code. To check this, when you open the page with your browser click with the right mouse button and select View Page Source. When search engine crawlers inspect these duplicate pages the link tag informs them that this is in fact the same page.
Catalog Search
The Catalog Search panel has some options related to the search function of your Magento site:
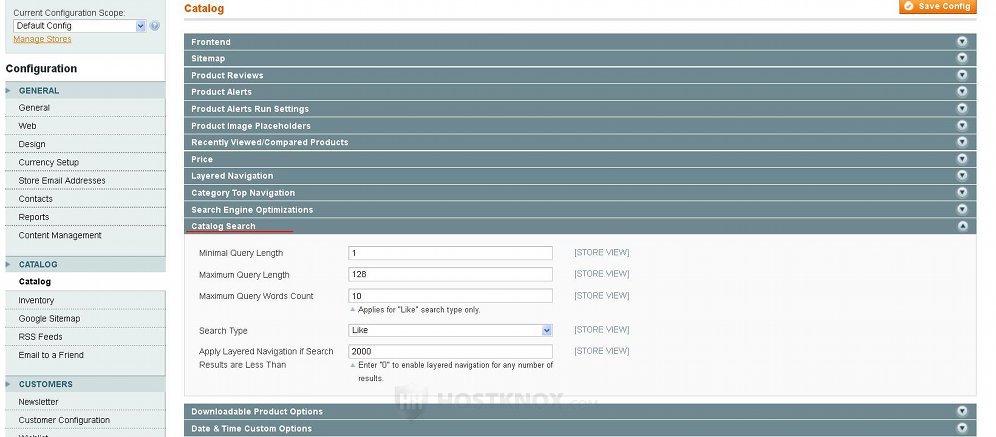
The settings are:
- Minimal Query Length - from this option you can configure the minimum number of characters that have to be used by the customer to be able to execute a query. By default, this is set to 1 which means that customers can perform a search for a single letter or number. If the search term contains fewer than the allowed minimum, the search will not be executed and the customer will receive an error message informing them that there's a minimum query length.
- Maximum Query Length - with this option you can set a limit to the maximum number of characters that can be used in the search term/phrase. The default is 128 characters. If the query of the customer exceeds the maximum number of allowed characters, it will be performed but the search phrase/term will be cut to the maximum query length. For example, if the option is set to 4 and a customer performs a search using the word hostknox, then only the first four characters will be used when performing the search (e.g. host).
- Maximum Query Words Count - with this option you can specify the maximum number of words that can be used in a search query. This option applies to the Like search type (see the next option) and to the combined search type.
- Search Type - by default, this is set to Like. With the Like search type partial matches, as well as full matches, are returned as search results. For example, a search for the word host will match host, hosting, hostknox, etc. Another search type that you can select from this option is Fulltext. With that search type only full matches are returned as search results. For instance, a search for host will match host but it will not match hostknox. There's also a search type that's a combination of the two; it's labeled Combine (Like and Fulltext). With the Combine search type, as with the Like one, both partial and full matches are returned as search results. One difference between the two is that with the Combine search type exact matches are listed first on the search results page (which is not the case with the Like type).
- Apply Layered Navigation if Search Results are Less Than - if the matching products of a search query exceed the number that you specify in this field, then the layered navigation block will not be displayed on the search results pages.
If you make any changes to these settings, you'll have to reindex the data from System menu>Index Management.
For additional information on the search function and search terms check out the tutorial on managing the search function and terms in Magento.
Downloadable Product Options
From the Downloadable Product Options panel you can configure some options that apply to downloadable products:
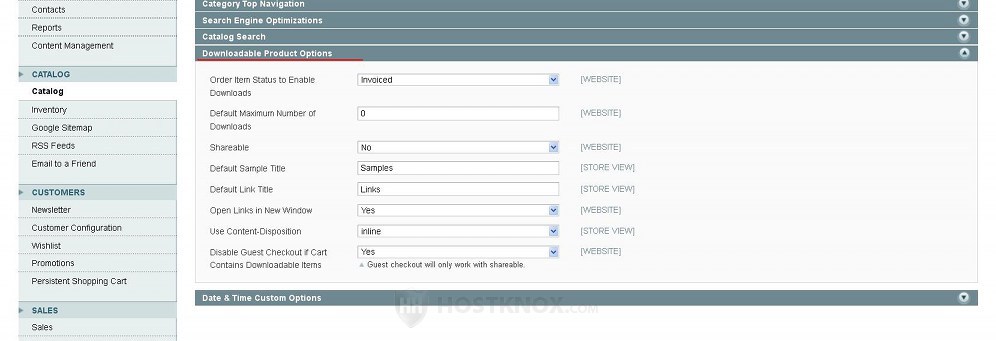
The settings in this panel are:
- Order Item Status to Enable Downloads - once the order is placed this option specifies what the status of the order should be for the customer to be able to actually download the purchased downloadable products. By default, it's set to Invoiced which means that the customer will be able to download the ordered product(s) after an invoice is issued for the order. You can change this option to Pending. This, however, may be a problem if the customer uses a payment option (e.g. check/money order) with which the money is not transferred immediately. In this case the customer will be able to download the product even if they haven't sent the money yet.
- Default Maximum Number of Downloads - with this option you can set a limit to the number of times the customer can download the purchased downloadable product. By default, it's set to 0 which means that there's no limit and so once the customer buys a downloadable product, they can download it from their account an unlimited number of times. If, for example, you put 1, the customer will be able to download the purchased product just once. If they try to download it again, they'll receive an error message that the link has expired. Note that if you change this setting, it will not affect existing downloadable products but just those that you will create after the change. What's more when you add a downloadable product you can set a different limit from the settings of the product. The setting for the maximum number of downloads will be preconfigured with the value of the system setting but you can change it to anything you want.
- Shareable - by default, guests cannot check out if there's a downloadable product in the shopping cart. Guest checkout with downloadable products can be enabled from the option Disable Guest Checkout If Cart Contains Downloadable Items (see the last option in this section). If, however, guest checkout with downloadable products is enabled, those products also have to be shareable. So if you want guests to be able to download downloadable products that they have bought, set the Shareable option to Yes. If you change this system option it will not affect existing downloadable products. When you add/edit downloadable products you can set whatever you want for the Shareable option of each downloadable item. The system setting only sets a preconfigured value for that option.
- Default Sample Title - in this field you can type a preconfigured title for the samples of your downloadable products. When you add/edit a downloadable product you can change this preconfigured title to any title you want. The title for the samples (if you upload any) is displayed on the product details page on the frontend above the links for the samples of the downloadable item(s).
- Default Link Title - this is similar to the previous setting but this one is for the title that's shown above the downloadable items within the downloadable product. For example, if the whole product is a music album, then each downloadable item within the product will be a song in the album. The link title is the title that's displayed above these downloadable items (e.g. the songs). With this option you can set a preconfigured link title. You can change that preconfigured link title when you add/edit the downloadable product.
- Open Links in New Window - by default, this option is set to Yes. This means that when a customer clicks on a link to download a downloadable product, a new browser tab will automatically open with the download window. If you want the link to open in the same browser window, set this option to No.
- Use Content-Disposition - by default, this option is set to inline. In this case, if the downloadable product is a picture, when the customer clicks on the link the picture will be displayed directly by the browser. If you change this option to attachment, then the picture will not be displayed but a window will pop out prompting the customer to open or download the product. Note that audio files, for example, will be treated as attachments no matter how this option is configured.
- Disable Guest Checkout if Cart Contains Downloadable Items - by default, guests cannot check out if they have added downloadable products to the shopping cart. If you want them to be able to do that, set this option to No. In order for the guest customer to be able to download the purchased product without creating an account, that product has to be shareable. So you also need to set the Shareable option to Yes, or just make sure when adding/editing the particular product(s) that it is shareable. Guests can download the product using the link in the order confirmation email, or the email with the invoice.
As we mentioned, some of the system settings for downloadable products described above are only used to set some of the options on the add/edit form for downloadable products to preconfigured values. When adding a downloadable product you can change the values for these options. Here is an example screenshot with the system options that you can be change when adding/editing a downloadable product:
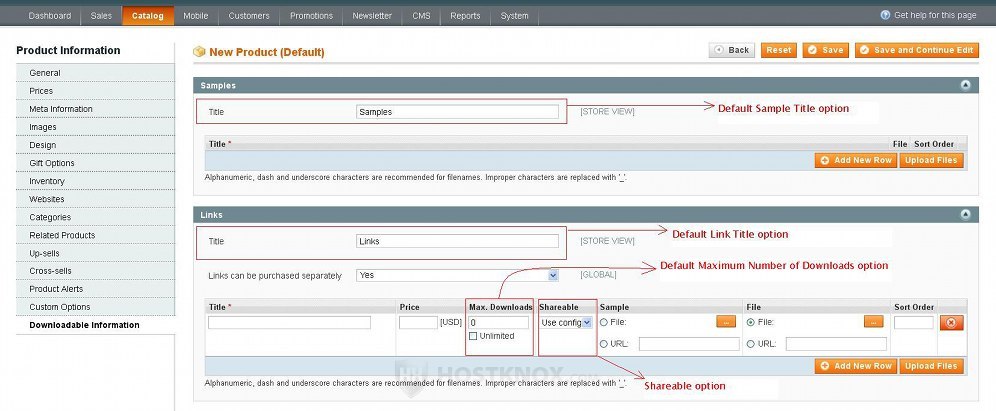
Of course, this will only change the settings of the particular product not the system ones.
For more information on creating downloadable products read the tutorial on how to add downloadable products in Magento.
Date & Time Custom Options
In the panel Date & Time Custom Options there are some settings related to the date and time format:
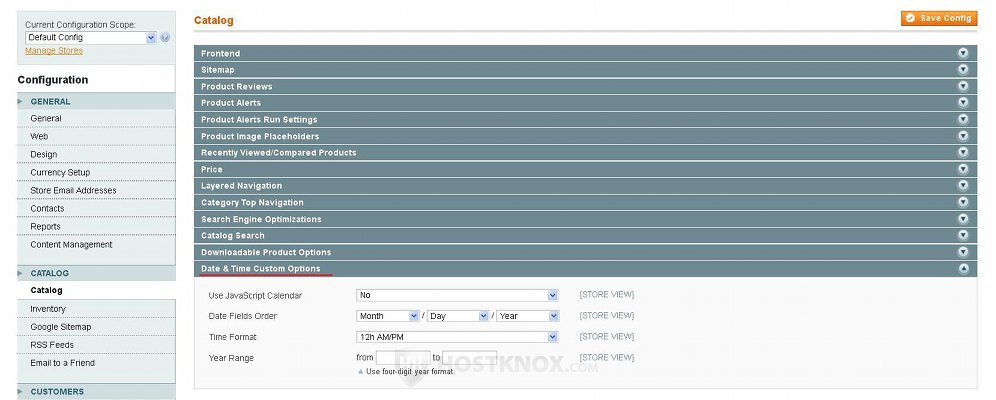
From the respective options you can change the format of the date, you can configure whether the time should be displayed using 24 hours or 12 hours with PM and AM, etc.