Automatic Database Backup Tutorial
How to back up databases automatically
There are different ways to back up your MySQL database(s). One way to do this is with phpMyAdmin. This is an application for managing databases with which you can export any of your databases into an SQL dump file and save it on your local computer. For more information on this method check out the section on database export in the tutorial on how to transfer your site.
Another way to do it is via SSH. With a simple command you can export a database and save it on your hosting account. For more information read the article on how to export and import databases via SSH.
HostKnox clients can request that a backup script be set for their databases at no extra cost by simply posting a ticket via the HostKnox Support Portal.
In this tutorial we'll suggest a way of backing up any or all of your databases automatically. The solution we'll propose involves a few things that you have to do:
- You have to create a file and upload it to your hosting account. Inside the file you have to put the appropriate command for backing up your database(s).
- Then you have to add a cron job that executes the file. Each time the cron job is performed and the file is executed the database(s) will be exported into a specified location on your hosting account.
Script for Database Backups
First you need a file with a command for backing up databases inside it. The file is uploaded on your hosting account and executed as a script. You can create the file either from the Files section of the HostKnox control panel, or you can do it on your local computer with a text editor (e.g. Notepad, Wordpad) and then upload it on your account with an FTP client (e.g. FileZilla). You can name the file backup.sh, for example. Whatever you name the file make sure that it has the file extension .sh at the end. You have to put the file in a folder on your hosting account. A good choice is the folder private_files that exists by default on every HostKnox hosting account. The path to that folder on HostKnox hosting accounts is /home/username/private_files. You have to replace username with your real hosting account username.
Database Backup Command
Inside the file you have to put a command for backing up databases. The command is actually an SSH command that can be executed directly from the command-line. The command is essentially the same. There are slight differences depending on where on your account you want the database dump files to be put, whether you want to backup one, a few or all databases. In the command you can also include some useful additional elements. For example, if you want to avoid overwriting the database backup file each time a new one is exported. Let's review the command that you have to put in the backup.sh file in more details.
In its most basic form the command itself should look like this:
mysqldump -u(username) -p(password) (database name) > (name of database dump file)
In the command replace:
- (username) - put the username of a user that has access to the particular database.
- (password) - should be replaced with the password of that user. You can add and remove database users for each of the databases from the Databases section of the HostKnox control panel. Instead of the username and password of a user of a particular database you can also use the user name and password of the master database user (the user that has access to all your databases). In the Databases section of the HostKnox control panel there's a link in the black area on the right from which you can set/change the password of the master user.
Another thing that you have to keep in mind when you put the password in the command is that if it contains special characters, you should enclose it in single quotation marks. You can put them anyway just to be on the safe side. - (database name) - should be replaced with the name of the database that you want to export.
- (name of database dump file) - put a name for the SQL dump file that's to be created; it can be any name that you want only make sure that it ends with .sql.
So, for example, if the name of the database user is john, the password of that user is Q1ny!av, the name of of the database is example_database and you want it to be exported into a file called example_database.sql, then the command that you have to add will look like this:
mysqldump -ujohn -p'Q1ny!av' example_database > example_database.sql
Note that we've put single quotation marks around the password.
To back up more than one database in the same dump file put the --databases option after the password and just list the names of the databases in the command:
mysqldump -u(username) -p(password) --databases (database name1) (database name2) > (name of database dump file)
You can also export all databases in the same dump file. To do this, in the command instead of the names of your databases put --all-databases:
mysqldump -u(username) -p(password) --all-databases > (name of database dump file)
However, if you back up more than one database or all databases with the same command you should use the username and password of the master database user. If you don't know what the master username is, go to the Databases section of the HostKnox control panel and click on the Master Username link on the right. On the page that opens you'll see the master username; on that page you can also change/set the password of the master database user.
Another useful thing you should do is to specify a path on your hosting account where you want the SQL dump files to be saved. All the folders in the path should actually exist on the account. You can, for example, create a folder called backups in the private_files directory on your account. The path to such a folder will be the same on all HostKnox accounts: /home/username/private_files/backups. Of course, you have to replace username with your actual account username. So with the path added the above example command will look like this:
mysqldump -ujohn -p'Q1ny!av' example_database > /home/username/private_files/backups/example_database.sql
Another important thing is that if you use the command as shown above, each time the database is backed up it will overwrite the old one that's already on the account. If you want to keep the old database backups, you have to add some variables to the name of the SQL dump file in the command so that it looks like this:
mysqldump -u(username) -p(password) (database name) > example_database-`date +%y-%m-%d`.sql
This will add automatically the year, month and day to the name of each SQL dump file. Of course, in the above command you have to put the correct username, password and database name, specify a path on the account where the dump files should be saved, and you can replace example_database with any name you want. Note that the symbols that enclose the date variables are not single quotation marks ' but the accent character ` (usually the button for that is in the upper left corner of the keyboard).
Since with time more and more database dump files will pile up in the particular folder on your account it's not a bad idea to delete the older backups that you don't need. One way to do that is to delete them manually either from the Files section of the HostKnox control panel or with an FTP client. Another way is to do it automatically by adding another cron job that deletes files in that folder that are older than a specified period. For more information on this check out the article on how to delete automatically old database backups on your hosting account.
Cron Job for Executing Database Backup Script
After you create the file backup.sh with the database backup command in it and you upload it on your hosting account, you have to add a cron job that executes that file. In this way your database(s) will be backed up automatically.
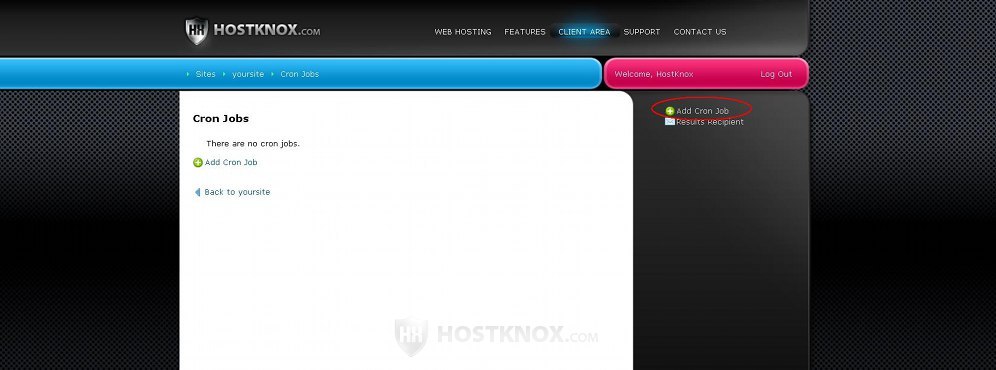
You can add cron jobs from the Cron Jobs section of the HostKnox control panel; there you'll see a button Add Cron Job in the black area on the right:
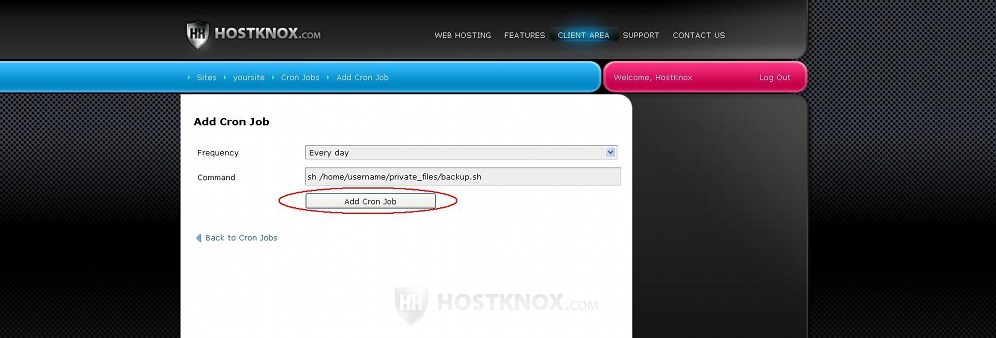
On the page that opens select from the Frequency drop-down menu how often you want the cron job to be performed, hence how often the database(s) will be backed up. In the field Command you have to put the command for executing the script for backing up the database. This command is a simple one and it should look like this:
sh (path to script file)
You have to replace (path to script file) with the full path on your hosting account to the file that contains the database backup command. Assuming the you named the file backup.sh and it's uploaded in /home/username/private_files, then the cron job command should be:
sh /home/username/private_files/backup.sh
Of course, you also have to replace username with the actual username of your HostKnox hosting account.
After you select the frequency of the cron job and you put the command click on the Add Cron Job button that's under the options: