PrestaShop 1.5/1.6 CMS Pages Tutorial
How to manage CMS pages in PrestaShop 1.5-1.6
CMS pages in PrestaShop are static pages with which you can display any information on the frontend of your site. It can be something related to the terms of service, the delivery, About us page, etc. You can create and use different CMS sub-categories to organize these pages, or you can use only the default home category that comes preconfigured with PrestaShop.
In this tutorial we'll show you:
- how to access the options for CMS pages and categories
- how to create new CMS categories
- how to edit and delete existing CMS categories
- how to add new CMS pages
- how to manage existing CMS pages
- CMS pages on the frontend
In this tutorial we've used as a basic example PrestaShop 1.6. The screenshots are also from that PrestaShop version. Although the design of the admin panel is different than that of PrestaShop 1.5, the options for CMS pages and categories are the same in both versions. If there are some differences we'll make notes about that in the tutorial.
Access the Options for CMS Pages and Categories
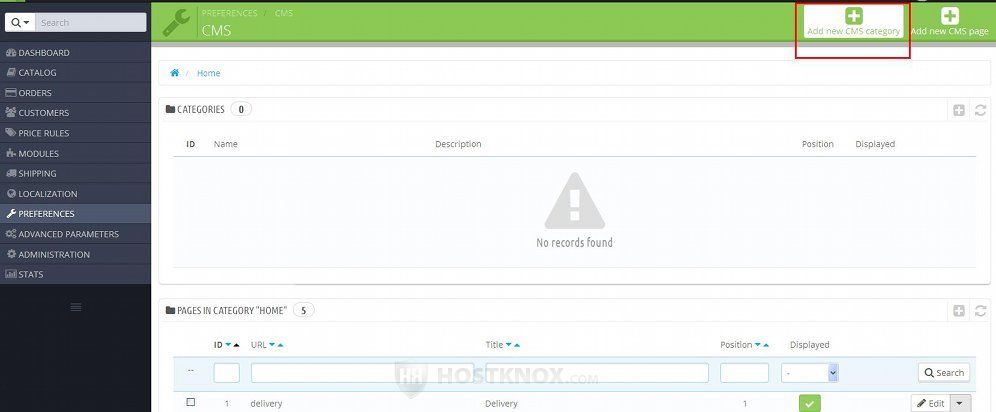
To access the options for managing CMS pages and categories, in the admin panel go to Preferences menu>CMS sub-menu:

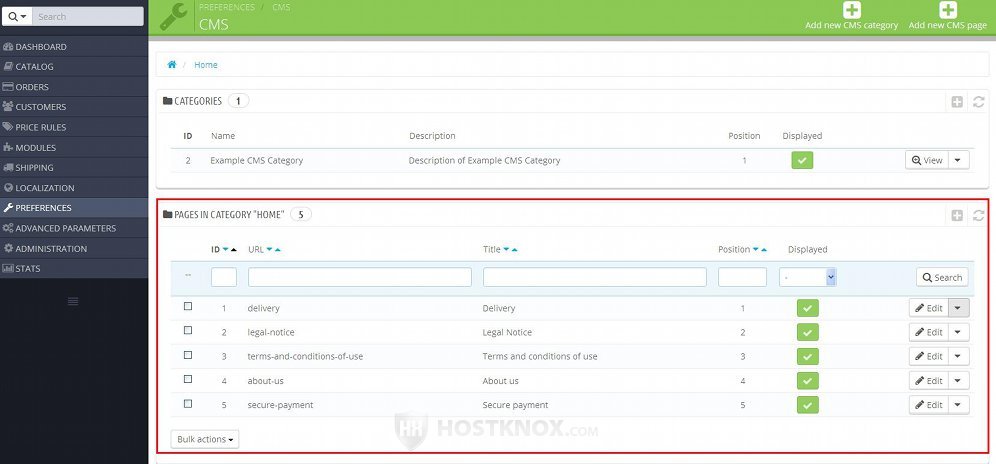
On the page that opens there are two tables. One lists the CMS sub-categories that are in the currently selected category, and the other the CMS pages in the selected category. By default, PrestaShop comes preconfigured with one top-level CMS category called Home. Any sub-category that you create will be listed in the table.
The table under it lists the CMS pages in the selected category. PrestaShop comes prepackaged with a few example pages in the Home category.
Add CMS Categories
To add a new CMS category, after you go to Preferences menu>CMS sub-menu in the admin panel click on the button Add new CMS category (in PrestaShop 1.5 the button is labeled Add new and it's right above the table with the existing categories):
After you click on the button the form for adding CMS categories will be displayed. The one for editing existing categories contains the same options:

The available options are:
- Name - type the name of the category. This will be the name shown both on the frontend and backend.
If you have more than one language installed, you can translate the name in each language; use the option on the right side of the field to select the language to which you want the name to apply. - Displayed - if you want the page of the CMS category to be available on the frontend, enable this option.
If the disabled category contains pages, the links to those pages will be removed from the sitemap page on the frontend. Note however that even if you disable this option, the CMS category page can still be accessed on the frontend either by using directly its URL address, or by using a link in a menu (if you have added a link to any of the menus).
Each CMS category has a page on the frontend that provides links to the pages in that category, and it also shows the description of the CMS category (if you have added one). - Parent CMS Category - from this drop-down menu you can select the parent category of the category that you're about to create. You can select the top-level Home category, or if you have sub-categories of the top-level category, you can select one of these sub-categories. In this way you can create sub-categories of the sub-categories and so on, as many levels down as needed.
- Description - if you want to, you can optionally type some description for the category. Whether the description is shown on the page of the CMS category on the frontend depends on the theme.
If you have more than one language, from the option on the right side of the text field you can select the language to which you want the description to apply. - Meta title, Meta description and Meta keywords - these options are not required. They are related to search engine optimization. In the field for Meta title you can type the name/title of the category, in the field for Meta description you can type a short description of the category, and in the field for Meta keywords you can type some words related to the category. The information provided in these fields is used by search engines (e.g. Google, Yahoo, etc.). The title and description are shown on the result pages displayed by search engines (this also depends on the particular search engine). The title is also shown at the top of the browser window and in browser tabs, when the CMS category page is opened.
Note that if you have more than one language installed, you can translate the title, description and keywords, and from the option on the right side of the fields you can select the language to which you want them to apply. - Friendly URL - this is a required field. This is the part of the URL that corresponds to the CMS category, and it will be used if friendly URLs are enabled. Friendly URLs can be enabled from Preferences menu>SEO & URLs sub-menu>Friendly URL option.
When you type the friendly URL for the CMS category, don't type the whole URL address but just the part corresponding to the CMS category. Separate words with hyphens and use lowercase letters. For the friendly URL you can use the name of the CMS category. For example, if the name is Example CMS Category, then for friendly URL you can type example-cms-category. If the main address of your store is yourdomain.com, then this would mean that the full URL with which the CMS category page can be accessed would look like this: yourdomain.com/content/category/2-example-cms-category (2 is the ID number of the category).
After you're done with the options don't forget to click on the Save button.
Manage CMS Categories
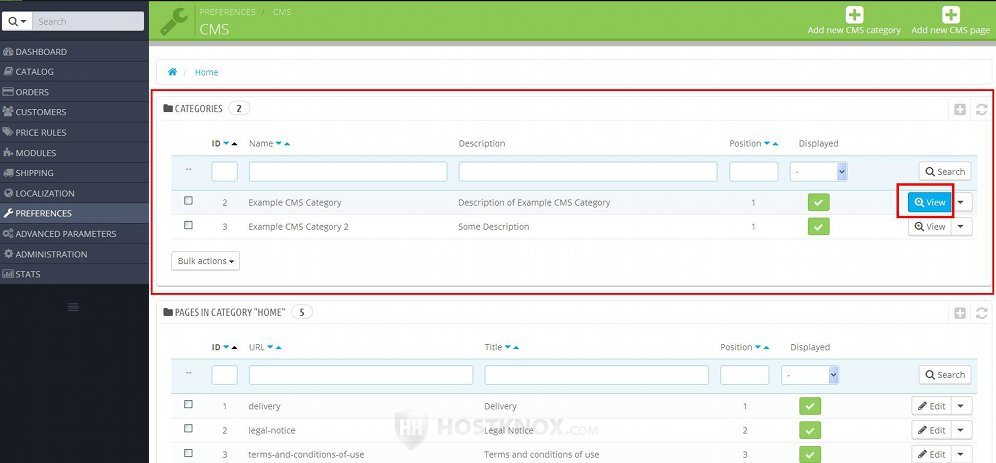
After you go to Preferences menu>CMS sub-menu in the admin panel, on the page that opens you'll see a table that lists the CMS sub-categories (if you have created any) of the main Home category. To view a list of the CMS pages associated with a sub-category, and also a list of the sub-categories of that sub-category, either click on the row of that sub-category in the table or on its View button (in PrestaShop 1.5 the button is an icon that looks like a magnifying glass):
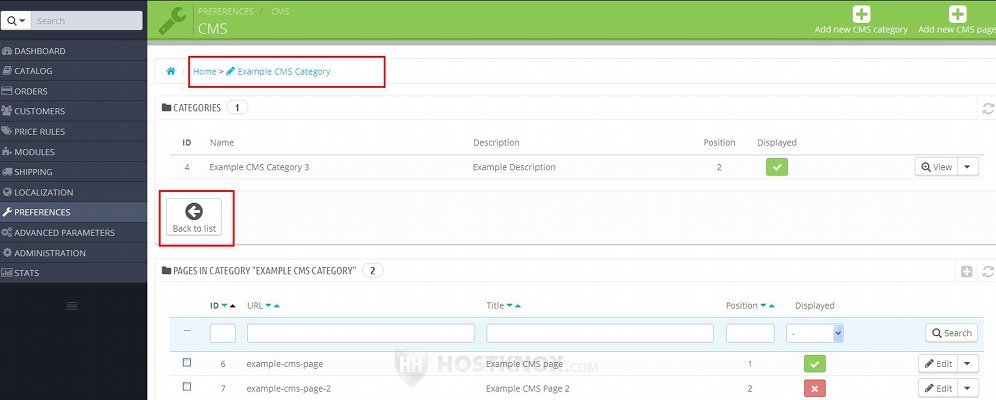
On the page that opens there are two tables. One lists the sub-categories of the sub-category (if any) and the other shows the pages associated with the sub-category that you're viewing. To go back to the previous CMS category either click on the button Back to list or use the links at the top of the page:
To edit the options of a CMS category, in the table that lists the categories click on the arrow next to its View button and from the drop-down menu that appears select Edit:

In PrestaShop 1.5 the button is an icon that looks like a pencil.
This will open the form with the options of the CMS category. We reviewed all the options in the previous section of this tutorial.
To delete a CMS category, in the table that lists the categories click on the arrow next to its View button and from the drop-down menu select Delete:
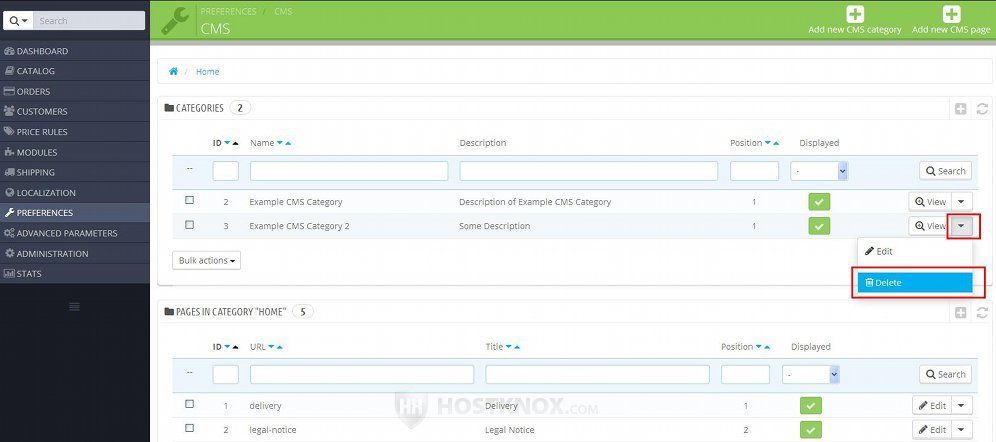
In PrestaShop 1.5 the button is a trash can icon.
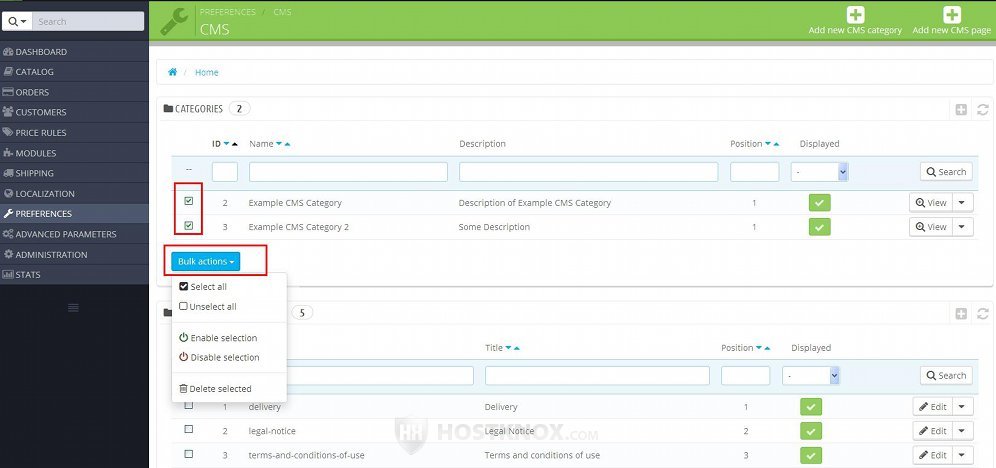
If you want to delete or enable/disable more than one CMS category at the same time, mark the checkboxes of the categories in the table and from the drop-down menu Bulk actions that's under the table select the action:
Note that if you delete a CMS category this will also delete all the sub-categories and pages within that category.
Add CMS Pages
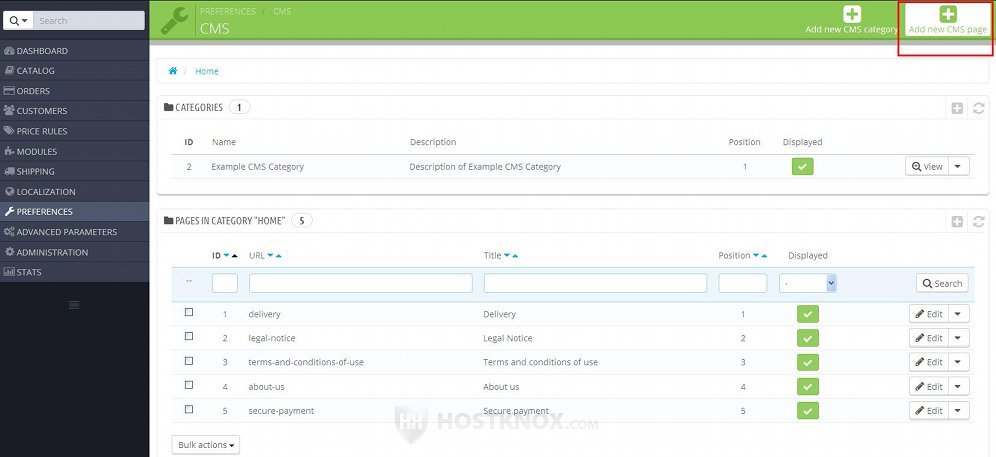
To add a CMS page, in the admin panel go to Preferences menu>CMS sub-menu and on the page that opens click on the button Add new CMS page (in PrestaShop 1.5 click on the Add new button that's above the table with the existing CMS pages):
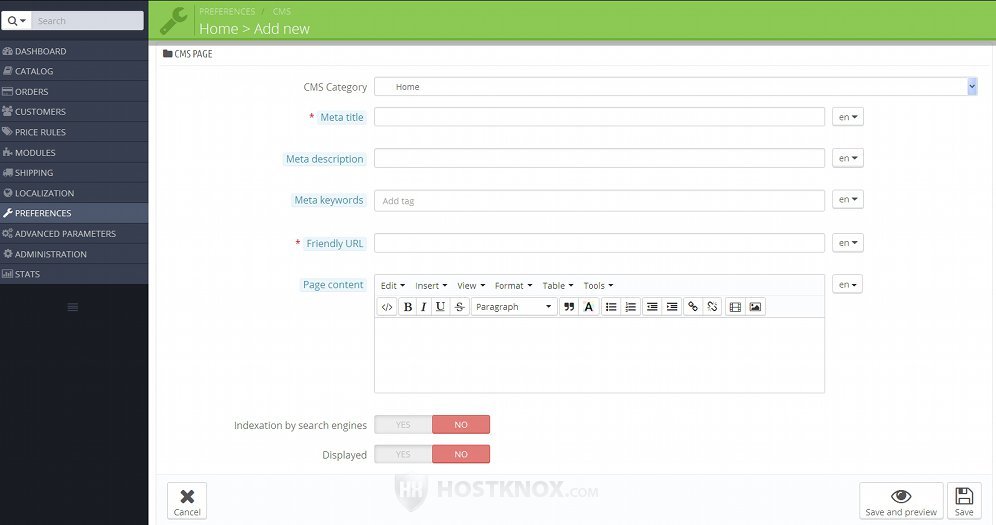
This will open the form for adding CMS pages (the settings when editing an existing page are the same):
The options are:
- CMS Category - from this drop-down menu select the CMS category to which you want the page to belong.
- Meta title - this is a required option. This is the title used by search engines and displayed on search engine result pages; it's also the one shown in the tabs of the web-browser when the page is opened. However, unlike other meta title options (e.g. for CMS categories) this one is also for the name of the CMS page. There's no separate option for the name; this option is both for the name shown on the frontend of your site and for the title used by search engines. That's why it's required.
- Meta description - in this field you can optionally type some description to be used by search engines. It's displayed on search engine result pages, but this also depends on the particular search engine.
- Meta keywords - like the other meta options, this one is also intended for search engines and for improving the ranking of the page in search engine searches. In practice however the meta keywords don't really help much for improving the ranking of the page; but if you want to, you can still provide some keywords relevant to the content of the CMS page.
When you type a keyword or a phrase, press either the Enter button on your keyboard or the button for the comma. The keyword/phrase will be added with a light background color, and there will be an X symbol on its right side with which you can remove the keyword. Once it's added like this you can type another one. - Friendly URL - this is a required option. When you type the title of the page it's automatically used as the friendly URL. If there are uppercase letters in the title they are automatically turned into lowercase ones in the friendly URL, and words are separated with hyphens. So, for example, if you type Example CMS Page in the field for Meta title, this will automatically put example-cms-page in the Friendly URL field. If you want to, you can change it. It's not the full URL of the page but just the part that corresponds to the title. You only need to specify that part; it will then be automatically added to the rest of the URL to form the full address. So if we use the same example, and the main URL of the shop is yourdomain.com, then the full URL with which the page can be accessed will look like this: yourdomain.com/content/2-example-cms-page (the number is the ID number of the particular page).
Note that friendly URLs will be used only if you have enabled them. You can do this from Preferences menu>SEO & URLs sub-menu in the admin panel. - Page content - use this built-in editor to type the actual content of the CMS page as you want it to appear on the frontend.
If you have installed more than one language, for each of the meta options, as well as for the friendly URL and for the content you can add a translation in each of the languages. Simply type the content in the field, select the language from the option on the right and save the change.
The rest of the CMS page options are:
- Indexation by search engines - if you want the page to be indexed by search engines and thus displayed on the result pages of search engines, enable this option.
- Displayed - if you want the page to be accessible and visible on the frontend, enable this option. If you disable this option, the links to that page will be removed from all the menus and the sitemap, and it won't be accessible even if the customer uses directly the URL address of the page.
After you're ready with the options don't forget to click on the Save button.
Manage Existing CMS Pages
To edit and delete existing CMS pages, go to Preferences menu>CMS sub-menu in the admin panel of your PrestaShop. The bottom table displays the pages that are in the CMS category that's currently selected. After you go to Preferences menu>CMS sub-menu the pages that are in the top-level Home category are listed by default:
To view and manage the pages that are in another CMS category, select that category from the top table.
To edit the options of a CMS page, just click on the Edit button for that page (in PrestaShop 1.5 the button is an icon that looks like a pencil):
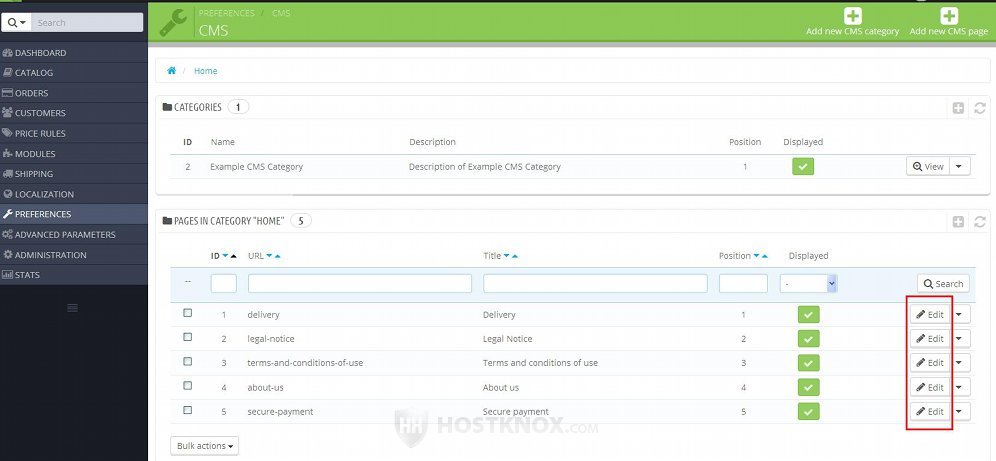
This will display the settings of the CMS page. For a detailed review of these settings check the previous section of this tutorial.
To enable/disable a page, you can either edit that page and configure its Displayed option, or you can do it directly from the table that lists the pages. In the table there's a column labeled Displayed:

The enabled pages are marked with green checkmarks and the disabled ones with red X symbols. To enable/disable a page, click on its symbol and it will turn into the opposite one.
To delete a CMS page, in the table click on the arrow next to the Edit button for the page and from the drop-down menu select Delete:
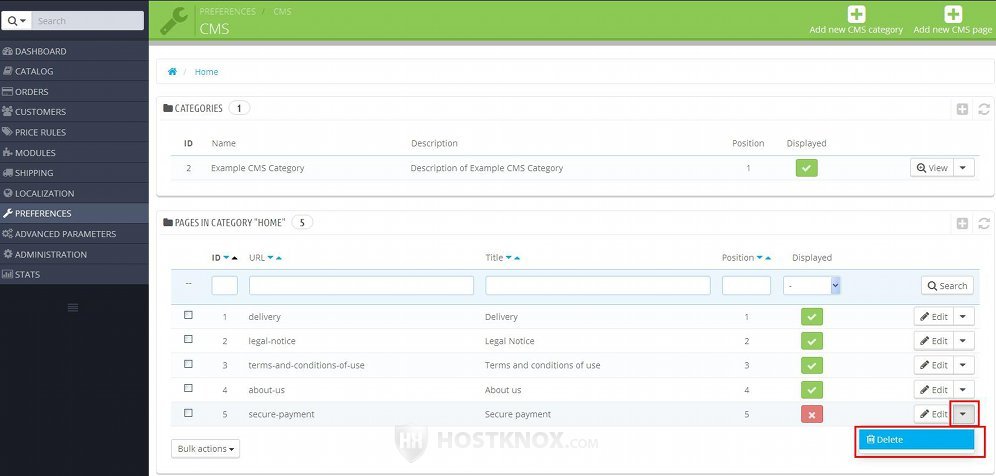
In PrestaShop 1.5 there's no such drop-down menu. The button for deleting is a trash can icon that's next to the button for editing.
If you want to delete or enable/disable more than one page at the same time, mark the checkboxes (in the first column of the table) of the pages that you want to be affected and then select the action from the Bulk actions drop-down menu that's under the table:
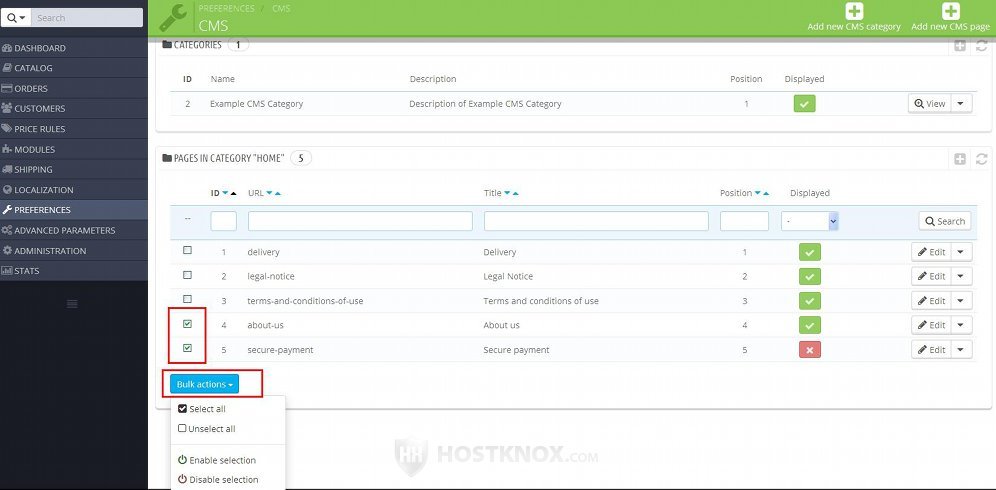
In PrestaShop 1.5 the buttons for bulk actions are not organized in a menu. They are listed directly under the table.
CMS Categories and Pages on the Frontend
In short, these are some basic ways to access and make more easily accessible CMS category pages and CMS pages on the frontend:
- by directly opening the URL address of the particular CMS page
- by adding links in the CMS block
- by adding links in the top horizontal menu
- by using the links on the sitemap page
CMS pages and CMS category pages can be accessed on the frontend in several ways. One way is to open directly the URL address of the CMS page or category. If your PrestaShop is installed directly in the public_html directory of your PrestaShop hosting account, meaning the URL of the homepage is yourdomain.com, the URL addresses of CMS pages will have the form yourdomain.com/content/2-name-of-cms-page, and the URL addresses of the pages of CMS categories will have the form yourdomain.com/content/category/2-name-of-cms-category. In both cases, of course, 2 is replaced with the actual ID number of the page/category and name-of-cms-page and name-of-cms-category are respectively replaced with the actual name of the category/page (as specified from its Friendly URL option). The above URL examples will be valid if friendly URLs are enabled. This can be done from Preferences menu>SEO & URLs sub-menu in the admin panel of your PrestaShop.
A way to make the CMS pages and categories more accessible is to put links to them in any of the preconfigured menus that come prepackaged with PrestaShop. There's one module that's intended exactly for displaying links to CMS pages and categories. It's called CMS block. To configure it, go to Modules menu>Modules sub-menu>Front Office Features, find the module CMS block and click on its Configure button. On the page that opens you'll see listed the CMS categories and pages that you've created. You can decide which ones to include in the menu. Typically, the menu is shown in the left or right column on the frontend of the site. This is theme-specific, and in any case you can change module positions from Modules menu>Positions sub-menu.
Another prepackaged menu that you can use to display links to CMS categories and pages is the top horizontal menu. To edit that menu go to Modules menu>Modules sub-menu>Front Office Features, find the module Top horizontal menu and click on its Configure button.
When you add new CMS categories and pages, links to them are automatically put in the sitemap. By default, on the frontend there's a link to the sitemap in the CMS block menu. Of course, you can add links to it in other menus. The sitemap can also be accessed directly by using its URL address. If friendly URLs are enabled and the URL of the homepage of your site is yourdomain.com, then the URL of the sitemap will be yourdomain.com/sitemap. This will open the sitemap page that contains a section with links to the CMS categories and pages:
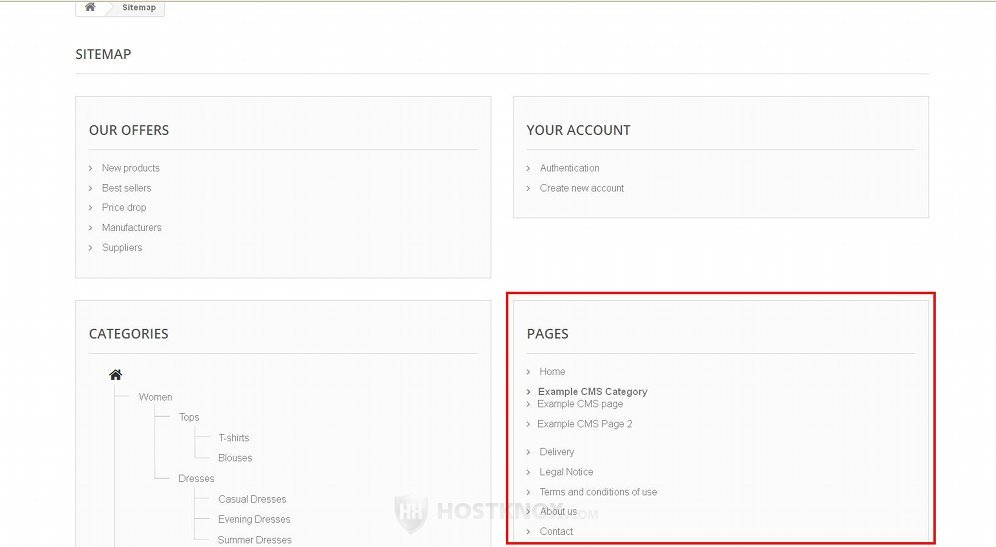
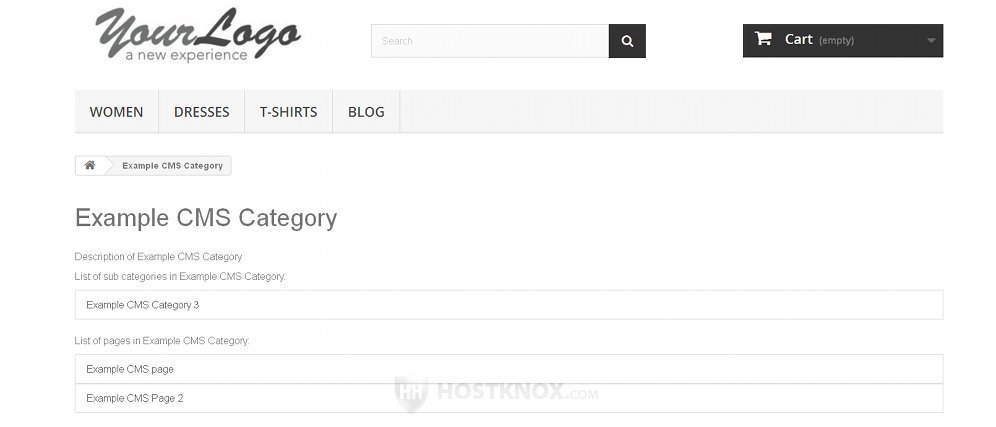
Keep in mind that each CMS category also has a page on the frontend and that page lists links to the pages in that category, and also to sub-categories of the category (if any):