PrestaShop 1.4 Themes Tutorial
How to install themes in PrestaShop
In this tutorial we'll show you how to install new themes in PrestaShop and how to switch between the existing themes.
Before you begin anything make sure you have a recent backup of your PrestaShop files and of the database used by the application.
By default, the PrestaShop installation package comes with one theme. However, you can install many other themes. There are a couple of ways to look for themes. One is to go the addons section of the official PrestaShop site and search for themes there.
You can also search for themes from the backend of your store. Go to the Modules tab, then click on the Modules & Themes Catalog sub-tab and you'll find a search box there. You can choose from hundreds of themes, mostly paid, but there are some free ones too.
When it comes to installing a theme, you have a couple of options. One is to do it manually and the other is to use the theme installer that comes with the PrestaShop installation package. We'll go over both methods.
Automatic PrestaShop Theme Installation
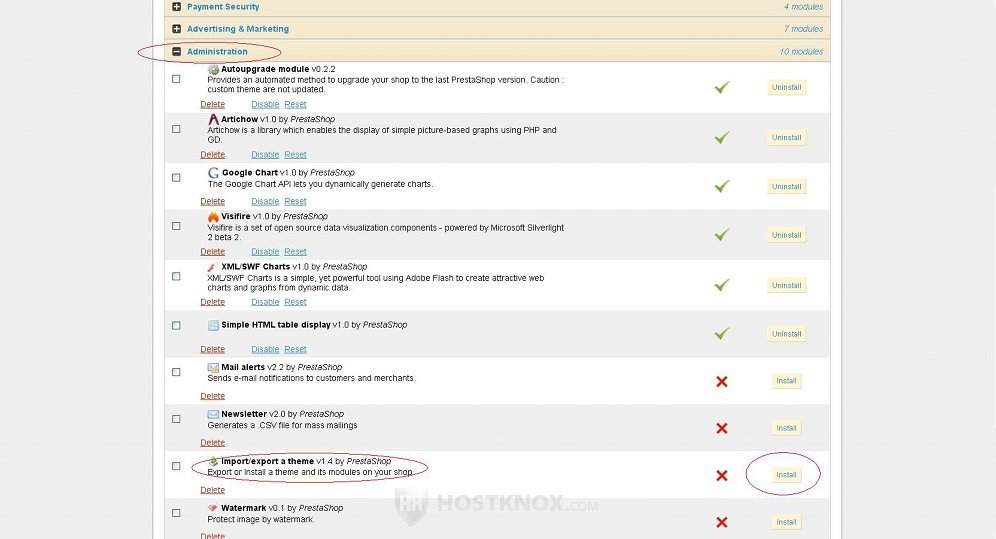
PrestaShop has a theme installer which you can use to install new themes. It comes as a module prepackaged with PrestaShop. However, this module is not installed by default, so you have to install it first. To do this log in to the backend of your store, click on the Modules tab, then on the Modules page click on the module section called Administration. Find the module Import/export a theme and click on its Install button:
After the module is installed, a Configure button will appear under the module's name. Click on that button. The theme installer link in the Themes section of the Themes sub-tab (a sub-tab of the admin panel's Modules tab) will redirect you to the same module. After you click on the Configure button you'll be taken to a page where you'll be offered three ways to upload the module: from your computer, from the web (with an URL address), from FTP.
Of course, first you have to find the theme you want to install, and then, depending on the upload method you prefer to use, you have to download it to your local computer, or copy the archive's URL address, for example. In our example we've downloaded a theme called prestashop template to the local computer, and so we'll use the method for uploading from a local computer (the archive has to be zipped):
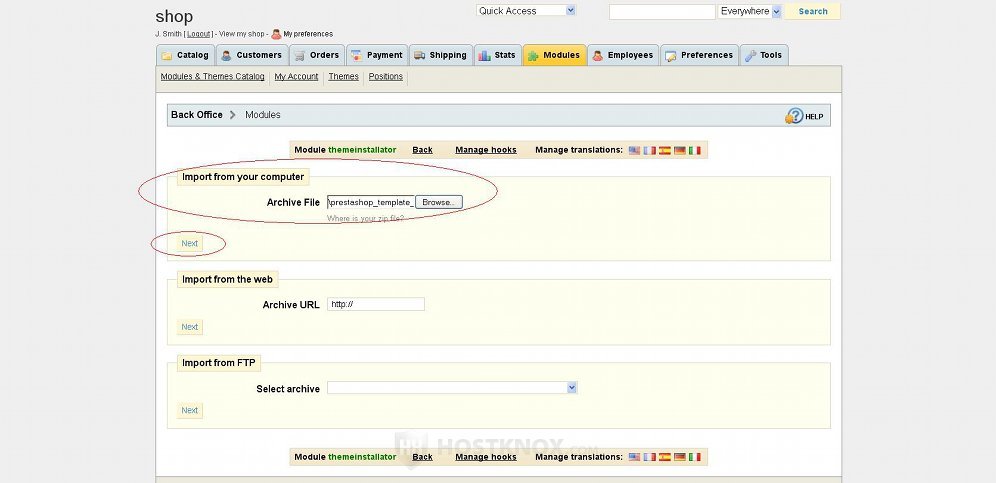
Whichever upload method you choose, after you locate the archive on your local computer, or copy the URL, etc., click on the Next button for that method.
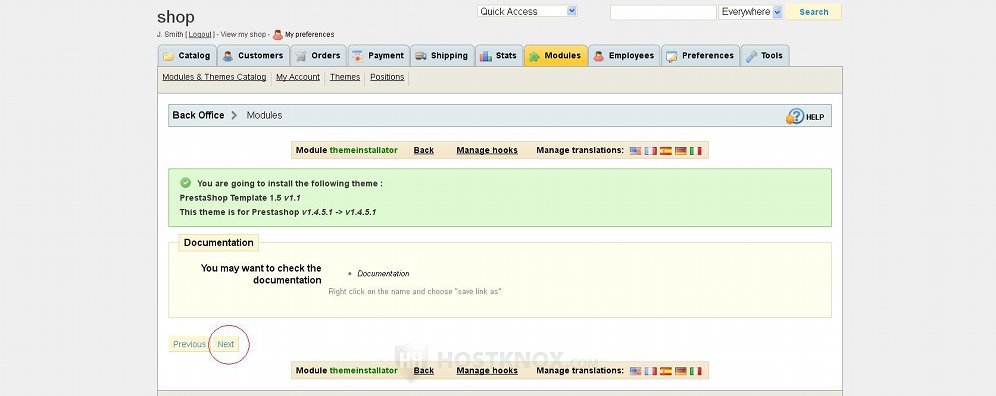
On the new page that opens you'll be asked to confirm that you want to install the theme, so just click on Next to continue:
On the next page you'll be congratulated on the successful theme installation, and you'll be asked whether you want to install the modules that come prepackaged with the theme (if there are any). You'll also be asked whether you want to use the modules and images configurations of the theme you're installing:
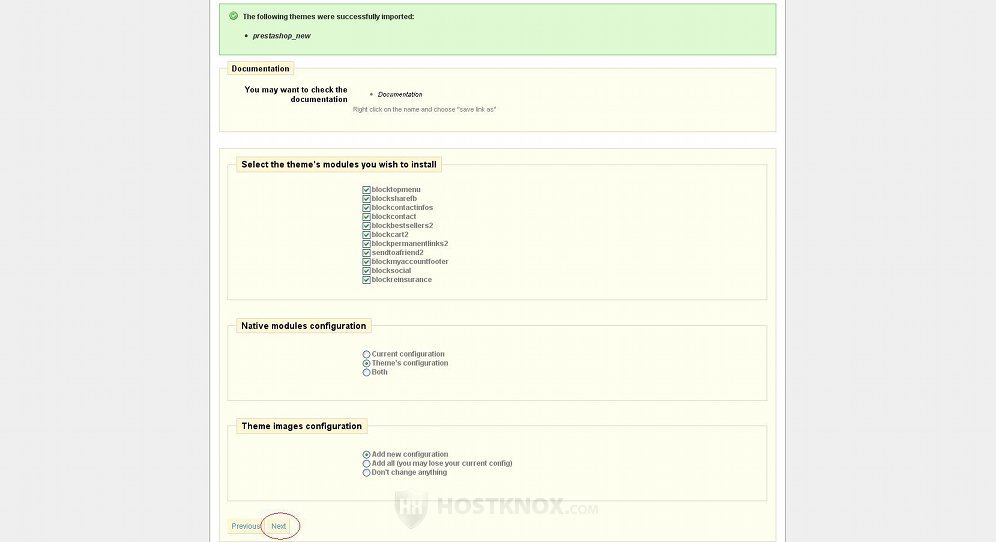
For full compatibility it's recommended to install the modules that come with the theme and to use its configuration. Later you can uninstall any module you don't need. You can also always switch back to your previous theme, although you'll probably need to uninstall (or disable) the modules that were installed with the new theme.
After you configure the options click on the Next button to continue. The theme installer will automatically install the modules, and enable and disable the necessary modules, so as to match the theme's configuration; this also depends on what you chose from the modules and images configuration options. On the next page you'll be shown a list of the performed actions:
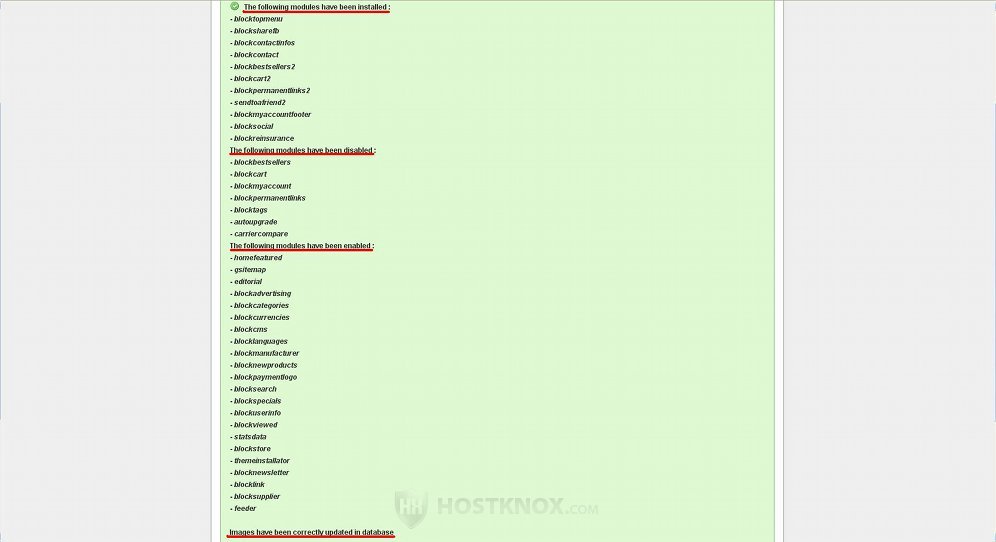
To finish the process simply click on the Finish button at the bottom of the page.
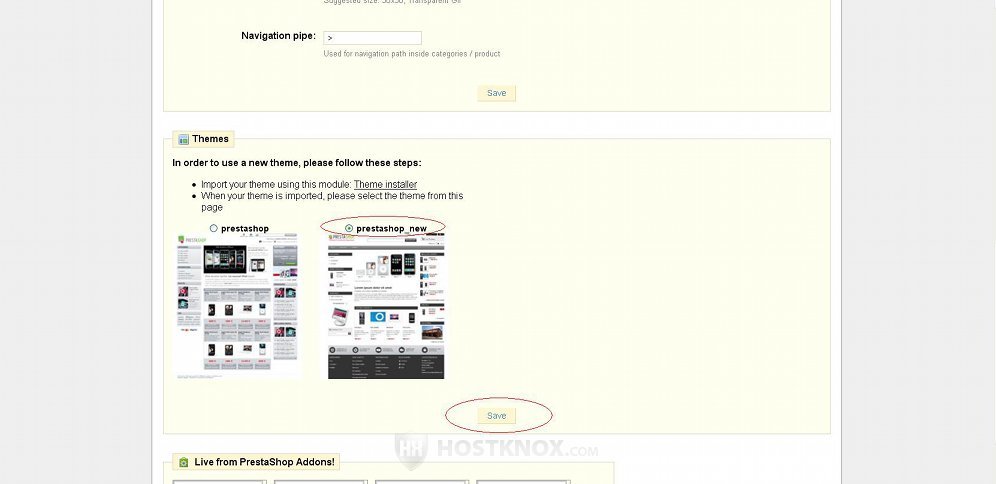
The only thing left to do is to switch to the new theme. To do this click on the Themes sub-tab of your admin panel's main Modules tab. Then scroll down to the Themes section, mark the button for the new theme and click on Save:
Refresh the frontend of your site to see the result.
Although the install method is automatic, as we mentioned, when you change themes you might have to additionally uninstall/disable some modules that are not needed for the theme to which you're switching. You can do this from the main page of your backend's Modules tab. You may also need to change the position of some modules, hook/unhook modules from positions (also referred to as transplanting modules). Depending on the module, one module can be put in different positions. You can do this from the Positions sub-tab of the Modules tab.
It's a good idea to have an additional PrestaShop application installed in a subfolder somewhere on your PrestaShop hosting account, so that you can use this installation only for testing.
Manual PrestaShop Theme Installation
After you find the theme that you want, view its details to make sure it's compatible with your PrestaShop version and download it to your local computer. To be able to download themes or any addons from the official PrestaShop site, you have to create an account there and to be logged in.
After you download the archive to your local computer, unzip it. The archive might contain only a folder with the name of the theme, and only the theme's files and subfolders inside that folder. Or, as is often the case, the unzipped folder may contain two subfolders, one named themes and the other modules. In this case, the themes folder should contain a folder which itself holds all the theme's files and subfolders. This is the folder that you have to upload to the themes folder in the root PrestaShop directory on your hosting account.
If the unzipped theme archive also contains a modules folder, this means that the theme comes with some additional modules. Upload the folders inside this modules directory to the modules folder which is in the root PrestaShop directory on your account. In case you already have these modules on your account and their version is newer, don't upload the modules. Check also whether the archive contains some additional installation instructions (e.g. an installation.txt file).
To make it clearer we'll use an example. We've downloaded a free theme called PrestaShop Alternative. We've unzipped the downloaded archive, and the unzipped folder is called prestashop_alt. This unzipped folder contains two folders and one file. The two subfolders inside prestashop_alt are named modules and themes. In the themes directory there's a folder called prestashop_alt (it has the same name as the top folder) and this is the folder that we have to upload to the hosting account. So, for example, our PrestaShop is installed in a folder called prestashop in the root public_html directory, which means that we have to upload the folder prestashop_alt (the second one) to public_html/prestashop/themes.
As we mentioned above, the unzipped parent folder prestashop_alt also contains a folder called modules. Inside this modules directory there are four folders which contain the files for four different modules. These modules are needed for the proper functioning of the theme, or at least for it to look as intended. The four module folders are named blockadhome, blockcategorieshome, blockheaderlogos, blocksearchcenter. So we upload these four folders to the modules folder in the root PrestaShop directory on the hosting account (e.g. public_html/prestashop/modules).
Depending on the particular theme, it may not need any additional modules and so the archive will contain only the folder for the theme.
You can upload the necessary folders using an FTP client.
After everything is uploaded you can switch to the new theme. Log in to the backend of your store, click on the Modules tab and then on the Themes sub-tab. Scroll down the page to the section labeled Themes, mark the button for the new theme and click on Save.
If you uploaded modules as well, you have to install them. Click on the Modules tab, find the modules you uploaded and click on the Install button for each module. One tip that might be helpful: when you hover the mouse pointer over the install/uninstall button the name of the module folder will be displayed as it exists on your account. You can also use the search function in the top right corner of the Modules tab page to find the modules. Depending on your previous theme, you may need to disable/uninstall some modules that are not needed for the new theme.