PuTTY Tutorial
How to connect to your account through SSH (for Windows users)
SSH (Secure Shell) is a network protocol through which you can access your hosting account and execute commands, transfer files, etc using a secure connection. Windows users can establish an SSH connection from their local computer to the server hosting their account with an application called PuTTY.
All HostKnox shared servers come with free SSH access. If you are a HostKnox client, you can request your free SSH access by submitting a support ticket informing us that you want to use SSH to connect to your account. If you don't have an SSH key we'll send you a private key together with a passphrase. There's also a public key which stays with us. If you generate the SSH keys yourself, you have to send us only the public key. We'll come to the SSH keys again a bit later.
Then you have to download the PuTTY installer package from the site of its creater (Simon Tatham). It's free. You'll need the whole package that contains PuTTY itself, Pageant, PuTTYgen, etc. To download it, once you go to the download page of the developer's site click on the link putty<version>-installer.exe and save the installer on your local computer.
After you download the PuTTY installer and before you install it on your local computer, it's a good idea to compare the MD5 checksums of the original file on the server from which you downloaded it with the MD5 checksums of the file that is already downloaded on your local computer. This is done for security reasons to check whether the file on your local computer hasn't been hacked while transferring through the Internet. Just to be sure that the two files are exactly the same; after all you'll use this application to access your hosting account and you wouldn't want other people to use any sensitive information for their own purpose. It's very unlikely that the file will be hacked during the download, but this is just in case you want to be extra cautious. For details on how to do this read the tutorial on performing an MD5 hash check (for Windows users).
After you download the PuTTY installer and optionally run an MD5 hash check, run the installer in order to install on your local computer all the PuTTY applications in the package.
Next, you need to add the private SSH key. That's done from the Pageant application (the icon looks like a computer with a hat on it). To be able to add the key it has to be in the file format used by PuTTY: .ppk. When you request a private SSH key you have the option to ask for a specific file format, but in the case with PuTTY you need the format .ppk. Nevertheless, here we'll show you how to convert an SSH key that is in another format to the desired .ppk file format.
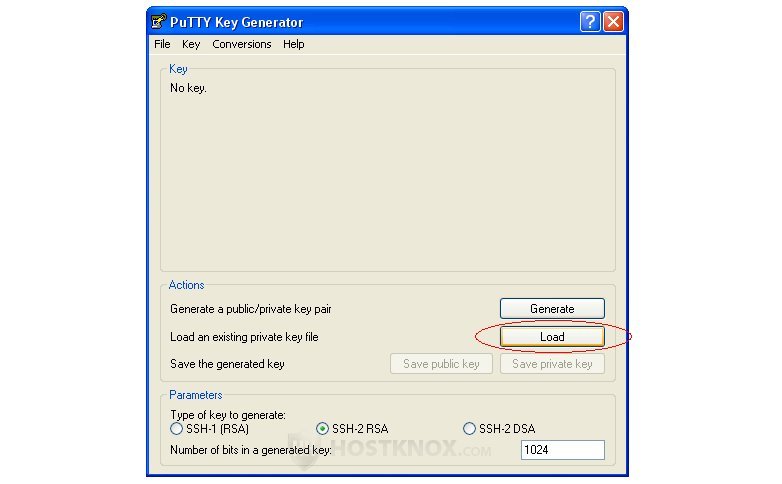
This can be done with the puttygen (key generator) application that comes with the PuTTY installer package. So, on your local computer go to the folder where you installed PuTTY, find puttygen and open it. After you open the PuTTY Key Generator, click on the button Load:
The browse window that opens is automatically set to look for .ppk files, so from the File Type drop-down menu select All Files, find the SSH private key that we've sent you and that you have saved on your local computer. After you find the key and you open it, the PuTTY Key Generator will ask you for a passphrase (together with a private SSH key we'll also send you a passphrase for it). Keep in mind that the passphrase is case sensitive and that if there are spaces between the words in the passphrase, you have to insert them too:
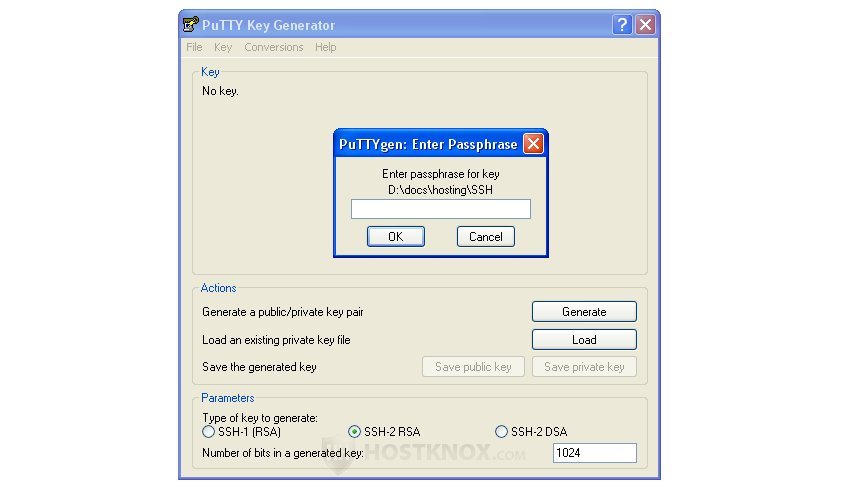
Type the correct passphrase, click on OK and then in the PuTTY Key Generator click on the button Save private key to save the key in the new .ppk file format. After you save it you'll have an SSH private key in the desired .ppk file type used by PuTTY.
If the key is already in the .ppk format, you can skip the step about converting the key using the PuTTY Key Generator.
Before you start the PuTTY application itself you need to add the private key using Pageant. It's in the same folder as PuTTY, the key generator and all the rest of the PuTTY applications:
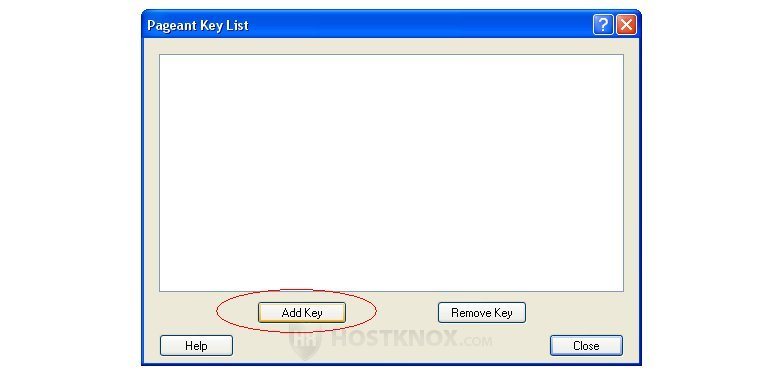
After you open Pageant click on the Add Key button, find the SSH private key on your local computer and add it. You'll be prompted again to type the passphrase. After you do it you can close Pageant. It will be minimized, you can find its icon on the Windows toolbar in the lower right corner (near the clock). You shouldn't remove it from there, otherwise you won't be able to log in to your hosting account using PuTTY. Once you're done and you log out of your account you can exit Pageant. Keep in mind that each time before you start PuTTY you have to start Pageant and add the private SSH key.
After you add the private key in Pageant you can start the PuTTY application itself. A PuTTY configuration window will open:
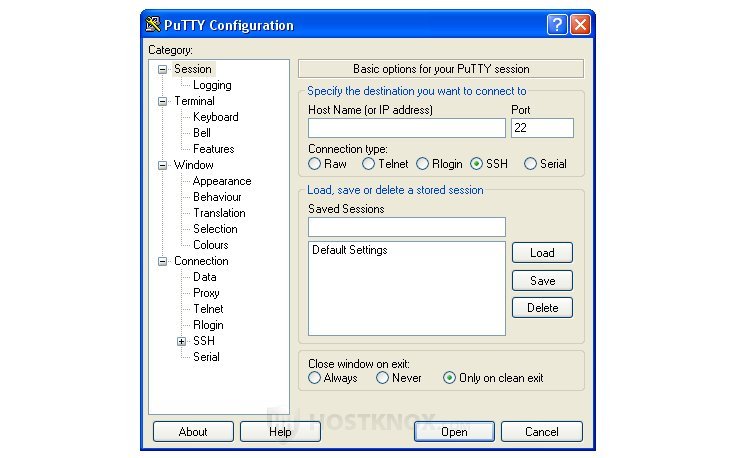
In the Host Name (or IP address) field type your host name (yourdomain.com, as long as it points to our servers) or the IP address. Alternatively, you can also use your system username followed by the name of the server on which your account is located (e.g. systemuser@nameofserver.com). After that just click on Open and you'll see PuTTY's command line interface.
In case you want to generate your own keys and you don't want to use any keys sent to you, you can do that from PuTTY Key Generator. Generate two keys, save one as a public key and the other as a private key. Then you have to send us the public key; the private key is for yourself. You have to add it in Pageant as described above.