SugarCRM Core Modules Tutorial
A short description of the SugarCRM core modules
SugarCRM comes prepackaged with more than a dozen core modules. In this tutorial we'll briefly describe these modules. Here is a list of the core modules:
HomeAccounts
Contacts
Opportunities
Leads
Calendar
Documents
Emails
Calls
Meetings
Tasks
Notes
Cases
Targets
Target Lists
Campaigns
Projects
Bug Tracker
Each module offers different functions and actions that users can perform, if they are not restricted by a role. Most modules are visible and accessible to regular users with the exception of Projects and Bug Tracker. These modules can be made accessible to regular users by the administrators.
The modules can be accessed by clicking on the tabs in the navigation bar:
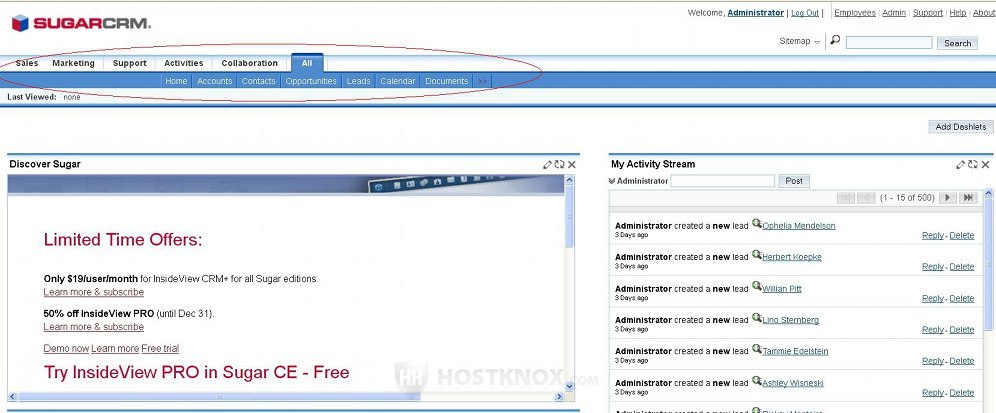
By default, the modules are grouped into menus. Each user can choose whether the module tabs should be grouped in such menus or not.
If they are not restricted by a role, regular users can perform all the actions in the modules to which they have access.
Home
The Home module is actually the homepage of a user's account. It's the first thing that's displayed when a user logs in the SugarCRM application. The homepage consists of panels called dashlets. They show various information and records from other modules. By default every user can customize the homepage of their account by adding, removing and editing the dashlets. For more information on this you can check the tutorial on SugarCRM dashlets. Administrators can disable the customization of the homepage. Check out the article on how to block SugarCRM homepage customizations if you want to know how to do it.
Accounts
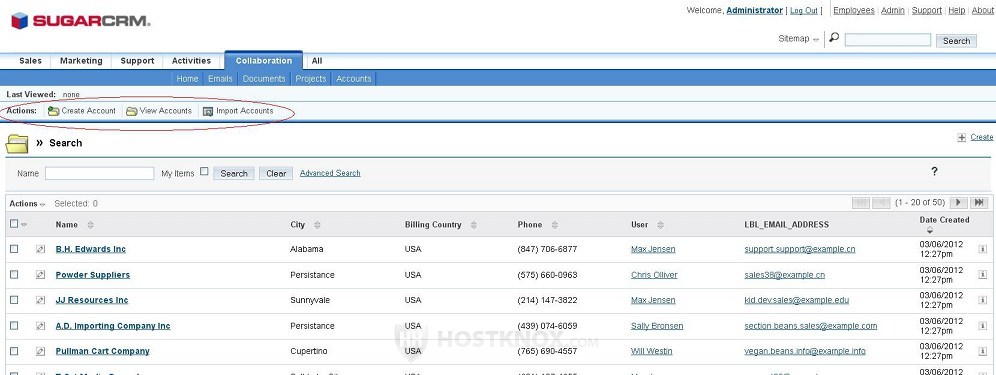
The Accounts module contains the accounts of your customers and clients, and also of potential customers. After you access the module you'll see a table with all the customer accounts. If we are to use the SugarCRM terminology, this page in each module is called the List View page. In case you installed the sample data there should be some example accounts. To see more information about the customer and edit it just click on the name in the table. The page on which the details of a record are displayed is called the Detail View page.
The record for each customer contains various information: name of company, shipping address, billing address, email address, phone number, website, the user/employee to whom the customer is assigned, etc. At the top of the page in the navigation bar for each module there are some action buttons. For most of the modules the buttons are the same. They can be used to create a new record (in this case a new account), to view all the records, and to import records from an external source:
When you view the details of an account you'll see that under the information about the account there are sub-panels with records from different modules. These records are connected with this account in some way; for example, if there is a note associated with the particular account, it will be listed in a sub-panel called Notes on the Detail View page for the account. This linking of information and records is common for other modules as well, and makes the whole management process easier.
Contacts
The Contacts module, as the name suggests, is used for managing all the contacts of your company. Most often a contact is associated with an account, but it can be connected with records from other modules (e.g. Opportunities). When you access the Contacts module all the contacts are listed in a table (List View page). Click on the name of a contact to go to the Detail View page and see more details about that contact (and edit it if necessary). As with the previous module use the buttons in the navigation bar to create records for new contacts, etc.
Opportunities
You can use the Opportunities module to follow the progress of potential sales. Here you can manage potential customers through the various sales stages until the successful (or unsuccessful) completion of the process. SugarCRM comes with several preconfigured sales stages that you can set when you create/edit an opportunity. When you choose or change the sales stage SugarCRM automatically calculates the probability of closing the sale based on the particular stage. When you create a record for an opportunity you have to associate it with an account. This means that you have to create the account first and then you can add a record for the opportunity associated with that account.
Leads
Leads are potential customers. The difference with opportunities is that leads are much further away in terms of closing a deal. Opportunities are more concrete and present a better chance for actually completing a sale. You can have a list of leads which later can become real opportunities and eventually customers. The process of managing and creating leads is the same as with the previous modules. When you access the Leads module there's a table in which all the leads a displayed. If you want to view and/or edit a lead just click on the name in the table. To create new leads click on the Create Lead button in the navigation bar and configure the settings.
You can convert a lead into an opportunity, account, contact, etc. To do this, in the table where all the leads are displayed (List View page) click on the one that you want to convert to go to its Detail View page. Then click on the Convert Lead button that's above the information for that lead. On the next screen configure the settings as desired. By default, the option for converting the lead into an account is marked. You can additionally add a record for an opportunity by marking the respective checkbox:
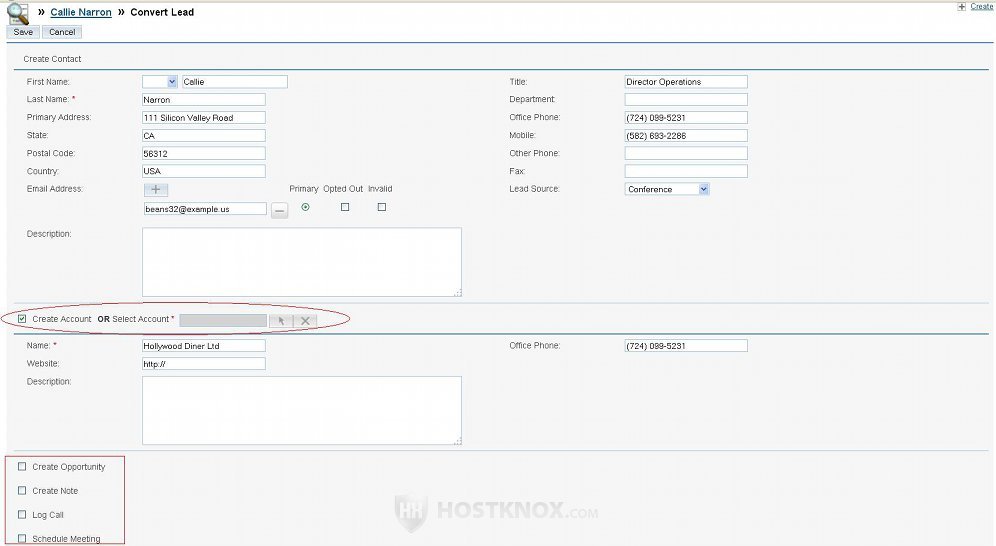
Remember that you can't have a record for an opportunity before creating an associated account. When converting a lead, a record in the Contacts module will be automatically created.
Calendar
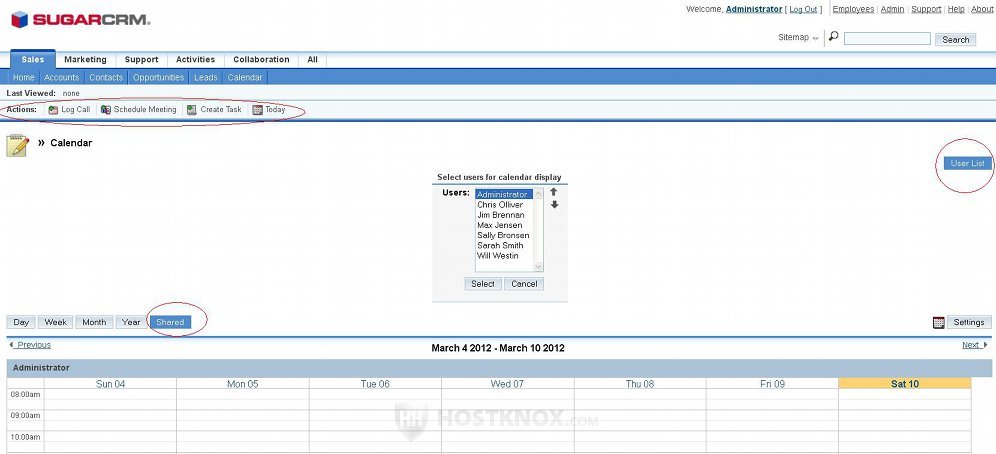
The Calendar module is used to schedule meetings, calls and tasks. In this way you can organize your schedule more effectively, as well as use the calendar as a reminder for everything that you have to do. It is also used for better coordination between the users, as each user has a calendar that is shared, so that users can check when other users have scheduled something. You can use the action buttons in the navigation bar to schedule events, or just click with the left mouse button on the box in the calendar corresponding to the day for which you want to schedule an event, and then configure the settings in the window that appear. To view the calendars of other users click on the Shared button that's just above the top left corner of the calendar; then click on the User List button in the top right corner and select the user from the menu that appears:
Documents
From the Documents module you can create new documents, and manage and view the existing ones. To add a new document just click on the Create Document button in the navigation bar; then on the page that opens click on the Browse button to locate the file on your local computer; configure the rest of the settings and click on the Save button to upload the document. After you do it, when users visit the Documents module they will be able to download the document, and also to perform all the actions (delete, edit, etc), unless they are restricted by a role.
Emails
From the Emails module you can access and use the built-in email client to send and receive emails. You should have already configured the settings for the outgoing mail server. You can set and change them from the admin panel & Email section & Email Settings button. Users can set and change their credentials for the outgoing mail server form the settings for their account. They can access them by clicking on their name in upper right corner of the SugarCRM application. For an outgoing email account you can use one that you have created from the Email section of the HostKnox control panel (or you can use an email account from a web-based email service such as Google, Yahoo, etc.). From the HostKnox control panel you can also create email accounts for the users that they can use in SugarCRM with the same outgoing mail server. Users can set the same email account to be used for the incoming mail.
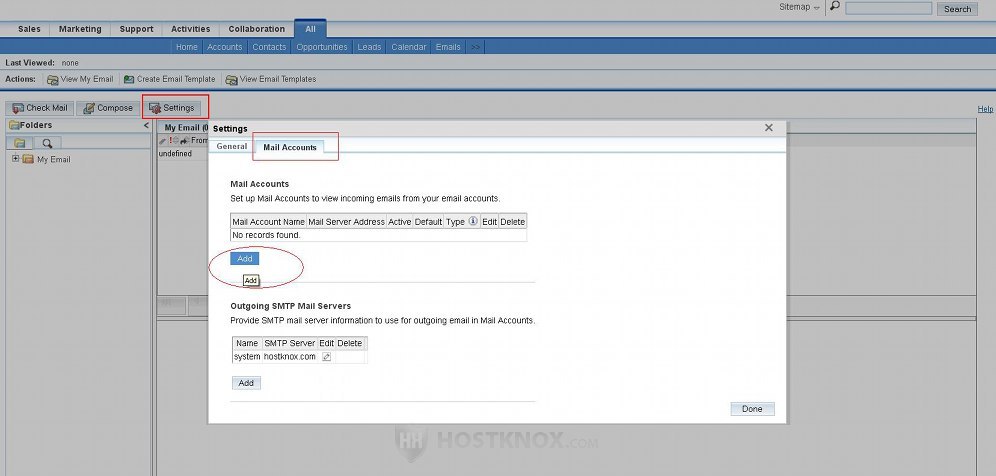
To add your email account for the incoming mail to the built-in SugarCRM email client, after you access the Emails module click on the Settings button that's above the panels of the email client. A new window will pop out; click on the Mail Accounts tab. It gives you the chance to add an email account for incoming messages, as well as to configure the outgoing mail server (we'll assume you have configured it). To add an incoming mail account click on the Add button that's in the respective section:
A new window will pop out. You have to configure the settings for the email account:
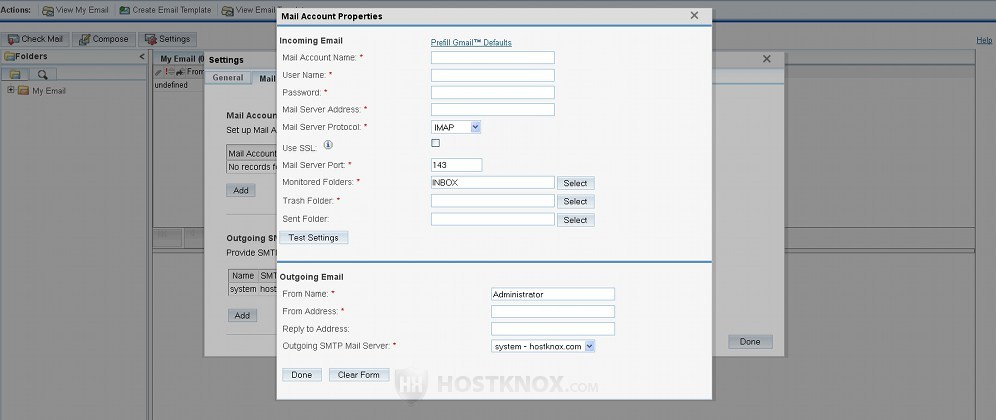
Type the full email address in the fields for Mail Account Name and User Name. Type the password in the respective field. Assuming you're going to use an email account that you have created from the HostKnox control panel, type the URL address of the HostKnox server hosting your SugarCRM hosting account in the field for Mail Server Address. Leave the protocol to IMAP. If you want to use encryption, mark the checkbox for Use SSL; the port number should change automatically to 993. The correct port numbers are 143 without SSL and 993 with SSL. When you're ready click on the Done button.
You can also use the Emails module to create email templates for automatic replies, and to associate email messages with records from other modules.
Calls
As the name suggests, the Calls modules is used to schedule and manage calls. To schedule a call, after you access the module click on the Log Call button in the navigation bar and configure the options. You can log inbound and outbound calls, you can set the date and time of the call, you can add extra information about the call, etc. By default, the call will be assigned to you, but you can assigned it to other users. You can also set the status of the call; after you complete it, for example, you can change it to Held. As with other modules, when you access the Calls module there's a table with records for all the calls. You can view details for all the calls (outbound, inbound, planned, held, etc.).
Meetings
Meetings is a module that's very similar to Calls. It works in exactly the same way, and you can use it to schedule and manage meetings.
Tasks
Tasks is another module similar to the previous two. It's used for scheduling and managing tasks. For example, if something needs to be send to one of your customers, you can access the Tasks module and click on the Create Task button in the navigation bar to add the new task. From the options for that task you can specify the due date, the priority (e.g. high, low), you can add a short description and set the status of the task (e.g. not started). You should also associate the task with the account record for the particular customer and assign the task to a user (or just leave it assigned to you). After the task is completed you can change its status. All the tasks are listed on the List View page (the homepage of the Tasks module).
Notes
You can use the Notes module to add notes or attach files to records from other modules. Just access the module by clicking on the Notes tab in the navigation bar. This will display a table with all the notes that have been created, if any. If you installed the sample data, there should be some example note records. To create a new note click on the button Create Note or Attachment in the navigation bar. Then type the subject of the note, the actual content of the note and/or attach a file; select the module (e.g. Accounts, Meetings, etc.) and the exact record to which you want to relate the note, and click on Save.
Cases
The Cases module is used to manage and keep track of issues connected with the products and/or services that you offer. For example, if a customer has troubles with some of the services offered by your company, you can create a new record in the Cases module, and associate it with the account for that customer. This module is no different than most of the other ones in the sense that when you access it you'll be shown the List View page with the table containing the records in that module. You can view and edit a record by clicking on its subject. To add a new record click on the button Create Case in the navigation bar. Then describe the case in the textarea that's provided. Select a priority, a status and a type. You also have to relate the case to a record from the Accounts module; to do this use the "arrow" button that's provided for the Account Name option.
Targets
Targets have something in common with leads and opportunities because they too are potential customers. Targets, however, are the furthest away from becoming customers, if the three can be graded with respect to completing a sale. If, for example, you have some information (might be very vague) about a person, who you think might become your customer, you can create a record for that person in the Targets module. You can include targets in a target list that you have created from the Target Lists module, and then you can use this target list in marketing campaigns.
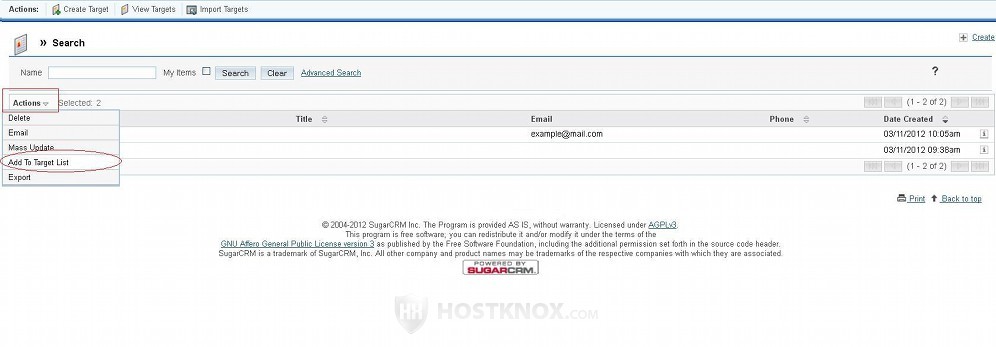
The module itself functions as the other modules. Click on the Targets tab in the navigation bar to access the List View page of the Targets module. There you can view the table with all the targets, and you can view the details of a target or edit it by clicking on its name, or on the small edit icon in front of the name. To create a new target click on the Create Target button in the navigation bar and configure the options. As we mentioned, you can add targets to a target list. To do this mark the checkbox in front of the target(s) on the list view page of the Targets module; then click on the Actions button that's in the upper left corner of the table, and select Add to Target List from the drop-down menu that appears:
A new window will open from which you can select a target list that has been created from the Target Lists module.
Target Lists
As we mentioned, target lists are used for marketing campaigns. After you create a target list you can include many targets in it. Click on the Target Lists tab in the navigation bar to go to the List View page of the Target Lists module. To view the details of a list or edit it just click on its name in the table. To create a new list, as usual, use the Create Target List button in the navigation bar. You have to type a name for the list and select a type from the drop-down menu that's provided. You can also include a short description. Once the list is created you can relate records from other modules to it. You can relate to the target list records not only from the Targets module but also from Leads and Contacts, for example. This, however, can't be done from the Target Lists module itself but from the module with which you want to associate the list. To learn how to do it check the description of the Targets module (just above this one).
Campaigns
The Campaigns module is used for creating, launching and managing marketing campaigns. After you have target lists with targets in them you can use these lists in campaigns for finding new customers. After you access the module click on the button Create Campaign (Wizard) or on Create Campaign (Classic) to create a new campaign:
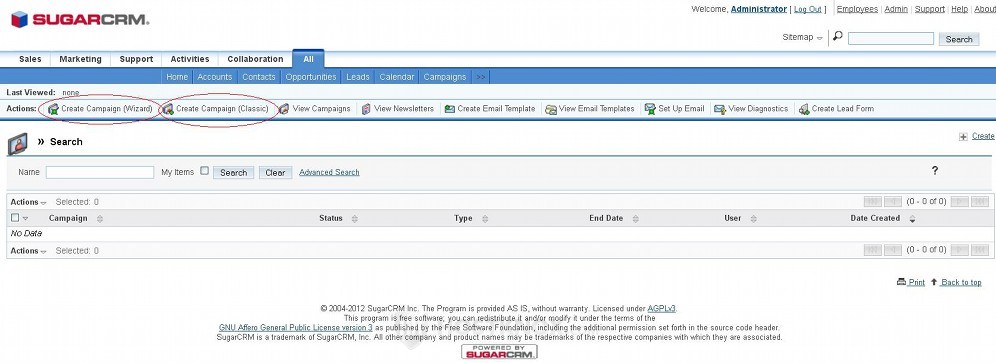
Basically, both are for the same thing but the campaign wizard will guide through the whole process step by step.
Projects
The Projects module is used for creating projects and managing these projects. The difference is that this module is hidden from users by default. Administrators can add it to the navigation bar and make it visible from the admin page (Developer Tools section & Display Module Tabs and Subpanels button). Otherwise, the module works in the same way as other modules. When you access it there's a List View page which has a table with all the projects listed in it. You can go to the Detail View page of a project and edit it by clicking on its name in the table. To create a project click on the Create Project button in the navigation bar. Then you have to type a name for the project, a start and end date, and you can also specify its status and priority. By default, it's assigned to the user who creates the project.
After the project is created you can add project tasks to that project. To do this, on the List View page of the Projects module click on the name of the project to which you want to add tasks. On the Detail View page for that project, right under the details there's a Project Tasks sub-panel. Click on the Create button on that sub-panel, configure the settings and click on the Save button.
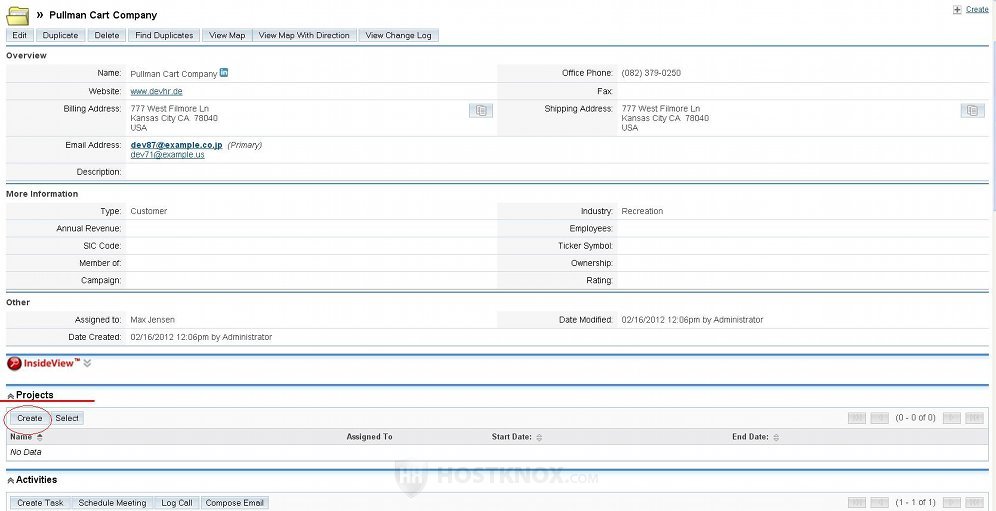
Even when the Projects module is hidden users can still create projects. They can do this from the Detail View pages of other modules. For example, if you access the Accounts module and you click on the name of an account to view its details, you'll see that there are many sub-panels for records from other modules (records associated with the account you're viewing). One of these sub-panels is Projects. You can use the Create button on that panel to create projects associated with the particular record you're viewing:
Bug Tracker
Bug Tracker is another module that's hidden by default. It's a module for reporting and keeping track of bugs in the system. Administrators can display it from the same place from which the Projects module can be displayed (admin page & Developer Tools section & Display Module Tabs and Subpanels button). The module itself is organized in the same way as other modules. When you access it there's a List View page with a table showing all the bugs that have been reported. A new bug can be reported by clicking on the Report Bug button in the navigation bar and configuring the settings.
As with Projects, if the module is not displayed, users can still report bugs. There's a Bugs sub-panel on the Detail View pages of the other modules.