PrestaShop 1.4 Footer Links Tutorial
How to add or remove footer links in PrestaShop
By default, when you install the full PrestaShop installation mode there are some bottom links added to your store's frontend. All of these footer links can be disabled and removed by changing one option on the backend of store. If you want to remove just some of them, this can be done also from the backend, but for some particular links you will have to modify the code of one of the PrestaShop files.
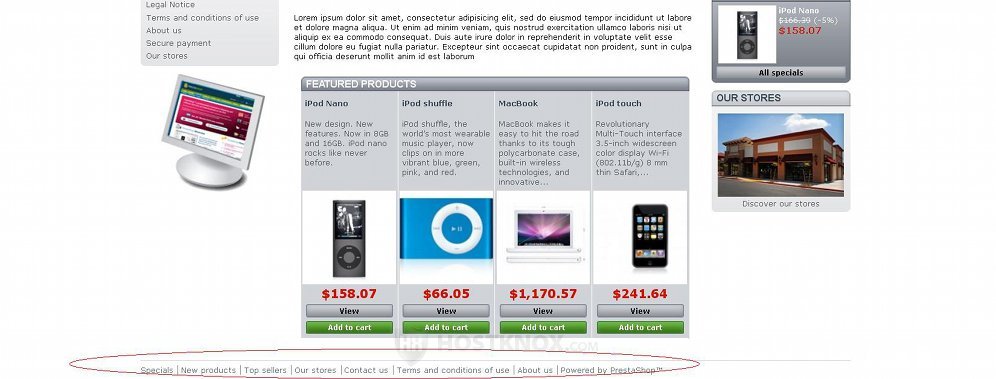
Here we'll use as an example the default prestashop theme:
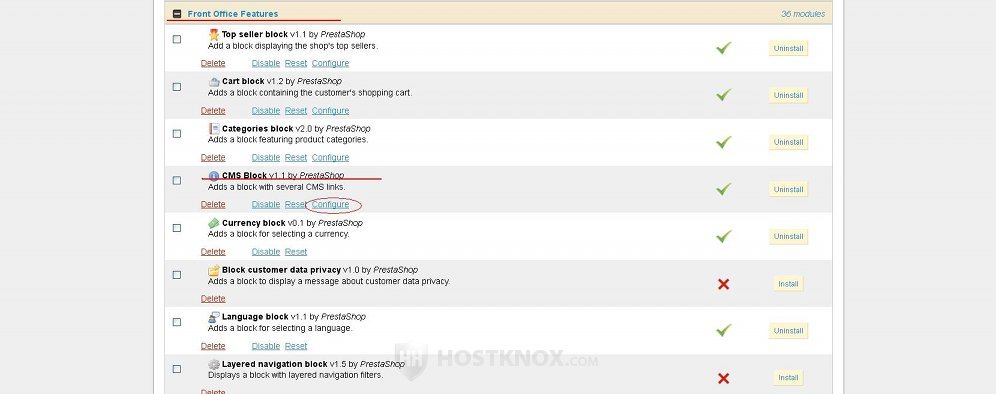
Most of these links can be managed from the settings of the CMS module. To access these settings log in to the backend of your PrestaShop, click on the Modules tab, then click on the module section Front Office Features, find the module CMS Block and click on its Configure button:
On the page that opens after you click on the button you'll see the options for that module. The second section is called Footer's various links Configuration:
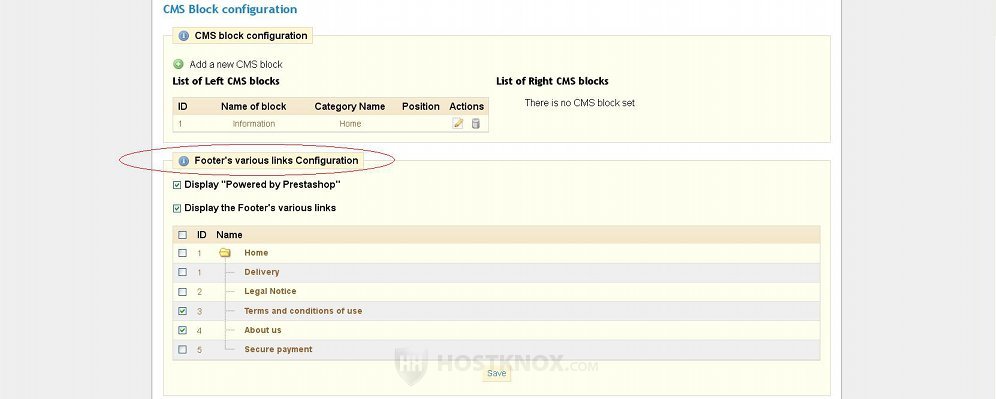
To remove all the footer links simply unmark the checkbox for the option Display the Footer's various links. If you don't want to remove all the links, from the other options you can remove just some of the other links. You can remove the Powered by PrestaShop link (a link to the official PrestaShop site) by unmarking the checkbox for Display "Powered by PrestaShop". Under it there's a list of the existing CMS pages. By default, the checkboxes for Terms and conditions of use and for About us should be marked. To remove any of these links unmark the respective checkbox. You can also add links to any of the other CMS pages. After you change the options don't forget to click on the Save button.
You can create as many CMS pages as you like and you can provide links for them in the footer. You can add CMS pages from the backend of your store (Tools tab>CMS sub-tab). For some more information on this you can also checkout the tutorial on how to add CMS pages in PrestaShop.
As we mention, from the settings of the CMS Block module you can either remove all the footer links altogether or just some of the links (as well as adding links to CMS pages). It doesn't however give control over each of the default bottom links. From the backend of your store you can also remove the Our stores footer link. To do this go to the Tools tab and then to the Stores sub-tab. Then mark the button No for the option Display in the footer:
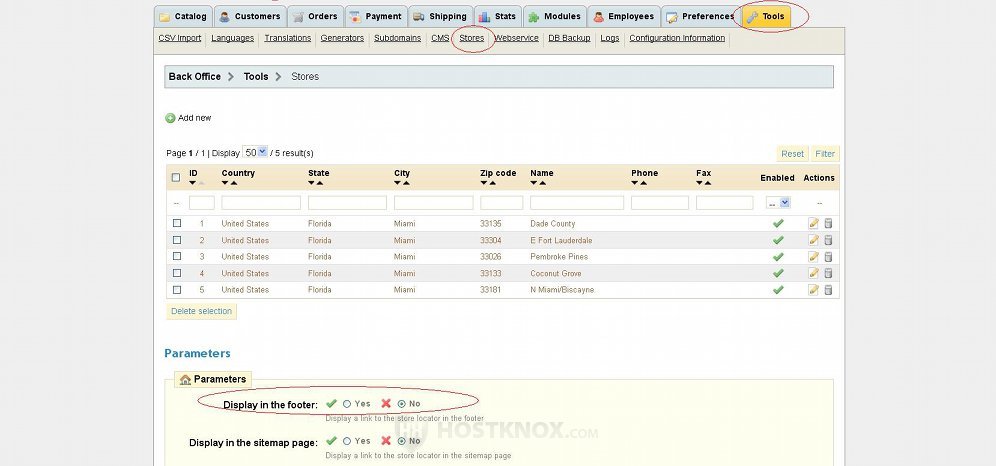
Then click on the Save button. This will remove only the Our stores link from the footer.
To remove some or all of the other default footer links (Specials, New products, Top sellers, Contact us) that can't be removed from the settings of the CMS Block module, but keep some or all of the links that can be managed from the module's options, you have to modify the code of one of the core PrestaShop files.
The file is in fact the template file for the CMS Block module. If, for example, your PrestaShop is installed in a folder called prestashop in the root public_html directory on your PrestaShop hosting account, the path to the file would be public_html/prestashop/modules/blockcms/blockcms.tpl. You can edit the file from the Files section of the HostKnox control panel. The code for each link looks similar. The code for each one is at the end of the blockcms.tpl file. For example, for the Specials link the code looks like this:
{if !$PS_CATALOG_MODE}
<li class="first_item"><a href="{$link->getPageLink('prices-drop.php')}"
title="{l s='Specials' mod='blockcms'}">
{l s='Specials' mod='blockcms'}</a></li>{/if}
For the New products link it's:
<li class="{if $PS_CATALOG_MODE}first_{/if}item">
<a href="{$link->getPageLink('new-products.php')}"
title="{l s='New products' mod='blockcms'}">
{l s='New products' mod='blockcms'}</a></li>
For Top sellers:
{if !$PS_CATALOG_MODE}
<li class="item"><a href="{$link->getPageLink('best-sales.php')}"
title="{l s='Top sellers' mod='blockcms'}">
{l s='Top sellers' mod='blockcms'}</a></li>{/if}
For the Contact us link:
<li class="item"><a href="{$link->getPageLink('contact-form.php', true)}"
title="{l s='Contact us' mod='blockcms'}">
{l s='Contact us' mod='blockcms'}</a></li>
To remove a link delete its code, or comment it out. You can comment it out by putting an exclamation mark and two hyphens after the first bracket for the HTML code (e.g. <!--li class...) and two hyphens before the last HTML bracket (e.g. </li-->).
You can also add a link, as well. To add a new footer link, in the same blockcms.tpl file insert a string of code on a new line somewhere between the code for the other links, depending on where you want the link to appear. For example, you want a link to another site to appear in the footer of your store between the links New products and Top sellers. So between the two strings of code for these two links (the ones shown above) insert a line of code that looks like this:
<li class="item"><a href="http://sitename.com">Name</a></li>
Replace http://sitename.com with the actual URL address and Name with the text that you want to appear as a link on the frontend of the store.
When you make any changes to the code of template files you should also enable the force compile option. To do this go to the backend of your PrestaShop, click on the Preferences tab, then on the Performance sub-tab and set Force Compile to Yes. In this way when you change a template file, you'll be able to see the change after you refresh the site's frontend. When you're done with the changes disable the force compile setting.
It's also a good idea to have a child theme of the one that you want to change. You can switch the default theme to the child theme and modify the files of the child theme. This will save the changes from being overwritten during an update; especially useful if you use the prestashop theme and you want to update the whole PrestaShop application. For more information on this read the article on how to create a child theme in PrestaShop.