Joomla 3.0 Installation Tutorial
How to install Joomla 3
In this tutorial we'll provide you with step-by-step instructions on how to install Joomla 3 on your Joomla hosting account.
Create a database
You'll need a database for your new Joomla installation. HostKnox clients can create it from the Databases section of the HostKnox control panel. There's an Add Database button in the black area on the right. After you click on it you have to type in the corresponding fields a name for the database and optionally a username and a password in case you want to create a separate user for that database. For security reasons it's recommended to have a different username and password for each database and also to install a single instance of an application in a database. Then just click on the Add Database button that's under the fields to create the database.
Download Joomla 3
Next, you need to download to your local computer the archived package with the last full stable release of Joomla 3. You can do that from the download section of the official Joomla site.
Upload the Joomla installation package on your account
After you download the archive on you computer you need to upload the Joomla files and folders on your hosting account. There are a few ways in which you can proceed. One way is first to unpack the archive on your local computer; by default, the unpacked folder should be named Joomla_3.x.x-Stable-Ful_Package (the x being replaced with the actual version number). Inside that folder are all the Joomla files and directories (e.g. administrator, cache, cli, etc.) that you need to upload to your hosting account. If you want your site to be accessible at yourdomain.com, then you need to upload those files and folders directly in the public_html directory of your account. Of course, you can upload them in a subfolder; for example, if you want to create a test site first, you can create a subfolder inside public_html and upload the Joomla files and folders in that subfolder. You can use an FTP client (e.g. FileZilla) to upload the content.
A faster way to do this is to upload the Joomla archive on your hosting account and then to unpack it directly on the account. You can upload the archive with an FTP client or you can do it from the Files section of the HostKnox control panel (there's an Upload button in the black area on the right). Once the archive is on your account you can unpack it from the Files section of the HostKnox control panel. To do this highlight the archive by clicking with the left mouse button next to its name, then an Unpack button will appear in the black area on the right, so just click on it.
A third way to do this is to upload and unpack the Joomla archive via SSH. All HostKnox clients have a free SSH access to their accounts. For more information on how to connect to your account via SSH and on how to upload and unpack archives check out the SSH section of our knowledgebase.
Install Joomla 3
Once the Joomla files and folders are on your hosting account you can start the actual installation process. To start it you have to access with your web browser the URL address corresponding to the location of the Joomla files and folders on your hosting account. For example, if you uploaded them directly in the public_html folder on your account, the corresponding URL address would be yourdomain.com. If, for example, you uploaded them in public_html/joomla, the URL would be yourdomain.com/joomla. The first step of the installation process includes adding the general information about the site and creating the administrator user account:
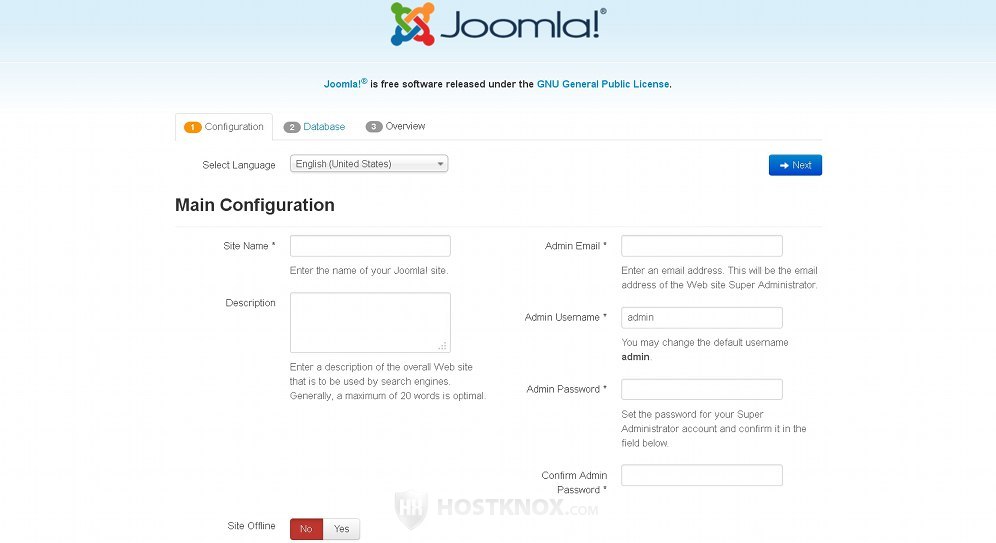
Select the default language from the Select Language drop-down menu at the top. Then type the name and description of your site in the corresponding text areas. On the right are the options for the administrator account that's about to be created. Specify the admin email, the username and password. For security reasons it's recommended to use a complex password. Use a random combination of upper and lowercase letters, numbers and symbols, and make it 8-10 characters long (e.g. r8G?p*D~). At the bottom of the page there's a Site Offline option; if you leave the default No, the frontend will be accessible after the installation is complete. You can change that at any time from the admin panel once the installation is complete. After you're done click on the Next button in the upper right corner of the page.
The next page is for the database configuration:
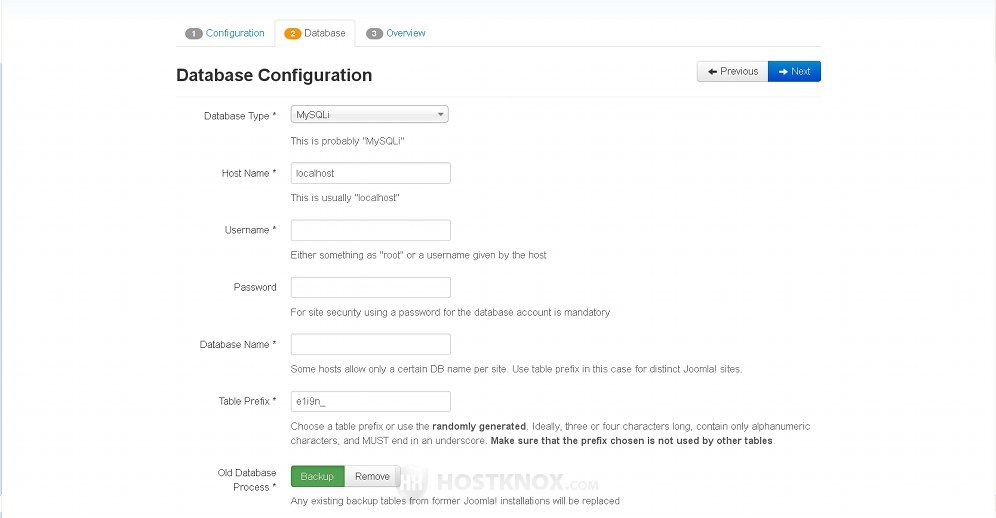
Leave the Database Type drop-down menu to the default MySQLi. Host Name should be set to localhost. In the fields for Username and Password type the credentials of the database user that you added while creating the database for your Joomla installation. In the field for Database Name type the name of that database. The Table Prefix is generated randomly; you can leave it as it is or you can change it to whatever you want. However, if there's another application installed in the same database make sure it doesn't have the same table prefix. The option Old Database Process at the bottom of the page is set to Backup by default. This is only of concern if you have other Joomla applications in that database. As we mentioned, it's preferable to install each application in a separate database. When you configure all the options click on the Next button at top right corner of the page.
The last step lets you choose whether you want to install sample data:
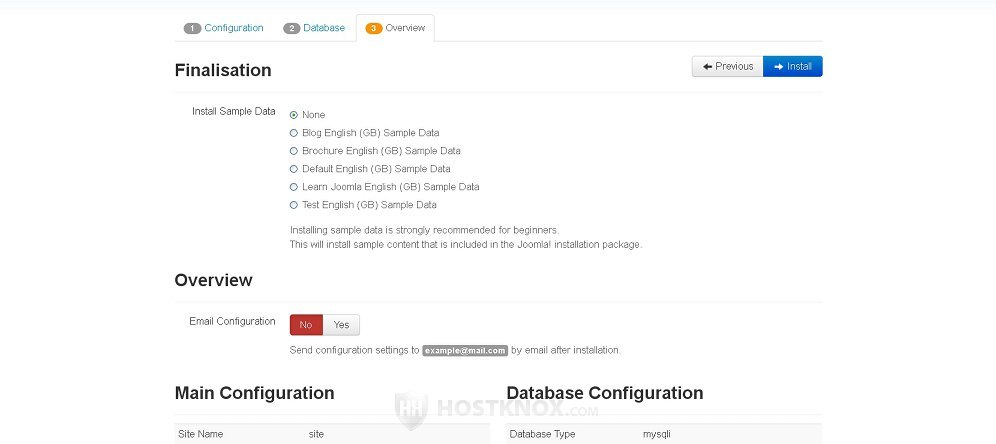
By default, no sample data is installed. You can choose from several different sample data types; just mark the corresponding button. Especially if you haven't used Joomla before, it's recommended to install sample data. There's also an Email Configuration setting which lets you choose whether you want the configuration settings to be sent to the email that you specified at the first step of the installation process; by default, it's set to No. Below these two options there's an overview of the main and database configuration settings that you have specified. To continue click on the Install button in the upper right corner.
Once you do that the database will be populated with the necessary information, Joomla will be installed and you'll receive a confirmation message:

The final step before you can use your new site is to remove the installation folder. You can do that automatically by clicking on the Remove installation folder button. Below it there are two buttons that you can use to go to your site's frontend and administration panel. If you installed Joomla directly in the public_html folder of your hosting account, the frontend would be accessible at yourdomain.com and the admin panel at yourdomain.com/administrator.