Joomla Optimization Tutorial
How to speed up your Joomla
In this tutorial we'll make some suggestions on how to optimize and speed up your Joomla site. It's highly recommended that you have a recent backup copy of your Joomla files and database before you make any significant changes.
Cache
One thing you can do to make your site faster is to enable the cache. By default the cache is disabled. You can enable it from the admin panel of your site. After you log in to the backend of your site, go to the Site menu in the upper left corner and click on Global Configuration. Then click on the System tab, the cache options are on the right side:

From the Cache drop-down menu you can turn the cache on. There are two modes: conservative and progressive caching. Progressive caching is bigger and faster. You can also set the cache time. The default is fifteen minutes. If you change it, the number you choose depends on how often you make changes to your site. If you make changes less frequently (e.g. once a day, a few times a week), you can set a higher number. If you make changes more often or you have a forum on your site, it's better to set it to a lower number (e.g. several minutes). After you make any changes don't forget to save them.
The caching option in Global Configuration enables caching of modules and components (not all components, however). The caching of components (view caching) works only for guests, while module caching applies to visitors and registered users. You can change whether a certain module is cached from the Advanced Options for the module (Extensions>Module Manager>click on the name of the module>Advanced Options). By default some modules such as menus are set to No caching and that's how it should be in order for them to work properly.
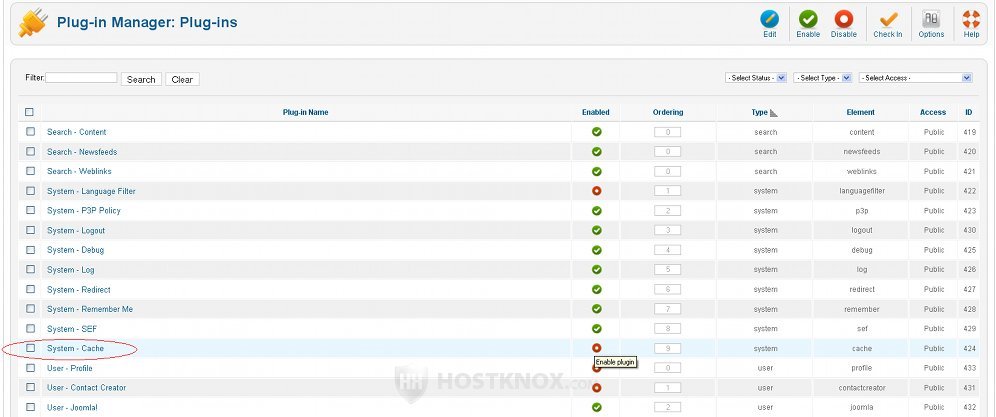
You can also enable page caching (the caching of whole pages of your site) from your backend's Plugin Manager. To do this, log in to your admin panel, go to the Extensions menu in the upper left corner and select Plugin Manager. In the table with all the plugins find the one named System-Cache and enable it (either mark its checkbox and click on the Enable button in the upper right corner, or just click on the red icon in the Enabled column):
Page caching works for guest visitors and not for logged in members, and it doesn't work if Debug System in Global Configuration is set to Yes (it's set to No by default).
Although page caching can increase the loading time significantly, there are some reported problems that could occur with the System-Cache plugin enabled, such as some problems with submenus or a user seeing the personal information of another user. If you decide to try this caching option and you experience any problems, just disable the plugin and leave enabled only the caching option available in Global Configuration.
With caching enabled, after you make any changes to your site, clear the cache. You can do this from your admin panel. Go to the Site menu in the upper left corner and then to Maintenance>Clear Cache.
Gzip Compression
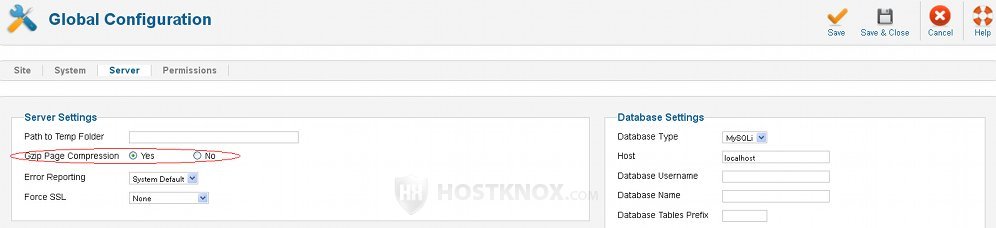
Another thing that can help you speed up your Joomla site is to enable gzip compression. This can be done from your site's backend. After you log in, go to Global Configuration, click on the Server tab and set Gzip Page Compression to Yes:
With this option enabled, PHP files will be compressed before being sent from the server to the client's browser.
Update
Update your site when there is a new stable Joomla update. Updates include different fixes and improvements in terms of performance, security and others.
Extensions
Install and use extensions that you really need and are useful for your site. The more extensions and features that you have on your site, the longer it will take for the site to load. If there are extensions that you don't need any more, remove them from your site. Also observe whether the new extensions that you install don't slow down your site too much. There might be some extensions that are particularly slow.
Images
The number of images also decreases the speed of your site. Each image is a separate HTTP (Hyper Text Transfer Protocol) request. If your site is getting slower and you have many images, try to reduce their number. Before you upload images on your site, optimize them: edit them to be in the resolution that you need and, if possible, reduce their file size. Use image file formats that are more optimal in terms of size and quality (e.g. GIF, PNG, JPEG).
A useful tool for optimizing images is Yahoo's online Smush.it tool. It reduces the file size of images without affecting their quality or changing their dimensions. The smaller the file size of the images, the faster your site will load. Smush.it optimizes images that are not larger than 1 MB and are in the GIF, PNG and JPEG (JPG) formats (it also automatically converts GIF images into PNG images).
FastCGI
FastCGI is a variation of CGI and, as the name suggests, it's faster. By default HostKnox accounts are configured to use CGI. You can switch to FastCGI from the PHP Settings section of the HostKnox control panel. FastCGI will speed up the PHP applications. It's unlikely, but if you experience any problems you can always switch back to plain CGI.
Optimize Database
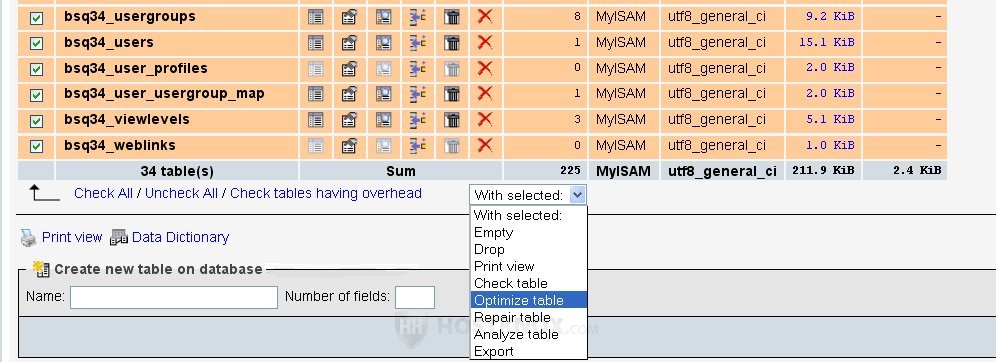
From time to time it's also a good idea to optimize the Joomla database tables. You can do that with phpMyAdmin. You can access phpMyAdmin from the Databases section of the HostKnox control panel (there is a link on the right). Inside phpMyAdmin in the left frame click on the database used by Joomla. Its database tables will be displayed in the right frame. Mark all the checkboxes for the tables (just click on Check All at the bottom of the page) and from the With selected drop-down menu choose Optimize table:
If necessary you can also use the phpMyAdmin Repair table function.
Minify
Minify is a PHP application for merging, optimizing, compressing and caching CSS (Cascading Style Sheets) and Javascript files. You can download the application and read the instructions on how to install and use it from http://code.google.com/p/minify/. Basically, you have to download the application on your local computer, then unzip it and upload the min folder that's inside the package to the root public_html directory on your account. That's provided your Joomla is installed directly in the root public_html directory on your account. After that access the min folder through your browser (e.g. www.yoursite.com/min) and use the Minify URI Builder to add the Joomla CSS and Javascript files.
If your Joomla is in a subfolder and you want to use Minify only for that subfolder, upload the min directory in the subfolder (e.g. public_html/joomla/min). Then, however, you have to make some additional changes to the config.php file in the min directory. For more complete instructions visit the Minify site (use the link above).
There are also some Joomla extensions which do exactly the same: merge, compress and cache CSS and Javascript files. They can save you the trouble of setting up things on your own. Check, however, from the comments of other Joomla users if the particular extension has bugs or whether it might break your site. It's also important to check whether the extension is updated to work with your Joomla version because many extensions (including those for minifying) are still either Joomla 1.5 or 1.6 native.