Magento Multistore Tutorial
How to set up a Magento multistore
You can use a single Magento installation to manage more than one Magento store. All stores are managed from the same admin panel, but the frontend of each store has its own URL address. Each store can have its own catalog or you can use the same catalog. Since you only need a single instance of Magento you can have multiple stores with a single Magento hosting account. Note, however, that such a multistore is more difficult to upgrade, configure and transfer; you'll also have problems if you want to use SSL certificates, and generally the more customized and complex a single installation is, the more likely it is for it to break. In this respect it makes more sense to have a different installation for each of your stores instead of setting up a multistore with a single installation. And this is not a marketing trick. Of course, it's entirely up to you.
There are a few ways in which you can set up your Magento multistore:
- with subdirectories (e.g. domain.com/store1, domain.com/store2, etc.)
- with subdomains (e.g. store1.domain.com, store2.domain.com, etc.)
- with a different domain for each store (e.g. domain1.com, domain2.com, etc.)
Setting up a multistore with subfolders or subdomains is done in pretty much the same way, while there are some differences if you want to use different domains.
First we'll go over the settings that you have to configure from the admin panel of your Magento. They are the same regardless of which of the three structures you choose to set up.
Then we'll go over the three different multistore structures and what you have to do to make each work.
Admin Panel Settings
Whether you choose to use different domains, subdomains or subdirectories there are some settings that you need to configure from the admin panel of your Magento. The settings that you need to configure are the same; there's only a slight difference in case you choose to use different domains. We'll come to this in a little while.
As an example, let's say that you have a domain called domain.com which has its hosting account on which you've installed Magento, so that the frontend is accessible at domain.com. Now you want to add a second store that's managed from the same backend.
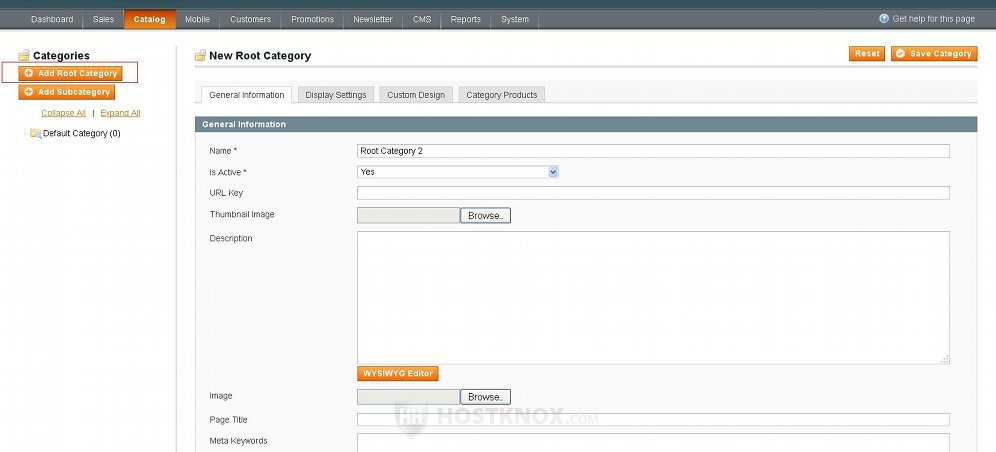
First, if you want your stores to have different catalogs and products, you need to add another root category. So to do that, log in to the admin panel and go to Catalog menu>Manage Categories, click on the Add Root Category button on the left, then type the name in the respective text field on the right, set the Is Active drop-down menu to Yes, optionally, if needed, change some of the other settings and click on the Save Category button:
Of course, if you want your stores to share the same catalog, you don't have to do this.
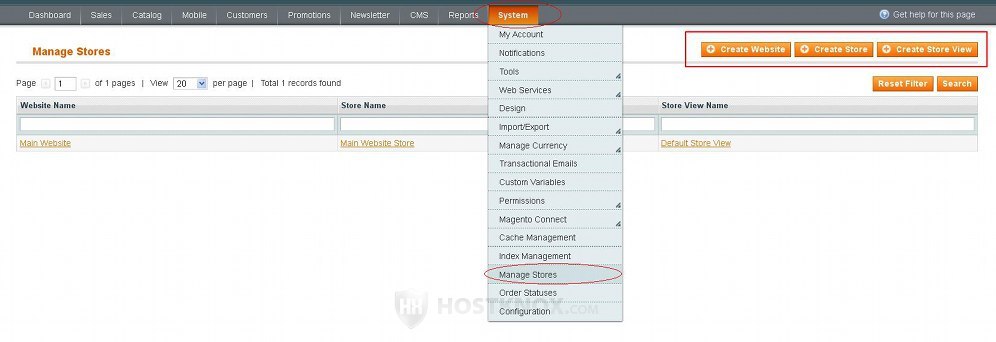
Then you need to create the website, store and store view for the new shop. To do this go to System menu>Manage Stores. On the page that opens there are three buttons in the upper right corner: Create Website, Create Store, Create Store View.
First, click on the Create Website button. On the page that opens you'll see e few settings. Type a name for the website in the field for Name. It doesn't have to be the URL address of your new shop; just type any name that you want. It will be used in the menus in the admin panel. In the field for Code type a code for the new shop. It can be anything that you want. However, you can only use lowercase letters and numbers. If you use more than one word, separate them with underscores:
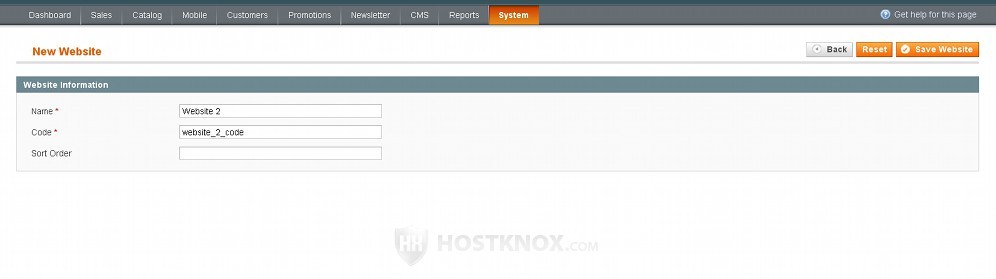
You'll need this code later during the multistore setup. Optionally, you can type a number in the Sort Order field to determine the position in which the website will be displayed in the various menus in the admin panel. After you're done click on the Save Website button.
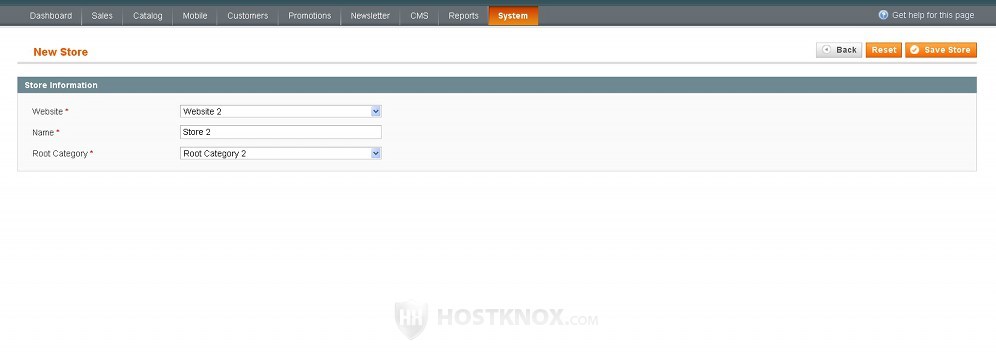
This will bring you back to System>Manage Stores. Click on the Create Store button to add a store for the new website. On the page that opens from the Website drop-down menu select the website that you just created. Type a name for the store in the respective field and select the root category from the Root Category drop-down menu. In case you want the store to have its own catalog select the new root category that you created from Catalog>Manage Categories. If you want the new store to share the catalog of the old one select the root category of the other shop:
Then click on the Save Store button.
Back on the page with the websites, stores and store views click on the Create Store View button to add a store view for the new shop. On the page with the settings from the Store drop-down menu select the new store that you just created. Type a name and a code in the respective fields. When typing the code you can use lowercase letters and numbers, and you can separate words with underscores. Set the Status drop-down menu to Enabled to make the shop accessible on the frontend:
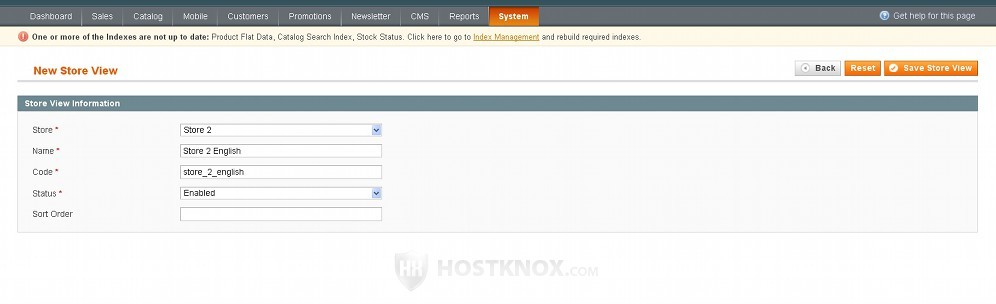
Optionally, from the Sort Order setting you can specify the position of the store view within menus. Then click on the Save Store View button. As you probably know, each store can have many store views. They are usually used to display the same store in different languages. If you need more information on this check out the tutorial on how to create a Magento multilingual store.
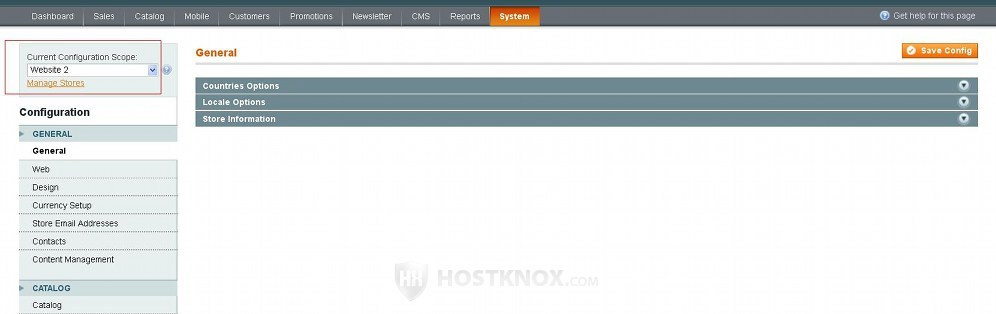
Once you have created the website, store and store view(s) for the new shop, go to System menu>Configuration. On the page that opens from the Current Configuration Scope drop-down menu that's in the upper left corner select the new website that you just created:
Then click on the Web button that's in the General section on the left. From the panels that appear on the right click on the Unsecure panel to expand it. Unmark the Use Default checkbox for the Base URL option and in the field type the full URL address of the new store including the http part at the beginning and a trailing forward slash at the end. It doesn't matter whether you've already created the subfolder/subdomain or new domain for the new shop, or whether you're going to do it after you configure these settings, as long as what you put in the field for this option corresponds to the actual URL address of the shop. Of course, you can edit this option if you need to at any time.
You have to edit the Base URL option no matter whether you use subdirectories, subdomains or different domains for the new shop(s) (e.g. http://domain.com/store1/, http://store1.domain.com/, http://domain2.com/):
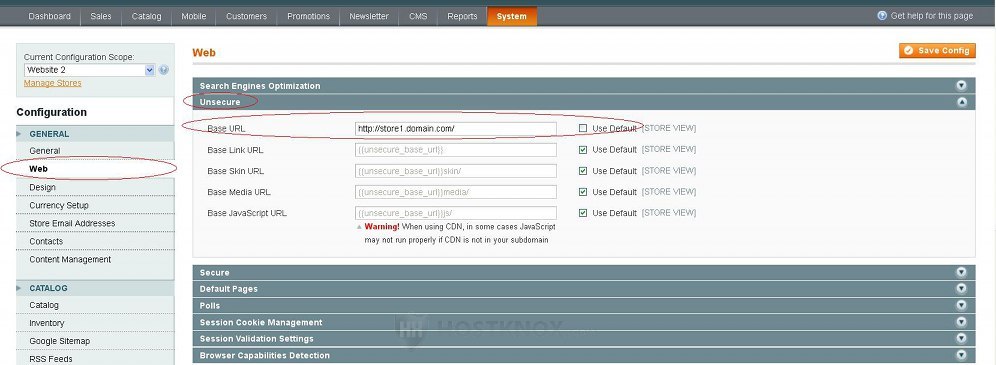
In case you use subdirectories or subdomains to set up your multistore you also have to edit the settings Base Skin URL, Base Media URL and Base JavaScript URL. Unmark the checkbox next to each and type the full URL address to that folder in the original installation. So, for example, if the URL address of the Magento installation is http://domain.com and you are creating another store accessible at http://store1.domain.com, then the Base URL setting has to be set to http://store1.domain.com/, while the options Base Skin URL, Base Media URL and Base JavaScript URL have to be set correspondingly to http://domain.com/skin/, http://domain.com/media/, http://domain.com/js/:
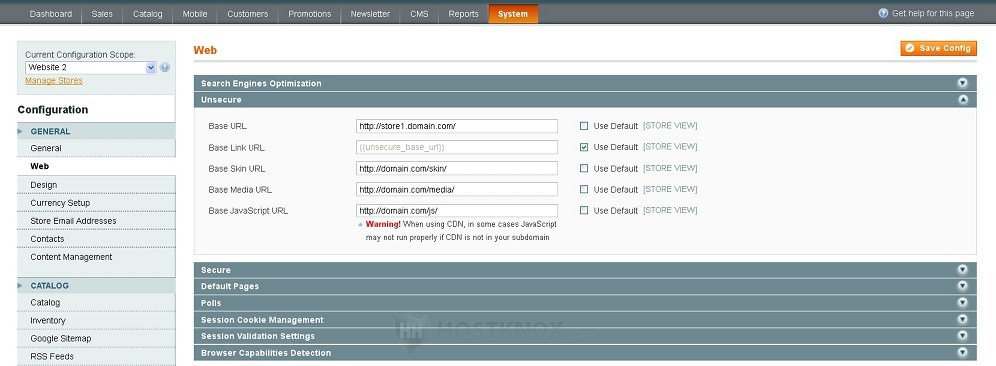
Don't change the Base Link URL option. Note that you only have to change the base URLs for skin, media and javascript if you use a subdirectory or a subdomain for the new store. If you use a new domain, you only have to change the Base URL option. Don't forget to click on the Save Config button in the upper right corner.
On the same page click on the Secure panel and make the changes to the base URL address(es) in the same way as with the settings in the Unsecure panel; change the http part of the URLs with https (e.g. https://store1.domain.com/).
Once you've completed all of the above you're done with the settings in the admin panel. If you want to add another shop(s), just repeated the same steps: add a website, a store and a store view, and edit the URLs. Now depending on whether you want to use subdirectories, subdomains or different domains go to the section on Magento subdirectory multistore setup, Magento subdomain multistore setup, or Magento different domains multistore setup.
Subdirectory Multistore Setup
You can create a multistore with each store in a subdirectory (e.g. domain.com/store1, domain.com/store2, etc.). In addition to configuring the settings in the admin panel as described in the Magento admin multistore settings section above, you also have to do a few other things to make the shop in each subdirectory work.
- Create the subdirectory for each store within the directory with the Magento installation.
You can do that from the Files section of the HostKnox control panel, you can also do it with an FTP client, or through SSH. For example, let's say that your Magento is accessible at domain.com which means that it's installed directly in the public_html directory on your hosting account. You want to add two stores which are accessible respectively at domain.com/store1 and domain.com/store2. So inside the public_html folder on your account you have to create the subfolders store1 and store2.
- Copy the index.php file and the .htaccess file from the root directory of the Magento installation into the newly created subdirectory for each of the new shops.
Again, you can do that from the Files section of the HostKnox control panel, with an FTP client or via SSH. Using the above example you need to copy the files index.php and .htaccess from the public_html folder on your hosting account and paste them in public_html/store1 and public_html/store2.
- Edit the copied index.php file for each of the stores.
Using the same example of the location of your Magento installation and subdirectories you need to edit the index.php file that's inside public_html/store1 and the one in public_html/store2. Don't edit the original index.php file in the root of your Magento installation.
There are a few things that you need to modify. First find the following line inside the index.php file:
$mageFilename = MAGENTO_ROOT . '/app/Mage.php';
You need to change the path to the Mage.php file so that it points to the file in your Magento installation. Assuming that your Magento is installed directly in the pubic_html folder on your account, you need to edit the code so that it looks like this:
$mageFilename = '/home/username/public_html/app/Mage.php';
This would be the full path on your account to the Mage.php file. Of course, you need to change username with your actual username.
After that find the following lines in the index.php file:
/* Store or website code */
$mageRunCode = isset($_SERVER['MAGE_RUN_CODE']) ? $_SERVER['MAGE_RUN_CODE'] : '';

/* Run store or run website */
$mageRunType = isset($_SERVER['MAGE_RUN_TYPE']) ? $_SERVER['MAGE_RUN_TYPE'] : 'store';
The lines enclosed in slashes and asterisks are just comments. These lines are at the end of the file just before the last line. Edit the line for the code and put in the quotations that are at the end of the line the code of the website that you created for the new shop from System>Manage Stores in the admin panel of your Magento. If you don't remember it just go to System>Manage Stores, on the page that opens click on the name of the website, and on the following page you'll see it in the field for Code. In the line for type change the type from store to website.
So, for example, if you created a website for the shop domain.com/store1 that has the code domain_com_store1_code, you need to edit the index.php file in public_html/store1 and modify the above listed lines so that they look like this:
/* Store or website code */
$mageRunCode = isset($_SERVER['MAGE_RUN_CODE']) ? $_SERVER['MAGE_RUN_CODE'] :
'domain_com_store1_code';

/* Run store or run website */
$mageRunType = isset($_SERVER['MAGE_RUN_TYPE']) ? $_SERVER['MAGE_RUN_TYPE'] : 'website';
After you modify the index.php file of each of the stores you can test whether everything works properly by opening the frontend of each of the stores with your web browser.
Subdomain Multistore Setup
Basically, it's done in the same way as with subdirectories. Let's say that you have a Magento application installed directly in the public_html directory of your hosting account, meaning it's accessible at domain.com, and you want to add two new stores accessible at store1.domain.com and store2.domain.com. You have already configured the necessary Magento multistore settings in the admin panel and now you have to do a few more things.
- First you have to create a subdomain for each store that you want to add.
You can do that from the Subdomains section of the HostKnox control panel. Just click on the Add Subdomain button that's in the black area on the right. On the following page type in the text field that's provided just the name of the subdomain (e.g. store1) not its whole URL address, and click on the Add Subdomain button that's under the text field.
- Copy the index.php file and the .htaccess file from the Magento installation into the folder of each subdomain.
If we use the above example of the location of Magento on your hosting account (e.g. public_html) and the subdomains that you have created (e.g. store1 and store2), then you have to copy the files index.php and .htaccess from /home/username/public_html into /home/username/subdomains/store1 and /home/username/subdomains/store2 (username stands for your actual username). You can do that from the Files section of the HostKnox control panel, or you can also do it with an FTP client or via SSH.
- The last thing to do is to modify the copied index.php file(s).
There are a couple of modifications that have to be made. Don't edit the original index.php file of your Magento installation. Using the above example you need to edit the index.php file in /home/username/subdomains/store1 and /home/username/subdomains/store2. You can edit the files from the Files section of the HostKnox control panel. Alternatively, you can download it on your computer with an FTP client, edit the file with a text editor (e.g. Notepad, Wordpad), and upload it back in the same folder overwriting the old one.
Find the following line in index.php:
$mageFilename = MAGENTO_ROOT . '/app/Mage.php';
and change the path to the Mage.php file with the full path to the file in the Magento installation. In our example since Magento is installed directly in the public_html folder the edited line should look like this:
$mageFilename = '/home/username/public_html/app/Mage.php';
The part username in the above line has to be replaced with the actual username.
The second modification that has to be made in the index.php file involves the lines that are just above the last line in the file. They look like this (the ones in slashes and asterisks are comments):
/* Store or website code */
$mageRunCode = isset($_SERVER['MAGE_RUN_CODE']) ? $_SERVER['MAGE_RUN_CODE'] : '';

/* Run store or run website */
$mageRunType = isset($_SERVER['MAGE_RUN_TYPE']) ? $_SERVER['MAGE_RUN_TYPE'] : 'store';
The first line is for the website code. As you remember you created a website from the admin panel of your Magento (from System menu>Manage Stores) for each shop that you want to add to your multistore. If you don't remember the code, log in to the admin panel, go to System>Manage Stores, on the page that opens click on the name of the website that corresponds to the shop and check the value in the field for Code. That's the code that you need to type between the quotation marks at the end of the line for the code. In the line for the type change store with website.
If, for example, the website that you created for store1.domain.com has the code store1_domain_code, the modified lines in the index.php file should look like this:
/* Store or website code */
$mageRunCode = isset($_SERVER['MAGE_RUN_CODE']) ? $_SERVER['MAGE_RUN_CODE'] :
'store1_domain_code';

/* Run store or run website */
$mageRunType = isset($_SERVER['MAGE_RUN_TYPE']) ? $_SERVER['MAGE_RUN_TYPE'] : 'website';
Once you're done with the index.php file of each shop you can test their frontend by opening their URL addresses with your web browser.
Different Domains Multistore Setup
Let's assume that you have a domain called domain1.com that points to a hosting account on which you have installed Magento. So you have one Magento shop accessible at domain1.com. You have another domain called domain2.com and you want to use the installation for domain1.com to create a multistore. You have already configured the options from the backend of your Magento as described in the section on admin panel settings.
Now there are a few more things that you have to check and configure in order for the multistore to become functional.
- Check to make sure that the name servers for the second domain point to the name servers of the first domain (the one with the Magento installation).
You can do that from the domain name registrar responsible for the second domain that you want to add to the multistore. Using our example you need to go to the registrar for domain2.com, log in to your account there and if necessary change the name servers. They have to be the same as the ones for domain1.com.
- You have to add the necessary DNS records for the domain that you want to include in the multistore.
You can do that from the Domain Names and DNS Settings section of the HostKnox control panel. Just click on the Add Domain Name button that's in the black area on the right, on the following page type the domain name (e.g. domain2.com) in the text field and click on the Add Domain button that's under the field. The HostKnox control panel will create the DNS records and it will automatically update the vHost file of the account adding the new domain. Adding a domain name in this way corresponds to the parked domain function of cPanel.
After you do the above things the second domain will be mapped to the same IP address as that of the first domain and it will resolve successfully.
There's one more thing that you have to do.
- Edit the index.php file of the Magento installation.
If, for example, your Magento is installed directly in the public_html folder on your hosting account, making the original store accessible at domain1.com, you need to edit the index.php file that's in public_html. You can do that from the Files section of the HostKnox control panel, or you can download it with an FTP client, edit it with a text editor (e.g. Notepad, Wordpad) and upload it back overwriting the old file.
Find the last line in the file. It looks like this:
Mage::run($mageRunCode, $mageRunType);
Just before that line you need to put the following code:
switch($_SERVER['HTTP_HOST']) {
    case 'domain2.com':
    case 'www.domain2.com':
    $mageRunCode = 'domain2_website_code';
    $mageRunType = 'website';
    break;
}
Replace domain2.com and www.domain2.com with the actual URL addresses of the shop that you want to add. Replace domain2_website_code with the actual code of the website that you created for the new shop from the admin panel of your Magento. If you don't remember it just log in to the admin panel, go to System menu>Manage Stores, on the page that opens click on the name of the website and on the following page check the value in the field for Code. Leave the value for mageRunType to website.
In case you want to add more shops expand the code that you put in the index.php file like this:
switch($_SERVER['HTTP_HOST']) {
    case 'domain2.com':
    case 'www.domain2.com':
    $mageRunCode = 'domain2_website_code';
    $mageRunType = 'website';
    break;

    case 'domain3.com':
    case 'www.domain3.com':
    $mageRunCode = 'domain3_website_code';
    $mageRunType = 'website';
    break;

    case 'domain3.com':
    case 'www.domain3.com':
    $mageRunCode = 'domain3_website_code';
    $mageRunType = 'website';
    break;
}
Now you can open with your browser the URL address of each shop to check whether the frontend of each one works correctly.
Keep in mind that when you upgrade Magento the index.php file will be overwritten so you'll have to make the custom code changes again.
Additional Information
- When you add/edit products you have select the website in which you want the product to be displayed. Click on the Websites button on the left and mark the checkbox corresponding to the website:
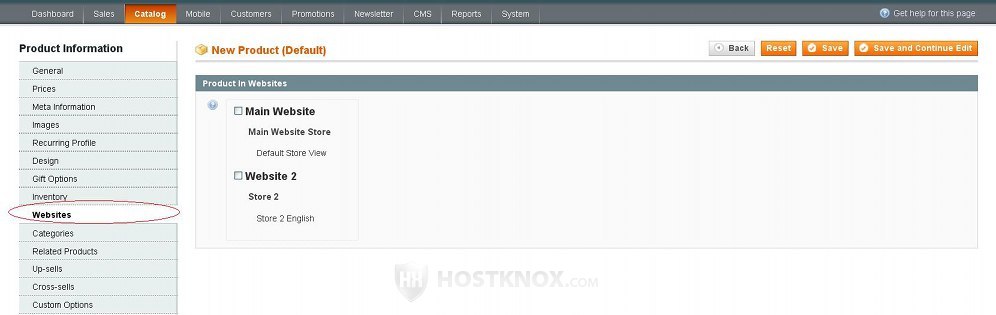
Of course, you also have to select a category for the product from the Categories button on the left. Don't forget that if your shops don't share the same catalog, each one has its own root category that you've created from Catalog menu>Manage Categories.
- By default, customer accounts are not shared across websites. This means that if you have the shops domain1.com and domain2.com, a customer who has created an account in domain1.com won't be able to use that same account to log in domain2.com. If you want to, you can change that so that a customer who creates an account in one shop will be able to log in and use that account in all of the shops in the multistore. To do this, in the admin panel go to System menu>Configuration>Customer Configuration button in the Customers section on the left>Account Sharing Options panel on the right:
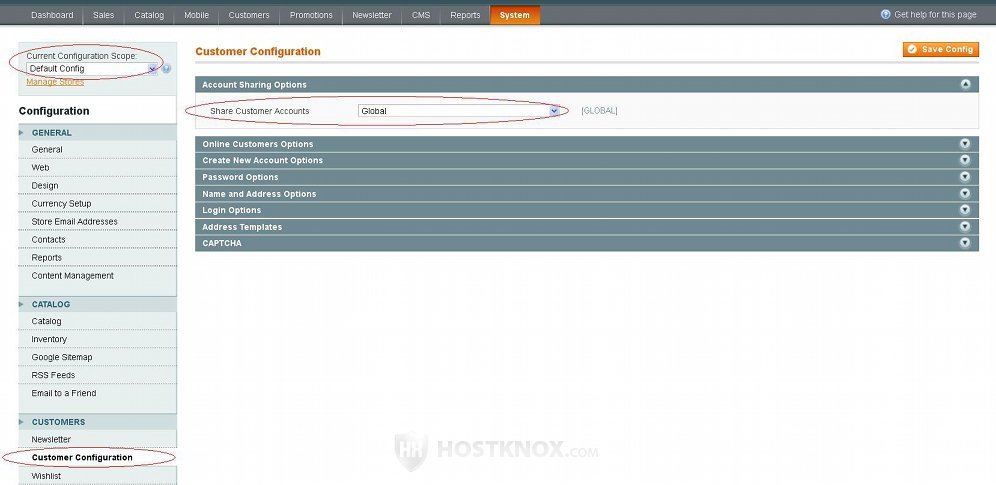
Just set the Share Customer Accounts drop-down menu to Global and click on the Save Config button. The Current Configuration Scope drop-down menu in the upper left corner should be set to Default Config.
- In addition to creating a separate catalog for each shop you can also set the scope of CMS pages and polls. You can edit their visibility per store view for each of your stores. To do this, in the admin panel go respectively to CMS menu>Pages or CMS menu>Polls, on the page that opens click on the name of the page/poll that you want to edit, and on the following page edit the visibility option. For each of your websites you can also set the default home page, about us page, etc. To do this go to System>Configuration, on the page that opens select the website from the Current Configuration Scope drop-down menu in the top left corner, click on the Web button in the General section on the left, from the panels that appear on the right select Default Pages, and you can use the settings there to change the default pages for the website.
- You can also set a different theme for each store. To do this in the admin panel go to System menu>Design, on the page that opens click on the Add Design Change button and configure the settings. Design changes are actually set per store view.