Magento Custom Product Options Tutorial
How to add and manage custom product options in Magento
When you add or edit products in Magento you can create custom options for that product. These are useful for creating variants of the same product. The custom options can be used by customers to select a variant of the product which they want to order or to customize it in some way. The options apply only to the particular product to which you have added them from the admin panel of Magento and not to other products.
Adding custom options to products is similar to using configurable products but there are some differences. In some cases it might be more convenient to use products with custom options, while in others it may be better and easier to use configurable products instead. The basic difference between the two is that the inventory of a product with custom options is not managed separately for each product variation, while with a configurable product the stock of each variation is counted separately. Another thing is that a custom option is created per product, while a configurable product uses attributes which, once created, can be use with any product.
So, for example, if you sell shoes and you want to manage the inventory of the different sizes for each model, it will be easier to create a configurable product (per model) that will allow you to manage the stock of each size separately. Alternatively, you can allow customers to choose the shoe size of a model by configuring a simple product with a custom option for size, but in this case all sizes will be managed in one inventory.
There are cases, however, where custom options have their specific advantages. For example, if you want to offer customers the possibility to stamp text or an image of their choice on a model of t-shirt that you sell, you can do that by adding a custom option(s) to that product. The option will let customers type the text or/and upload the image that they want to have stamped on the t-shirt. A similar example is if you sell jewelry and you want to offer the option to engrave initials or text on rings, for instance. Of course, you can also add custom options to configurable products. For example, you can offer a t-shirt as a configurable product that let's customers choose the color and size, and you can also add a custom option that allows them to send you some text or an image that they want to have stamped on the t-shirt.
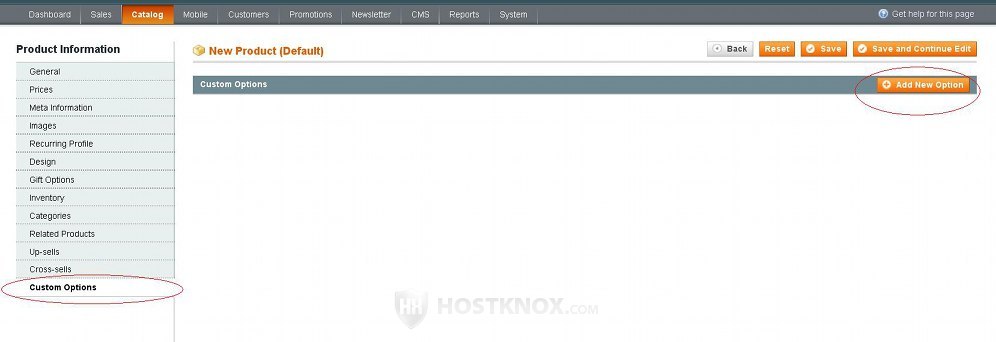
Adding custom options to products in Magento is easy. To do this, log in to the backend of your store, go to Catalog menu>Manage Products and then click on the product in the table that you want to edit or on the Add Product button, if you want to add a new one. On the page with the product settings click on the Custom Options button on the left. Then click on the Add New Option button that appears on the right:
After you do that a few settings will be displayed:
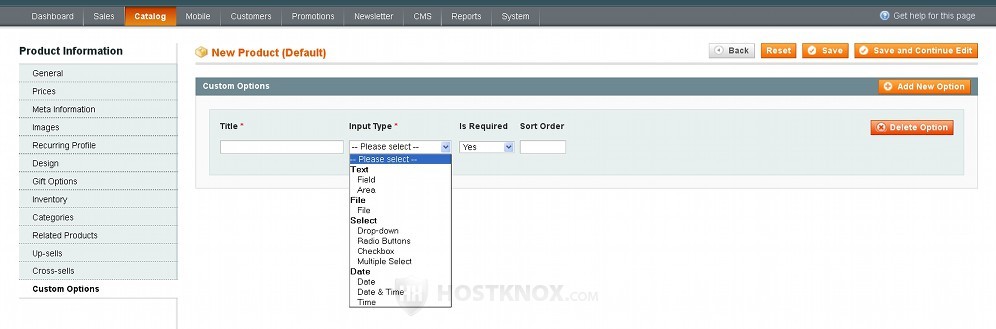
Let's review them:
- Title-this, of course, is for the name of the option as you want it to appear on the product details page on the frontend.
- Input Type-this option determines the way in which customers can input data. You can select different input types according to your needs. For example, there are a couple of text input types (Field and Area) which allow the customer to type some text; the difference between the two text types is only in the size of the text area. There's also a File input type which can be used to allow the customer to upload a file or an image. For example, if you want to allow customers to upload an image that you can stamp on t-shirts, that's the input type that you should use. There are also several input types for offering some preconfigured multiple choices (Drop-down, Radio Buttons, Checkbox, Multiple Select). After you select the input type some additional settings will appear under the basic ones. They may vary a bit depending on the input type. We'll come to this further down in this tutorial.
- Is Required-this option is set to Yes by default. It determines whether the customers are required to select/specify some value for the custom option in order for them to be able to order the product.
- Sort Order-in case you add more than one custom option you can use this setting to specify the order in which the custom options will be displayed on the frontend.
As we mentioned, after you select the input type a few more settings will appear. There are slight differences depending on the particular input type. For example, if you select one of the two text types, the options that can be configured are Price, Price Type, SKU and Max Characters:
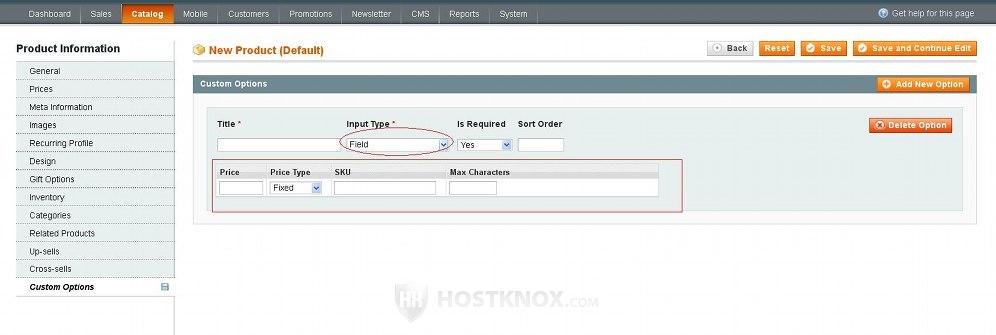
The common settings that appear for all input types are for the price, price type and SKU.
With the File input type, for example, in addition to these, there are also settings that let you list the allowed file types and the maximum image dimensions:

In the field for Allowed File Extensions you can list the file types that customers will be able to upload. Separate them with a comma or a space (e.g. jpg,png,txt).
If you choose one of the Select input types (e.g. Drop-down, Radio Buttons, etc.) a button will appear which you can use to add an option for the select menu:
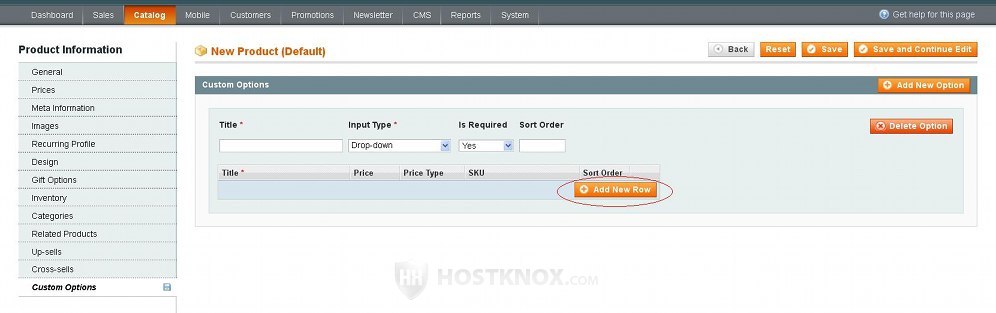
Just click on the Add New Row button and the settings will be displayed:
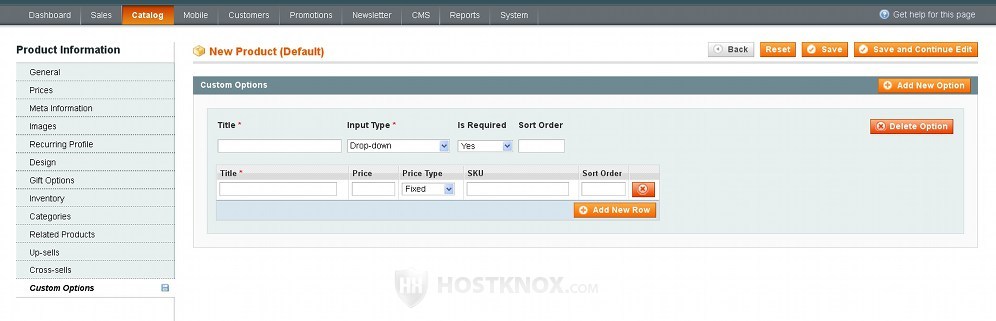
The Price, Price Type and SKU options are used for all input types. If you want the price of the product variation to be different than that of the basic one, you can use the Price field to adjust the price. The Price Type drop-down menu determines whether the number in the price field should be added/subtracted as a fixed sum or as percents from the base price.
For example, if the price of the product is 50 dollars, and you want the price of the product variation created with the particular custom option to be a 100 dollars, you should type 50 in the field for Price (and leave Price Type to the default Fixed). Note that the number that you put in the field for price for the option will be added to (or subtracted from) the basic price of the product. To decrease the price just put a minus/hyphen in front of the number in the field for price (e.g. -25). If you set the Price Type drop-down menu to Percent, the number in the Price field will be calculated as percents from the basic price. For example, if the product costs 50 dollars, and you put 50 in the field for price for the custom option (and the type is set to Percent), then the price of the variation will be 75 dollars.
The SKU option is a unique identifier for internal use. You can use the name of the option as the SKU; you can simply type it with lowercase letters, and, if it consists of more than one word, separate the words with hyphens or underscores.
In case the custom option is a Select input type, each option within the menu also has a Title; you can also specify its position within the menu thanks to the Sort Order option. With the Add New Row button you can add as many options within the custom option as you want.
You can add many custom options and each can be with a different input type. Simply use the Add New Option button in the upper right corner and and configure the settings.
Once you're done click on the Save or on the Save and Continue Edit button.
After that flush the Magento cache and refresh the frontend of your site to check the result.