Mozilla Thunderbird Tutorial
How to configure Mozilla Thunderbird to connect to your email account
Mozilla Thunderbird is an open source email client. It is cross-platform which means it can be used on Windows, Linux and Mac OS X. As with Mozilla Firefox you can add additional functions and features to Thunderbird by installing extensions. This can be done through the email client itself (Tools>Add-ons). You can download Thunderbird for free from Mozilla's official site.
Before you add a new email account in Thunderbird you need to create one. HostKnox clients can do this from the Email section of the HostKnox control panel. If you're not sure how to do it read the tutorial on creating an email account.
After you start Mozilla Thunderbird, if you haven't used it so far and you haven't added any email accounts in it, the set up process of adding a new account will start automatically. Otherwise, to add a new email account, after you open Mozilla Thunderbird go to the Tools menu and select Account Settings. On the Account Settings window click on the Account Actions button and select Add Mail Account:

On the window that pops out you have to type your name (the name you want other people to see when they receive emails from you), the full email address and the password for the email account:
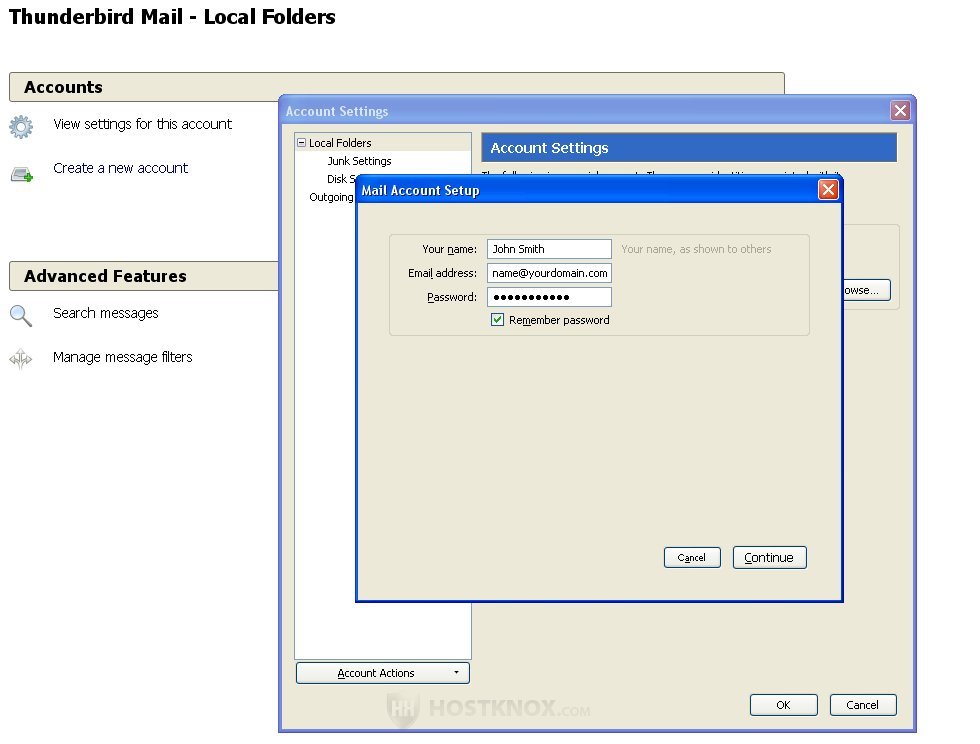
After that click on Continue.
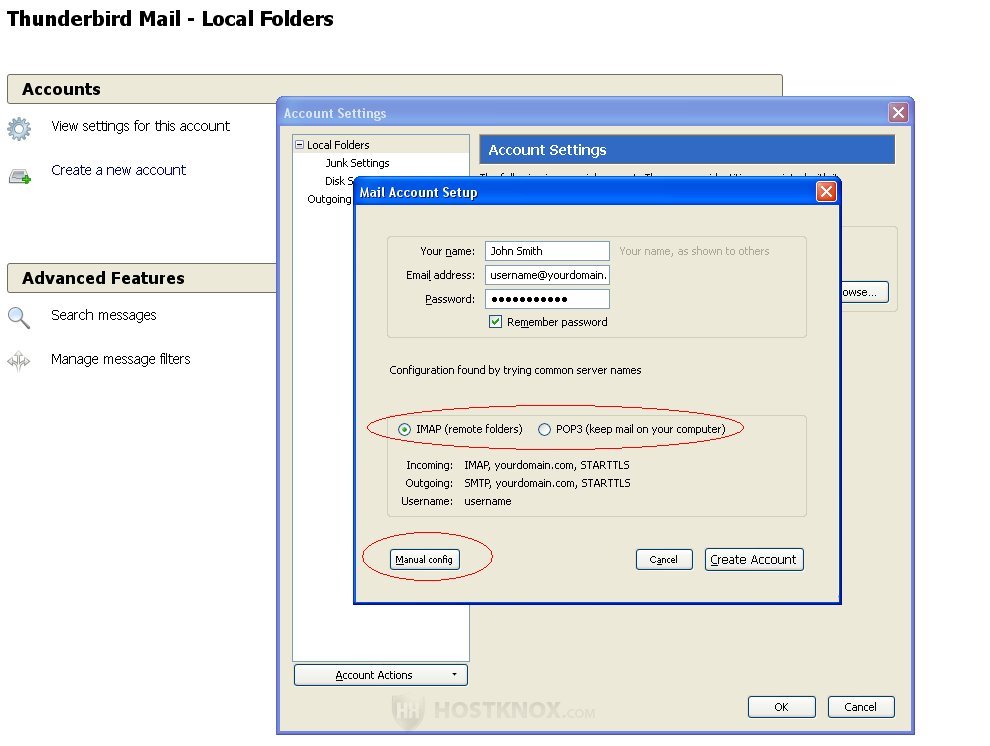
On the next window Thunderbird will try automatically to set up the configuration that you need to establish a connection with your email account. What you have to select on this page is whether you want to use IMAP (Internet Message Access Protocol) or POP (Post Office Protocol). These are Internet protocols for retrieving email messages. The main difference between them is that with POP before you can read the inbox messages they have to be downloaded from the server to your local computer and with IMAP you can read and manage them directly on the server, which means that with IMAP you can manage your email account from different locations.
After you select IMAP or POP click on the button Manual config in the lower left corner of the window:
On the next window you have to configure the incoming and outgoing mail server names and port numbers. For both incoming and outgoing server you can use your domain name (e.g. yourdomain.com), as long as it points to our servers and you don't plan to use SSL/TLS, or you can use the name or IP address of the HostKnox server hosting your account.
SSL and TLS are internet protocols used to encrypt data transfer. If you want to use encryption, set the SSL drop-down menus for both incoming and outgoing server to SSL/TLS. If you want to use encryption you also need to type the server name or IP address (not your domain name) for both incoming and outgoing server hostname. Although the port numbers should change automatically, change them manually if they are not correct. They should be as follows: 587 for outgoing server (SMTP) without SSL/TLS, and 465 if you enable SSL/TLS; 143 for IMAP without SSL/TLS, 993 for IMAP with SSL/TLS, 110 for POP without SSL/TLS, 995 for POP with SSL/TLS.
In the field for Username at the bottom of the window be sure to type your full email address (e.g. username@yourdomain.com).
In this example we've set the email account to use IMAP without encryption, so we've set the SSL drop-down menus to None and the port numbers to 143 for incoming (IMAP) and 587 for outgoing. For server names we've used the domain name (e.g. yourdomain.com) but we can also use the server name or IP address:
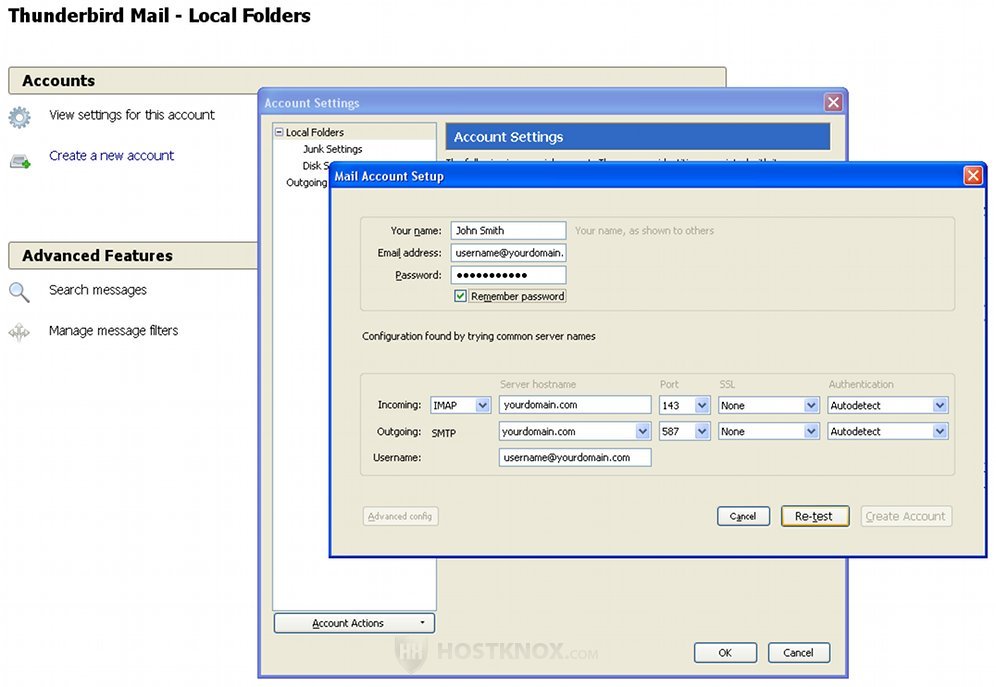
After you configure all the options click on the Re-test button in the lower right corner of the window. Thunderbird will check the settings. Then the Create Account button will appear, so just click on it. If you haven't enabled SSL/TLS a window will appear informing you that your email account doesn't use encryption. Confirm that you know this and that's it.
Now you should be able to use your email through Mozilla Thunderbird. You can change all the settings at any time from Tools>Account Settings.
Mozilla Thunderbird can also be used to manage your accounts in Yahoo, Gmail, Hotmail, etc. It will configure all the necessary options automatically after you type your email address and password on the fist step of the setup process. Nevertheless, if you need information on the settings that you have to change read the article on configuring email clients to connect to your email accounts in Yahoo, Gmail and Hotmail.