Pixie - Cron Jobs Tutorial
How to manage cron jobs with the HostKnox control panel
Cron jobs are used to perform different tasks automatically at specified intervals. For example, the cron job can be performed once an hour, once a day, once a week, etc. Cron jobs can be used for all sorts of things. Usually the cron job is for executing some script file that in turn performs some task(s) (e.g. backing up your databases, updating some information on your site, etc.).
HostKnox clients can add and manage cron jobs from the Cron Jobs section of the HostKnox control panel. After you log into the control panel click on the Manage button for the account/site for which you want to manage cron jobs and on the page with the tools click on Cron Jobs:
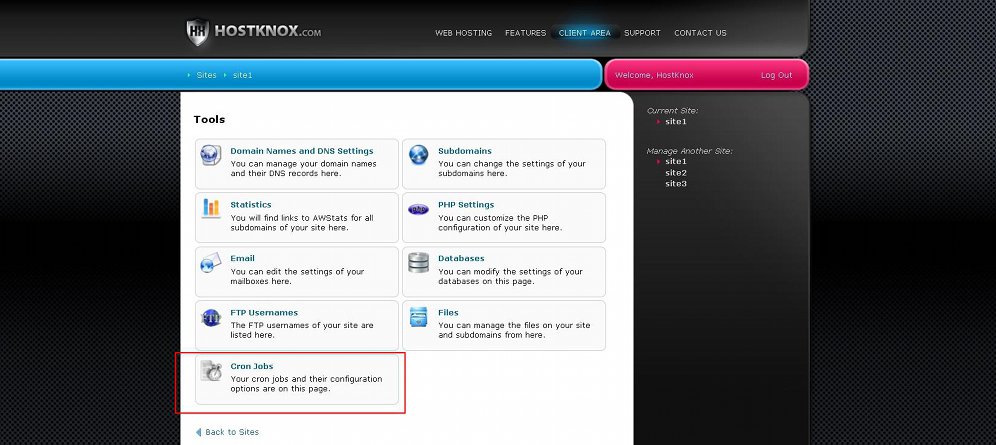
For a general overview of the HostKnox control panel check out the tutorial on how to access and manage the HostKnox control panel.
Now we'll go over the cron job options.
Add Cron Jobs
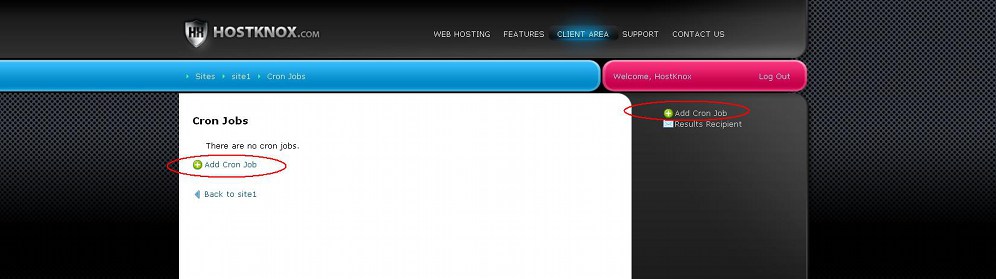
To add a cron job, after you access the Cron Jobs section of the HostKnox control panel click on the Add Cron Job button in the black area on the right. If there are no cron jobs, the same button will be available in the white central area of the page:
On the page that opens select from the Frequency drop-down menu how often you want to cron job to be executed and put the actual cron job command in the Command text field:
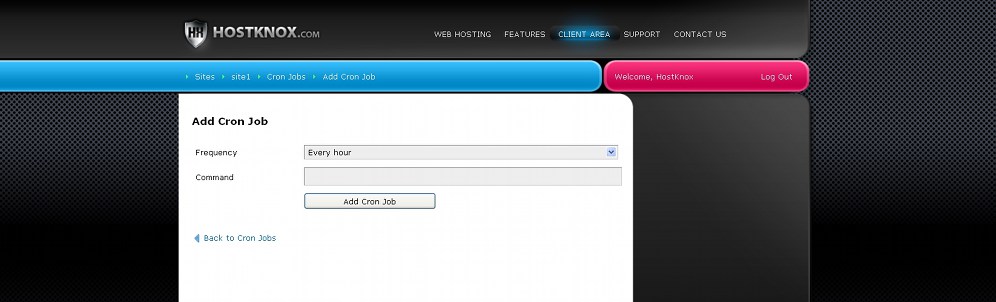
By default, the frequency is set to once an hour. You can make it more or less frequent by selecting another option from the drop-down menu. After you configure the options click on the Add Cron Job button that's under the fields.
Remove Cron Jobs
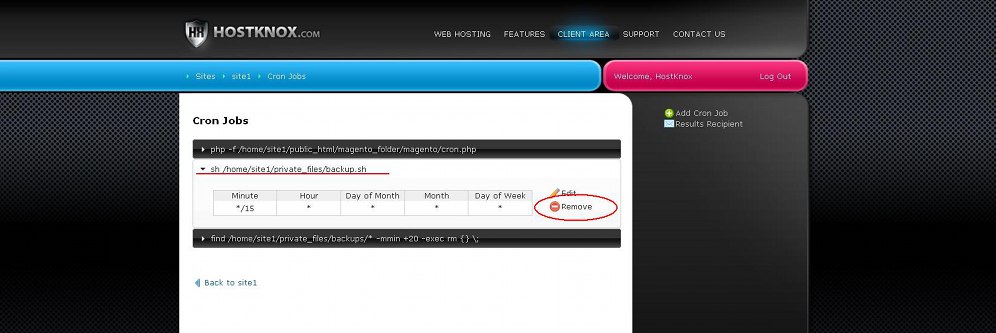
To remove a cron job, access the Cron Jobs section of the HostKnox control panel. You'll see displayed the currently added cron jobs. Click on the cron job that you want to delete. A panel will expand under the cron job command. Click on the Remove button:
A small window will pop out asking you for confirmation that you really want to delete the cron job.
Edit Cron Jobs
When you access the Cron Jobs section of the HostKnox control panel you'll see listed your existing cron jobs. Each cron job is listed with its command. To see the details about its frequency, as well as the buttons for managing it, click on the cron job command. This will expand a small panel with a table that shows when the command is executed. Next to the table there are a couple of buttons. One of them is Edit:
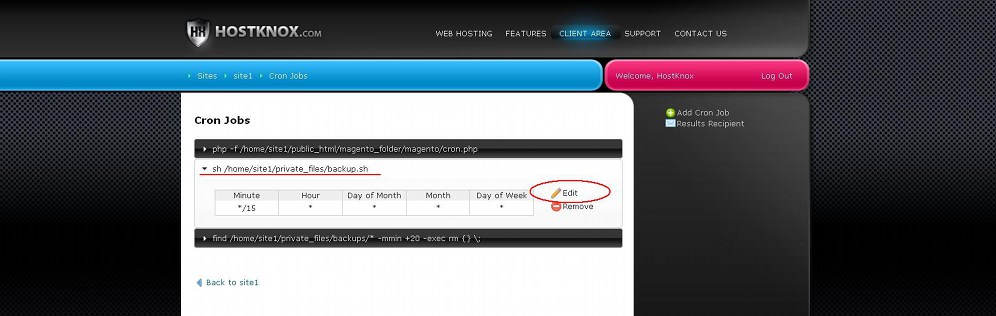
Click on it to edit the cron job command and/or its frequency. On the page that opens you'll see a text field with the crontab entry. The crontab entry contains the time of execution represented with numbers and asterisks followed by the cron command:
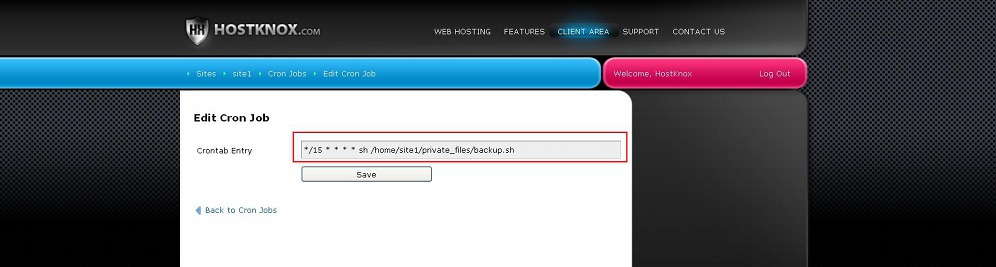
To change the command jut edit or replace the command that's in the text field. On our example screenshot the command is sh /home/site1/private_files/backup.sh. The command executes the file backup.sh that's located in /home/site1/private_files on the hosting account. The time of execution might seem a bit confusing at first. In our example it's */15 * * * * which means that the command is executed once every fifteen minutes. Each asterisk or a number in its place represents minutes, an hour, a day of the week, etc. They are labeled in the table on the previous page (the one that lists all the cron jobs). For more information on what each means and how to configure them check the section in this tutorial on cron job frequency and time of execution.
If you make any changes don't forget to click on the Save button.
If you find this way of editing the cron job frequency too confusing and you can't do it, you can simply delete the cron job and add it as a new one. On the add form you can select the frequency from a drop-down menu that lists the frequency options in a more user-friendly way (e.g. every 15 minutes, every 30 minutes, every hour, etc.). In this way you won't have to configure any asterisks and numbers.
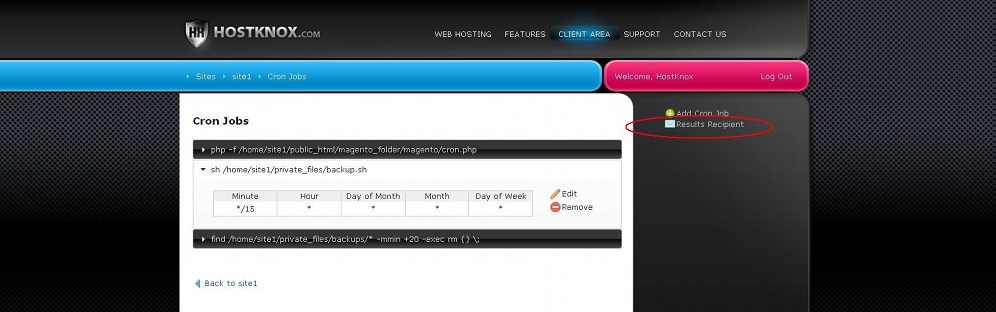
Results Recipient
If you want to, you can provide an email address to receive error messages in case for some reason any of your cron jobs could not be executed. To do this, in the Cron Jobs section of the HostKnox control panel click on the Results Recipient button in the black area on the right:
On the page that opens type the email address in the text field and click on the Save Recipient button.
Of course, this is entirely optional and will not affect in any way the execution of your cron jobs.
Cron Job Frequency and Time of Execution
As we showed you, when you add a new cron job from the HostKnox control panel you can select its frequency from a drop-down menu. This drop-down menu is very user-friendly and easy to use; you only have to select the frequency option that best suits your needs. Then the HostKnox control panel automatically configures the time of execution which is represented with asterisks and numbers in the crontab file. The time of execution and the command are added as a line to the crontab file on your hosting account. This is the file that stores all the cron jobs.
When you edit a cron job you don't have such a choice of preconfigured frequency options, and if you want to edit the frequency and time of execution you have to edit this combination of numbers and asterisks. Here we'll show you how to configure the frequency using this combination of numbers and asterisks (and some other symbols). In this way you can actually be more precise in terms of configuring the frequency and exact time of the cron job execution.
Each cron job is represented in the crontab file as a combination of a cron expression (the time of execution of the cron job) and a shell command. It has the following form:
* * * * * command
The asterisks stand for the frequency/time of execution and command stands for the actual cron job command. What's interesting here are the five asterisks. The first one stands for the minutes, the second for the hour, the third for the day of the month, the fourth for the month and the fifth for the day of the week:
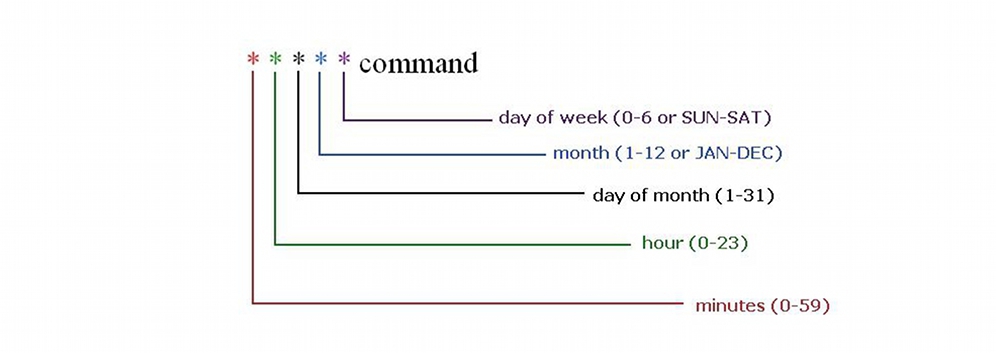
On the above picture in brackets you can see the allowed values for each position. For example, for minutes you can use the numbers from 0 to 59. For the month you can use either the numbers from 1 to 12, or a three-letter abbreviation of the name (e.g. JAN, FEB, MAR, etc.). For the day of the week you also have the choice to use either the numbers from 0 to 6 (0 stands for Sunday and 6 for Saturday) or a three-letter abbreviation of the name of the day (e.g. SUN, MON, TUE, etc.). The asterisk symbol itself stands for any value. So, for example, if you leave an asterisk for the hour position, the command will be executed every hour.
Let's give some examples to make it clearer. The following command:
15 * * * * command
will be executed once every hour on the fifteenth minute.
The following:
15 22 * * * command
will be executed at 22:15 every night regardless of the day of week and the month.
While the following:
15 22 * 1 6 command
will be executed at 22:15 every Saturday during January.
By using some other symbols such as forward slashes and commas you can come up with more combinations. For example, with the following:
*/15 * * * * command
the command will be executed once every fifteen minutes.
Commas are used to put more than one item in a list. For instance:
*/15 * * * 0,1,4 command
will execute the command every fifteen minutes only on Sunday, Monday and Thursday. Note that the items are listed without spaces between the comma and the item (e.g. 0,1,4).