Pixie - FTP Usernames Tutorial
How to manage FTP users with the HostKnox control panel
FTP (File Transfer Protocol) is a protocol that's used for transferring files over the Internet. You can use it, for example, to transfer files from your local computer to your hosting account and vice versa. You can connect to your account via FTP and transfer files with the help of an application known as an FTP client (e.g. FileZilla). However, to be able to connect to your hosting account through FTP there should be an FTP user created on your account that has access to the account via FTP. When you configure an FTP client to connect to an account you have to use the login credentials of such an FTP user that has access to the particular account.
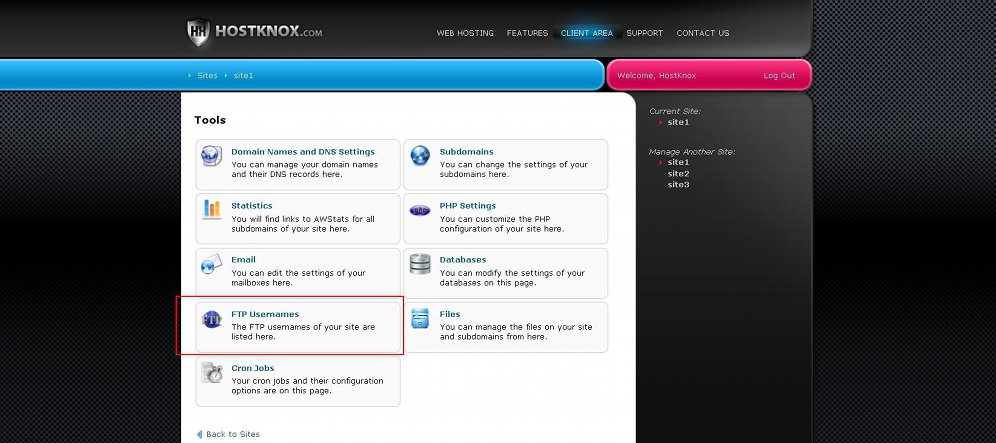
HostKnox clients can add, remove and manage FTP users for each of their hosting accounts from the FTP Usernames section of the HostKnox control panel. To access it, log into the control panel, click on the Manage button for the account/site for which you want to manage FTP users and on the page with the tools click on FTP Usernames:
For a general overview of the HostKnox control panel check out the tutorial on how to access and manage the HostKnox control panel.
Now we'll go over the options in the HostKnox control panel related to FTP users.
Add FTP Users
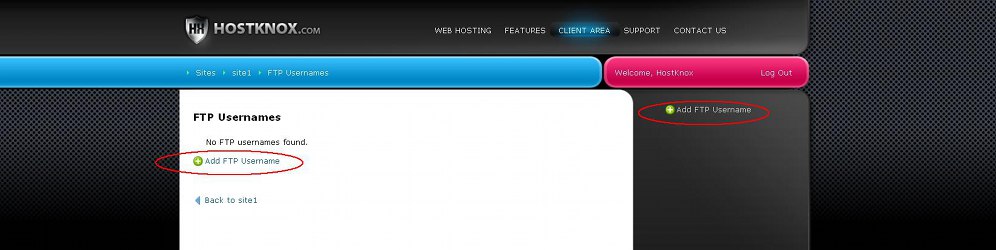
After you access the FTP Usernames section of the HostKnox control panel you'll see listed the existing usernames (if any). To add a new user click on the Add FTP Username button in the black area on the right. If there are no users, the same button will also be available in the white area in the center of the page:
This will open the form for adding an FTP user:
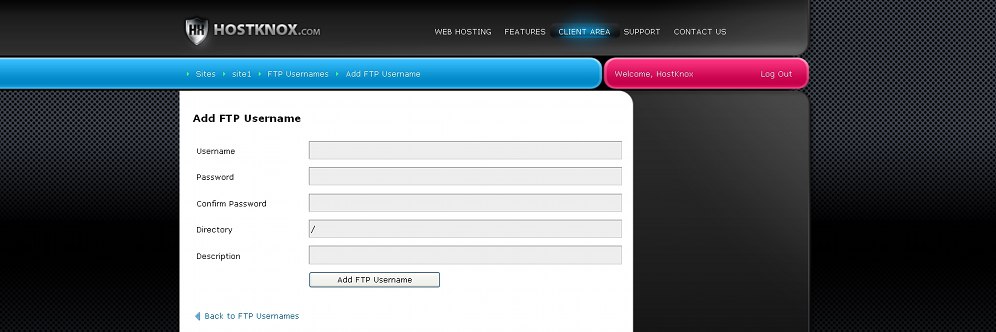
Type a username and password for the user in the respective fields. The Directory option is set to / by default. With this option you can limit the access of the FTP user to a particular folder on your hosting account. The default forward slash means that the user will be logged into /home/username on your hosting account (username stands for the actual hosting account name). This means that the FTP user will have access to all subfolders of /home/username. These include the directory public_html which is the root web-accessible folder and other folders such as private_files, subdomains, etc. To limit the access of the FTP user to a particular folder (with all its subfolder) just put the path to it in the Directory field. For example, if you want the user to be able to access only the root web-accessible folder public_html, put /public_html in the Directory field. If you want to limit the user to a subfolder of public_html that's called example_dir, then you should put /public_html/example_dir in the Directory field.
The Description field is optional. You can use it if you want to include some note or useful information about the particular user. For example, if you limit the access of the user to a particular folder, you can include this information in the description. This description will be shown under the username on the page in the HostKnox control panel that lists all FTP users.
After you configure the options click on the Add FTP Username button that's under them.
Remove FTP Users
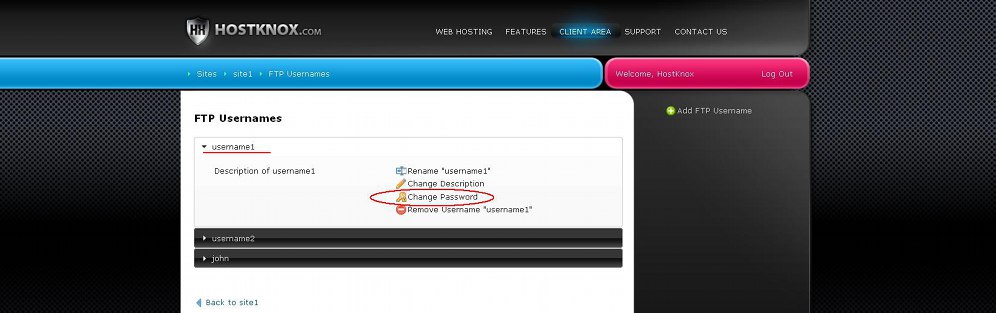
To delete FTP users from your account, access the FTP Usernames section of the HostKnox control panel. On the page that opens you'll see listed in the white area in the center the existing FTP usernames. Click on the particular username to expand a small panel with some buttons. Then click on the Remove button:
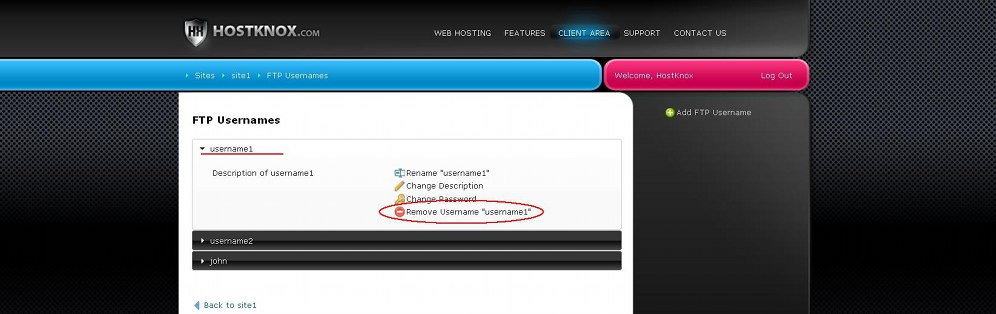
A small window will pop out asking you to confirm that you want to delete the user.
Change Passwords of FTP Users
You can change the password for any of the FTP usernames that you've added. To do this, access the FTP Usernames section of the HostKnox control panel, on the page that lists the usernames click on the username for which you want to change the password. Then in the panel that expands click on the Change Password button:
On the page that opens type the new password in the two text fields that are provided and click on the Change Password button that's under them.
Rename FTP Users
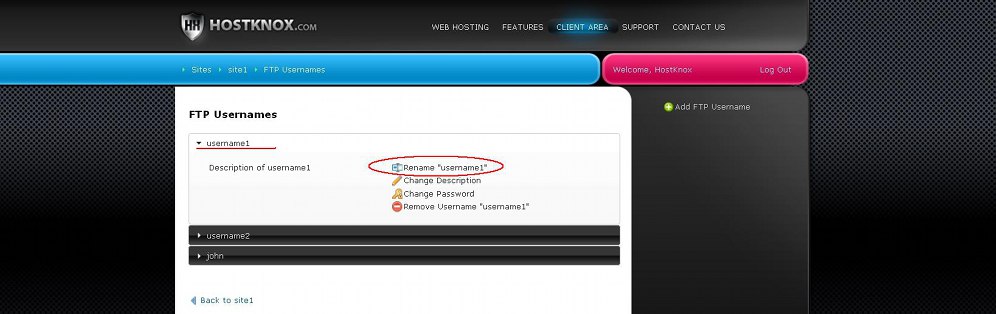
You can change the name of any of the FTP usernames. To do this, in the FTP Usernames section of the HostKnox control panel click on the username that you want to change. A small panel with some buttons will expand; click on the Rename button:
On the page that is displayed type the new username in the text field and click on the Rename button under it.
Change Description of FTP Users
You can add a description to each of the FTP users. This is optional. You can do it if you want to include some relevant information about a particular user(s). The description is shown only in the HostKnox control panel. There's a field for the description on the form for adding new FTP users. There's also an option from which can add/edit the description of a user at any time after the user is added. To do this, access the FTP Usernames section of the HostKnox control panel, on the page that lists the existing usernames select the particular username by clicking on it. In the small panel that expands you'll see the current description (if any) of the user just under the username. To add a description or change the existing one, click on the Change Description button:

On the page that opens type the new description in the text field and click on the Save Description button under it.
For information on how to set up and configure some of the most popular FTP clients check out the HostKnox FTP tutorials.