Pixie Control Panel Tutorial
How to access and manage the HostKnox control panel
The HostKnox control panel is used for managing your HostKnox hosting accounts. It can be used to manage the files and folders on your accounts, to add and manage databases and database users, to configure DNS settings, to add and manage mailboxes and FTP users, to add and manage cron jobs, to change PHP versions, to add and manage subdomains and many more.
Most other hosting companies use third-party solutions for managing hosting accounts such as cPanel, Plesk, etc. The HostKnox control panel that HostKnox provides is our own software. This means that it's continuously improved and new features and functions are added.
In this tutorial we'll show you how to access the Pixie control panel and we'll provide you with a general overview of the homepage and the available sections in the control panel.
Accessing Pixie Control Panel
There are a couple of ways you can access the HostKnox control panel. The fastest and most direct one is to open its URL address pixie.hostknox.com. This will display the login page on which you have to type the username and password. The username is actually the email address that you used to register and order a HostKnox hosting account. The password is also first specified by you during the sign up process for your first HostKnox hosting account. You can change your email address and password from the HostKnox Client Area in the section My Details; for more information check out the tutorial on how to edit your personal information and change your password. The email address and the password with which you can access the HostKnox control panel and the Client Area are the same.
You can also access the HostKnox control panel from the Client Area. In the section My Services you'll see a table with all the hosting accounts that you've purchased. Next to the name of each hosting account there's a small button that looks like a magician's wand:
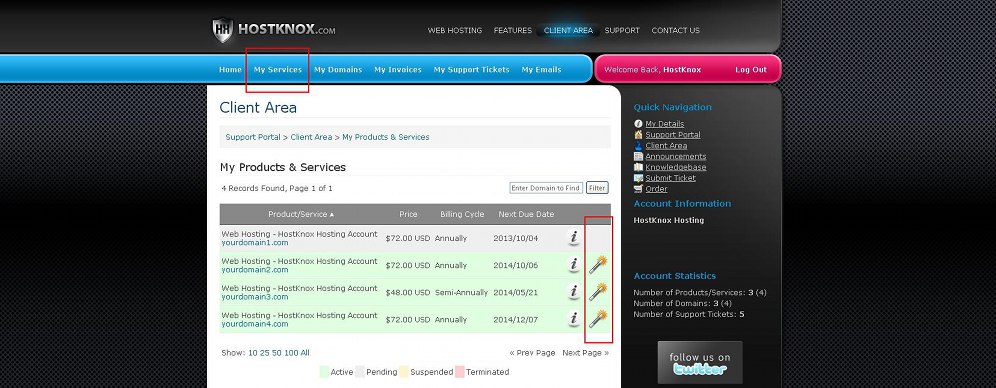
Clicking on any of these buttons will open the login page of the HostKnox control panel.
Pixie Control Panel Homepage
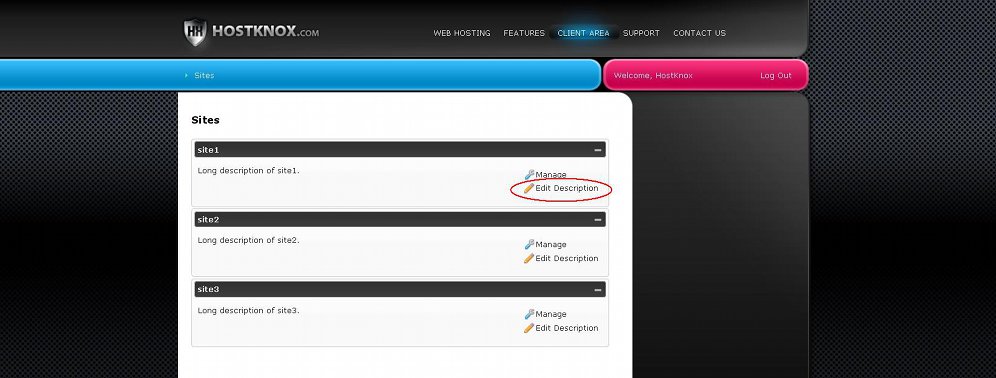
After you access the HostKnox control panel on the home page you'll see a list of your HostKnox hosting accounts. Each account/site is listed in a panel with a short and a long description:

For each site there are two buttons: Manage and Edit Description. To edit the short and/or long description of a site click on the Edit Description button for that site:
On the page that opens you'll see text fields for editing the short and long description:
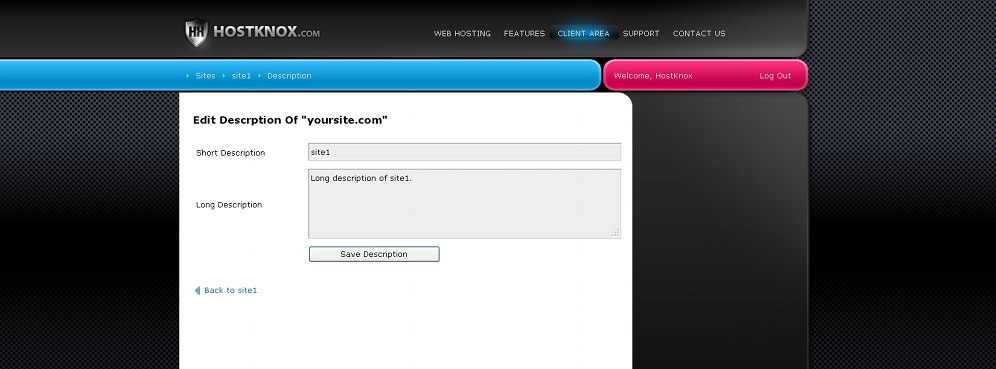
If you make any changes don't forget to click on the Save Description button. These descriptions are used only in the HostKnox control panel.
To manage a hosting account, on the Sites homepage of the HostKnox control panel click on the Manage button for the particular site:

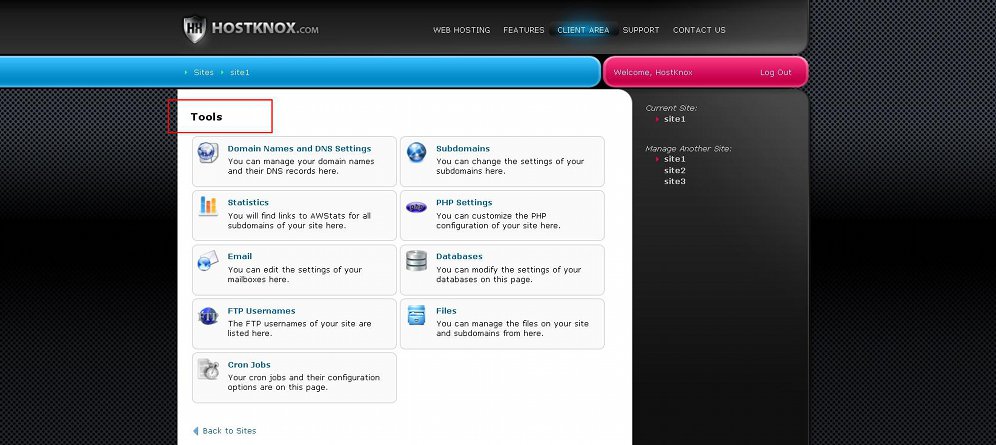
This will open the Tools page for that site from which you can access all the different tools and use the functions that the HostKnox control panel provides:
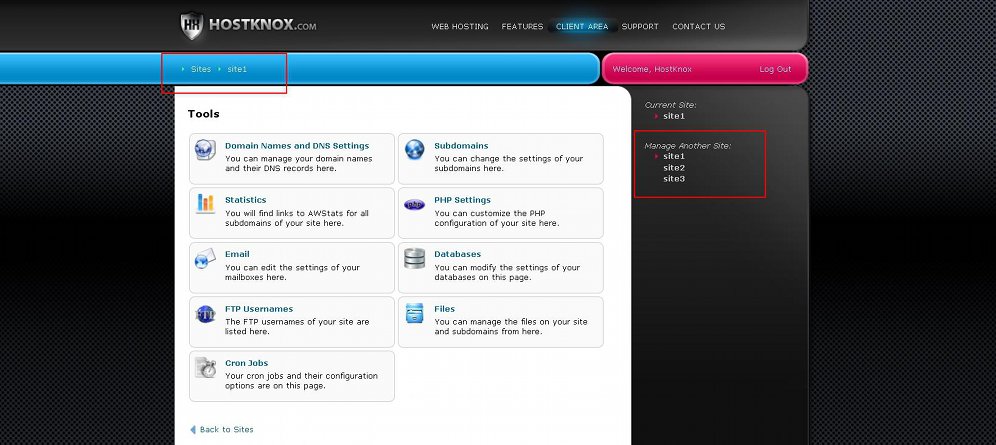
You can use these tools to manage only the particular site. To manage your other sites/accounts, navigate in the HostKnox control panel to the Tools page of that site. In the black area on the right you'll see listed all your sites. To manage another site just click on the name of that site and you'll be redirected to the Tools page for that site. You can also use the breadcrumbs in the blue area at the top to go back to the homepage of the HostKnox control panel from where you can access the Tools pages of the other sites:
Now let's have a quick overview of the tools and functions.
Pixie Control Panel Tools and Functions
On the Tools page of the HostKnox control panel you'll see listed some buttons for accessing the different sections of the control panel:
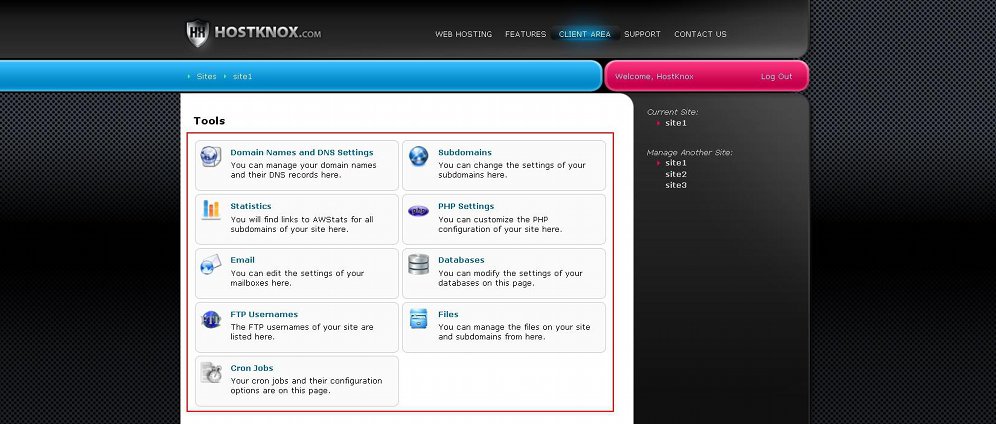
From each section you can perform various actions and tasks. The tools/sections include:
- Domain Names and DNS Settings - here you can edit the DNS settings. You can also park domain names (and remove them).
- Subdomains - from this section you can add subdomains to the domain name associated with the site. You can also rename and remove existing subdomains.
- Statistics - here you'll find links to AWStats for the domain and all subdomains that you've created.
- PHP Settings - from this section you can change the PHP version that's used by the main site and all subdomains that you've added. HostKnox offers different PHP versions from which you can choose. You can also set the main site and the subdomains to use FastCGI instead of CGI.
- Email - from this section you can create mailboxes/email addresses. Each mailbox that you add will be with your domain name (e.g. name@yourdomain.com). You can also configure the settings for each mailbox (e.g. quota, spam filter, forwarding, password, etc.). There's also a link for accessing the webmail interface from which you can check your mail.
- Databases - here you can add and remove MySQL databases. You can add users to them, and you can set and change the password of the master database user. There's also a link to phpMyAdmin.
- FTP Usernames - this is the place from which you can add and remove FTP users. You can also configure the options for each of the existing users (e.g. change the username and password, etc.).
- Files - from the file manager you can manage the files and folders of your site. You can copy/paste files and folders within the account, you can rename them, change file and folder permissions, delete files and folders, upload/download files etc.
- Cron Jobs - from here you can add, edit and remove cron jobs. Cron jobs are used for performing various tasks automatically (e.g. database backup).
For more information on each of the above listed sections of the HostKnox control panel check out the respective tutorial.