MediaWiki File Uploads and Images Tutorial
How to enable, disable and manage file uploads and images in MediaWiki
In MediaWiki it's possible to allow users to upload images and other files which can then be included on pages. By default, file uploads are disabled. They can initially be enabled during the installation of the application; in the additional options that are available during the installation process there's a setting for that.
Images are the most common files that are uploaded, and usually when people talk about uploads it's precisely images that they have in mind. But it's also possible to allow the uploading of other file types.
In this tutorial we'll review various aspects related to uploads. We'll go over:
- how to enable and disable file uploads
- how to upload files
- how to access and view file description pages
- how to add files and images in the content of pages
- how to add links to files
- user account settings related to files
- how to manage user permissions for uploading files
- how to allow file types to be uploaded
- how to change the allowed upload file size
- directory on the hosting account where uploads are stored
- how to delete files and to restore deleted files
- links to articles related to file uploads and images
Enable and Disable File Uploads
File uploads are disabled by default. Once the application is installed you can enable and disable file uploads at any time by modifying an option in the LocalSettings.php file of your MediaWiki. This is done with the option $wgEnableUploads. It should already be there. So if you open LocalSettings.php and find the following line there:
$wgEnableUploads = false;
this means that file uploads are disabled. To enable them simply replace false with true:
$wgEnableUploads = true;
In this way all users who belong to a user group that has the permission to upload files will be able to upload. By default, all registered users are allowed to upload files.
Note that there are also default file types that are allowed, so that users will not be able to upload other file types. By default only the image formats PNG, GIF, JPG, JPEG are allowed. For more information on how to add more or remove allowed file types check out the section in this tutorial on how to change the allowed file types.
You can change the user permissions for uploading files. For more information check the section in this tutorial on user upload permissions.
In case you haven't edited the LocalSettings.php file you can find it in the root MediaWiki folder on your MediaWiki hosting account. For instance, if the application is installed directly in the public_html directory on the account (making the frontend accessible at yourdomain.com), the path to the file in relation to that directory will be public_html/LocalSettings.php. HostKnox clients can edit files with the file manager of the HostKnox control panel. Another possibility is to download the file on your local computer, edit it with a text editor (e.g. Notepad ++) and upload it back replacing the old file.
Upload Files
After uploads are enabled users can upload files (by default only images can be uploaded). As we mentioned, by default all registered users can upload files. So the user has to log in first. Unregistered users are not allowed to upload files.
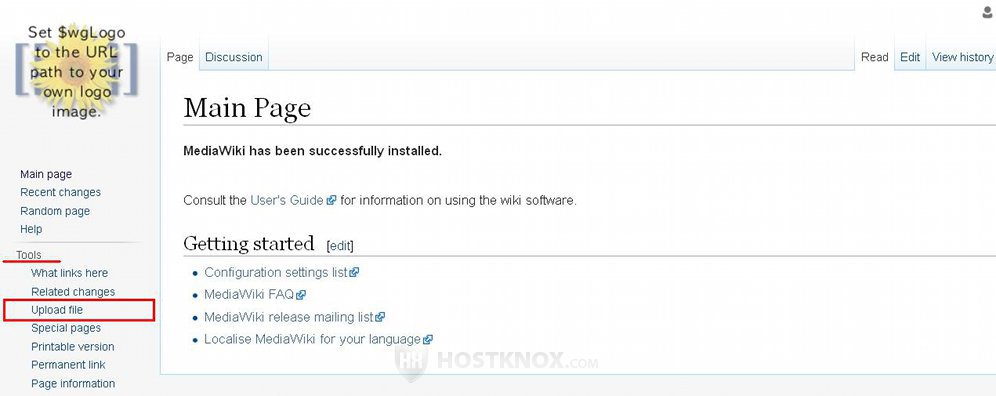
To upload a file, after you log in click on the Upload file button in the Tools menu:
Alternatively, to access the form for uploading files you can also directly open its URL address. Just add Special:Upload to the main URL of the site. For example, if the base URL of the site is yourdomain.com, then open yourdomain.com/index.php/Special:Upload.
This will open the form for uploading files. It contains some options grouped into a few sections:
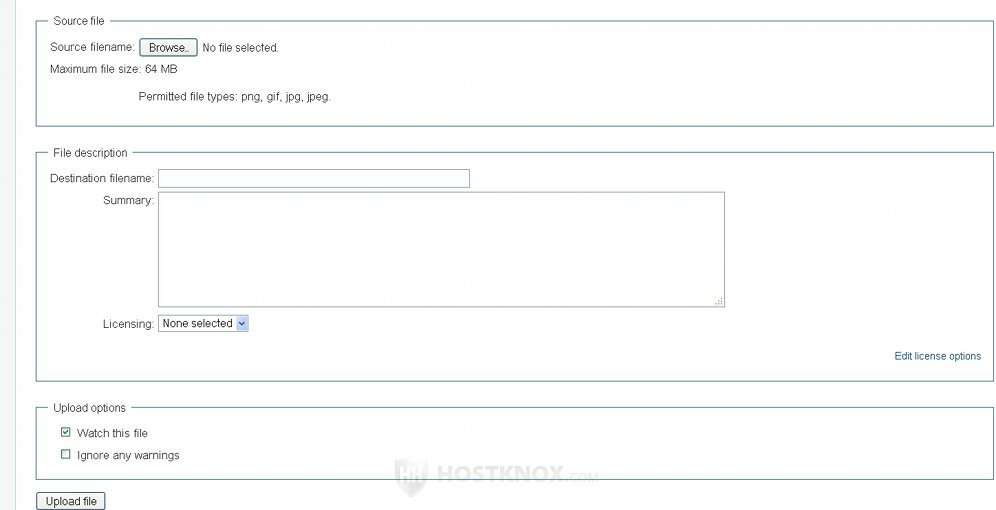
In the panel Source file you'll find the option for selecting the file that you want to upload. Just click on the Browse button and use the pop-out window to find the file on your local computer. In that panel you'll also see the file types that are currently allowed and the maximum file size.
The panel File description contains the options:
- Destination filename - after you select a file from your local computer this text field will be automatically filled with its name. If you want the file to be uploaded and saved with a different name, you can specify the new name in this field. That's the name with which the file will be saved on your hosting account and that will be used on the frontend of the site. It will also be the name of the description page of the file.
- Summary - in this text area you can optionally provide any information about the file. After the file is uploaded this text will be displayed as the content on the page of the file. Each uploaded file has its own description page on the frontend; it's automatically created when the file is uploaded. Once you upload the file you can edit this information at any time by editing the page of the file.
- Licensing - a drop-down menu for selecting a license for the file (if any).
The section Upload options has a couple of checkboxes:
- Watch this file - this checkbox is marked by default. This means that after you upload the file its page will be included on your watchlist. If you don't want it to be on your watchlist, unmark the checkbox.
- Ignore any warnings - this checkbox is unmarked and so if there are any warnings or problems during the upload they will be displayed. If you don't want warnings to be shown, mark this checkbox.
After you're ready with the options click on the Upload file button at the bottom. After the file is uploaded you'll be automatically redirected to its description page on the site.
File Pages
For each file that's uploaded MediaWiki automatically creates a page. It's often referred to as the description page of the file. This page shows the actual file. In case of images it displays a resized copy of the image (the full size can be viewed by clicking on it). The page also shows information about the file, its history (when it was modified), and a list of the pages that link to the file. On the page of a file you can also add any other content or information about it. This is done by editing the page in the same way as any other regular page.
The file pages are stored in the File namespace. This means that the name of a page consists of the File: prefix and the name of the file. For example, if the name of the uploaded file is Example Picture.jpg, then the full name of the page will be File:Example Picture.jpg.
- One way to access the description page of a file, if you know its name, is by opening its URL address. Just add the full name of the page (with the namespace prefix) to the main URL of the site. For instance, if the main URL is yourdomain.com and the file is Example Picture.jpg, then the URL will be yourdomain.com/index.php/File:Example_Picture.jpg.
- You can also view a full list of all the file pages. From there you can access any of them. To do this, go to Tools menu>Special pages button>Lists of pages section>All pages button:
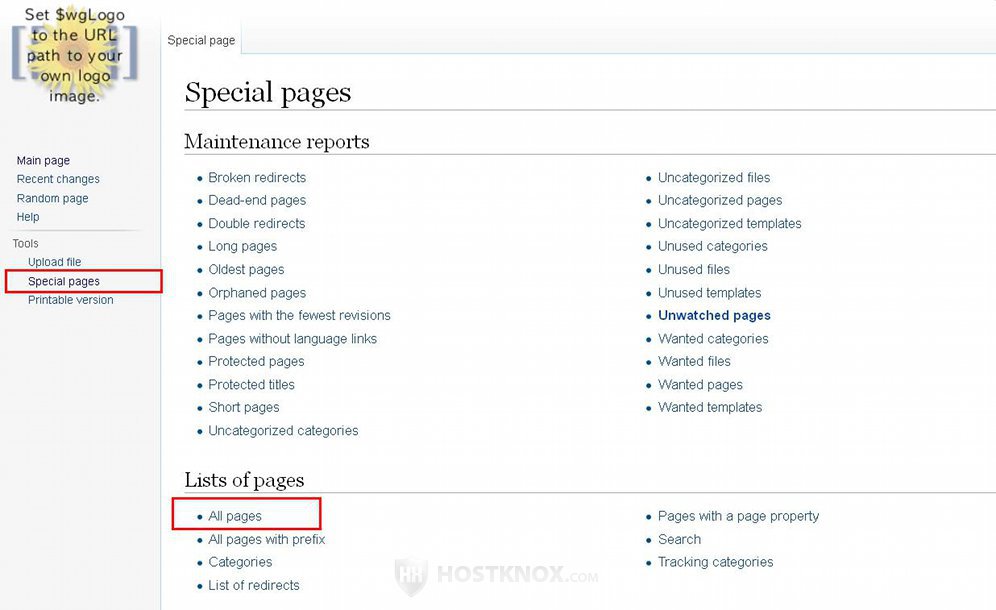
On the page that opens select File from the Namespace drop-down menu and click on the Go button.
Add Images in the Content of Pages
When you upload an image it's not displayed on any other page than its own file description page in the File namespace. If you want an image to be shown in the content of a page, you have to add it there. This is also true for other file types but here we'll concentrate on images since these are the most common files that are uploaded and added to pages.
Here we'll not go through all the available options. We'll list the most basic ones with their values and we'll give some examples. This will give you an idea of how it's done and you can test it yourself and use various combinations depending on your needs.
In its most basic form the wiki code for displaying an image looks like this:
[[File:Example Picture.jpg]]
You have to edit the page on which you want the image to appear and add that code there. It will display an image called Example Picture.jpg that you have previously uploaded. It will be shown with its original dimensions and at the exact spot in the content where you put it. If the file is not an image but some other file type (e.g. a text file), then a link to the description page of the file will be added.
You can add options with which you can change the format of the image, its size, the horizontal and vertical alignment with respect to the text in the content. You can also link the image to other pages on the site or to an external URL. The syntax that you can use is the following:
[[File:Example Picture.jpg|option|caption]]
You have to replace Example Picture.jpg with the name of the file. You can add more than one option; they are separated with the pipe symbol |. The caption is always the last one, if you decide to include it at all. Now we'll go over the basic options and we'll give some more examples.
- caption - this always appears last just before the closing brackets. The caption can be any text that describes the image. It can be the name of the image or some information about it. Depending on the format option that you use, the caption is displayed either just below the image or it's shown when the mouse pointer is hovered over the image. For example:
[[File:Example Picture.jpg|This is an example image]]
This will display the image Example Picture.jpg with the caption text This is an example image.
Some of the basic options that you can use are Format, Size, Horizontal Alignment, Vertical Alignment and Link.
The Format option can have one of these values:
- thumb - shows the thumbnail size of the image. This means that the image is shown resized according to the dimensions of the thumbnail format. Registered users can change the thumbnail dimensions that will be used for their account from their account settings. When a user views the page the image will be shown with the dimensions specified in their user preferences. Of course, these dimensions will be applied only if in the code for adding the image there are no dimensions specifically set.
With this format the image is automatically aligned to the right side of the page.
With the thumb format the image is displayed with a frame around it and the caption (if any) is shown in the frame just below the image itself. The caption can be formatted (e.g. italicized) and links to internal and external URLs can be added. - frame - like the thumb format, the image is shown with a frame and aligned to the right by default. The caption is shown in the frame under the image and it can be formatted and links can be added to the caption text.
Unlike the thumb format it doesn't resize the image and uses its original dimensions. What's more the size option cannot be used with the frame format. So it cannot be resized on the page on which its shown. - frameless - like the thumb format, but with the difference that the image is not shown with a frame and it's not aligned to the right by default. Because there's no frame this means that the caption is not shown under the image (and thus no links can be added to the caption); it's shown when the mouse pointer is hovered on the image.
- border - the image is shown with a very thin gray border around it. It's shown with its original dimensions, but unlike the frame format it can be resized with the option for the size.
Here is an example:
[[File:Example Picture.jpg|thumb|This is an example image]]
This will display the image Example Picture.jpg using the thumb format. Since no size option is included, the picture will be shown with the thumbnail dimensions (300 pixels width by default for unregistered users). Since the thumb format automatically aligns the picture to the right and there's no horizontal alignment option included, the picture will be displayed on the right side of the page. The caption text shown under it will be This is an example image.
With the Size option you can specify either the maximum width or height of the image or both; they are set in pixels (px). You can add values in the following way (the numbers are just examples):
- 200px - this will set the maximum width of the image (e.g. 200 pixels)
- x100px - this sets the maximum height of the image (e.g 100 pixels)
- 200x100px - this sets both the maximum width and height of the image. The width is always first.
If you don't specify a format or you add the border format as an option, you can set any size for the image (even bigger than its original dimensions).
The frame format ignores the size options.
The thumb and frameless formats allow you to set a size smaller than the original dimensions of the image. What's meant here is not the thumbnail size dimensions of the image but it's original dimensions. For example, if the original width of the image is 400 pixels and the thumbnail size is 150 pixels, you can set a size with the thumb and frameless formats that's smaller than 400 pixels. Don't forget that by default, if you don't specify any size, the thumb and frameless formats use the thumbnail size specified in the account preferences of the user.
Setting only one dimension means that, of course, the whole image will be resized and the other dimension will be resized proportionately. For example, an image with default dimensions 1657x756 when set to have a maximum dimension of 200 pixels width is resized to 200x92.
Note that specifying both the width and the height doesn't mean that the displayed image will have both dimensions set to these exact values. These are the maximum allowed dimensions. Usually MediaWiki uses one of the dimensions and reduces the other one so that the image is proportionate. For example, if the image has original dimensions 347x460 and you set maximum dimensions to 140x200 pixels, the image might be displayed with dimensions 140x186. So generally it's enough if you specify only one of the dimensions.
Here are some more examples. With the following:
[[File:Example Picture.jpg|200x100px]]
The image will be displayed with a maximum width set to 200 pixels and maximum height set to 100 pixels. No format and caption are specified.
With this:
[[File:Example Picture.jpg|frameless|200px|This is some caption text]]
the image Example Picture.jpg will be displayed with the frameless format, with a maximum width set to 200 pixels and with the caption text This is some caption text. By default the frameless format displays the image using the thumbnail size dimensions but in this case that will be ignored because the width is specifically set to 200 pixels.
Another useful option is the one for Horizontal alignment. When no alignment is set the image appears as an inline image in the text, meaning that it appears in the place in the text where you've put the code for the image. You can use one of the following values for the horizontal alignment:
- left - the image is displayed on the left side of the text.
- right - the image is placed on the right side of the text.
- center - the image is in the center of the page. Note that it's displayed on a separate line, meaning that there's no text on the left or right of the image.
- none - the image appears in the spot in the text where it's placed. The image is displayed on a new line. This makes it different as compared to when no alignment is set (in that case the image is not shown on a new line, but as an inline image with the text on the same line surrounding it).
Here is another example:
[[File:Example Picture.jpg|border|x200px|left|This is some caption text]]
The image will be displayed on the left side of the text, with the border format with a maximum height of 200 pixels and with the caption This is some caption text.
You can also set a Vertical alignment. This is more rarely used. You can set it to one of the following values: baseline, sub, super, top, text-top, middle, bottom, text-bottom. This is more typically used when no horizontal alignment is specified and the image appears as an inline picture in the text.
Another option that may be useful is the Link option. By default, an image is a automatically also a link to its own file description page. You can use the link option if you want the image to link to a different page on the same site or on another site, or if you want to remove the link altogether. Here's the syntax for doing that:
- link=Example Page - this is used for adding an internal link, i.e. a link to a page on the same site. Just replace Example Page with the name of the page. For example:
[[File:Example Picture.jpg|link=Example Page]]
This will make the image a link to the page Example Page.
- link=http://domain.com - this will make the image a link to an external URL address. Simply put the address you want. For instance:
[[File:Example Picture.jpg|link=http://hostknox.com]]
This will link the image to hostknox.com.
- link= - by adding the option without any value you'll remove the default link to the file description page of the image. For example:
[[File:Example Picture.jpg|link=]]
This will add the image and it will remove the default link.
Keep in mind that if you use the thumb or frame format you can also add links in the caption. This is useful if you want the image to link to its own description page, but you want to add links to other pages related to the image. For example:
[[File:Example Picture.jpg|thumb|You can follow the discussion in [[Talk:Main Page]] and make comments]]
will contain a caption with the text You can follow the discussion in Talk:Main Page and make comments, and Talk:Main Page will be a link to the discussion page associated with the Main Page. The link can also be to an external URL. The image itself will be a link to its description page.
Add Links to Files
Instead of displaying an image in the content of a page, you can also add just a link to the image (or to any file).
You can either add a link to the description page of the file (the page stored in the File namespace), or you can add a link to the corresponding page in the Media namespace (this is useful if you want the link to display only an image on the page without any other information).
- Adding a link to the description page of a file is done in a very similar way as adding an image in the content of a page. Edit the page in which you want to place the link and add the following in its content:
[[:File:Example Picture.jpg]]
This will add a link to the description page of the image Example Picture.jpg. Just replace the name with the one for the file to which you want the link to point. Note that the difference as compared to adding an image in the content of a page is that in this case there's a colon right after the first two brackets.
- MediaWiki has a virtual namespace called Media. It can be used to link to an uploaded image. This will display the image in its original size, and it won't show anything else on the page except for the image. If the file is not an image but another type, a text file for example, the link will display a page that shows only the content of the file.
To add such a link use the prefix Media: plus the name of the file (e.g. Media:Example Picture.jpg). For example, if you put the following in the content of a page:
[[Media:Example Picture.jpg]]
This will add a link to the image Example Picture.jpg. Note that in this case you shouldn't put a colon after the first two brackets.
User Account Settings Related to Files
Registered users can configure a few options related to files. The changes a user makes will be applied only to the account of that user.
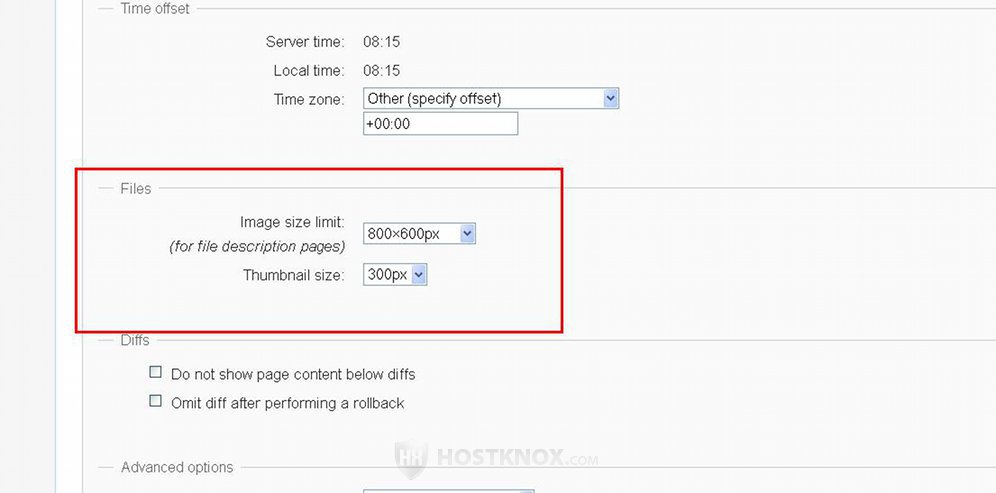
To be more precise, by default there are a couple of options related to the resizing of images. To configure them, after you log in click on the Preferences option and on the page that opens click on the Appearance tab. On the following page there's a section Files:
The available options are:
- Image size limit - from here you can change the dimensions with which images will be displayed when you open their description pages in the File namespace (e.g. File:Example Picture.jpg). When you open such a page the image will be displayed with the dimensions that you have selected from this option. If you click on the image this will display it in its original size.
- Thumbnail size - from here you can select the size of the thumbnail format. When an image is embedded on a page with the thumbnail format and you open that page, the image will be resized and displayed with the dimension selected from this option.
If you make changes, don't forget to click on the Save button.
User Permissions for Uploads
There are a couple of user rights related to uploads. One is labeled upload and it gives the permission to upload files; the other is reupload and it gives the permission to change existing files, or in other words to replace them. By default, both rights are assigned to the user group. This is the group to which all registered users belong and consequently all registered users have the right to upload images and overwrite images (provided of course that uploads are enabled).
Note that both rights are also explicitly added to the sysop group which means that if you disable them for the user group, administrators/sysops will still be able to upload files.
If you want to you can add the permissions to other groups or remove them from groups that have them at the moment. This can be done by adding some lines to the LocalSettings.php file of your MediaWiki. For example, if you add the following at the end of LocalSettings.php:
$wgGroupPermissions['user']['upload'] = false;
$wgGroupPermissions['user']['reupload'] = false;
The people in the user group will not be able to upload files and overwrite existing files. This means that all registered users except administrators will not be able to upload files and replacing existing uploads.
If you want to add one or both rights to a user group, put the label of the group in quotation marks in the first pair of brackets and replace false with true. For example, you may want to create a new user group that's specifically intended for uploaders, and give that group both rights. For instance, by adding the following to LocalSettings.php:
$wgGroupPermissions['uploader']['upload'] = true;
$wgGroupPermissions['uploader']['reupload'] = true;
you'll create a group called uploader and you'll grant it the permissions for uploading files and overwriting uploads. You can assign users to that group from the frontend of the site (Tools menu>Special pages button>Users and rights section>User rights management button). If in addition to these two lines you keep the previous two, then only the users in the uploader and sysop groups will be able to upload files.
For more information on users and groups check out the tutorial on how to manage users, user groups and permissions in MediaWiki.
Allowed File Types
By default, the allowed file types that can be uploaded are the image formats PNG, GIF, JPG, JPEG. If the user tries to upload another type of file, they'll not be allowed to do it.
You can change the list with the allowed file types; you can add and/or remove file types. This is done by adding to the LocalSettings.php file of your MediaWiki the option $wgFileExtensions with a list of the file extensions which you want to allow. For example, if you add the following at the end of LocalSettings.php:
$wgFileExtensions = array( 'gif', 'jpg', 'jpeg', 'txt', 'pdf' );
The allowed file types will be GIF, JPG, JPEG, TXT and PDF. You can add the file types you want.
Note that there's a default option $wgFileBlacklist which lists some file types that cannot be uploaded even if you add them with the option $wgFileExtensions. These are file types which may be used for malicious purposes and may pose security risks and so they are blacklisted. By default, the file extensions that are blacklisted are: html, htm, js, jsb, mhtml, mht, xhtml, xht, php, phtml, php3, php4, php5, phps, shtml, jhtml, pl, py, cgi, exe, scr, dll, msi, vbs, bat, com, pif, cmd, vxd, cpl. They are specified in the file DefaultSettings.php. The file is in the includes folder which in its turn is in the root MediaWiki folder on your hosting account.
Although you can change the blacklist it's not recommended that you remove file types from it. This can make your site vulnerable in terms of security. If nevertheless you want to remove file types from the blacklist, you can do so by editing the LocalSettings.php file. In addition to changing the blacklist you also should allow with the option $wgFileExtensions the file extension that you remove from the blacklist, if you want to allow users to upload such files. For example, by adding the following at the end of LocalSettings.php:
$wgFileBlacklist = array_diff( $wgFileBlacklist, array ('html') );
$wgFileExtensions[] = 'html';
you'll remove the html file extension from the blacklist and you'll allow it to be uploaded. If you have already added an array of allowed file extensions to the LocalSettings.php file as shown in the previous example, instead of adding the line $wgFileExtensions[] = 'html'; you can just add the html extension to that array. Both variants will work fine. Note however that if you remove a file type from the blacklist and you allow it as shown with the above two lines, and then under them you add the option $wgFileExtensions again with an array of file types (as shown in the previous example) and you don't include that file type, then it will not be allowed; in this case you should also include that file type in the array.
Maximum Upload File Size
In MediaWiki there's an option with which you can change the maximum allowed size of files that can be uploaded.
Note however that for each hosting account there's a PHP limit on the maximum upload file size which applies to the whole account and is not dependent on the MediaWiki application.
Here we'll go over the MediaWiki specific option for the maximum file size. The size that you set with it can't be bigger than the PHP limit for the account.
When you go to the upload page in MediaWiki you'll see the current limit. If you try to upload a bigger file, a warning message will be displayed.
The MediaWiki option for changing the maximum upload file size is $wgMaxUploadSize. If you want to use it, you have to add it to the LocalSettings.php file of your MediaWiki together with the value that you want to set. The value is in bytes. So, for example, if add the following at the end of LocalSettings.php:
$wgMaxUploadSize = 3145728;
the maximum upload size will be set to 3145728 bytes which is the equivalent of 3 megabytes. If it makes it easier for you, you can specify the value in the following way:
$wgMaxUploadSize = 1024 * 1024 * 3;
This will also set the maximum to 3 megabytes (1024 bytes in one kilobyte, multiplied by 1024 kilobytes in one megabyte, multiplied by the number of megabytes you want to set).
Note that the option $wgMaxUploadSize will not have an effect (for file uploads from local computers) in MediaWiki versions older than 1.17.
Directory for File Uploads
When a user uploads a file it's automatically put in the images folder of your MediaWiki. That's the directory into which all files are uploaded. The folder itself is in the root MediaWiki directory. So if, for example, the application is installed directly in the public_html directory on your account, the path to the images folder in relation to that directory will be public_html/images.
You can change the folder in which files are saved but it's not recommended to do that. In any case you'll have to change more than one option to make this work.
By default, when a file is uploaded MediaWiki automatically creates a subfolder in the images folder, and in that subfolder it creates another subfolder and it places the file there. The first subfolder (the parent one) is labeled with one character and the subfolder of the subfolder is labeld with two characters. For example, an image with the name Example.jpg will result in, let's say, the creation of the subfolder a and in it a subfolder a9, so that the path to the file on the account will become public_html/images/a/a9/Example.jpg. Although the names of the subfolders may seem random and not connected with the name of the file, there's a precise system that MediaWiki uses in labeling them. It uses the MD5 hash value corresponding to the name of the file. It uses the first two characters from that value.
If the uploaded file is an image MediaWiki may also create resized copies (e.g. a thumbnail) of the image.
Delete and Restore Deleted Files
The options on the frontend for deleting files are available only to users who belong to a user group that has the delete permission. By default, only the sysop/administrator user group has that permission.
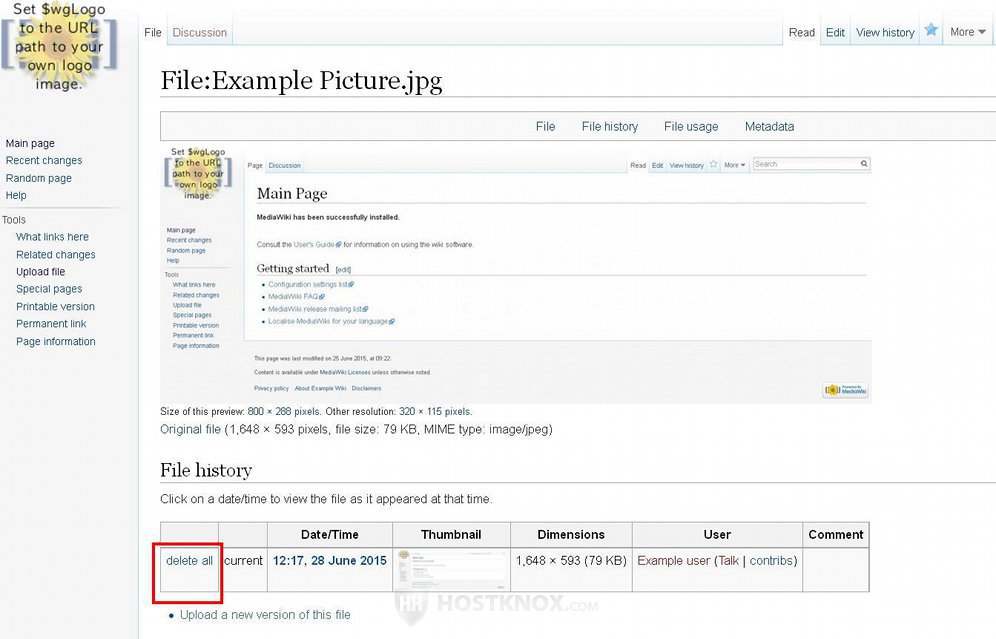
When you go to the description page of a file in the File namespace you'll see a table with the revisions of the file. In the table there's a delete all button for deleting the file:
If it has revisions, there'll be a button for each revision to remove only that particular version of the file.
If you delete all the versions this will have the effect of deleting the file and its description page. The same can be achieved by directly deleting the page. The subdirectories in the images folder on the hosting account where the file was stored will not be deleted but the file will be removed from there. However it will not be removed completely from the account so that you can restore it. It will be moved to the deleted folder which is a subfolder of the images directory.
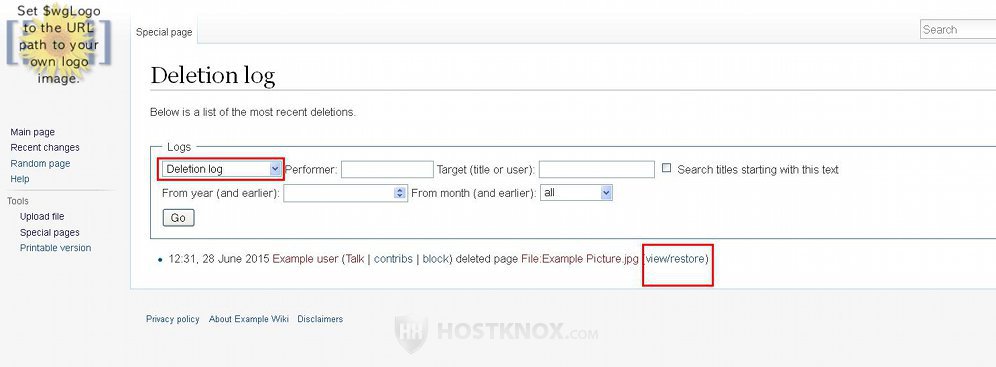
Deleted files are restored in the same way as a deleted page. This can be done by users who have the undelete user right. By default, members of the sysop/administrator group have that permission. You can view all the deleted pages and files in the Deletion log. Go to Tools menu>Special pages button>Recent changes and logs section>Logs button. On the page with the logs select Deletion log from the drop-down menu that's there and click on the Go button. This will display a list of the deleted pages. Find the one you want and click on the restore button to recover it:
On the next page if the file has a revision history you can select which version you want to restore. Then just confirm the action.
Links to Articles Related to File Uploads and Images
In our knowledge base there are some articles on topics related to file uploads that you may find useful: