MediaWiki Upgrade Tutorial
How to upgrade MediaWiki
In this tutorial we'll go over the process of upgrading your MediaWiki application. New versions of MediaWiki are regularly released. It's recommended that you upgrade your MediaWiki. Even if you don't do it every time when there's a new minor release (e.g. from 1.24.1 to 1.24.2), you shouldn't wait too long before upgrading to a new major release (e.g. from 1.24 to 1.25). New versions have fixes for bugs and problems, new options and features are introduced, there are security improvements, etc.
Free Application Upgrade from HostKnox - get a MediaWiki hosting plan and we'll upgrade MediaWiki for you at no additional cost.
HostKnox clients can request a free upgrade by submitting a ticket to our support team.
We'll explained how to upgrade your MediaWiki step by step:
- check the current version of your MediaWiki and the latest available version
- back up the files and database of your MediaWiki
- get the new version and upload it on your hosting account
- upgrade extensions, if there are ones that have to be upgraded
- update the database
Check the Version of Your MediaWiki and the Latest Available Version
If you're not sure what the version of your MediaWiki is, one way you can check is from the frontend of your site. After you open the site, in the Tools menu on the left click on Special pages>on the page that opens scroll down to the Data and tools section>click on the Version button in that section. On the page that opens you'll see shown the version of the currently installed MediaWiki, as well as the PHP and MySQL versions that are currently used. You can also access the page with the version information by directly opening its URL address. If the homepage of your site is yourdomain.com, then open yourdomain.com/index.php?title=Special:SpecialPages.
You can check what the latest available MediaWiki version is on the official MediaWiki site. There is information about that on the homepage of the site. You can also check on the download section of the official site. At the top of the page you'll see displayed the latest stable release and a link with which you can download it.
Back Up MediaWiki
Before you start the actual upgrade make sure that you have a recent backup of your MediaWiki. This includes the files of the application and the database.
- You can back up the files of the application by downloading them from your MediaWiki hosting account to your local computer. One way you can do this is with an FTP client (e.g. FileZilla). Before you download the files you can pack them into an archive and then download that archive from the hosting account to your local computer. In this way you'll save a lot of time for transferring the files. HostKnox clients can pack files into an archive on their hosting account from the Files section of the HostKnox control panel; from there you can also quite easily download that archive from your hosting account to your local computer. These tasks can also be performed via SSH.
You can also keep a copy of the archived files in another folder on your hosting account. In this way if something happens to the files on your local computer, you can still restore your site.
So, for example, if your MediaWiki is installed directly in the root web-accessible folder public_html on your hosting account (making the frontend of the site accessible at yourdomain.com), then you have to transfer the content from public_html to your local computer and/or to another location on your hosting account. Optionally, before that you can pack it into an archive and transfer the archive instead. An archive is transferred much faster than unpacked files.
For information on how to download files with an FTP client check out the tutorial on how to back up your site; you may also find useful the FTP tutorials on setting up different FTP clients. Another thing you can find useful when it comes to transferring files is the section on transferring files in the tutorial on how to transfer your site. For information on how to pack files into an archive and download it with the file manager of the HostKnox control panel check out the tutorial on how to manage files with the file manager of the HostKnox control panel.
- To back up the database used by your MediaWiki you have to export it. There are a couple of ways you can do that. One way to do it is with phpMyAdmin. This is an application for managing databases that's used through a web-browser. Another way to do it is via SSH. If the database is very big, it has to be done via SSH.
For information on how to export a database with phpMyAdmin read the section on exporting databases in the tutorial on how to transfer a website.
If you want to learn how to do these tasks via SSH, in the SSH section of our knowledgebase you'll find articles on how to connect to your account via SSH, how to export and import databases, how to pack files into an archive, etc.
Download the Latest MediaWiki Version and Upload it on the Hosting Account
After you make sure that you have a backup of your site, you can proceed with the actual upgrade. The first thing to do is to transfer the files of the new MediaWiki version to your hosting account. This can be broken down into two steps:
- Download the latest stable release of MediaWiki from the download section of the official MediaWiki site. The release is packed into a tarball GZIP archive (e.g. mediawiki-1.24.1.tar.gz).
- Upload the new MediaWiki release on your hosting account. Put it in the folder where your MediaWiki is installed and replace the old files with the new ones. Actually, what's considered a best practice is to upload it in a new folder, then transfer to that folder only specific files from the old MediaWiki installation, mainly the LocalSettings.php file, any extensions and skins that you have installed (from within the /extensions and /skins directories respectively), the images folder, the logo, and after that delete or rename the folder with the old MediaWiki version and rename the new folder using the name of the old folder. However this is a bit more complicated for the average user, and it's very unlikely that you'll have any problems if you directly overwrite the files of the old installation with those of the new version; the LocalSettings.php file and anything additional that you have added to the installation (e.g. skins and extentions) will be left intact because there will be no such files in the new versions and consequently they will not be overwritten. Besides, you should have a backup so if something goes wrong you can restore the site.
So if, for example, your MediaWiki is installed directly in the public_html directory on your hosting account, upload the new release there and overwrite the old files.
Keep in mind that if you have made custom modifications to the code of files, these changes will be lost during the upgrade. You should keep a record of such modifications so that you can restore them.
Since the MediaWiki application comes packed into an archive you have the choice either to unpack it on your local computer and then upload it on your hosting account, or you can first upload the archive and then unpack it on the hosting account. The second option is much faster but might be more confusing to inexperienced users when it comes to unpacking the archive and overwriting old files.
You can upload the new MediaWiki version using one of the following methods:
- The easiest way to upload many files is with an FTP client (e.g. FileZilla). FTP (File Transfer Protocol) is a protocol that's specifically designed for transferring files. This method is suitable both for uploading the archive file, or for uploading the files from the unpacked archive. If you haven't used an FTP client, you can find information on how to set up and use some of the available FTP clients in our FTP tutorials.
- HostKnox clients can also upload files from the Files section of the HostKnox control panel. The tool there however is designed to upload files one by one, so it makes sense to use it if you upload the packed archive. Otherwise, it will be almost impossible to upload the unpacked files one by one (the archive with the MediaWiki application contains thousands of files). From the HostKnox control panel you can unpack archives. So if you decide to upload the archive and then unpack it on the account, you can do it from there.
- Files can be transferred via SSH; archives can also be unpacked via SSH.
After you upload the new version of MediaWiki on your hosting account and you replace the files of the old MediaWiki there, you can go on to the next step.
Note that if you're upgrading a MediaWiki older than version 1.24, you should manually enable the skins in the LocalSettings.php file. In MediaWiki versions older than 1.24 the skins are enabled automatically, while in newer versions they have to be enabled manually. So if you're upgrading an older version, the necessary code will not be present in the LocalSettings.php file and you have to add it. For more information on how to do it check the section on how to enable skins in the tutorial on managing skins. In any case after you complete the upgrade and you access the frontend of your site (and all skins are disabled) you'll be informed about this. On the page that opens MediaWiki will also show you the skins that are currently installed and the code that you can copy and paste in the LocalSettings.php file to enable them. So there's no chance that you'll skip this anyway.
Extensions
If you have any extensions installed and enabled, you should check whether you have to upgrade any of these extensions. In some cases when there's a new MediaWiki version some extensions also have to be upgraded so that they are compatible with the new MediaWiki. If you have such an extension and you want to use it with the new MediaWiki version, you have to upgrade it. Of course, if you want to, you can always disable and uninstall such extensions.
To upgrade an extension, get the new version of the extension and upload it in the /extensions directory on your MediaWiki hosting account replacing the files of the old version of the extension. For some extensions you also have to upgrade the database, but this is also part of the general upgrade of the MediaWiki application, and it's the next step of the upgrade process, so you'll do it anyway. More information on extensions you can find in the tutorial on how to install and manage extensions in MediaWiki.
Update the Database
In addition to updating the files of your MediaWiki (and optionally any extensions), you also have to update the database schema. This is usually required when you update from one major release to another (e.g. from 1.24 to 1.25), but it wouldn't do any damage if you do it for an upgrade between minor releases (e.g. from 1.24.1 to 1.24.2).
There are a couple of ways you can update the database:
- One way is to do it via SSH by executing the update.php script of your MediaWiki. The update.php script is located in the maintenance directory of MediaWiki. The maintenance directory itself is in the root MediaWiki directory. So if you change the current working directory to maintenance, then you have to execute the following command:
php update.php
You can also execute the command if your current working directory is another one, but you have to put the path to the update.php file. For example, if the current working directory is the root MediaWiki folder on your account you have to execute php maintenance/update.php. All HostKnox clients have SSH access to their accounts. For more information on how to connect, to change the current working directory and perform other tasks check the respective article in the SSH section of the knowledgebase.
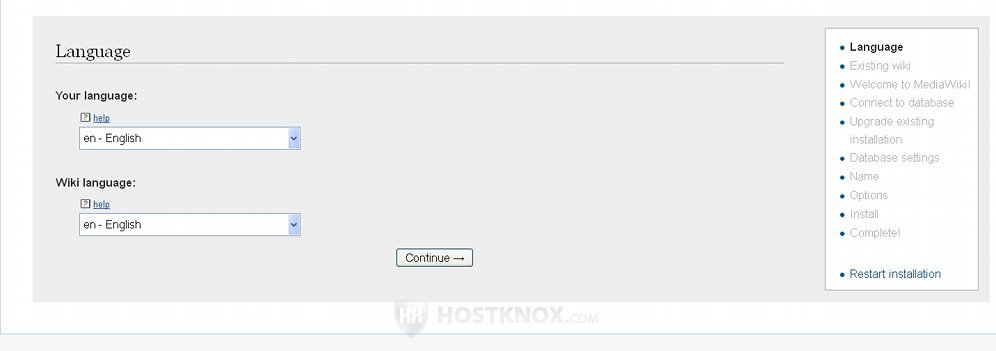
- The other method to update the database is to do it through a web-browser. This method is probably preferred by the average user who has never used SSH. We'll go over it in more details. To start the update of the database, first you have to access an URL address with your web-browser. If the homepage of your MediaWiki site is accessible at yourdomain.com, then open the URL yourdomain.com/mw-config. This will start the updater. The interface is the same as when installing the application:
Although at the top of the page the process is labeled as an installation, you won't be installing anything. Simply click on the Continue button at the bottom to proceed. The application will automatically detect that there's a LocalSettings.php file, meaning that there's an existing installation, and so it will continue with upgrading it. On the next page you have to provide the upgrade key:
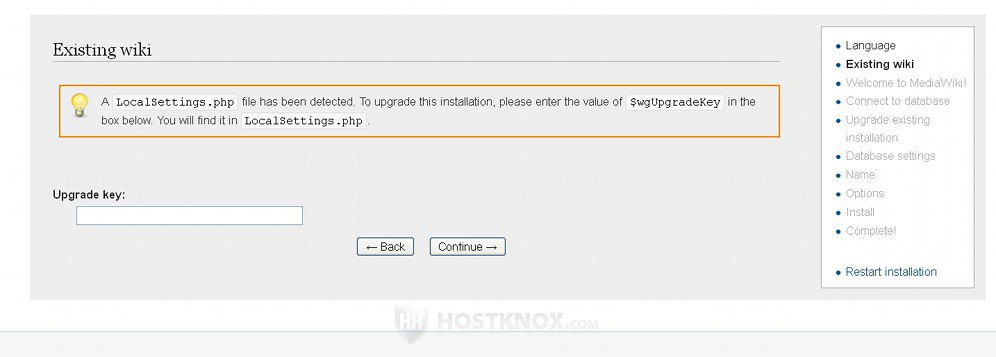
As the instructions on the page specify you can find that key in the LocalSettings.php file of your MediaWiki. As you probably know by now, the file is in the root MediaWiki folder on your hosting account. So if the application is installed directly in public_html (meaning the frontend URL is yourdomain.com), then the path to the file on the account will be public_html/LocalSettings.php. One way HostKnox clients can view the file is from the Files section of the HostKnox control panel. For more information on how to do it check the tutorial on how to manage files with the HostKnox control panel. Another way is to download the file (e.g. with an FTP client) and use a text editor to view it. You can also do it via SSH with a command-line editor such as Vim or nano.
In the file find the line that starts with $wgUpgradeKey. On that line you'll see a string of numbers and letters. Copy it and paste it on the web-browser page of the updater, in the field Upgrade key. Then click on the Continue button.
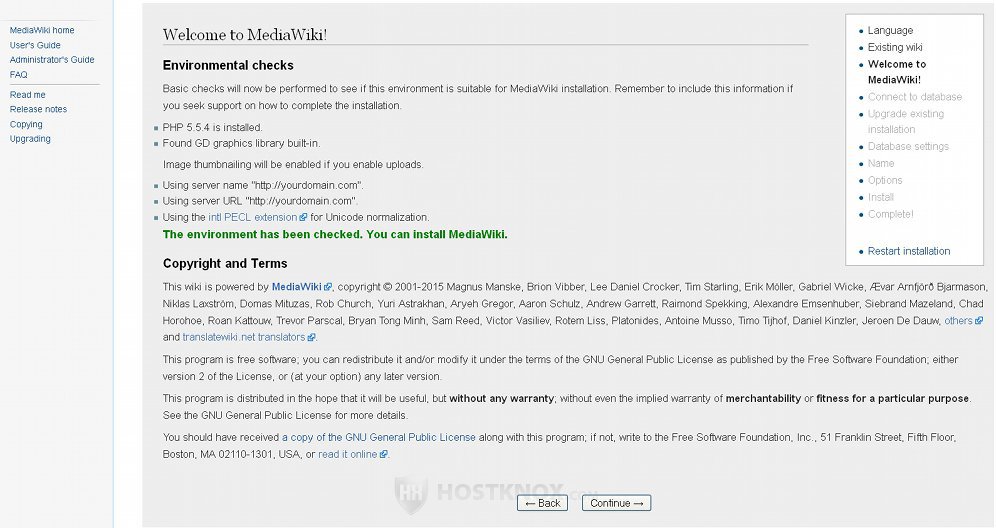
The next page is a check of the environment (e.g. PHP version, etc.). The same page is displayed during the installation so you may be familiar with it.
Click on Continue to go on.
The next page informs you that the database tables are about to be updated which is the purpose of the whole thing:

Click on Continue to proceed.
The last page lists the performed actions and the updated tables:
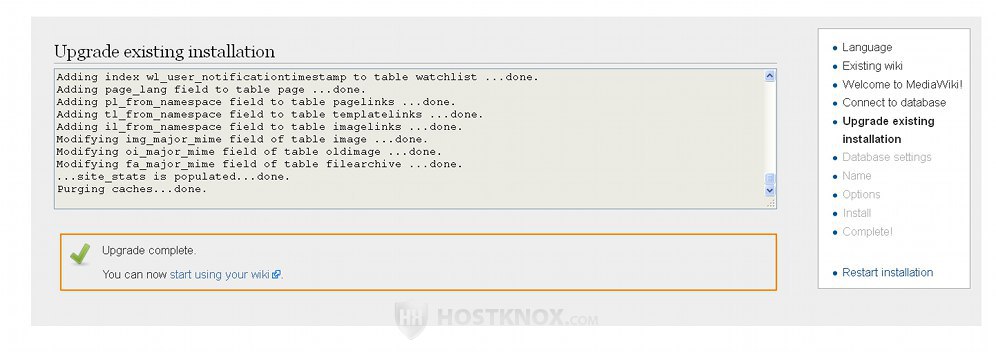
With this the upgrade of the database (and the whole upgrade of the application) is complete. You can open the homepage of your site. There's a link pointing to it at the bottom of the page, just under the message for the successful upgrade.