MediaWiki Installation Tutorial
How to install MediaWiki
MediaWiki is a free and open-source web application for creating and managing wiki websites. It was originally developed and used for creating Wikipedia, but now it's used by many other sites. A wiki site is one on which the content can be added and edited by the users and visitors of that site. The extent to which users can modify the site and whether user registration is required in order for them to add and edit content depends on the way the administrator has configured the settings of the application.
In this tutorial we'll go over the process of installing MediaWiki.
Free Script Installation from HostKnox - get a MediaWiki hosting plan and we'll install MediaWiki for you at no additional cost.
HostKnox clients can request a free installation by submitting a ticket to our support team.
In order to install MediaWiki you need to:
- create a database for the application
- download the installation package from the official site
- upload the installation pack on your hosting account
- access its URL and configure the settings to finish the installation
We'll go over these steps in details.
Create a database
In order for MediaWiki to function it needs a database to store data. It's recommended that you keep each application in its own database. If you want to, it's possible to keep more than one application in the same database, but you have to make sure that each one has a different database table prefix. The prefix is set later during the installation. We'll come to this further down in the tutorial.
HostKnox clients can create databases from the MySQL > Databases section of the control panel. Click on the Add Database button on the left and fill out the form that appears.
Download MediaWiki
First you need to download on your local computer the MediaWiki installation package. You can download the latest stable release of MediaWiki from the download section of the official MediaWiki site. The installation package is a tar archive compressed with gzip. The name of the file has the form mediawiki-1.24.1.tar.gz where the number represents the version of the application.
Upload the MediaWiki installation pack on the hosting account
After you have MediaWiki on your local computer you have to upload it on your hosting account. There are a few ways you can do that:
- You can use an FTP client (e.g. FileZilla). For more information on how to configure different FTP clients to connect to your account check out our FTP tutorials.
- You can do this from the Files section of the control panel. This way is intended only for uploading single files, meaning one file at a time, and it's not suitable for uploading big files.
- More advanced users can also do it via SSH.
Since the installation package is an archive you have the choice of unpacking it on your local computer and then uploading all the files and folders that are inside the archive to your hosting account, or you can upload the archive on your hosting account and then unpack it directly on the account. Here is some more information and things to consider about each of the two ways:
- Because the installation package is a tar archive compressed with GZIP, in order to unpack it on your local computer, first you have to uncompress it, which will produce a tar file, which then you can unpack. This will result in a folder named with the version of the application (e.g. mediawiki-1.24.1), and this folder will contain all the files and folders (e.g. mw-config, maintenance, etc.) of the application; you have to upload these files and folders on your hosting account. You can uncompress and unpack the installation package on your local computer with applications such as 7-Zip or WinRAR. After you do this, the easiest way to upload all the unpacked MediaWiki files and folders is with an FTP client.
If you want the wiki site to be accessible at yourdomain.com, you have to upload all the files and folders that are inside the uncompressed and unpacked installation folder (without the parent folder itself) directly to the public_html folder on your hosting account. - A much faster way is to upload the archive on your hosting account and then uncompress and unpack it there. After you upload it you can unpack it from the Files section of the control panel. Archives can also be unpacked via SSH (for more advanced users).
Note that if you unpack the archive on your hosting account this will produce a folder that contains all the files and folders of the application. The folder will be named with the number of the version: e.g. mediawiki-1.24.1. This means that if the archive is in the public_html folder on your account, after you unpack it the path to the application will be public_html/mediawiki-1.24.1. This in turn means that the URL of the site will be yourdomain.com/mediawiki-1.24.1. If you want to, you can rename the folder, or if you want the site to be accessible at yourdomain.com, you have to move the files that are inside the folder public_html/mediawiki-1.24.1 directly to the public_html folder.
In short, the fastest and easiest way for the average user to do this is to upload the installation archive on the hosting account with an FTP client, and then unpack it there from the Files section of the control panel. If after that files and folders have to be moved on the account, this can be done with an FTP client or from the Files section of the control panel.
Install and Configure MediaWiki
To actually install MediaWiki, after you have a database and you upload the MediaWiki files and folders on your hosting account, you have to access with a web-browser the URL address corresponding to the location of the MediaWiki files on your hosting account. For example, if the MediaWiki files and folders are directly in the root web-accessible folder on your account (public_html), then the URL will be yourdomain.com. If the files and folders are, for instance, in a subfolder named wiki (e.g. public_html/wiki), then the URL will be yourdomain.com/wiki.
After you open the URL address on the page that is displayed you'll see a message that the LocalSettings.php file of the site is not created and configured yet. To continue with the installation and to create the file click on the link set up the wiki that's on the page:

On the next page are the options for the language:
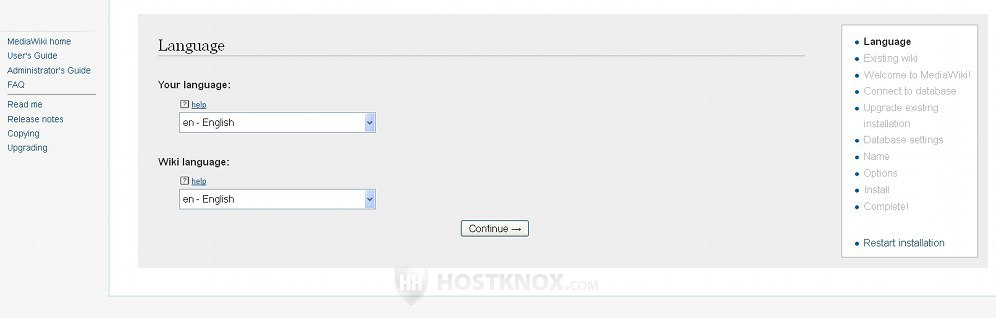
The options are:
- Your language - select the language that will be used during the installation process.
- Wiki language - select the default language that will be used for the website. This is the language in which the pages of the site and the options will be displayed. Note that some translations may not be a hundred percent complete, meaning that some default text strings and options that appear on the site might not be translated into that language.
After you're ready with the options click on the Continue button.
The next step automatically checks the server environment (e.g. PHP version, graphics library, domain name and URL address of the installation, etc.). The page displays the result of this check as well as the copyright and terms:
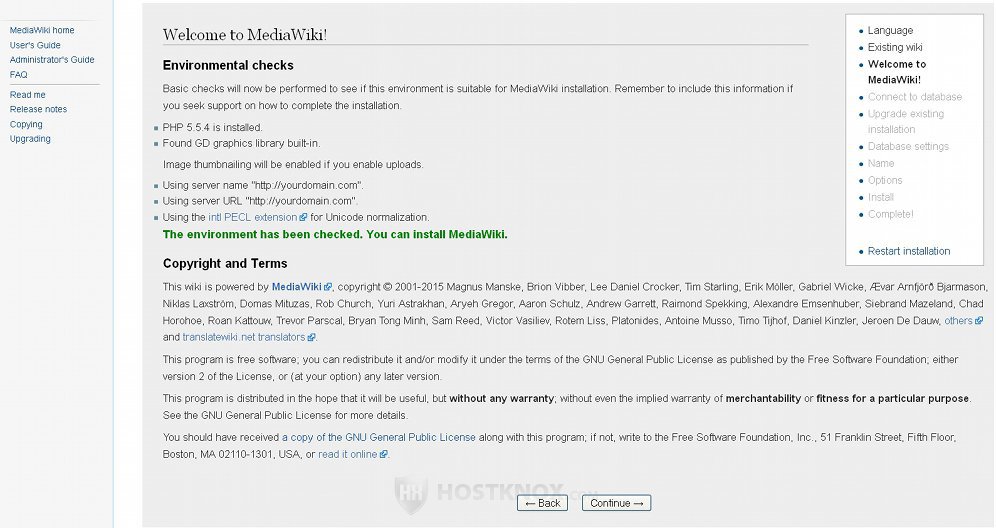
HostKnox servers are configured in such a way so that MediaWiki runs without problems.
Click on the Continue button to go to the next page.
The next page is for the database information:
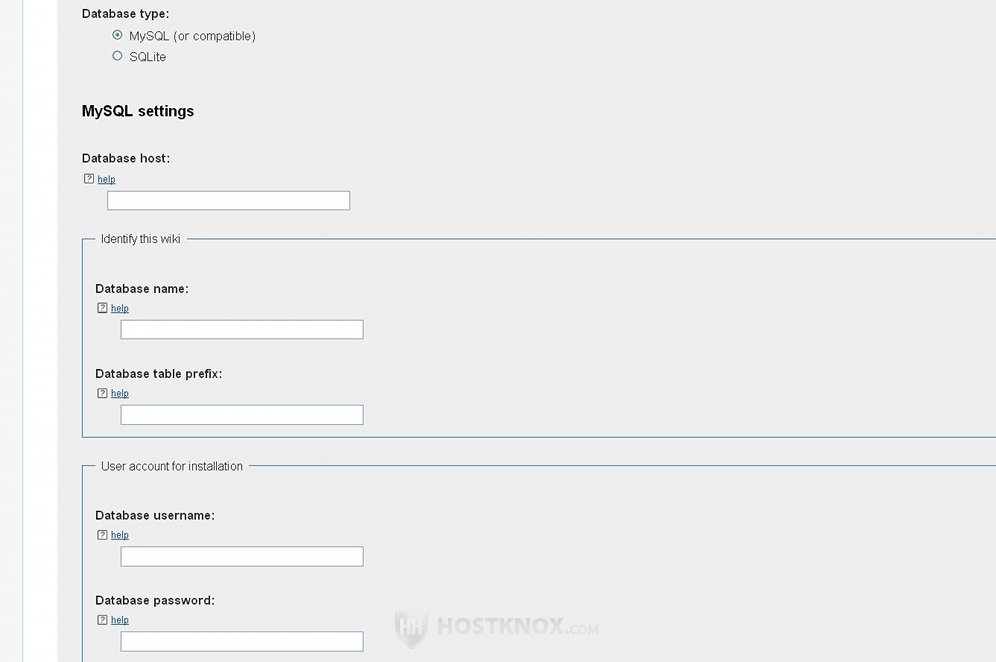
It contains the following options:
- Database type - mark the radio button for MySQL. It should be marked by default. That's the database management system installed on HostKnox servers.
- Database host - in this field type localhost.
- Database name - type the name of the database that you created for the application.
- Database table prefix - in this field you can type any prefix for the database tables that are about to be created in the database. The table prefix is useful if you decide to install more than one application in the same database. In this case the tables of each application should have a different table prefix. For security reasons however it's recommended that you keep each application in a separate database.
If you leave the field empty, the tables will have no prefix. If you decide to put a prefix, the common way of doing it is to add an undescore "_" after the actual prefix. In this way it's easier to read the names of the tables when you browse the database. For example, if you add as a prefix wiki1_, then tables will be listed as wiki1_category, wiki1_user, etc. If you don't put an underscore, the prefix will still be used, it just makes it more difficult for people to read and find the names of tables (e.g. wiki1category, wiki1user, etc.). - Database username - type the name of the user that you added to the database. The user is created when adding the database. After the database is created you can also add a new user to it; this can be done from the MySQL > Usernames section of the panel. The user will have access only to that particular database.
Note that each hosting account has a master user that has access to all databases. You can type the name (and the password in the next field) of that user. You can check the name of the master database user and set and change the password for that user from the MySQL > Usernames section of the control panel. Note however that for security reasons it's preferable to add a separate user for each database that you create, and to connect to the database with that username. - Database password - in this field type the password of the user that you created for the database.
Databases, database users and their passwords can be managed from the MySQL section of the control panel.
After you configure all the options click on the Continue button at the bottom of the page. If you configured all the options correctly, a connection will be established with the database and the database tables will be created. This will happen after you configure a few more pages with options.
The next page has some additional database settings:
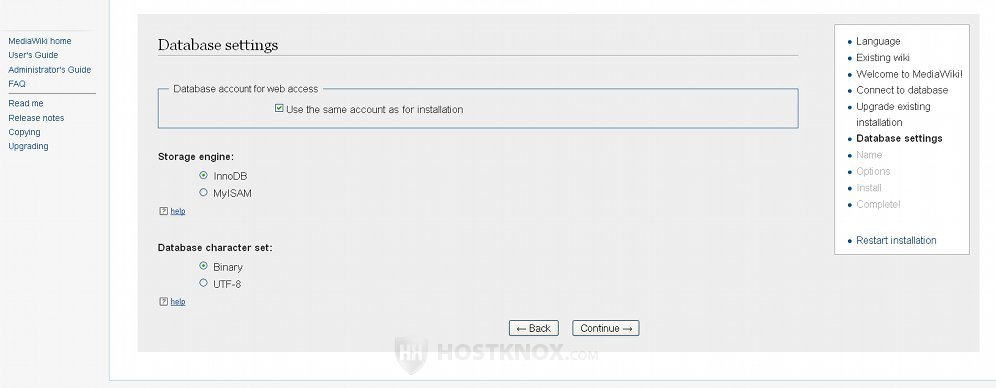
The options are:
- Database account for web access - this contains a checkbox for using the same account for the database as for the installation. It's marked by default; leave it like this.
- Storage engine - by default, the radio button for InnoDB should be marked. This is a newer engine than MyISAM and it's the default for MySQL. It's recommended to keep InnoDB marked.
- Database character set - by default, Binary is marked. This is the recommended option.
After you're ready click on Continue at the bottom.
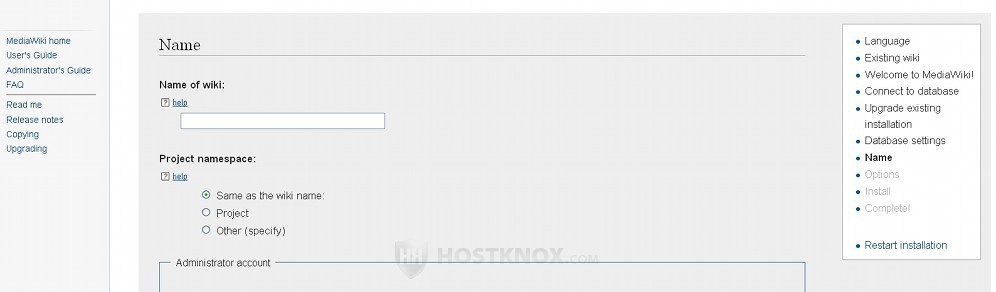
The next page contains options for the name of the site and the administrator user. At the top of the page are a couple of options for the name of the site:
The options are:
- Name of wiki - in this field type the name of your wiki site. This will be the name shown on the frontend of the site and in web-browser tabs.
- Project namespace - this option is for the name of the site shown on pages that are not content pages but pages about the site itself (e.g. an about us page, policy pages, etc.). The names of these pages will start with the name that you specify with this option. If you want it to be the same as the general name set in the option Name of wiki, just leave marked the radio button Same as wiki name. If you want it to be any other name, mark the radio button Other and type the new name in the field that appears.
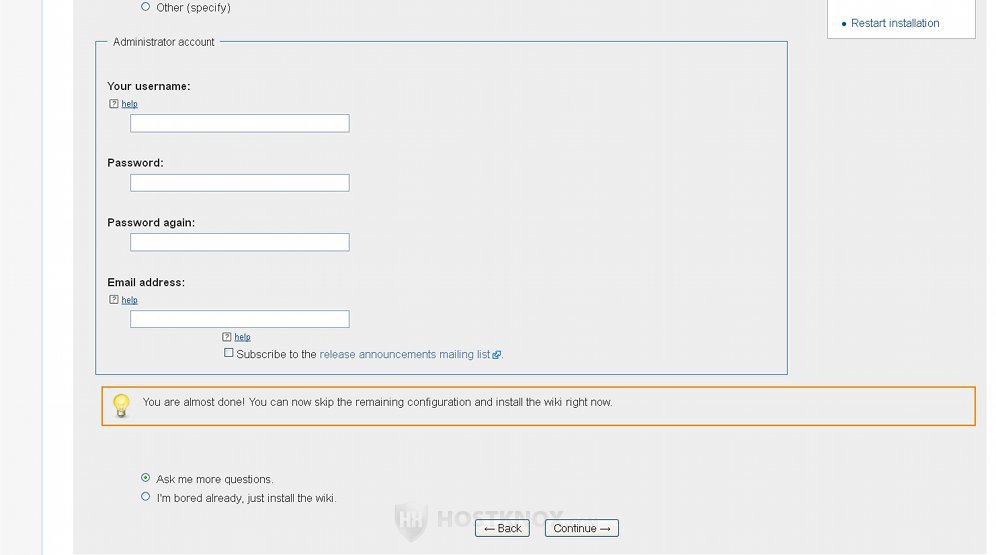
On the same page under the options for the name are the options for the administrator account that's about to be created. This will be the user (you) that will have access to all options of the site.
The settings are:
- Your username - type a name for the administrator account.
- Password - type a password for the account. To make the password more secure make it at least 8 characters long, and use a random string of lower and upper case letters, numbers and symbols.
- Password again - type the password again.
- Email address - this field is not required. If you want to, you can type an email address. It will be used by others to contact you; it will also be used for various administrative purposes, and if you subscribe to the mailing list for official release announcements, they will be sent to this address.
Under the field for the email address there's a checkbox with which you can subscribe to receive release announcements sent by the MediaWiki official website.
After you configure these options you can complete the installation, or you have the choice to configure some additional options. These options are not required and are not necessary for the successful installation of the application. They can also be configured after the application is installed; however it's faster and easier just to do it before the installation is complete. At the bottom of the page there are a couple of radio buttons. By default, the button Ask me more questions is marked. If you leave it like this and you click on the Continue button, you'll be able to configure some more options. If you don't want to do it, mark the radio button I'm bored already, just install the wiki and click on Continue. Note that if you skip the page with these additional options, they'll simply be automatically configured with the default values.
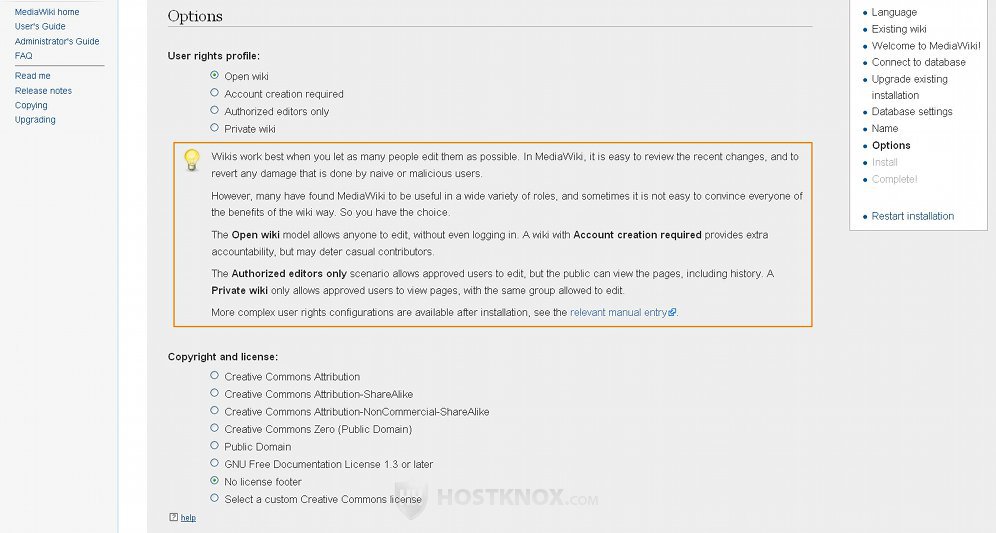
We'll go over these additional settings. At the top of the page there's an option for the type of wiki that you want to create, in the sense of who is allowed to add and edit content, and an option for the copyright and license:
The options are:
- User rights profile - this option consists of several radio buttons. You can use them to specify who has permissions to add and edit content. As it's explained in the text under the option, an open wiki means that anyone can edit content. By default, the wiki is configured to be an open one. By marking the respective radio button, you can require users to make an account before being able to add and edit content. Another option is to authorize only particular editors to manage content. In all three cases anyone can view the content on the site. If you want only approved users to be able to view the content, you can create a private wiki.
Whatever you select you can configure additional permissions and manage user groups once you install the application. - Copyright and license - from this option you can select the license that you want to be used for you wiki site. This determines the terms that others have to observe if they want to use texts from your site. Just mark the respective radio button. In case you want to be able to use on your site texts from Wikipedia and respectively to allow Wikipedia to use texts from your site, mark the radio button for Creative Commons Attribution-ShareAlike. If you want to, you can search on the Internet for more details about each type of license. Wikipedia, for instance, has information about them. For example, you can find out more about the different types of Creative Commons Attribution on the Wikipedia page on Creative Commons license.
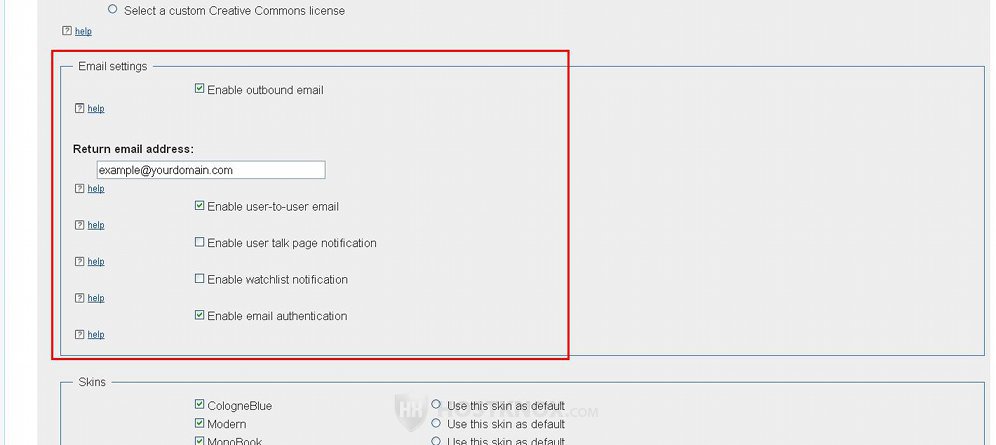
Further down the same page there are some email settings:
There are several checkboxes:
- Enable outbound email - this checkbox is marked by default which means that emails can be sent from your site. If you want to disable the function, unmark the checkbox. If you disable it, all other email options will be disabled automatically.
- Return email address - in this field specify an email address to which replies and bounce messages to be sent.
- Enable user-to-user email - this checkbox is marked by default. This means that registered users can send each other emails. This, of course, refers to using the MediaWiki application to send emails. When the option is enabled a registered user can send from the site an email to another user. Note however that from their account settings a user can disable the option to receive emails from other users.
If this option is disabled, users will not be able to send each other emails through the MediaWiki application. The option for receiving emails from other users will be disabled for all users, and it will not be available in the user account settings. - Enable user talk page notification - this option is disabled by default. If you want users to be able to receive automatic notifications when there are changes on their user talk page, mark this option.
Each page on the site has a talk page that can be used for discussing the content of the associated page. Each registered user has a user page on which the user can provide any information about them. The user page also has an associated talk page on which other users can comment and type messages to the user. So when somebody adds a comment or edits the talk page associated with a user's page and the option for notifications is enabled, that user will receive an email message informing them about it. Keep in mind that when user talk page notifications are enabled for the whole site, this means that each user can enable and disable these notifications for their account. They can do this from the account settings.
If this option is disabled, users will not be notified when somebody edits their user talk page, and the option in the user account settings for enabling/disabling user talk page notifications will not be available. - Enable watchlist notification - registered users can compile a list of pages that interest them and add them to their watchlist. This allows them more easily to watch for changes on those pages. When this option for watchlist notification is enabled (it's disabled by default) and a page in the watchlist is edited, the user will be informed with an email.
When this general option is enabled, each registered user can choose whether to receive watchlist notifications or not (they are enabled by default). If they don't want to receive notifications, they only have to disable the respective option in their account settings.
When this general option is disabled it affects the whole site, and in the account settings of users the option for enabling and disabling watchlist notifications will not be available.
Keep in mind that no matter whether watchlist notifications are enabled, for each user account there's a watchlist page on the site. It lists the pages in the watchlist of that user and the changes to these pages. - Enable email authentication - this option is enabled by default. This means that when a user registers or changes the email address of their account, they have to verify their email address. The user receives an email message containing a link and they have to open that message and click on the link. If the user doesn't confirm the email, they will still be able to log in to their account on the site and to use the features there with the exception of the features related to email.
Under these options there are some options related to the themes/skins and the extensions:
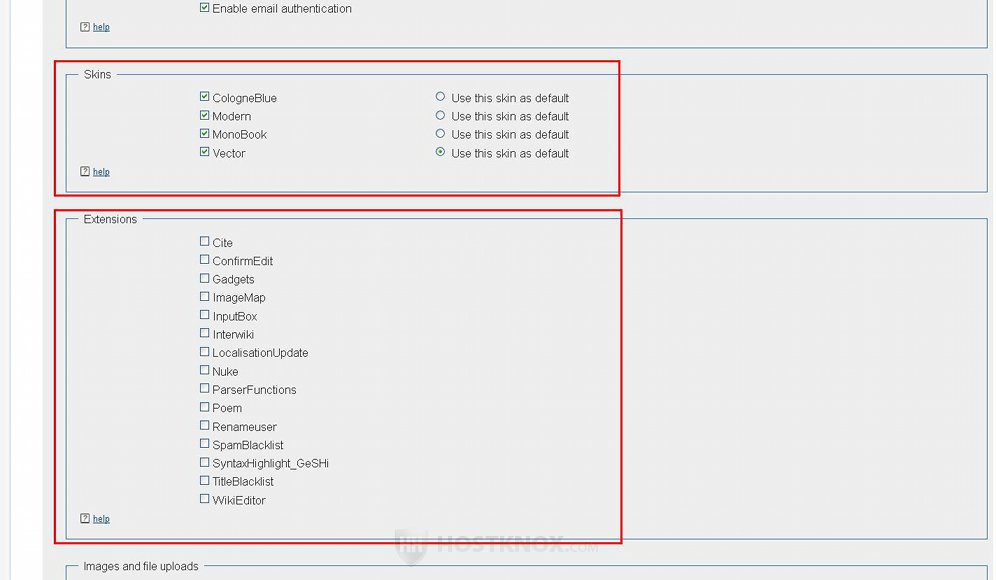
In the panel labeled Skins you'll see a list of the skins that come prepackaged with the application. The skin determines the colors and design of the site. By default, all the skins are enabled. If you want to disable a skin, unmark its checkbox. Next to each skin there's also a radio button, mark the one for the skin which you want to be the default one. After you finish the installation you can add new skins and change the default one. All visitors of the site see it displayed with the default skin. Registered users can select another default skin from the enabled skins. This skin will be displayed when they log in; if they are logged out, the general default skin for the site will be displayed. They can select a skin from their account settings.
The panel labeled Extensions lists the extensions that come prepackaged with MediaWiki. An extension adds some functionality to your site. Mark the checkboxes of the extensions that you want to enable. After the installation is complete you can enable/disable these extensions and you can install new ones.
At the bottom of the page there are some options related to file uploads, the logo of the site and to caching:
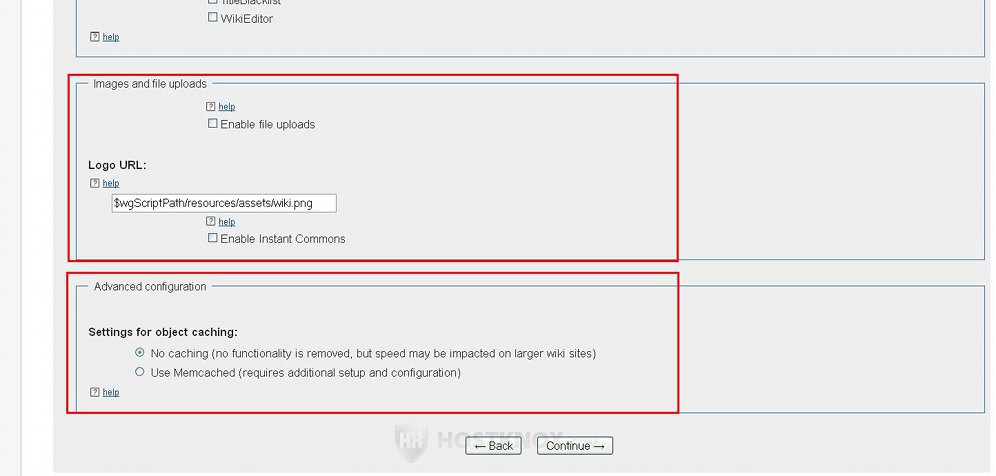
In the panel Images and file uploads you'll find the options:
- Enable file uploads - by default, file uploads are disabled for security reasons. If you want users to be able to upload images and other files, mark this checkbox. Keep in mind that in addition to enabling this option, in order for a particular user to be able to upload files, that user should also be allowed to do so. By default, registered users have permissions to upload files. After the installation is complete you can disable file uploads for specific user groups and enable it for others. There are also allowed file types that can be uploaded; if the file is not listed as one of these allowed types, then the user won't be able to upload it. By default, the allowed file types are the image formats JPG, JPEG, PNG and GIF. After the installation is complete you can allow more file types, or remove some of the default ones.
- Logo URL - this field contains the path to the example logo image that comes prepackaged with the application. If you have uploaded another image in the respective MediaWiki folder on your hosting account and you want to use it as a logo, change the path to point to it. You can also do that at any time after the installation is complete.
- Enable Instant Commons - this option is disabled by default. With Instant Commons you can use on your site media files from Wikimedia Commons. This is where all the media files used by the sites of the Wikimedia Foundation are stored.
The panel Advanced configuration contains a few radio buttons. One is for using Memcached (currently not supported on our servers) and the other specifies that it will not be used.
After you're ready with the options click on the Continue button. Don't forget that you can change these settings after the installation is complete, and configure many other aspects of your site.
The next page is for starting the actual installation process:
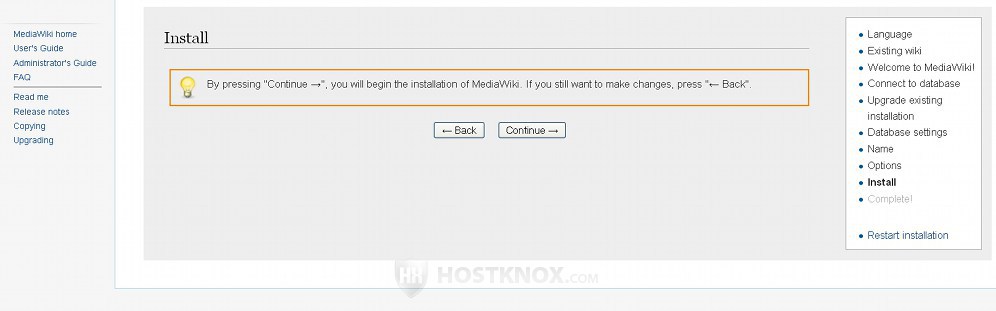
Click on the Continue button to proceed.
If you configured the settings for the database information correctly, the database will be populated with the necessary data, and on the next page you'll see a confirmation that the database tables have been successfully created and populated with data:
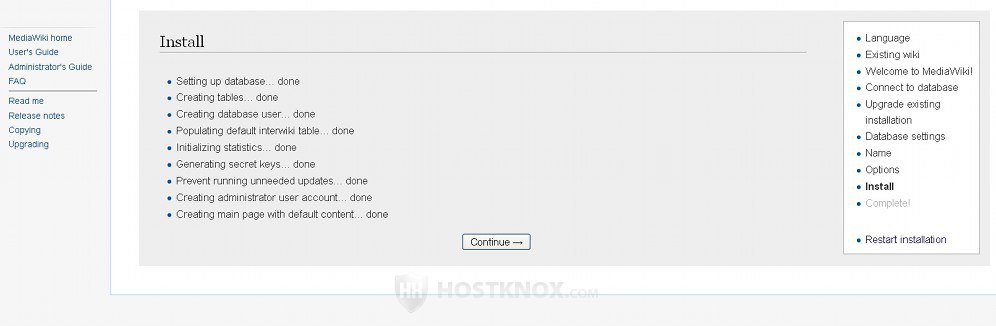
Click on the Continue button. The last thing the installer does is to generate a LocalSettings.php file. This is an essential file that you have to put on the hosting account in the root MediaWiki folder. The file contains data related to the configuration of your site. It's configured according to the way you set up the options in the previous steps of the installation process.
The last page informs you about this and provides you with a link for downloading LocalSettings.php in case the download did not start automatically:
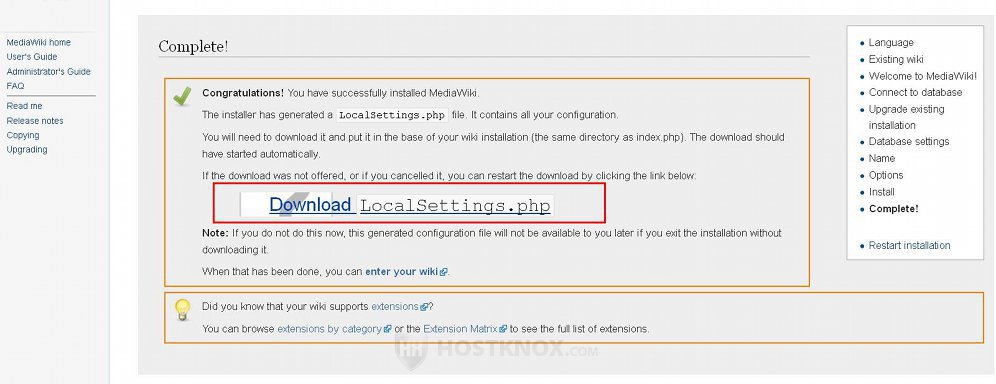
So click on the link and use the window that pops out to save the file on your local computer. Then you have to upload it in the root MediaWiki folder on your hosting account. For example, if the application is installed in public_html/wiki on your account (making the frontend of the site accessible at yourdomain.com/wiki) then you have to upload LocalSettings.php in public_html/wiki. You can do this with an FTP client or from the Files section of the control panel.
Once you do this you can access and use your wiki site.