MediaWiki Page Transfer Tutorial - How to export and import pages in MediaWiki
How to export and import pages in MediaWiki
In MediaWiki you can export pages from one installation and import them into another installation (or in the same one). You can export and import not only the main pages/articles, but also pages from the other namespaces of the site: e.g. category pages, user pages, discussion pages, etc.
There are different ways this can be done. In this tutorial we'll discuss the two main ways to do it. One of them is to use the frontend features for exporting and importing pages. This is the way that's easier to understand and follow by the average user. Another way is to do it via SSH. Using the frontend Export and Import tools is not very suitable for a large number of pages (e.g. more than a few hundred at a time). In this case you should either do it via SSH, or you can use the frontend tools but export/import the pages in portions and not all of them at the same time.
So we'll start with the first method which includes the built-in frontend functions, and we'll then cover the way to do it via SSH:
- how to export pages using the built-in Export tool
- how to import pages with the built-in Import tool
- how to disable and enable the Export and Import tools
- how to export pages via SSH
- how to import pages via SSH
- links to other tutorials related to pages
Note that it's not necessary to do both actions using the same method, meaning that you can, for example, export pages via SSH and then import them using the frontend Import function of the site.
Another note to keep in mind is that by default the frontend Export function can be used by all users, including visitors, while the Import function can be used only by administrators/sysops.
Export Pages with the Frontend Export Tool
MediaWiki has a tool for exporting pages that's available on the frontend of an open wiki site to all users. In order to export pages you need the titles of these pages. If you have to export only a few pages and you know exactly what their names are (including capital and lowercase letters), then you can go straight to the Export tool. Otherwise, first you have to copy the names of the pages that you want to export and optionally compile a list of the page names.
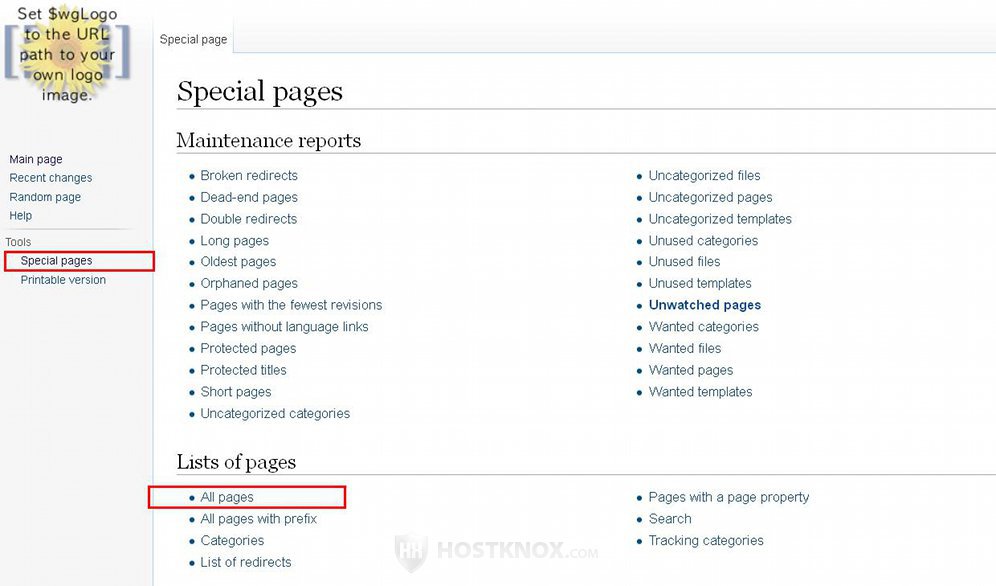
You can view the names of all pages on the special page that lists all pages on the site. To access it go to Tools menu on the left>Special pages button>on the page that opens All pages button in the section List of pages:
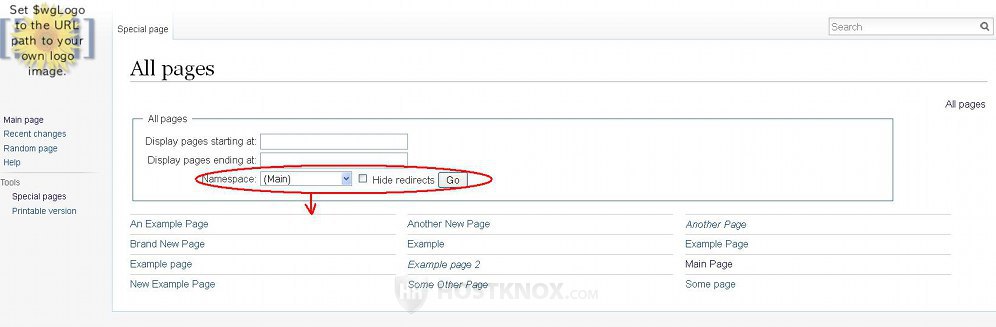
By default, on the page that opens you'll see a list of the pages from the main namespace. You can use the drop-down menu and the Go button above the list to select a different namespace (e.g. if you want to get a list of category pages, user pages, etc.):
You can use the page titles there to create a list of the pages that you want to export. One way to go about it is to highlight the titles with the mouse (click and hold the left mouse button and drag the mouse so that you mark the titles), then press the right mouse button and from the menu that appears select Copy. You can then either open a text editor (e.g. Notepad) and paste the titles there, or you can go directly to the Export tool and paste the titles in the text area that's provided there. As usual, to paste the copied information just press the right mouse button and from the menu select Paste. In both cases you may need to format and edit the list a bit. You have to make sure that there's one page title per line and there are no empty lines between the titles. If you use a text editor to create and edit the list, after you're done copy the list and paste it in the corresponding text area of the Export tool.
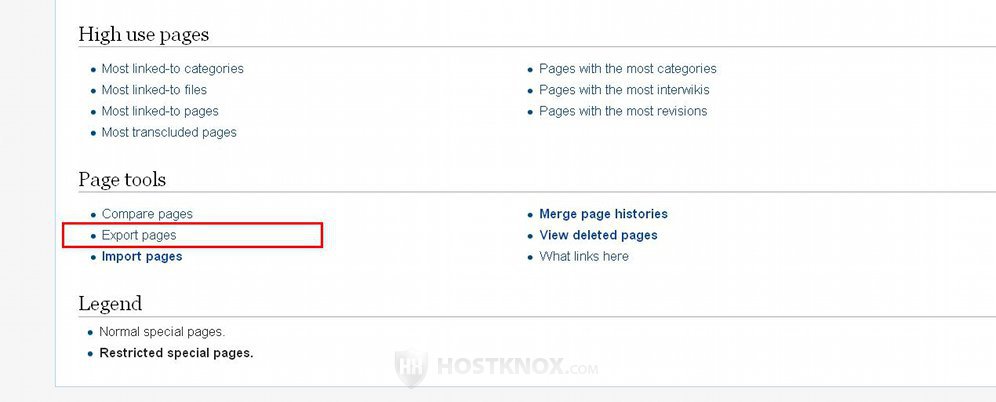
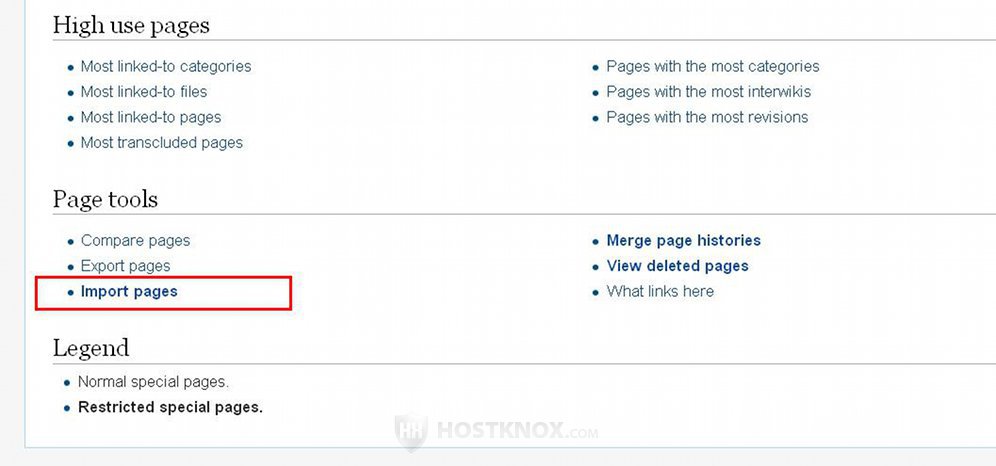
To open the Export tool, go to Tools menu on the left>Special pages button>on the following page Export pages button in the section Page tools:
This will open the actual tool. There you'll see a text area and a few options. You have to put the titles of the pages in the text area. Whether you type them on the spot or you copy/paste them, as we mentioned, make sure that there's one title per line:
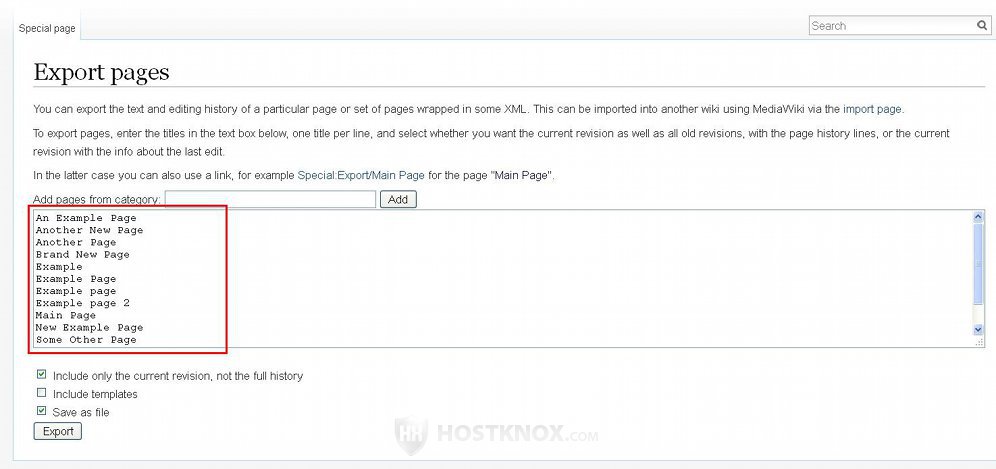
Note that if there are pages from namespaces other than the main one, you have to add the namespace at the beginning of the name (separated by a colon). For example, to add to the list a category page named Example you have to put Category:Example; for the page of a user with the username Example User, you have to put User:Example User, and so on.
Right above the text area there's an option with which you can automatically add to the list all the pages from a category. To do this, type the name of the category in the text field labeled Add pages from category and click on the Go button. The titles of the pages associated with that category will be put on the list.
Under the text area there are a few checkboxes. With the option Include only the current revision, not the full history you can choose whether to export only the current version of each page, or the whole page history of each page (i.e. each revision of the page). The checkbox is marked by default and so only the current revision with which the page is displayed on the site will be exported.
After you're ready with the list click on the Export button at the bottom. The pages are exported in an XML file which you have to save on your local computer. When you click on the button a window will pop out with which you can save the file. The file contains all the necessary information for each page (e.g. content, the name of the user that created it, etc.).
Then by importing this file to another installation you'll import the pages that are in the file. We'll go over this in the next section of this tutorial.
Import Pages with the Frontend Import Tool
By default the built-in feature for importing pages can be used only by administrators/sysops. With it you can import pages that have been exported from another (or the same) MediaWiki site. The exported pages are stored in an XML file. So to import the pages you have to import the file. In the previous section we went through the process of exporting pages with the built-in Export tool. In this section we'll go over how to import an exported XML file.
First you need to open the tool. Go to Tools menu on the left>Special pages button>on the following page click on Import pages in the section Page tools:
This will open a page with a few options:
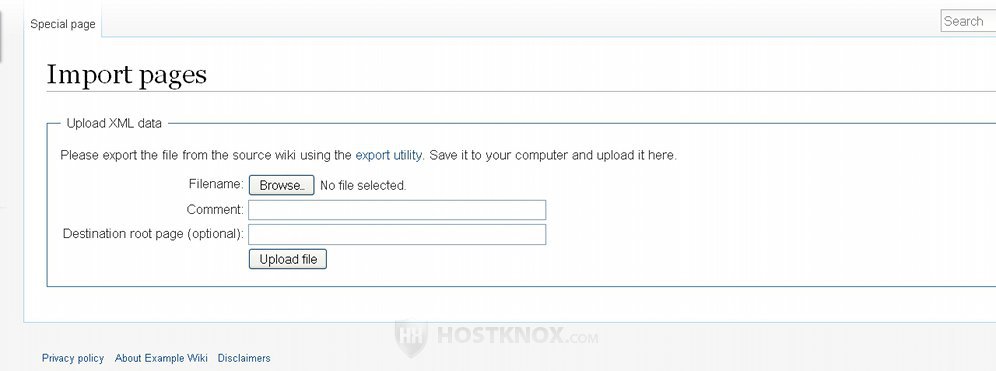
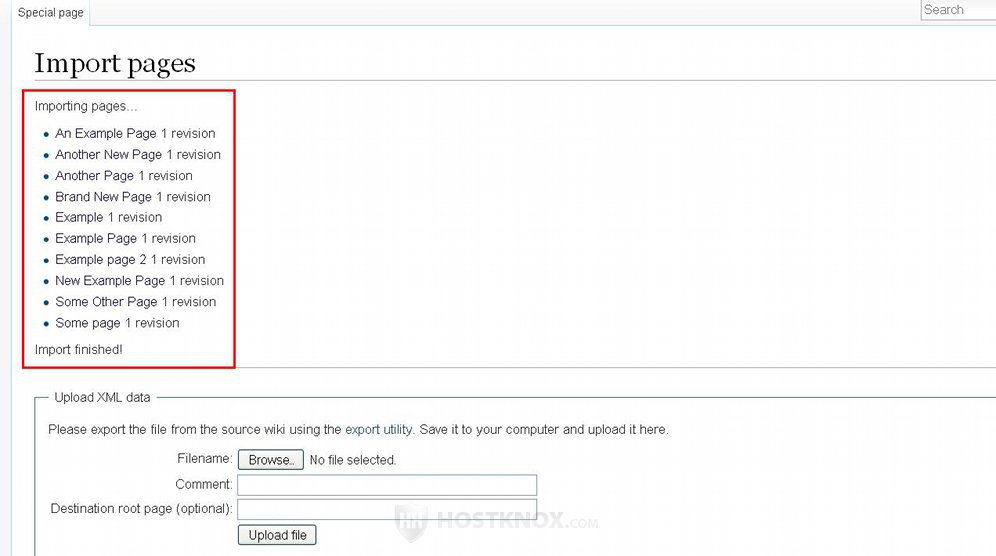
Click on the Browse button and use the window that pops out to locate on your local computer the XML file with the exported pages. When you do it the name of the file will be shown next to the Browse button. You can leave the two text fields empty. Then click on the Upload file button. After this a list of the imported pages will appear with the number of imported revisions for each page:
There are also some things to keep in mind when importing:
- Before importing the XML file you can edit it and if needed you can change some of the information in it. For example, if there are pages on the site and in the file with the same titles but with different content, and you don't want to overwrite the pages on the site, you can change the names of the pages in the file. Or, for instance, if there are matching usernames on the site and in the file, but the actual users are different, you can edit the file and change the respective usernames. Data, such as page titles and usernames, is quite easy to spot and find in the file; you shouldn't change anything that's inside the tags (meaning that's between the angle brackets <>). But you should be careful when editing XML files, and if you're not certain what you're doing it might be better to leave it as it is.
- If on the imported pages there are internal links to other pages, and a page to which a link points doesn't exist on the new site, then it will be an inactive link, meaning that it will be colored in red and clicking on it will not open the page but will suggest to the user to create it.
- In case there are images on the pages that you import and you want them to appear on the site, you have to upload these images to the new site. One way to do it is to use the Upload function on the new site and upload the images. To do this the function has to be enabled and you need to have the images on your local computer.
Another way to go about this is to use the script importImages.php that's in the maintenance directory of your MediaWiki. This can be done via SSH.
An alternative is to transfer the images directly to the /images folder of the installation. The folder is located directly in the root MediaWiki directory on your hosting account. So if the application is installed directly in the public_html directory on the account, then the path to the folder will be public_html/images. However, if you use this method and you don't transfer the whole /images folder, it might be a bit difficult to find on the installation from which you exported the pages all the images you want because they are organized into subfolders in the /images folder itself. Besides, in the /images folder of the installation with the imported pages the images also have to be organized into subfolders and when there are a lot of images to transfer this can be very difficult to do. - If on the site to which you import the pages there's a page with the same title as one of those that you import, but they have different revisions, then the revision of the page on the site will be replaced with that from the XML file that you imported.
- It's a good idea after the import to optimize the database. One way to do this is with phpMyAdmin. For more information check out the tutorial on how to optimize databases with phpMyAdmin.
- Although it's not necessary, after the import it might be a good idea to regenerate the list with the recent changes displayed by the Recent changes page on the site on which you imported the pages. You can check the page and see how it is. This can be done via SSH by executing the script rebuildrecentchanges.php. It's in the maintenance directory of the installation. If you change the current working directory to the maintenance folder, then you can execute the file with the command php rebuildrecentchanges.php.
Disable and Enable the Export and Import Tools
As we already mentioned, by default the frontend Export tool can be used by anybody, while the Import tool can be used only by administrators (also called sysops). If you want to, you can disable the Export tool; you can also give other user groups the right to use the Import tool (or disable it for those who have that right). Note that these changes concern only the frontend features for exporting and importing pages; they don't affect the method performed via SSH.
- When it comes to the Export tool you have the option to disable it for everybody. This means that no user will be able to export pages from the frontend of the site. You can do this by inserting the following code on a new line at the end of the LocalSettings.php file of your MediaWiki:
function removeExportSpecial(&$aSpecialPages)
{
        unset($aSpecialPages['Export']);
        return true;
}
$wgHooks['SpecialPage_initList'][] = 'removeExportSpecial';
In case you want to enable the tool again simply delete the code.
The LocalSettings.php file is in the root MediaWiki directory on your hosting account. If, for example, the application is installed directly in the public_html directory on the account, the path to the file will be public_html/LocalSettings.php. HostKnox clients can edit the file from the Files section of the HostKnox control panel. Another way to do it is to download it with an FTP client (e.g. FileZilla), edit it with a text editor (e.g. Notepad), and upload it back overwriting the old file. It can also be edited via SSH.
- When it comes to the Import tool by default it can be used only by administrators. If you want to completely disable it, you can remove the respective permission from the sysop user group. If on the other hand you want other people to use it but you don't want to assign them to the sysop/admin group, you can either give the right to an existing user group(s) or create a new group with that right and assign users to it. All these things are done by adding some lines that change the user permissions in the LocalSettings.php file. For example, to disable the Import tool for administrators/sysops insert the following two lines at the end of the file:
$wgGroupPermissions['sysop']['import'] = false;
$wgGroupPermissions['sysop']['importupload'] = false;
To give the permission to other user groups simply change the name of the user group in the brackets and replace false with true. For example, to allow all registered users to import pages, add the following lines to the LocalSettings.php file:
$wgGroupPermissions['user']['import'] = true;
$wgGroupPermissions['user']['importupload'] = true;
You can also create a specific group only for users who can import pages. In this case type in the first brackets any name for the user group you want to create. If the name consists of more than one word, separate the words with underscores or hyphens. For example:
$wgGroupPermissions['importers']['import'] = true;
$wgGroupPermissions['importers']['importupload'] = true;
will create a user group called importers and the users in that group will be allowed to use the Import tool. After the group is created you can assign users to it from Tools menu on the left>Special pages button>Users and rights section on the following page>User rights management button.
Strictly speaking, only the second permission (importupload) is for the frontend tool for uploading XML files with pages, while the first permission (import) is for a method for directly transferring pages from other wikis. So if you add only the second permission users will be able to upload XML files with pages. However, the link to the tool on the Special pages screen will not be available. They can access the tool by directly opening its URL address (e.g. yourdomain.com/index.php?title=Special:Import). When the import permission is enabled too, the link on Special pages for accessing the Import tool will be available.
Export Pages via SSH
Another way to export pages from a MediaWiki site is by executing a script via SSH. This script file is called dumpBackup.php and it comes prepackaged with MediaWiki. Note that the dump file that's created is not a full dump of the whole database. It exports only the pages.
All HostKnox clients have a free SSH access that comes as part of the hosting package. For more information on how to connect to your account via SSH and how to perform some basic tasks check out our SSH tutorials and the SSH articles in our knowledge base.
You can export all pages, including not only the main pages but also the user pages, talk pages, category pages, etc., by executing a command like this one:
php dumpBackup.php --full > pages.xml
After executing the command you'll see a message informing you how many pages and revisions were exported. This command will create an XML dump file called pages.xml that contains all the pages of the site with all the revisions of each page. You can name the file differently but make sure that you use the .xml file extension. After that you can download and transfer the XML file with the pages to another MediaWiki installation (or to your local computer, depending on which import method you decide to use), and then you can import it in that installation.
With the above example command it's also assumed that before executing it you changed the current working directory to the maintenance directory of your MediaWiki. It's a subfolder of the root MediaWiki folder. That's where the dumpBackup.php file is stored. The dump file pages.xml will also be created and stored in that directory. You can change the current working directory with the cd command. Let's say that your MediaWiki is installed directly in the public_html directory on the hosting account (making the frontend of the site accessible at yourdomain.com). The public_html directory on HostKnox accounts is a direct subfolder of the directory into which customers are logged in via SSH. So this means that right after HostKnox clients log into their account via SSH, they can change the current working directory to the maintenance directory with the command cd public_html/maintenance. Then the above example command for exporting pages can be executed.
The option --full in the command indicates that all pages will be exported and each page will be exported with all its revisions. There are different actions and options with which you can specify what to export. For example:
php dumpBackup.php --current > pages.xml
will export only the current revision of every page.
While, for example, with the --filter option you can export pages only from certain namespaces of your choice (e.g. only the main pages and/or the user pages). For example, with the command:
php dumpBackup.php --full --filter=namespace:0,2 > pages.xml
you'll export all revisions of the pages from the Main namespace (all the articles) and the pages from the User namespace (all the personal pages of users). The namespaces in the command are listed with number keys (0 and 2 respectively). You can list more than one; in this case you should put a comma between them. Each namespace has a corresponding key. If you export an XML file just for testing and then you open it with a text editor, at the beginning of the file you'll see listed the keys for all namespaces. To make it easier for you here are the keys for some of the namespaces:
- Special: -1
- Main: 0
- Talk: 1
- User: 2
- User talk: 3
- File: 6
- Category: 14
Each namespace contains the corresponding pages.
In case you want to see a list of the available actions and options that can be used with the dumpBackup.php file just execute the command php dumpBackup.php. This will not produce any dump file but it will list the available options that you can use with the command.
Import Pages via SSH
After we reviewed in the previous section how to export pages via SSH. In this section of the tutorial we'll go over how to import an XML dump file that contains pages. By importing the file the pages will be imported on the MediaWiki site. Note that it doesn't matter how the XML file was exported, meaning that it doesn't have to be exported via SSH. It might have been exported with the frontend Export tool. The format of the XML file is the same whichever method is used.
- First you need to upload the file in the MediaWiki installation into which you want to import the pages. Although you can upload it anywhere on the hosting account on which the particular MediaWiki is installed, for the sake of convenience we'll assume that you'll upload it in the maintenance directory of MediaWiki (that's also where the script for importing pages is located). You can upload the file with an FTP client (e.g. FileZilla); another way for HostKnox clients to do it is from the Files section of the HostKnox control panel, or it can also be done via SSH.
- After you have the file on your hosting account you can import the pages. An XML file with pages can be imported by executing the script importDump.php that's in the maintenance directory of the MediaWiki installation into which you want to import the pages. In its most simple form and assuming that you change the current working directory to the maintenance directory, and the XML file is also in that directory, then the command that you have to execute looks like this:
php importDump.php < pages.xml
You have to replace pages.xml with the actual name of the XML file with the pages.
As we explained in the section on exporting pages via SSH, you can change the current working directory with the cd command. For example, HostKnox clients who have the application installed directly in the public_html directory and they execute the command right after they log in (meaning that it's executed from the root login folder that bears the username of the account), the current working directory can be set to the maintenance directory of MediaWiki with the command cd public_html/maintenance. For more information on how to connect to your account via SSH and use SSH check out the SSH tutorials and the SSH articles.
You can also add various options to the command for importing XML files. To view the available options, execute the command php importDump.php.
There are a few things to keep in mind and optionally do after the import of the pages is complete. You can check them listed at the end of the section for importing pages with the frontend tool.
Links to Other Tutorials Related to Pages
We have a tutorial for the most basic tasks related to pages and some other tutorials on the topic of pages that you may find useful: