MediaWiki Skins Tutorial - How to install new skins in MediaWiki
How to install and manage skins in MediaWiki
In MediaWiki skins are used to change the design and look of your wiki site. In other types of web applications these are usually referred to as themes, but while themes often require some additional changes in terms of the components and functionalities that are added or removed from the site (e.g. by enabling/disabling modules and extensions), the skins in MediaWiki typically only make stylistic changes to the site.
By default, MediaWiki comes prepackaged with a few skins. They are all enabled. One skin is the general default skin that's displayed to all visitors of the site. Registered users can select a different default skin to be displayed when they're logged in. They can select from the enabled skins.
In this tutorial we'll go over the basic tasks related to skins. In general they are performed in the same way for all skins, but some skins may have specific requirements, or some additional things may have to be performed in order to install the particular skin, for instance. So you should also check the information about the particular skin.
We'll show you:
- how to install skins
- how to enable and disable skins
- how to set a default skin for the whole site
- how registered users can select a default skin from the enabled ones
- how to hide enabled skins in user account settings without disabling them
Install Skins
Most skins are installed in the same way. However, it's a good idea to check the information related to the specific skin to see if there's something additional that has to be done.
- The first thing to do is to get the skin's files. They can be downloaded in an archived package. One of the places where you can find and download skins for free is a page on the official MediaWiki site that lists available skins. When you click on a skin in the list this will open the page of that skin on the MediaWiki site. It displays information about the skin; there you can check if there's anything different or specific that you need to know about installing the skin. On that page you'll also find a link for downloading the skin. So download the skin on your local computer. It's usually a tarball archive compressed with GZIP (e.g. example-skin.tar.gz); it contains the files of the skin.
- The next step is to upload the skin on your MediaWiki hosting account. In the root MediaWiki folder on your hosting account there's a directory named skins. In that directory you have to upload the folder containing the files of the skin that you want to install.
You can upload the theme with an FTP client or from the Files section of the HostKnox control panel. If you upload the archive on your hosting account before unpacking it and you need to unpack it there, you can do it from the HostKnox control panel or via SSH.
Let's say, for example, that your MediaWiki is installed directly in the public_html directory on your hosting account (making the frontend of the site accessible at yourdomain.com), then you have to upload the skin in public_html/skins. You can either unpack the archive on your local computer and then upload the unpacked folder that contains the skin's file, or you can upload the archive on the hosting account and unpack the archive there. In any case the folder that contains the skin's files should be located in public_html/skins. If necessary you can create there a folder for the skin's files and put them in it.
We'll use as an example the skin Erudite version 1.8. When the archive that we downloaded is unpacked on the local computer it creates a folder named erudite-v1.8; it contains the skin's files and other folders (e.g. erudite.php, assets, etc.). So if we upload that folder as it is on the hosting account, the skin's files will be located in public_html/skins/erudite-v.1.8. Of course, we can then rename the folder from erudite-v1.8 to just erudite (or it can also be renamed before it's uploaded).
Whether you choose to unpack the archive on the local computer and then upload the unpacked content on the hosting account, or you choose to upload the archive on the account and unpack it there, you need to end up in the /skins folder of your MediaWiki with a subfolder containing the particular skin (e.g. public_html/skins/erudite). Inside that subfolder is the main PHP file of the skin (e.g. erudite.php) and some other files and folders.
And this is how skins are installed. You just need to put the folder with the skin's content on your hosting account in the /skins folder of the MediaWiki application.
Enable and Disable Skins
As we mentioned, registered users can select a default skin. The site is displayed with that skin when they are logged in. They can select a skin from their account settings. Only enabled skins can be selected. So after you install a skin, if you want users to be able to select it, you have to enable it.
This is done by inserting a line with some data in the LocalSettings.php file of your MediaWiki. In the file you can find the lines for the other enabled skins and put the line for the new skin there, or you can just put it at the end of the file. You have to insert the following:
require_once "$IP/skins/name-of-skin/name-of-skin.php";
You have to replace name-of-skin with the actual name of the folder on your account that contains the skin's files, and name-of-skin.php should be replaced with the name of the main PHP file of that skin; the file is labeled with the name of the skin and it's the same as the name of the folder. So you have to check in the /skins folder of your MediaWiki to see what the name of the folder is, and inside the skin's folder you'll also find the PHP file. In our example, the skin is located in public_html/skins/erudite, so the name of the folder is erudite, and inside is its main PHP file that's labeled erudite.php. So the line with code that we have to insert in the LocalSettings.php file would be require_once "$IP/skins/erudite/erudite.php";.
To modify the file you can download it with an FTP client, edit it with a text editor (e.g. Notepad), and then upload it back overwriting the old file; you can also do it from the Files section of the HostKnox control panel or via SSH.
After you modify the file and you enable the skin, registered users will be able to select it from their account settings. For more details check in this tutorial the section on registered users and enabled skins.
If you want to disable a skin, just remove its line from the LocalSettings.php file, or you can comment the line by putting the # symbol in front of it: e.g. #require_once "$IP/skins/monobook/monobook.php";. In this case, to enable it again just remove the # symbol that's in front of the line and save the change.
Set a Default Skin for the Site
Your MediaWiki site has a default skin in which the site is displayed. It's used for all visitors. As we mentioned, registered users have the option to select a different skin from the enabled ones. If they do this, when they log into their account they will see the site displayed with the skin they selected. Otherwise, the general default skin will be used.
Initially, the default skin is selected during the installation of the application. If you want to change it after that, you can do this by modifying a line in the LocalSettings.php file of the site. If your MediaWiki is installed directly in the root web-accessible public_html folder on your hosting account, the path to the file would be public_html/LocalSettings.php. In the file find the following line:
$wgDefaultSkin = "name-of-skin";
In that line name-of-skin stands for the skin that's set as the default one. This name corresponds to the name of the folder that contains the skin's files. If you check on your hosting account in the /skins folder of your MediaWiki, you'll find the folders of the installed skins (e.g. vector, monobook, etc.). So, for instance, if you set the line in LocalSettings.php to $wgDefaultSkin = "monobook"; then the MonoBook skin will be the default one.
Note that in order to set an installed skin as the default one, first it has to be enabled as explained in the previous section of this tutorial.
Default Skin Options in User Account Preferences
By default, registered users can change the default skin. This skin will be used when they are logged into their account on your site. Visitors and those registered users who don't change the skin will see the site displayed with the default skin that's set for the site.
Registered users can only select from the enabled skins. They can do this from the preference options of their accounts. This is done in the same way for all users, including regular registered users and administrators.
To do this, after you log into your account click on the Preferences button; it's usually displayed in the upper right corner, but this depends on the particular skin. On the page that opens click on the Appearance tab, and on the next page you'll see a list of the enabled skins:
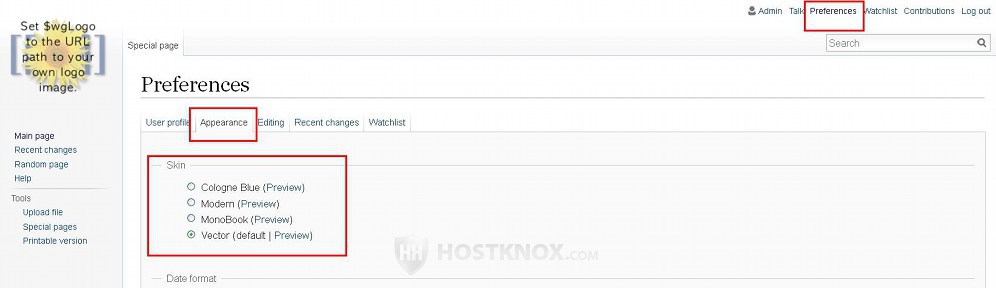
Mark the radio button of the skin that you want to be the default one and click on the Save button. If first you want to see how the site will look with the new skin, before you save the change click on the Preview button for the particular skin.
Hide Enabled Skins in User Account Preferences
When you enable a skin it automatically becomes available for selection in the account settings of registered users. They can select it to be the skin in which the site is displayed when the particular user is logged in.
If you want to, you can hide an enabled skin so that users can't select it, but the skin itself is still enabled. This is useful if you want to preview a skin and see how the site looks with that skin before you make it accessible to users.
This can be done by adding a line with code to the LocalSettings.php of your MediaWiki. On a new line at the end of the file add the following:
$wgSkipSkins = array( 'name-of-skin' );
You have to replace name-of-skin with the actual name of the skin. You can also list more than one skin in the brackets; just separate them with a comma. You can check what the name of the skin(s) is in the /skins folder of your MediaWiki. So, for example, if you don't want users to be able to select the skins MonoBook and Modern, put the following in LocalSettings.php:
$wgSkipSkins = array( 'modern', 'monobook' );
To view the site using one of the hidden skins add ?useskin=name-of-skin to the URL of the site (including the index.php file) and open it with a web-browser; you have to replace name-of-skin with the name of the skin. For example, if the URL of your site is yourdomain.com and you want to see it with the MonoBook skin, open the URL address yourdomain.com/index.php?useskin=monobook.
As we have already mentioned, the LocalSettings.php file is in the root MediaWiki folder on your hosting account. So if it's installed directly in the public_html folder on your account, the path to it will be public_html/LocalSettings.php. The skins will be located in public_html/skins.