MediaWiki Pages Tutorial - How to manage pages in MediaWiki
How to manage pages in MediaWiki
As any other site, a wiki website consists of pages. The difference is that the users themselves create and edit the pages. A page on a wiki site is like an article that covers a particular topic. In this tutorial we'll review the various tasks and actions related to managing pages. Some of these can be performed by all users (this also depends on the type of wiki and user permissions), while others are mainly reserved for the administrator(s).
We'll go over:
- how to edit pages
- how to add new pages
- how to manage page redirects
- how to move and rename pages
- how to delete pages and restore deleted pages
- how to protect pages
- maintenance reports, statistics and tools related to pages
- user pages and talk pages
- links to other tutorials related to pages
Edit Pages
This is the most basic action related to pages, and one that's very easy to perform. We'll start with it rather than with how to add pages because the process of editing is part of the one for creating pages. So you should be familiar with it.
To edit a page, go to that page and click on the Edit button at the top:

The exact location of the button depends on the particular theme/skin. On most skins it's in the top right corner. As an example we've used the default Vector skin that comes prepackaged with MediaWiki. If the user is not allowed to edit the page, there' will be no such button. This depends on the type of wiki, on whether the user is a registered one (and logged in) or just a visitor, on the permissions of the user group to which the user belongs, etc. By default, an open wiki allows everybody to edit pages which makes it easier for content to be added and edited, and for mistakes to be corrected, since many people manage the content. If you want to, by changing user group permissions you can allow, for example, only registered users to edit content. It's also possible to prevent users from editing the content only of a particular page(s). For information on how to do this check in this tutorial the section on how to protect pages.
After you click on the Edit button this will open the page with the built-in text editor with which you can edit the content:
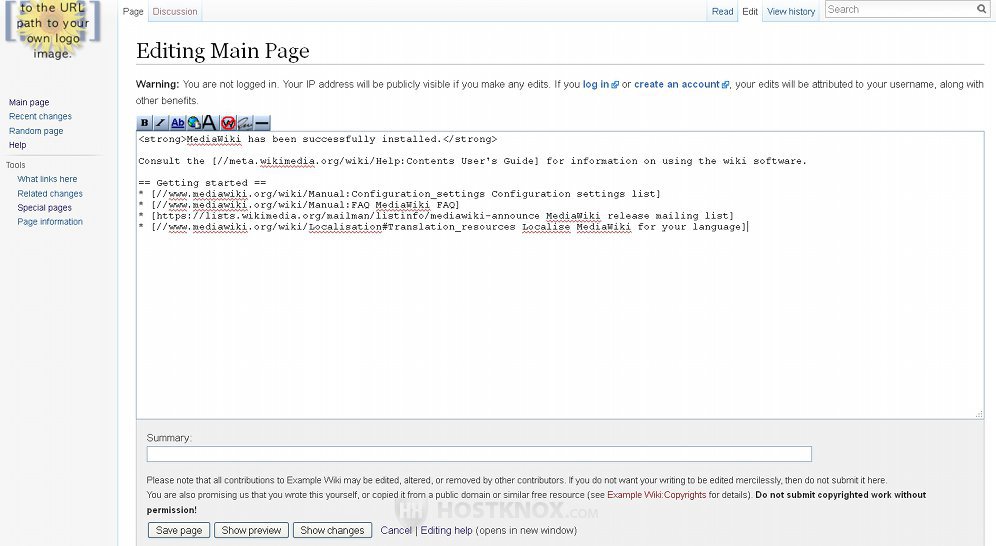
In the main text area of the editor you'll see the current content of the page. There you can make the changes that you want. Above the text there are some useful buttons (e.g. for making the text bold or italicized, for inserting internal links to pages on the same site or for inserting external links to other sites, etc.).
Under the main text area there's a text field labeled Summary. In it you can optionally describe in a few words the change(s) that you made to the content. This summary is shown to other users when they view a list of the changes performed to pages (e.g. on the Recent changes page).
At the bottom of the text editor there are a few buttons. With the button Save page you'll save the changes. If before that you want to see how the page will look with the changes, click on the Show preview button. Before you save the changes by clicking on the Show changes button you can also view all the changes that you've added as compared to the content without the changes. If you don't want to save the changes, click on the Cancel button.
The editor itself offers buttons for the most basic tasks for adding and editing text. Additional things can be performed and elements inserted (e.g. headings, bullet lists, numbered lists, etc.) by using wiki markup. This is the wiki syntax for formatting text. For example, three apostrophes before and after a text will make it bold: e.g. putting '''example''' in the text area of the editor will be shown as example on the page as its visible to users. By going to the edit screen of pages that are already created and comparing them with the frontend view visible to users you can see how the wiki markup works. Currently, there are some extensions such as VisualEditor that are being developed for creating a text editor with more built-in functions, so that users who are not familiar with wiki markup can add and use the full scope of functions and elements for editing text. Before you install such an extension on a live site however, make sure that it's a stable release and not a beta version. You can try a beta version too but you're more likely to run into problems with it.
Add New Pages
Unlike editing pages, there's no special button on the site that's intended specifically for creating a new page. There are a few ways you can open the form for adding a new page and create a page:
- One way to do it is to use the Search function of the site. Type the name of the page that you want to add in the Search field at the top of the site and execute the search. If there's no such page, on the search result page that's displayed you'll be offered to create that page. The name of the page is a link for creating it:
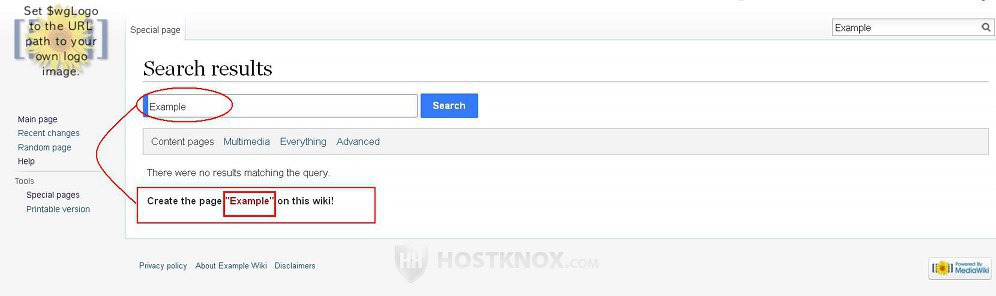
This will open the form for creating the page. The page will have the name of the search term that you used.
- Another way you can create a page is by opening the URL address of a page that doesn't exist. For example, if the homepage of your MediaWiki site is yourdomain.com and you want to create a page with a name Example, then open the URL yourdomain.com/index.php/Example. If the name of the page consists of more than one word, separate the words with underscores: e.g. yourdomain.com/index.php/Example_page. If no page with such name exist, the page that opens will be labeled with the name of that page but there will be no content, and you'll see a link for editing the page (i.e. for creating it); there'll also be a Create button at the top:
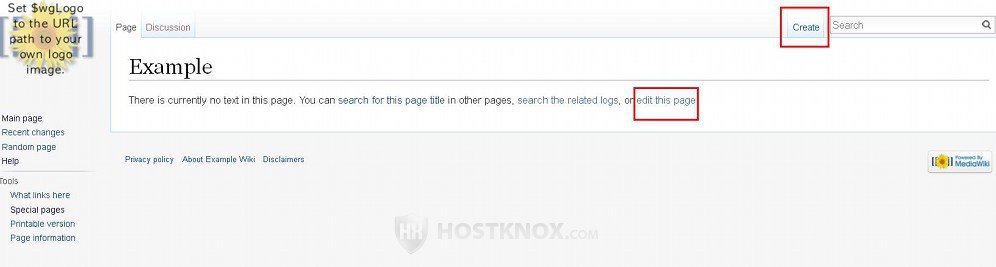
Clicking on any of them will open the form for adding the content and creating the page.
- A different way to add a new page is to use a link from an existing page to a page that doesn't exist. That may be a link added by another user, or you can add a link yourself. In this way you'll also make sure that the page that you're about to create will be linked to from another page. To add a link on an existing page, simply edit that page and use the button at the top of the text editor for inserting an internal link.
A link to a non-existent page is colored in red:
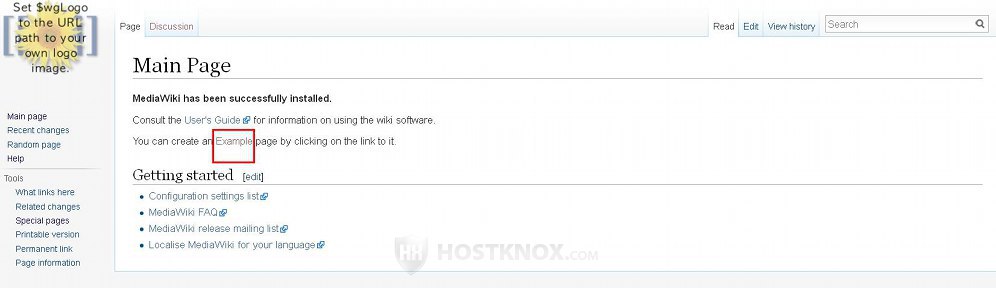
When you click on such a link the form for adding the content and creating the page will open. The page will be automatically named with the name of the link.
The form for adding a page is the same as the one for editing. There's a built-in text editor for adding the content.
Page Redirects
You can redirect a page to another one so that when users open the page with the redirect the page to which it points will automatically open. The original page with the redirect is not shown. In this way you can avoid having duplicate content on pages that are about the same or similar subject but have different titles. For example, you can have a few pages with different names that are about the same thing and you can point them to one page that contains the information about the subject. You can remove the content of a page with a redirect because that page is not shown and the relevant content is on the page to which it points. Capitalization in the titles also matters, meaning that a page that has for a title the same phrase as another page will be treated as a different page, if a word in one of the titles is capitalized and in the other it's not (e.g. Example page and Example Page). Note that the first word in a title is automatically capitalized, even if you originally used a lowercase letter. So you can also use redirects for such pages as well.
All users who can edit pages can place redirects.
To redirect a page open that page and edit it. Use the text editor to put a line at the very top of the page. It has to be above all other content in the text area (in fact you can delete any content that's there because it won't be shown). If there's content before the redirect, it will not work. The line that you have to put looks like this:
#redirect [[name-of-page]]
Replace name-of-page with the actual name of the page to which you want to point the page that you're editing. For example, let's say that you have pages titled Example Page and Another Page, and you want to redirect Example Page to Another Page. Then you have to edit Example Page and on the first line in the text editor you should put #redirect [[Another Page]]. If the name that you put in the redirect directive is correct, meaning that such a page exists, then when users open Example Page they will be automatically redirected to Another Page. Under the name of the page you will see the name of the page from which you were redirected:

The name itself is also a link to the page. This is how you can get to the page with the redirect, and if you want to, you can edit it and change or remove the redirect.
Move and Rename Pages
To move and to rename a page in MediaWiki is actually the same thing. The term that's used in MediaWiki is to move a page. When you do this a new page with the specified name is created and all the content and the editing history is moved from the old page to the new one. In this way users can still track the changes performed to the page and the contributers who added and edited the content of the page. When you move a page this also creates by default a redirect from the old page to the new one. In this way links on other pages that point to the old page will not be lost and they'll be redirected to the new page. The new page is in fact the same one in terms of content and editing history; it simply has a new name.
By default, visitors cannot move pages. This can be done by registered users who are logged in. To move a page, access the page that you want to move/rename, hover the mouse pointer over the More drop-down menu in the upper right corner and click on Move:
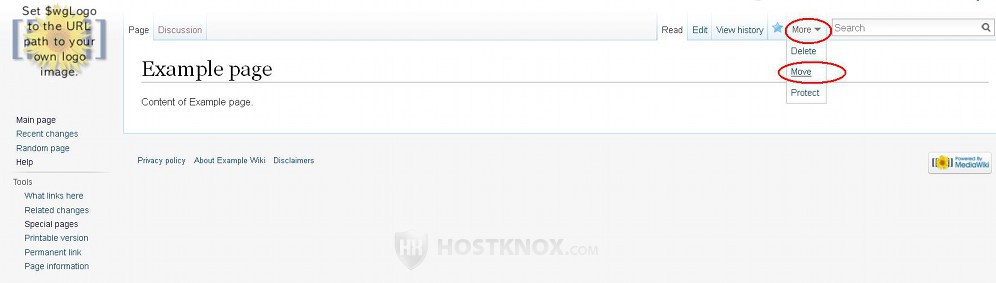
The location of the button depends on the particular theme. As an example we've used the Vector theme.
This will open a form with a few settings:
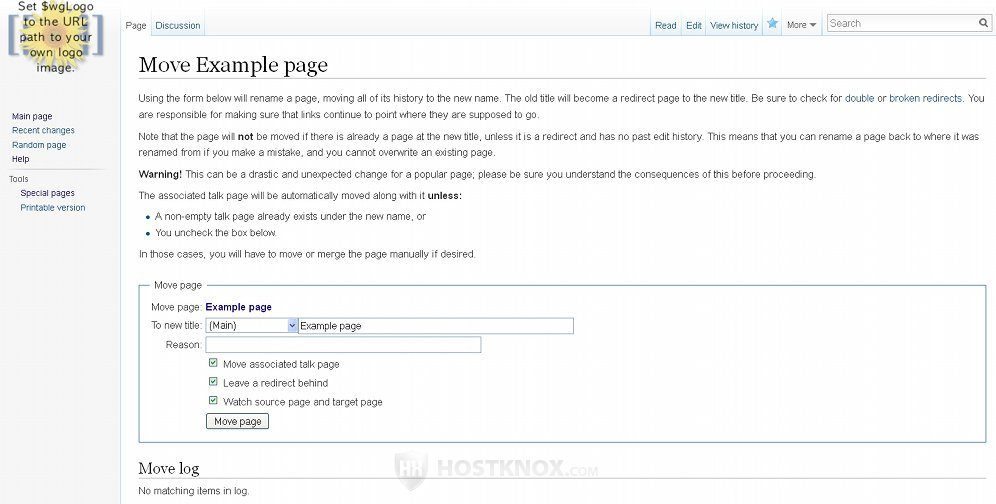
The options are:
- To new title - leave the drop-down menu to its default value and in the text field type the new name of the page.
- Reason - you can leave this field empty. Optionally, you can type some short explanation about the move to be shown to other users on the pages that list the changes to pages (e.g. Recent changes page).
- Move associated talk page - this option is only present if there's a discussion page associated with the page that you want to rename. If there's one and you want to move it too, make sure that this checkbox is marked. It's marked by default.
- Leave a redirect behind - by default, this option is not available to regular registered users but only to administrators. If you want other user groups to be able to edit this option, you have to edit their user rights and give them the suppressredirect permission.
The option for creating a redirect on the old page to the new page is enabled by default. This means that after you execute the move, the page with the old name will be kept so that when users open that page with the old name they will be automatically redirected to the page with the new name.
If you don't want a redirect to be created on the old page, unmark this checkbox. This is usually done when you undo a move (performed by another user or by yourself). In this case you move back the page to its previous name and so you don't need the redirect (you can also delete the empty page). - Watch source page and target page - this option is also enabled by default. This means that both the old page and the renamed one will be added to your page watchlist. With a watchlist you can more easily keep track of changes to pages that you've added to the list.
After you're ready with the options click on the Move button below them and a page will be displayed informing you that the move is successful.
Delete Pages and Restore Deleted Pages
By default, only users belonging to the administrator user group have the right to delete pages. Generally, this is an action that's rarely performed. In most cases instead of deleting the page it may be better to move/rename the page, if the title of the page is inappropriate or not relevant to the content; or to copy the content of the page to another page and add a redirect to that page, if the content of the page is more relevant to an existing page or a similar/duplicate content already exist on another page.
If you decide to delete the page, it's a good idea before that to check whether there are links to this page on other pages. To do this, access the page and click on the button What links here in the Tools menu on the left. If there are links, it's a good idea to remove them before you delete the page.
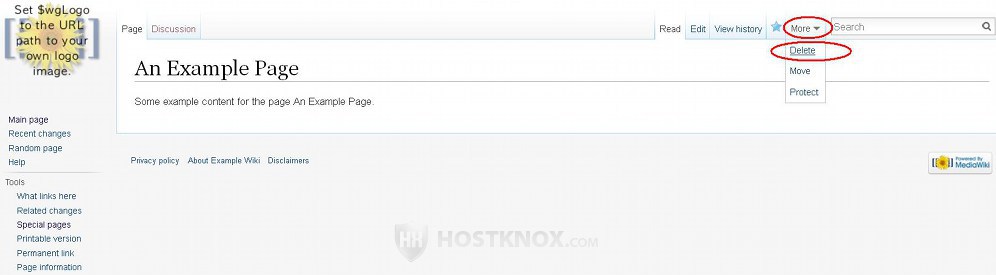
To delete a page, after you open the page click on the arrow next to the More button at the top and from the drop-down menu that appears select Delete:
This will open a form with a few options:
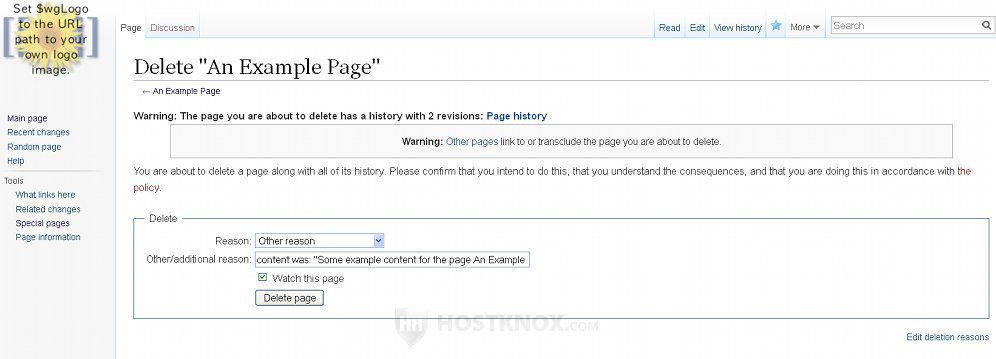
If there are links and/or redirects to the page that you haven't removed, there will be a warning message about this. On the form there are some options:
- Reason - from this drop-down menu you can select one of the preconfigured reasons (e.g. Spam, Vandalism, Copyright violation, etc.), or you can leave it to the default Other reason. You can add more to these preconfigured reasons by clicking on the link Edit deletion reasons that's under the options.
- Other/additional reason - in this text field you can type some additional information. By default it contains information about the content of the page. This information is shown to other users on the page that shows the recent changes to pages and in the deletion log.
- Watch this page - you can still put the page that you're about to delete in your page watchlist by marking the checkbox or you can remove it by unmarking the checkbox. Note that deleted pages can be restored.
After you're ready with the options click on the Delete page button that's under them. When you do this a page will open informing you about the successful deletion.
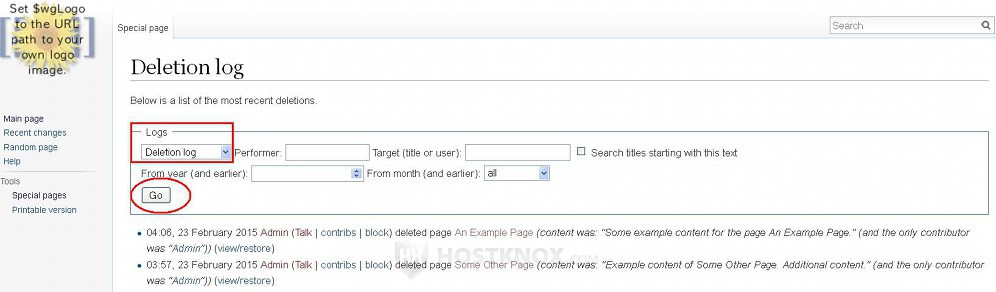
Users can check whether there are deleted pages by going to the Recent changes page (Recent changes button in the Tools menu on the left), or by opening the deletion log which is specifically intended for listing deleted pages.
The deleted page can still be visited by searching for its name with the search function or opening its URL address. It can be restored from there. By default, only administrators have that right. If, for example, the homepage of the wiki site is yourdomain.com and the name of the deleted page is Example page, then the URL of the page will be yourdomain.com/index.php/Example_page. On the page that opens there's a notice that the page has been deleted and the deletion (and move) log is also provided. You'll see a button view/restore with which you can go to the form for restoring the page. If you don't remember the name of the page, you can also access it from the deletion log. In the Tools menu on the left click on Special pages>Logs button in the Recent changes and logs section>on the page that opens select Deletion log from the Logs drop-down menu and click on the Go button.
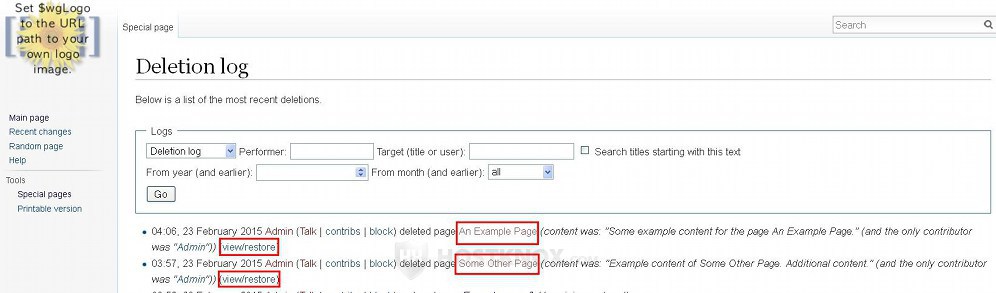
This will display a list of the deleted pages. From there you can directly go to the form for restoring the page by clicking on the view/restore button of the page. From that form you can restore the page from any of its revisions. Alternatively, you can go to the edit form by clicking on the name of the page. Since the page is deleted its name will be colored in red.
This will open the form with the text editor for creating/restoring the page. This is useful if you want to add a new content for the page; above the edit form there's also a list of the revisions and a view/restore button with which you can go to the form for restoring the page from an old revision.
On the form for restoring the page you'll see the page history, meaning each of the edits/revisions that was made to the page:
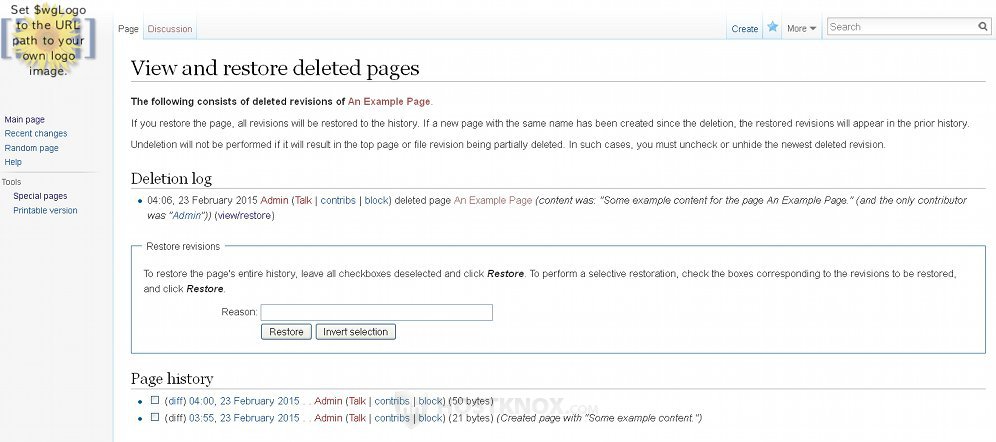
By default, the checkboxes for all revisions are unmarked which means that the whole page history will be kept and so the page will be restored according to the most recent revision. With the diff button in front of the revision you can check the differences between the revisions. If you want a particular revision to be restored, mark the checkbox of that revision.
You can optionally type in the Reason text field some short explanation of why the page is restored. Then click on the Restore button. Once you do that you'll see a page informing you that the deleted page has been restored.
Protect Pages
With the function for protecting pages you can specify which user groups can edit and move a particular page(s). By default only administrators are allowed to use this function.
If you have an open wiki, by default all users, including unregistered users, can edit pages, and all registered users can move pages. If you want to specify what a user group can do for the whole site, you can do this by changing the user rights of that group. For example, if you want all pages to be edited only by registered users, you can achieve this by limiting the rights of unregistered users so that they can't edit pages.
With the function for protecting pages you can restrict the actions that can be performed with specific pages. This is done per page. For example, there might be a page that you want only registered users or only administrators to be able to edit. To do this, access the page, click on the arrow next to the More menu in the upper right corner and in the drop-down menu that appears click on Protect:

Keep in mind that we've used as an example the default Vector skin. With other skins the button may be located somewhere else on the page.
This will open a form with some options:
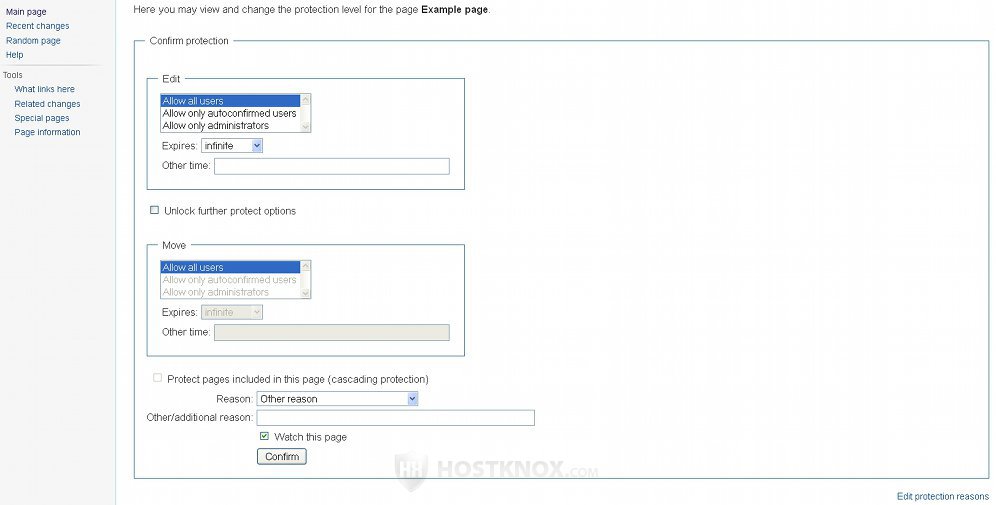
There are options with which you can change who can edit the page and options for who can move the page. If you make changes to the options for editing, those for moving will be automatically set in the same way. If you want to give different permissions for editing and moving, mark the checkbox Unlock further protect options.
There's a list of the groups for each of the actions. Select the group that you want to be able to perform the action. All groups that are hierarchically under that group will not be able to perform it, and those that are above the selected group will be allowed to perform the action. For example, if for the Edit action you select Allow only autoconfirmed users, then all registered users will be able to edit the page, while visitors/unregistered users will not be able to do it. From the Expire drop-down menu select for how long you want the protection to last. By default, it's set to infinite. Of course, you can later change the protection level and expiration at any time.
Under the option for the actions there are some additional settings. From the Reason drop-down menu you can select one of the preconfigured reasons. This is optional. The reason will be shown on the page with the recent changes and in the protection log. You can add more preconfigured reasons by clicking on the link Edit protection reasons that's under the options. If you want the page to be added to your watchlist, mark the checkbox Watch this page. When you're ready click on the Confirm button.
You can keep track of all changes to the protection of pages with the help of the protection log. To access it, click on the Special pages button in the Tools menu on the left>Logs button in the Recent changes and logs section>select Protection log from the drop-down menu on the page that opens and click on Go. Of course, you can also see these changes listed on the Recent changes page.
Maintenance Reports, Statistics and Tools Related to Pages
MediaWiki has many of the so called special pages that are related to managing pages. These include various maintenance reports, statistics and some other tools.
To view a list of the available reports and tools click on the Special pages link that's in the Tools menu on the left. On the page that opens the available special pages are grouped into sections. Some of them are directly related to managing the pages of your wiki. At the top of the page is the Maintenance reports section:
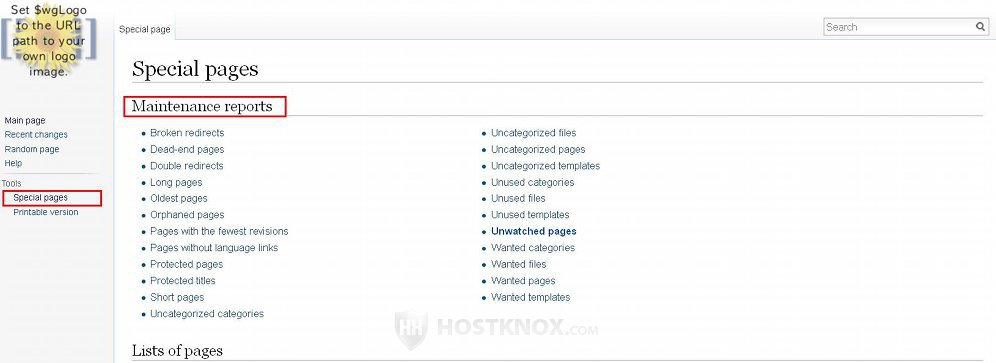
There you'll find all sorts of useful reports: e.g. for broken redirects, dead-end pages, protected pages, etc. If you click on any of them, a page with a relevant list will be displayed. For example, if you want to see a list of all the pages that don't contain links to other pages, click on the Dead-end pages link.
Another useful section related to pages is List of pages:
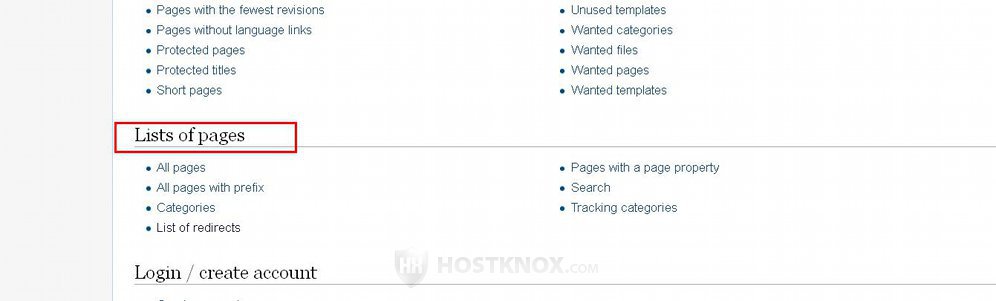
There you'll find links to different page lists: e.g. a list of all pages, a list of pages with redirects, etc.
Still another useful section is Recent changes and logs:
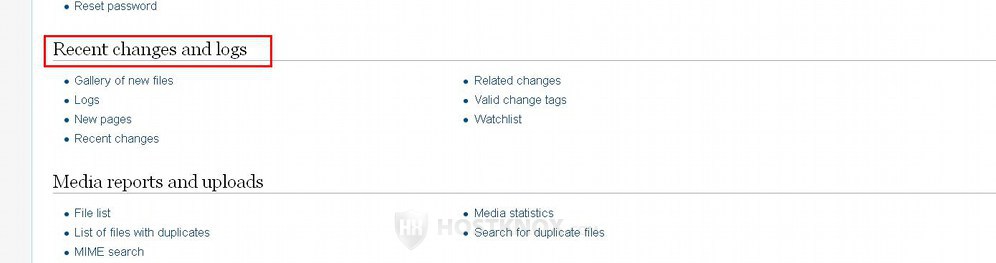
From there you can access, for example, a list of all the newly created pages, a list of the changes and revisions made to all pages. With the Logs button you can access the various logs; on the page that opens there's a filter which you can use to select a particular log (e.g. deletion log, protection log, move log, etc.). You can use them to track a particular action performed to pages (e.g. deletion of pages).
At the bottom of the list with the special pages there are a couple of sections also related to pages: High use pages and Page tools.
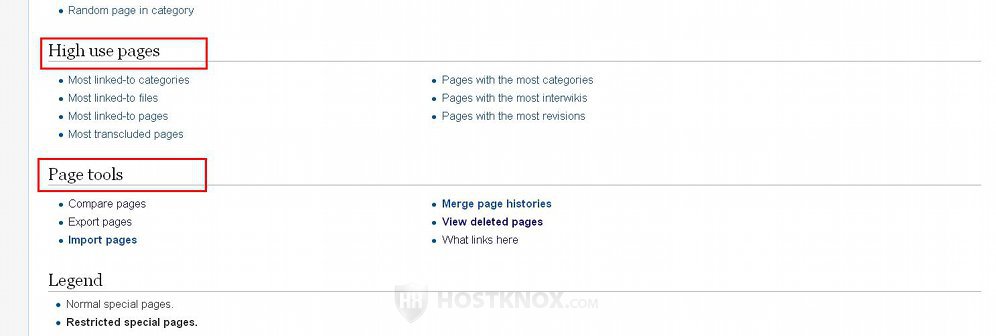
In the section High use pages you'll find some statistics about the most linked-to pages, the pages with the most revisions, etc.
In the section Page tools there are a few useful tools. When you click on the Compare pages link a form will open with which you can select pages that you want to compare. With the tool What links here you can select a page and see a list of all the pages that contain links to the selected page. The Export pages tool can be used to export the pages from your MediaWiki site. You can then import them on another wiki site using the Import pages tool. For more information on this check out the tutorial on how to export and import pages in MediaWiki.
Some of the special pages are available only to administrators.
The above mentioned special pages are only some of the available ones; the ones that are mainly related in some way to managing the other pages. As you can see from the full list with the special pages there are pages for managing other things like users, user groups and permissions, uploads and media, etc.
User and Talk Pages
In addition to the regular content pages and to the special pages, in MediaWiki there are also user pages and talk pages.
For each page an associated talk page can be created; it's also referred to as a discussion page. On that page users can discuss and comment on anything related to the page: e.g. they can discuss the content of the page, propose changes to be made, both to the content and administrative changes (e.g. deletion).
To access the talk page associated with a page, go to the page and click on the Discussion tab in the top left corner:
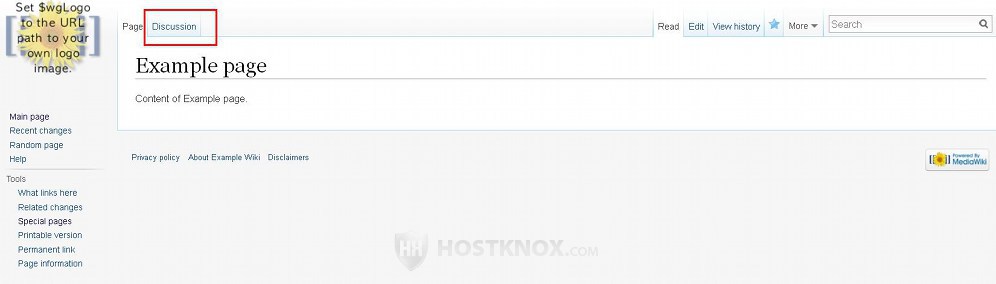
This will display the discussion/talk page. If there's no talk page created for the particular page, the Discussion button will be colored in red. If this is the case, clicking on the button will display the form for creating the talk page.
To post a comment, simply click on the Edit button on the talk page and add the comment in the same way as you add content to other pages. To go back to the page with which the talk page is associated click on the Page tab that's next to the Discussion tab.
Each registered user has a user page. On that page the user can add any information about them, or whatever they want. To access or create your user page, after you log in click on your username in the top right corner:
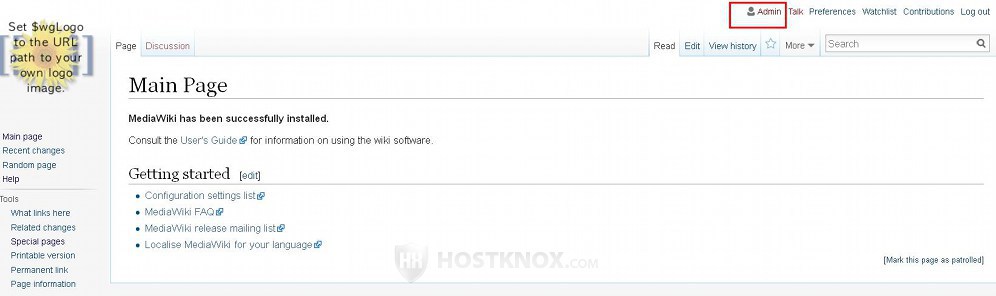
If the page doesn't exist the link will be red and by clicking on it you'll open the form for creating the page. Your username and respectively the link to your user page is listed in different lists throughout the site. For example, when you make a contribution by adding or editing a page, the change will appear in the various revision lists (e.g. the Recent changes page) and other users can go to your user page by clicking on the username. Note that user pages can be added and edited as any other page, meaning that a user can create and edit any user page, regardless of whether it's their own page or that of another user.
Keep in mind that a user page can also have an associated talk page on which users can discuss the page of that user, the contributions of the user, or anything they want. To access or to create it, after you open the page of the user click on the Discussion tab in the top left corner of the page. On pages that list the names of users there's also a link to the talk page of each user. So the talk page can also be accessed from there.
Links to Other Tutorials Related to Pages
In addition to this main tutorial on managing pages we have some other tutorials related to pages: