MediaWiki Users Tutorial - How to manage users, user groups and permissions in MediaWiki
How to manage users, user groups and permissions in MediaWiki
Each visitor on the frontend of your MediaWiki site is considered a user. There are two main types of users: unregistered users (or visitors) and registered user. This determines what the users are allowed to do on the site. A registered user can belong to one or more user groups. Each user group (including unregistered users) has a set of permissions, also called user rights, that specify what the users in that group can do on the site and which functions they are allowed to use. For example, by default on an open wiki site unregistered users are allowed to read and edit pages, while regular registered users in addition to these rights are also allowed to move/rename pages. Users from user groups with more privileges (e.g. administrators/sysops) are allowed to do more things.
MediaWiki comes preconfigured with a few user groups. If needed, you can add more user groups and you can also change the set of permissions for each group.
In this tutorial we'll go over the tasks related to managing users, user groups and permissions. We'll show you:
- how to create a user account
- how to view and find users
- how to view the existing user groups and their user rights
- how to add users to user groups and remove users from user groups
- how to block users
- how to create user groups and change the rights of user groups
Create User Accounts
By default, on an open wiki site visitors are allowed to create their own user account. For a visitor to create an account, after the visitor opens the site they have to click on the Create account button. The exact location of the button depends on the skin. Usually the button is in the top right corner. As an example we'll use the default Vector skin that comes prepackaged with MediaWiki. Clicking on the button will display the form for creating an account:
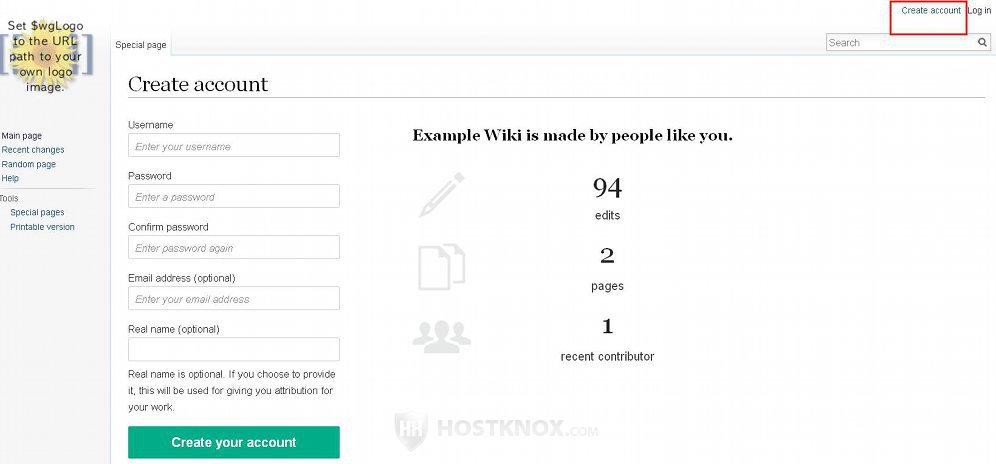
The user has to provide a username and a password, and optionally an email address. If email authentication is enabled, the user has to verify their email address before being able to use the options and features related to emails; if they don't verify the email they will still be able to log into their account, but they will not be able to use the options related to email.
Email authentication can be initially enabled/disabled during the installation of MediaWiki. After that it can be enabled or disabled by modifying the LocalSettings.php file of the application. For more information on how to do it check out the article on how to enable and disable email authentication in MediaWiki.
The form for creating accounts can also be accessed from Tools menu on the left>Special pages button>Login/create account section on the following page>Create account button. That's how registered users who are logged in can access the account creation form. Registered users can create accounts for other people. When a registered user opens the account creation form there's an additional option. It's a checkbox labeled Use a temporary random password and send it to the specified email address. When you click on it the fields for the password are removed and the email field becomes required. You only have to specify a username and the email address of the person for whom the account is intended. After you create the account a message with a temporary password that's automatically generated by MediaWiki will be sent to the user. After they log in with it they have to change the password.
It's also possible to disable user account creation for all users, or you can allow only users from a particular user group(s) to create accounts. For more information on how to do this check out the article on how prevent users from creating accounts in MediaWiki.
View and Find Users
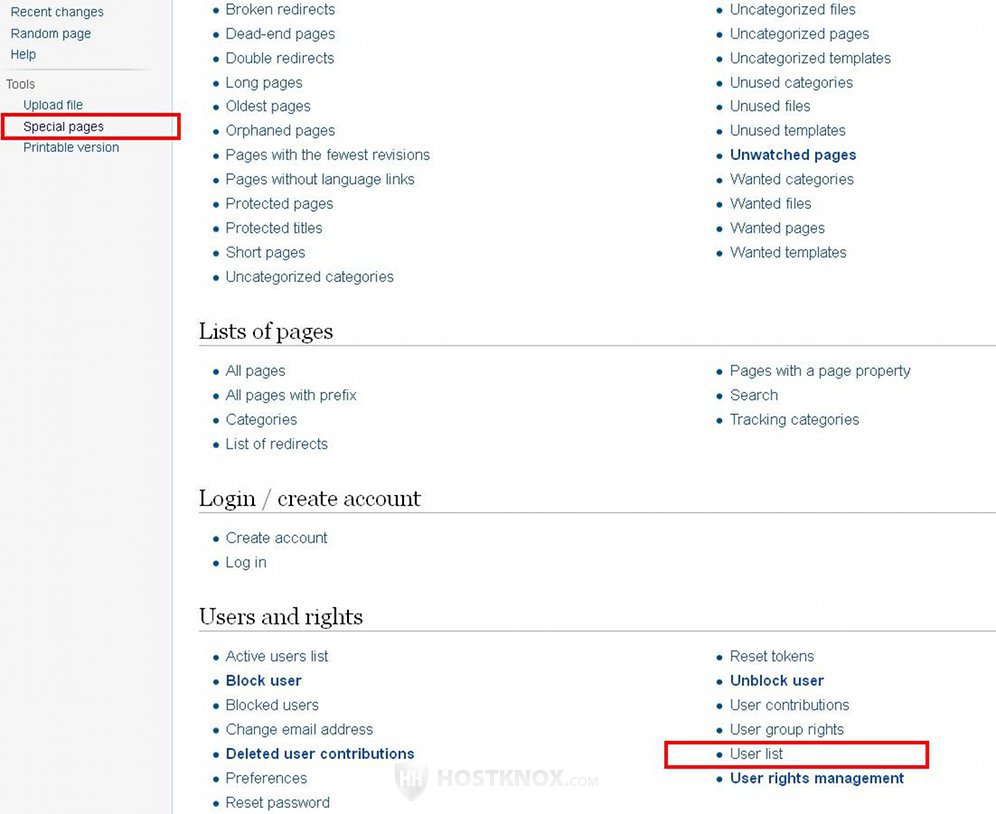
In MediaWiki there's a special page that displays a list of all users; on that page you can find any user you need. To open this page go to Tools menu on the left>Special pages button>Users and rights section on the following page>User list button:
In the same section there's also a button Active users list that displays a list only of the users who have performed some actions or made edits within the last 30 days.
After you click on the User list button this will open a page that lists the registered users:
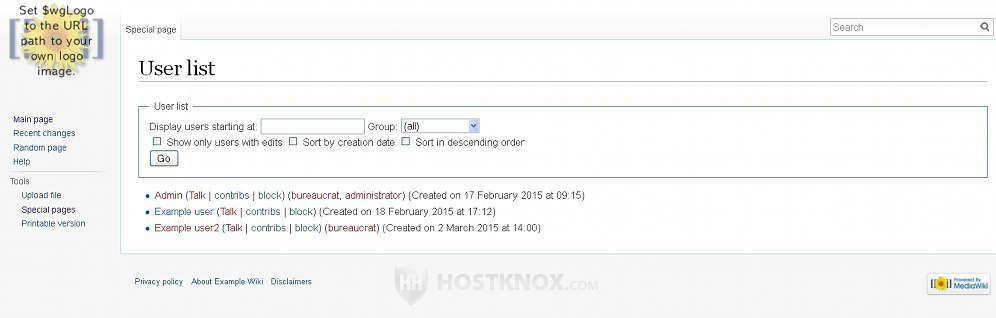
At the top of the page above the list there are some options with which you can filter which users should be displayed based on different criteria. For example, you can choose to view the users only from a particular group and/or only those that have edited pages. When you make changes to these options click on the Go button to refresh the list.
For each user on the list you'll see their user group(s) and the date on which the account was created. The username of the user is a link to their personal page on the site (if they have created one); there are also links to the discussion page for that user and for viewing a list of the page edits (contributions) that the user has made.
View the Existing User Groups and Their Permissions
On your MediaWiki site there's a special page that lists the existing user groups and the set of permissions for each group. This is a very useful page; from there you can check what the current groups are and what the users in each group are allowed to do. There's a description for each of the permissions. In addition to this there you'll also find the exact label for each permission. You need to know what this label is when you configure the permissions of a user group. This is done by modifying the LocalSettings.php file of your MediaWiki, and in order to add a permission to a group (or to remove it) you need to know the label of that permission. We'll discuss this in the section in this tutorial on how to change the permissions of user groups.
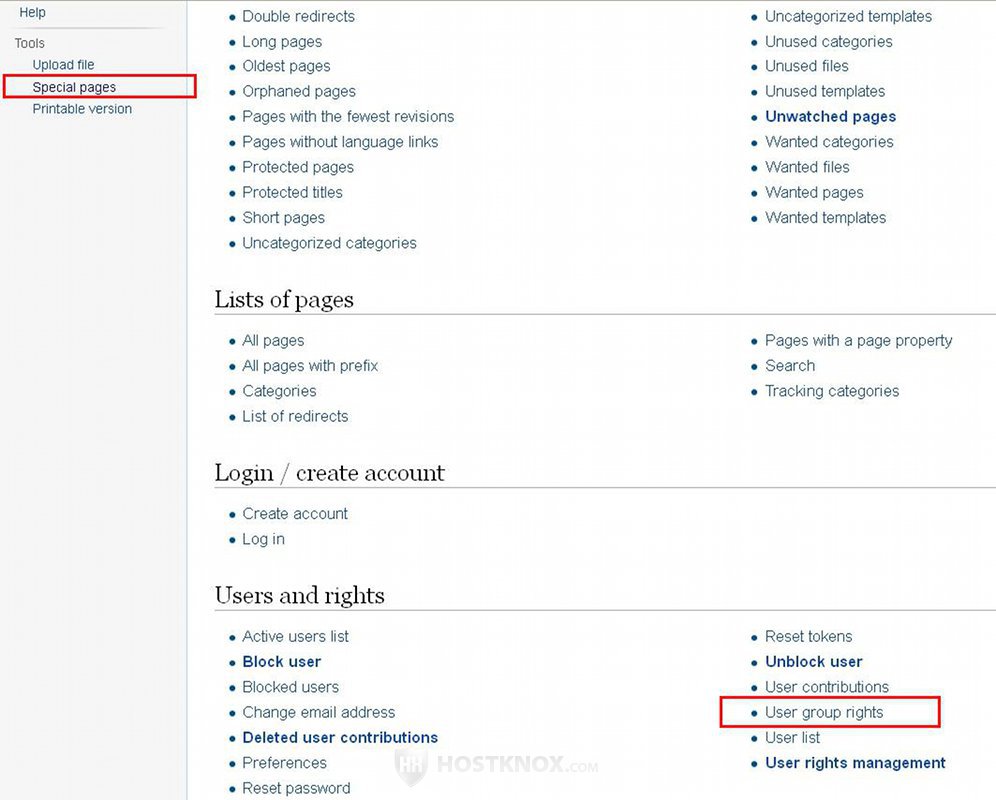
To access the page that shows the user groups and their rights, go to Tools menu on the left>Special pages button>Users and rights section on the following page>User group rights button:
On the page that opens after you click on the button there's a table with the user groups listed in the left column and their corresponding permissions in the right column. In brackets after the description of each permission you'll see its exact label. That's the name of the permission that you have to use when you change permissions in the LocalSettings.php file:
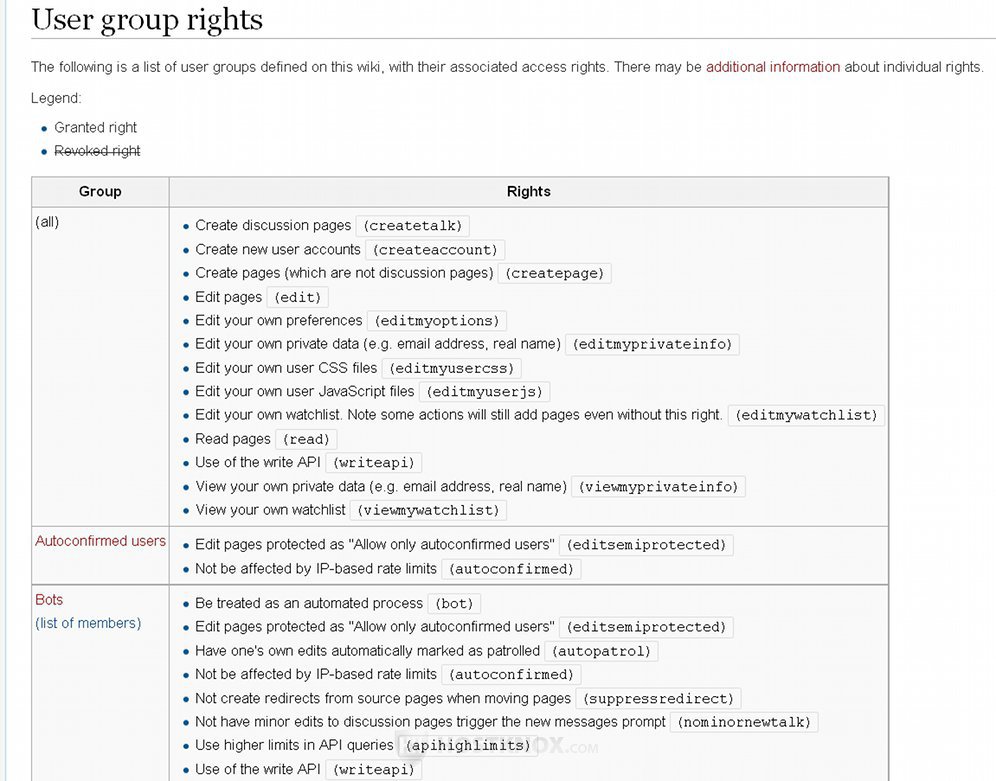
MediaWiki comes with several preconfigured groups: all/visitors, users (all registered users), bots (changes made by users from that group are not shown on the pages that list page changes and revisions), administrators (also called sysops), and bureaucrats. The group Autoconfirmed users has a couple of additional rights as compared to the Users group. Users are automatically put in that group based on two conditions: a certain time period has to pass and a certain number of page edits have to be performed by the user. By default, both these options are set to zero which means that practically all users in the Users group are immediately put in the Autoconfirmed users group. If you want to, you can change the values for these criteria for assigning users to the group autoconfirmed users.
The group all refers to all unregistered users/visitors. The first user account that's created during the installation of the application by default belongs both to the administrator and bureaucrat groups.
There are also a few other useful things to remember about user groups:
- The label that's used for the user groups on this page is not necessarily the one that's used in the LocalSettings.php file when changing the permissions of the existing groups. We'll show you what they are for the default preconfigured groups in the section in this tutorial on changing user group permissions.
- All registered users are automatically put in the user group. It's the basic group for registered users and they cannot be removed from it.
- A user can belong to more than one group. In this case the user has the permissions of all the groups to which they belong. For example, every registered user belongs to the user group by default. In order for that user to have additional rights you can assign them to other groups. They'll keep their permissions from the user group and they'll also have the rights of the other groups to which they are assigned (e.g. administrator, bureaucrat, etc.).
Assign Users to User Groups
As we mentioned, each registered user can belong to more than one user group. The group to which all registered users are assigned by default is called simply user. This is a group from which they cannot be removed. They are also automatically promoted to the autoconfirmed user group, but that group only has a couple of additional permissions that are not significant anyway. So when you see a user listed as being in the group autoconfirmed users this means that they also belong to the user group which is the basic one that has all the main permissions.
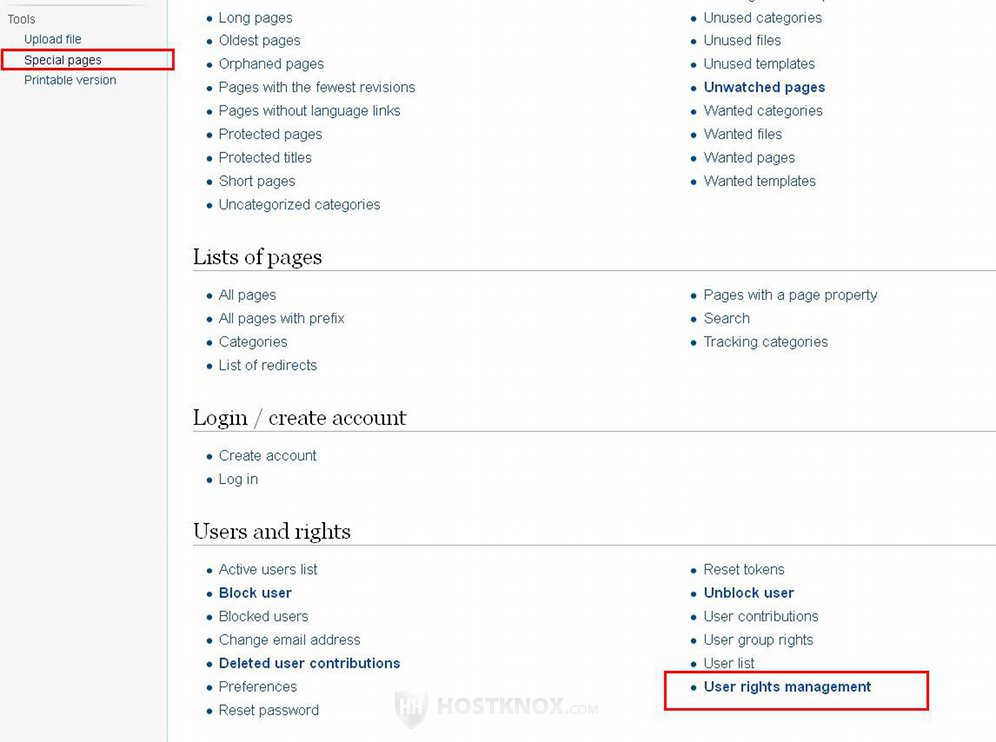
To add users to user groups or to remove them from user groups to which they belong, go to Tools menu on the left>Special pages button>Users and rights section>User rights management button:
This will open a page with a text field and a button:
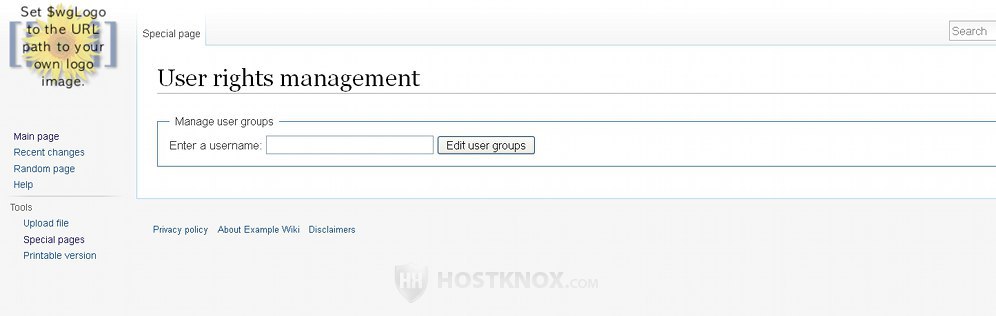
Type the username of the user in the text field and click on the button Edit user groups. This will display to which group the user belongs and a list of the available user groups with a checkbox for each group.
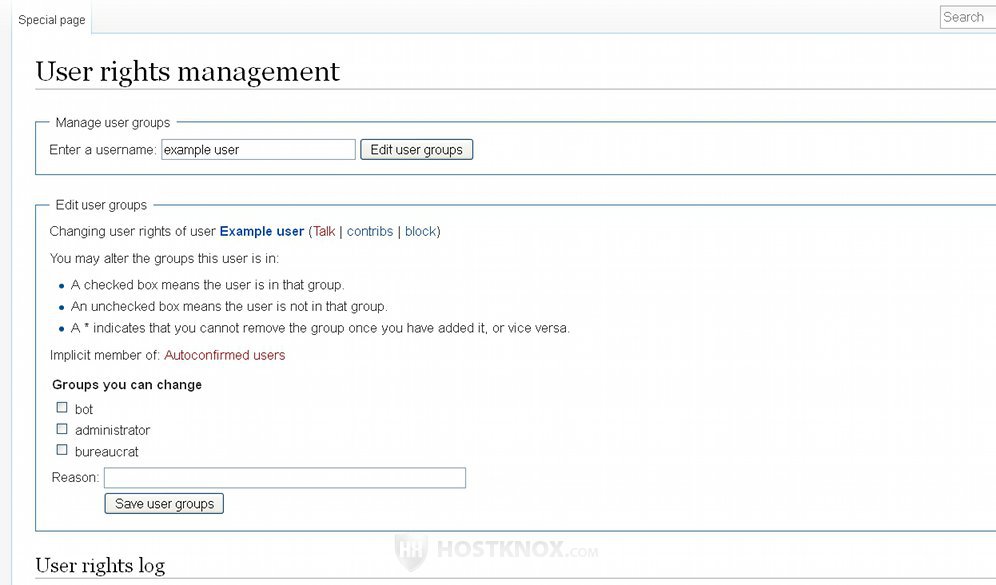
Since each registered user is by default a member of the basic user group, and by default such users are automatically promoted to the autoconfirmed user group, then each user will be listed as an implicit member of autoconfirmed users. In case you've edited the criteria for that group the user will be a member at least of the user group. And since users cannot be removed from that group it's not shown in the list with the groups to which the user can be added or removed from.
Under the label Groups you can change you'll see the available user groups. If the user already belongs to another group, its checkbox will be marked. To remove the user from that group, unmark the checkbox. To add a user to a group mark the respective checkbox. You can optionally type some short explanation in the text field for Reason; it will be shown to other users in the log. Then click on the button Save user groups.
Keep in mind that only users who belong to the bureaucrat user group are allowed to use the options for assigning users to user groups. The first account that's created during the installation belongs to the bureaucrat group as well as to the administrator/sysop group. So that user can configure these options and can promote other users to the bureaucrat group so that they can also assign users to user groups.
Block Users
In MediaWiki there are options with which you can block users. You can block user accounts of registered users, you can block specific IP addresses, or you can also block a whole range of IP addresses. Blocked users will not be allowed to edit content or perform any other action with the pages on the site; they will only be able to visit the site and read the content. Users can be blocked for a specified period of time or for an indefinite period. A blocked user can be unblocked at any time by a user belonging to a group with the permissions to block and unblock users.
By default, the only user group that has the permissions to block users is the administrator/sysop user group.
To block users, go to Tools menu on the left>Special pages button>Users and rights section>Block user button:

This will open the form for blocking users:
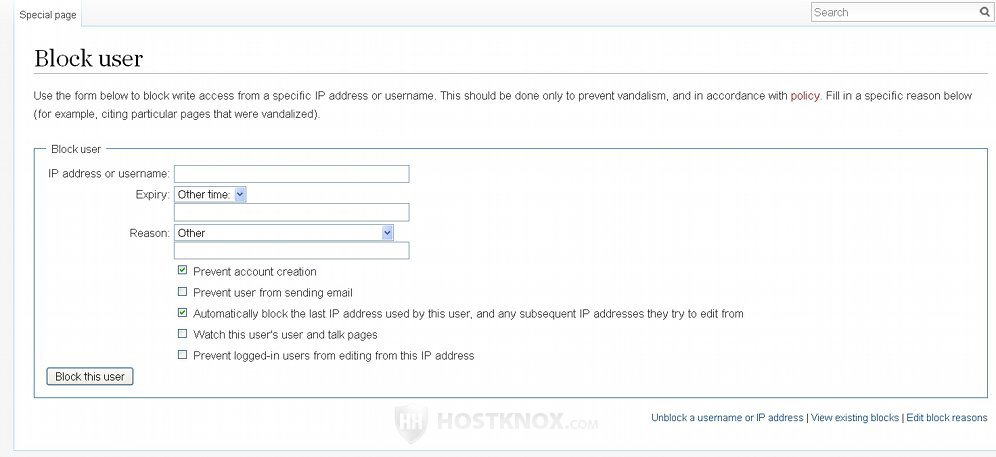
The form contains some options: a few text fields and drop-down menus, and several checkboxes. The available options with the checkboxes depend on which options are enabled/disabled in the LocalSettings.php file of your MediaWiki. Some of the checkboxes can be removed from the form or additional ones can be added by enabling/disabling these options in the LocalSettings.php file. By editing the LocalSettings.php file you can change the default configuration of the available options on the block form. Now we'll review the ones that are present by default after MediaWiki is installed.
- IP address or username - in this text field you can type either the username of a registered user or an IP address. The IP address can be that of a registered user or of an unregistered user/visitor. You can also specify a whole range of IP addresses (e.g. 1.2.3.4-1.2.3.10); however you should be careful when you do that because you can block the IP addresses of users who haven't done anything to be blocked.
Note that on the various pages that list page edits (e.g. Recent changes page, the revision history of a page) and also on the various pages that display logs, the usernames of the users that performed the actions are also shown. For each username on these pages there's a block button (it can be seen and used only by users who have the permission to block users). Clicking on it will automatically open the form for blocking users and the text field IP address or username will be automatically filled with the username of the user. - Expire - from this drop-down menu you can select for how long should the block apply. There are some preconfigured time periods (e.g. 1 day, 1 week, etc.). When the period expires the user will be unblocked. If you set it to indefinite, the user will be blocked until you (or another user with the permission to do so) unblock that user. If you leave the drop-down menu to Other time you can specify a specific time in the text field under it.
- Reason - this is an optional setting. If you want to, you can specify a reason for blocking the user. You can either select one of the preconfigured reasons from the drop-down menu, or you can leave it to Other and type some reason in the text field under the menu. The reason is shown to the blocked user when they try to perform some action (e.g. editing a page). It's also shown on the page that lists blocked users and in the block log.
You can edit the existing preconfigured reasons and add new ones by clicking on the button Edit block reasons that's in the lower right corner below the options. - Prevent account creation - this checkbox is marked by default. This means that the blocked user will not be allowed to create new accounts. If you unmark the checkbox, the user will be allowed to create new accounts.
- Prevent user from sending email - with this option you can select whether the blocked user will be allowed to use the email function, that is to email other users through the MediaWiki application (there's a form on the site for sending emails to users). By default, the checkbox is unmarked which means that the user will be able to use the email function. To disable it for the blocked user, mark the checkbox.
- Automatically block the last IP address used by this user, and any subsequent IP addresses they try to edit from - this option is only available if you block a username. If you type an IP address in the text field IP address or username, then the option will be automatically hidden. The option is enabled by default which means that the IP address associated with the account of the user will be automatically blocked, as well as any other IP address from which they log into their account and try to perform actions with pages (e.g. editing). For example, if the blocked user account tries to edit pages from a different computer, the IP address of that computer will be automatically blocked. These automatic blocks are for a specified period of time. By default, that period is 24 hours. It can be changed by editing the value for the option $wgAutoblockExpiry in the LocalSettings.php file of your MediaWiki.
So with this option you make sure that when you block a username the IP address associated with that username is also blocked, which means that the user will not be able to edit content as a visitor (without logging into their account) from that same IP address. If the user tries to edit content from a different account, they won't be able to do it because the IP address is blocked. It also means that the user can't edit content and perform other actions by simply logging into their account from a computer (i.e. from a different IP address) other than the computer that they usually use; this, of course, applies only if the log in from the blocked account. It also ensures that the other IP addresses from which the user tried to make changes are not blocked for an indefinite period of time. Of course, if the user tries to use one of these IP addresses again, it will be blocked again. - Watch this user's user and talk pages - as you know a user can create their personal page on the site and a discussion/talk page associated with that personal user page. If you mark this option, the personal page of the user and the associated talk page will be put on your watchlist.
- Prevent logged-in users from editing from this IP address - this option is available only if you block an IP address. If you type a username, the option will automatically be hidden. Usually when you block an IP address, it's implied that you're blocking a visitor, not a registered user. If you enable this option, it will ensure that registered users who log into their account from the specified IP address will not be allowed to edit content. If they log in from another address, or this option is disabled, then they will be allowed to edit content.
After you're ready with the options click on the button Block this user at the bottom.
As we mentioned on the form for blocking users there are some options that are only available when the respective options in the LocalSettings.php file of MediaWiki are enabled. These options include:
- Prevent this user from editing their own talk page while blocked - this checkbox is available on the block form when the option $wgBlockAllowsUTEdit in the LocalSettings.php file is set to true. If this checkbox is marked, the blocked user will not be able to edit the discussion page associated with their personal user page.
- Hide username from the block log, active block list and user list - when a user is blocked that user is listed on the mentioned pages on the frontend: the page that lists the blocked users, the user list and the block log. If you mark this checkbox, the username of the blocked user will not be visible on these lists. For this option to be available you have to be in a user group that has the permission hideuser. By default, the administrator/sysop group (or any other group) doesn't have that permission. You can edit in the LocalSettings.php file and add that permission to a group(s). All users who have that user right will see the hidden usernames on the user lists on the frontend.
For more information on the options in the LocalSettings.php file related to blocking users check out the article on how to enable and disable the LocalSettings.php options related to blocking users in MediaWiki.
Note that if you want to completely ban users from even visiting your site you can do that by adding some directives in the .htaccess file that's in the root MediaWiki folder on your hosting account. For more information on how to do that check out the article on how to block access to folders on your hosting account.
You can see a list of the blocked users by either opening the special page that lists the blocked users or by checking the respective log. To open the page with the blocked users list, go to Tools menu on the left>Special pages button>Users and rights section>Blocked users button. To view the block log, go to Tools menu on the left>Special pages button>Recent changes and logs section>Logs button. On the page with the logs select Block log from the drop-down menu and click on the Go button. The difference between the two is that the blocked users list shows only the users that are currently blocked, while the block log lists all actions related to blocking and unblocking users that have been performed.
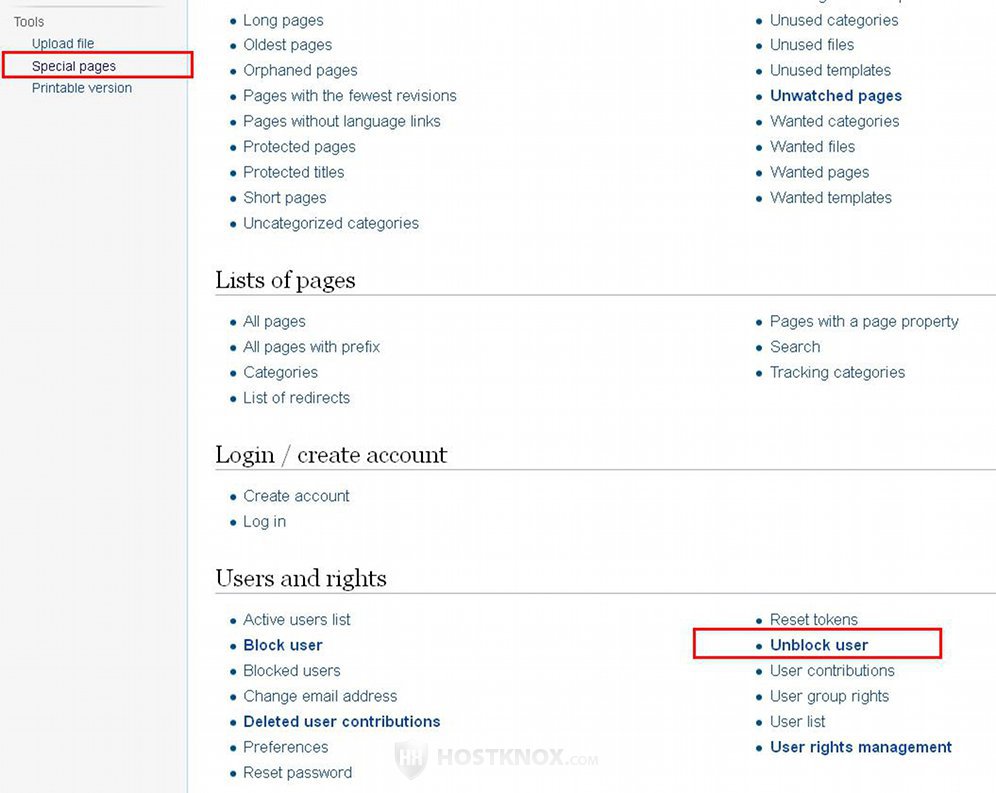
To unblock blocked users, go to Tools menu>Special pages button>Users and rights section>Unblock user button:
This will open the form for unblocking users:
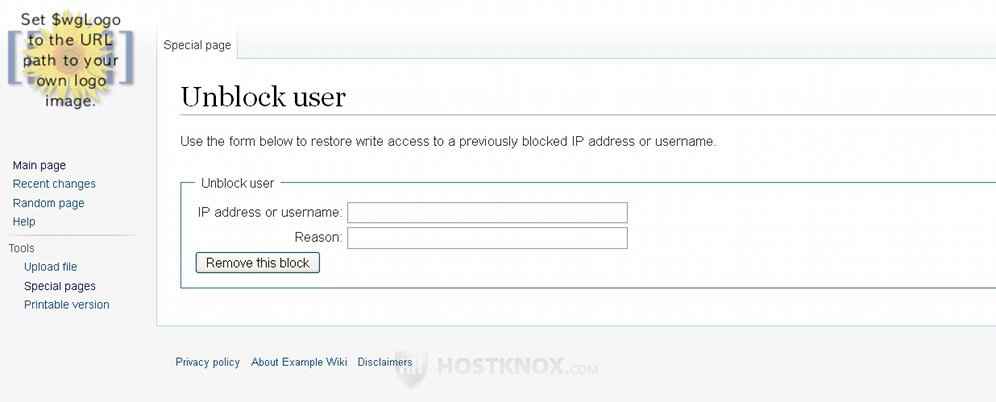
Type the username or IP address in the field IP address or username, optionally you can also provide a reason in the respective field, then click on the button Remove this block.
Create User Groups and Change Permissions
MediaWiki comes with a few default user groups and each group has a preconfigured set of permissions. If you want to, it's possible to change the permissions of each of these groups. You can remove permissions from a group or give permissions to a group that it doesn't have by default. If you want certain users to have more permissions or fewer permissions, there are different ways you can go about it depending on the particular case. You can assign the user(s) to any of the existing groups, or you can create a new group with the desired permission(s) and then put that user in the new group.
As we already mentioned, a user can belong to more than one group and the user gets all the rights from each group to which they belong. Keep in mind that if, for example, a certain right is disabled for a group and enabled for another group and a user belongs to both groups, then that user will be allowed to do the action corresponding to the permission.
You can create new groups and change the permissions for those groups and for the existing ones by adding some code to the LocalSettings.php file of your MediaWiki. Whether you set a permission for a new group or change the permission(s) of existing ones, the code is pretty much the same. The LocalSettings.php file is in the root MediaWiki folder on your MediaWiki hosting account. If, for instance, the application is installed directly in the public_html directory on the account (making the frontend accessible at yourdomain.com), then the path to the file on the account will be public_html/LocalSettings.php. HostKnox clients can edit the file from the Files section of the HostKnox control panel. Another way to do it is to download it (e.g. with an FTP client), then edit it with a text editor (e.g. Notepad) and upload it back overwriting the old file. It can also be done via SSH.
- The code for enabling a permission for a user group has the following form:
$wgGroupPermissions['group-name']['permission'] = true;
- The code for disabling a permission for a user group is almost the same. You only have to replace true with false:
$wgGroupPermissions['group-name']['permission'] = false;
In both cases you have to replace group-name with the actual name of the group which you want to be affected, and you have to replace permission with the actual name of the permission. For example by inserting the following on a new line in the LocalSettings.php file:
$wgGroupPermissions['user']['patrol'] = true;
you'll give the user group user (all registered users) the right to patrol page edits. While:
$wgGroupPermissions['*']['edit'] = false;
means that all users will not be able to edit pages. Note that this will apply only to unregistered users because the user group has the same permission specifically enabled by default.
Each preconfigured permission has an exact label that you have to use in the second pair of brackets. As we mentioned, you can check on the frontend of the site what the permissions for each group are by going to Tools menu>Special pages button>Users and rights section>User group rights button. On the page that opens the label for each permission is specified in brackets after the description of the permission.
When you change the permissions of one of the preconfigured groups you have to put its name in the first pair of brackets in the code. Here are the labels for the default groups that come prepackaged with MediaWiki:
* - all users. This includes the unregistered users too.
user - all registered users. This is the basic group to which all registered users belong.
bot - this is a user group intended for automated processes. The actions and edits performed by these bots are hidden. They are not shown on the Recent changes page, in logs, etc.
bureaucrat - the bureaucrat group. In addition to all the rights of registered users they can assign users to user groups.
sysop - the group of the administrators. This is the group with the most privileges.
- As we explained, the code for creating a new user group and giving it permissions is the same as for changing the permissions of existing groups. Just put whatever name you wish to give to the group in the first pair of brackets. If the name has more than one word, separate them with hyphens or underscores. For example:
$wgGroupPermissions['example-group']['patrol'] = true;
$wgGroupPermissions['example-group']['block'] = true;
will create a group called example-group that will be able to patrol edits and block users. The newly created group with its permissions will be listed on the frontend page that displays the existing user groups. You can then put users in that new group as explained in the section in this tutorial on how to add users to user groups.
To delete a newly created group remove the lines with its permissions from LocalSettings.php. If you want to remove one of the preconfigured groups that come with MediaWiki, you can do that as well. For more information read the article on how to remove preconfigured user groups in MediaWiki.