WordPress Images Tutorial
How to insert images and other media in Wordpress posts
Images, as well as other media formats (audio, video files, etc.), can be inserted inside any of your blog's posts. You can do this is through the administration panel of your blog. In this tutorial we'll insert images but the process is the same for other media types. Note that in addition to inserting an image(s) anywhere in the content of a post, you can also set a featured image. The featured image is displayed above the title of the post. Whether you can put featured images however depends on the theme.
The process of adding images and media files to static pages is the same as the one for posts.
You can add images that are already uploaded to the media library, you can upload images from your local computer or you can also display an image from another site using its URL (hotlinking).
Images in the Content of Posts
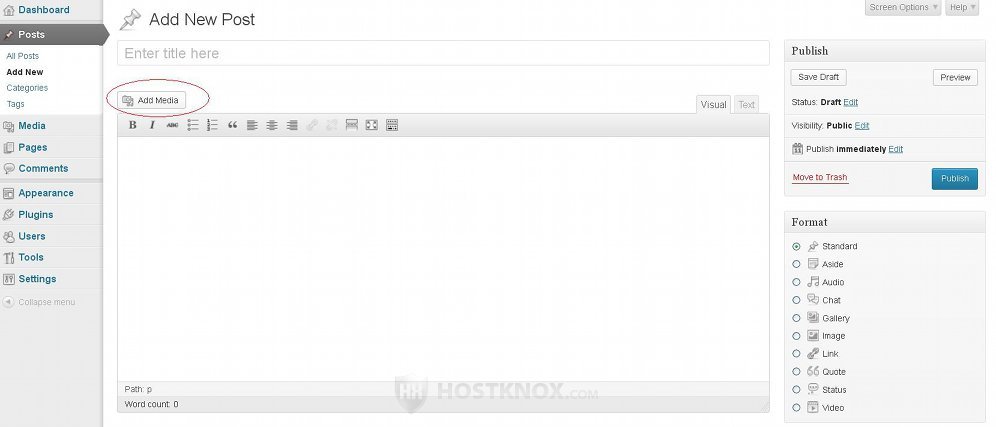
The first thing you need to do is to log in to your dashboard and click on the Posts menu on the left. On the page that opens you'll see your current posts, if you have any. You can add an image to any existing post. To do this just click on Edit under the the name of the particular post, or you can create a new post by clicking on the Add New button and add an image(s) to it. On the Edit Post/Add New Post page there is an Add Media button for uploading/inserting media. It's just above the text editor:
After you click on the Add Media button a window will pop out. If you have any files/images in the media library, their thumbnails will be shown in the window. You can select the one that you want to add in the content of the post by clicking on it with the left mouse button. This will display some settings related to the image on the right side of the panel:
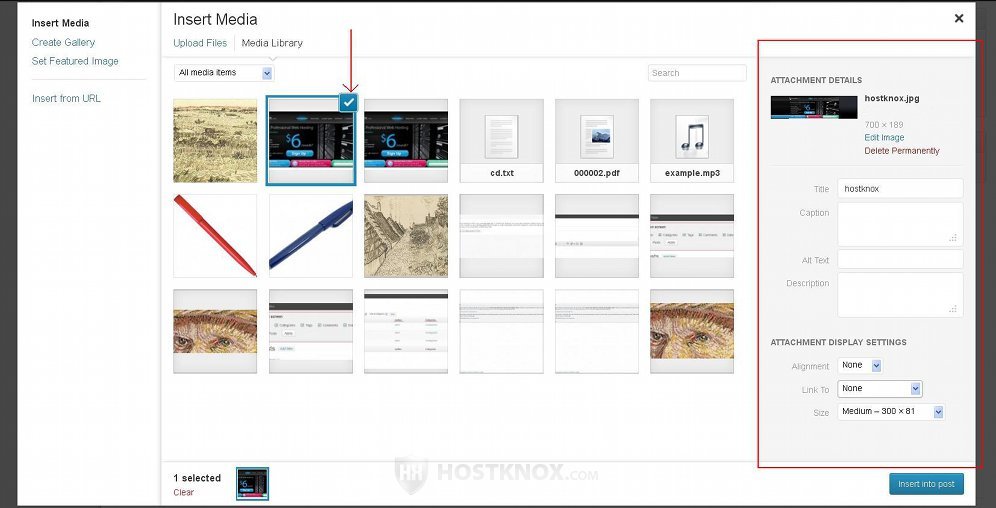
There's an Edit Image button that will redirect you to the media library where you can manipulate the image (e.g. crop it, scale it, etc.); with the Delete Permanently button you can remove the image from the media library altogether. In the respective fields you can type/change the title, caption, alternative text and description. These fields are optional. If you type a title, it will be shown on the frontend when somebody hovers the mouse pointer over the image. If you type some caption text, it will be shown on the frontend under the image. The alternative text is shown only if for some reason the image cannot be loaded.
There is a drop-down menu from which you can change the alignment of the image within the post. From the Link To drop-down menu you can select whether it should be a link or not. It can be set to None, Media File, Attachment Page or Custom URL. If you set it to Media File the image in the post will be a link; when a user clicks on the image it will be shown by the browser in its full original size. Only the image will be shown; no other parts of the site (e.g. background, menus, etc.) will be displayed. If you set the Link To drop-down menu to Attachment Page, the image will be a link to its attachment page. The attachment page shows only the image without the content of the post/static page. Unlike the media file link, the attachment page is part of the site and thus it is shown with the styling of the site (with all the menus, sidebars, etc.). On the attachment page the image itself is a link that points to the media file page. If you select the Custom URL option from the drop-down menu, you can make the image a link to any URL address.
From the Size drop-down menu you can select the size in which the image is displayed in the post. By default, the medium size is used; you can change it to thumbnail or full size. After you're done click on the Insert into post button.
If there are no images in the media library or you want to upload a new one click on the Upload Files button that's in the upper left corner of the window. Then click on the Select Files button:
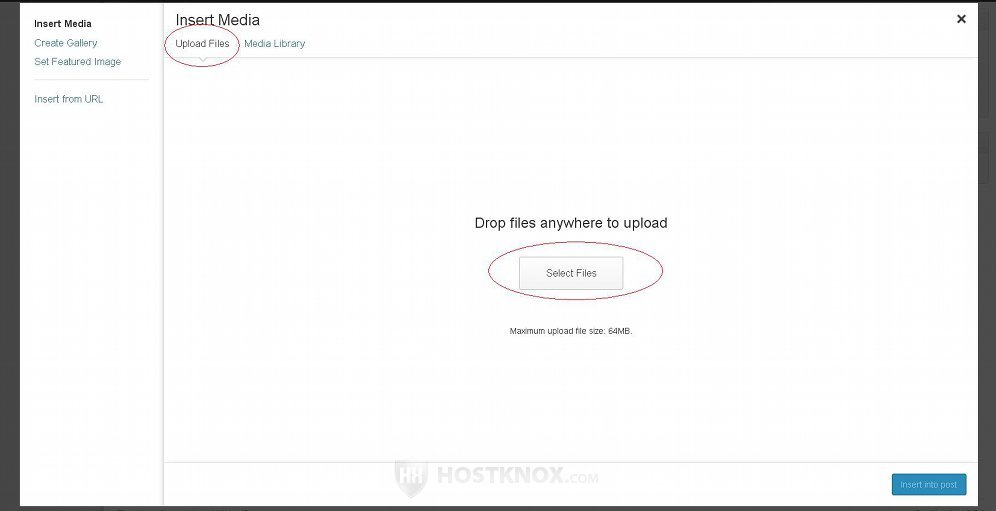
In this way you can transfer files from your local computer to the media library of your WordPress. After you click on the Select Files button a small window will pop out. From it you can select files that are on your local computer. To select more than one file press and hold the Ctrl button on your keyboard and mark the files with the left mouse button. After the image(s) is uploaded just select the one that you want to put into the post and click on the Insert into post button.
WordPress uploads automatically all files in the folder of the media library. If the file is an image, in addition to the original image WordPress automatically makes copies for the different sizes (e.g. large, medium, thumbnail) using the respective dimensions. On your WordPress hosting account the default folder for the media library is located in public_html/wp-content/uploads (assuming that your WordPress is installed directly in the public_html folder on the hosting account). There the uploads are arranged in folders according to the year and month.
You can also insert an image into a post by using directly the URL of the image (for example, an image from another site). To do this, after the pop-out window for adding media opens click on the button Insert from URL and then put the URL of the image in the respective field:
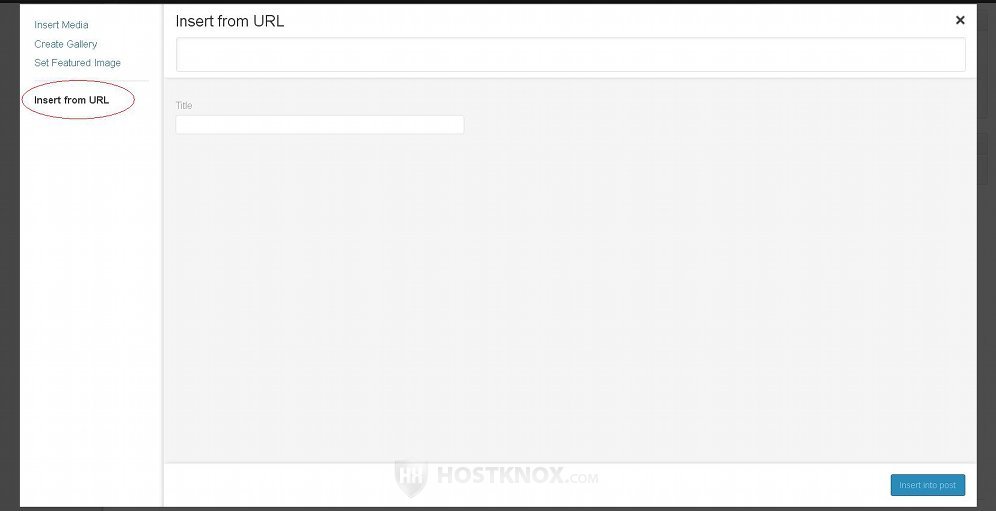
After you put the URL in the field the image will be automatically shown on the page and some options will appear:

You can type a caption, an alternative text; you can set the alignment and you can choose whether the image itself should be a link. After that click on the Insert into post button in the lower right corner. We don't recommend that you use this method to display on your site images from another sites (this is also known as hotlinking). Instead we recommend that you first download the image on your local computer and then upload it from there to the media library.
Once you click on the insert button the pop-out window will close automatically and you'll be brought back to the add/edit post form. The image will be shown in the text editor. When you click on it with the left mouse button a couple of buttons will appear in the top left corner of the image:
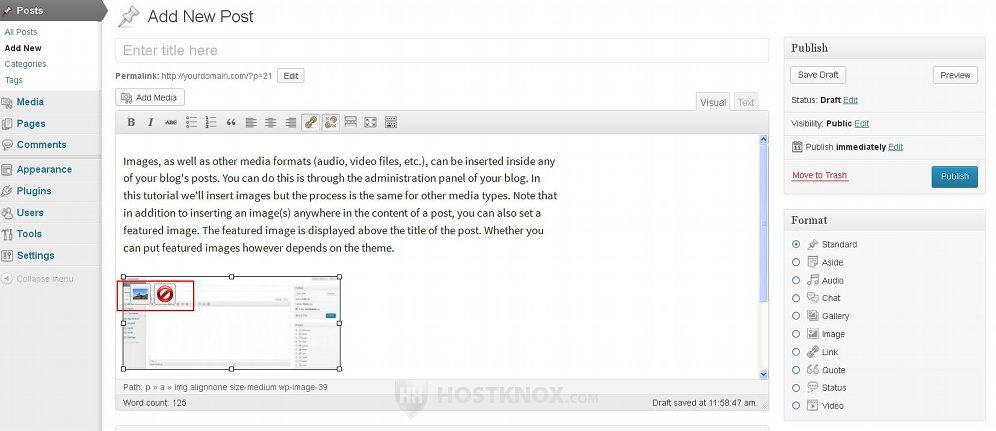
The first one is for editing the options of the image and the second one is for removing it from the content of the post. If you click on the button for editing the image a window will pop out. On it you can edit the options for the alignment, title, caption, link etc.
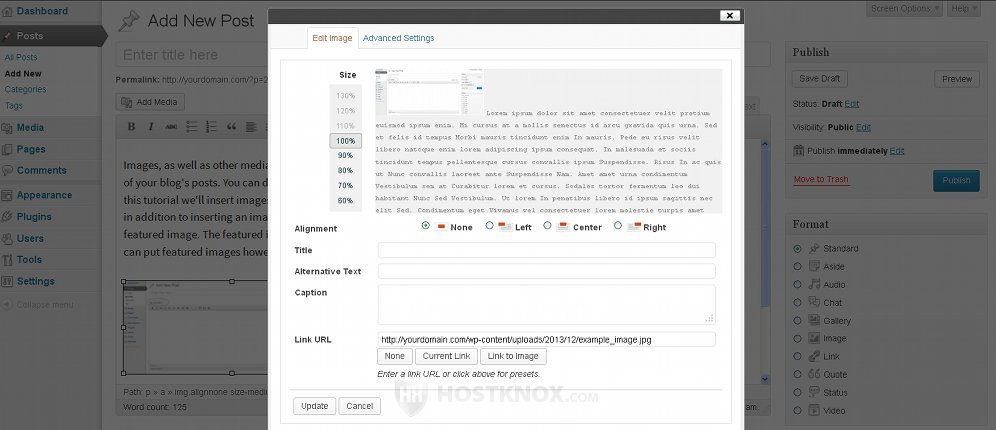
At the top of the window there's an Advanced Settings tab that will provide some additional options.
After you click on the Publish or Update button on the post form the image will be shown on the frontend.
Featured Images
As we mentioned, in addition to inserting images into the content of posts you can also set featured images. Whether this can be done depends on the theme that you use. Featured images are shown on the frontend above the title of the post. On the add/edit form of posts and pages there's a panel labeled Featured Image. If you don't see that panel, click on the Screen Options button in the upper right corner and make sure the respective checkbox is marked. The panel contains a button Set featured image:

Clicking on it will open the same window that's used for inserting images into the content of posts.
For more information on the media library and on managing uploaded files and images check out the following tutorials:
- how to manage the media library in WordPress (a general overview of the media library)
- how to add and edit media files in WordPress (a detailed look at the process of adding and editing media files through the media library)