Drupal Fields Tutorial
How to manage fields in Drupal
In this tutorial we'll use as an example content types to show you how to manage fields, but the field settings and the way they are managed are exactly the same for all the other places in the admin panel where there are such options: users and taxonomy.
When you create a content type, first you need to configure its basic settings. Once you do that and you save the content type you'll be able to manage its fields. You can configure the settings of the existing fields, you can change the order in which they are displayed on the frontend and backend, and you can add new fields. Of course, you can edit the fields for any of your existing content types at any time, not just for the newly created content types. For more information on how to create and edit content types and configure the basic settings check out the tutorial on creating and editing content types in Drupal.
In this tutorial we'll concentrate on the field settings of content types. When you edit a content type there are a few sub-tabs displaying different settings:
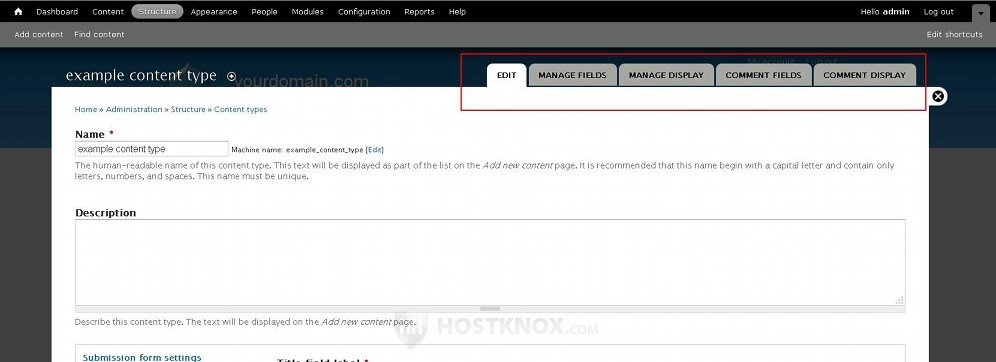
The Edit sub-tab shows the basic/general settings, the Manage Fields sub-tab is for configuring the settings of existing fields, for adding new fields, and for changing the order the fields are displayed on the submission form on the backend when adding/editing nodes from that content type. The Manage Display sub-tab can be used to reorder the way the fields are displayed on the frontend of your site. The Comment Fields and Comment Display sub-tabs are similar to Manage Fields and Manage Display, but the difference is that they apply to the comments submitted for the nodes of that content type.
When you create a new content type it is automatically preconfigured with two fields: Title and Body. This means that content items (nodes) from that content type will consist of a title and a body of text. To manage these fields and add new ones click on the Manage Fields sub-tab; the Title field is obligatory and cannot be removed or edited.
On the Manage Fields sub-tab page you'll see a table listing all the fields in that content type. The first two columns of the table are for the label of the field and for its machine name respectively. The field column lists what type the field is, and the widget column shows how the data for the field can be inserted (e.g. text area, checkboxes, buttons, etc.). For example, the default field labeled Body that is preconfigured for every content type that you create is intended for displaying a body of text, so its field type is Long text and summary, and the widget is Text area with a summary, meaning that when you create/edit a node you'll be provided with a text area for inputting the data for that field with an optional text area for the summary:

Once a field is added its type cannot be changed, but you can change the widget as long as the field type permits this (some field types can be used with only one widget). Drupal comes prepackaged with some different field types from which you can select when adding a new field. You can also expand the list of field types from which you can choose by installing contributed modules.
The last column in the table is operations and there you'll find the buttons for editing the particular field's settings and also for deleting the field. Clicking on the edit button will show a few tabs with settings that apply only to the particular field. The first tab is Edit and it shows the general settings for the field:
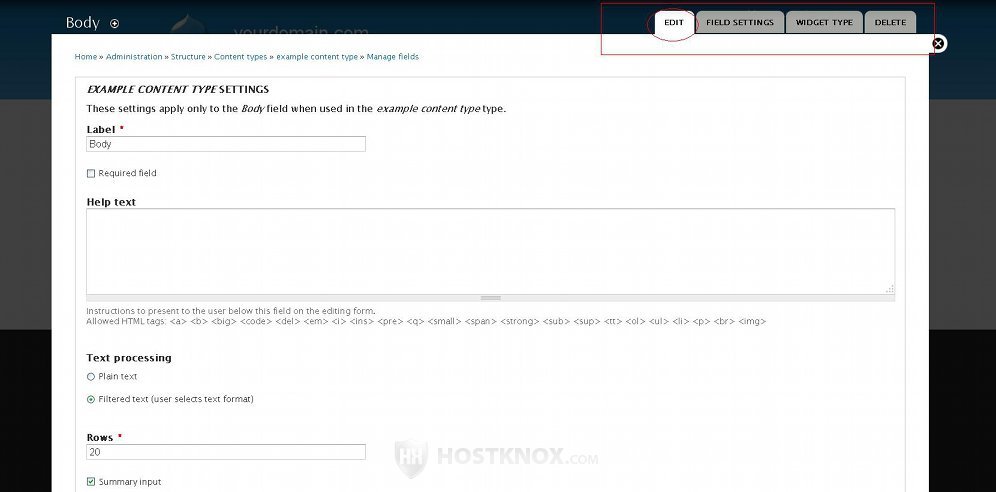
The settings on this page may vary according to the field type. However, for any field you can change its label; you can make the field required, so that it has to be configured before a node from that content type can be published; you can include some guidelines (in the text area labeled Help text) that will be displayed in the admin panel when creating/editing a node. You can also set the field to some default value. For example, for the Long text and summary field type you can type some text in the text area labeled Body. When somebody creates a node, that text will be shown by default in the Body text area, and if it's not change, it will be shown on the frontend after the node is published.
If you make changes to the settings don't forget to click on the Save settings button at the bottom of the page.
The Field Settings tab contains only options that cannot be changed after the field is added:
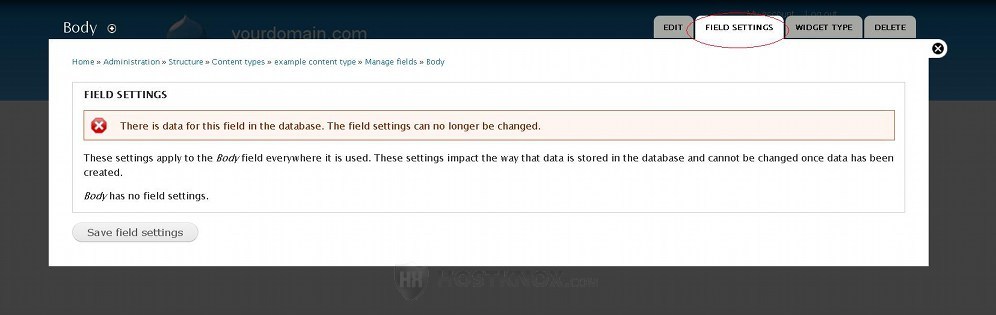
So the settings displayed by this tab cannot be changed for existing fields. They are configured while adding a new field, and remain the same for as long as the field exists.
From the Widget Type tab you can change the widget used by the particular field:
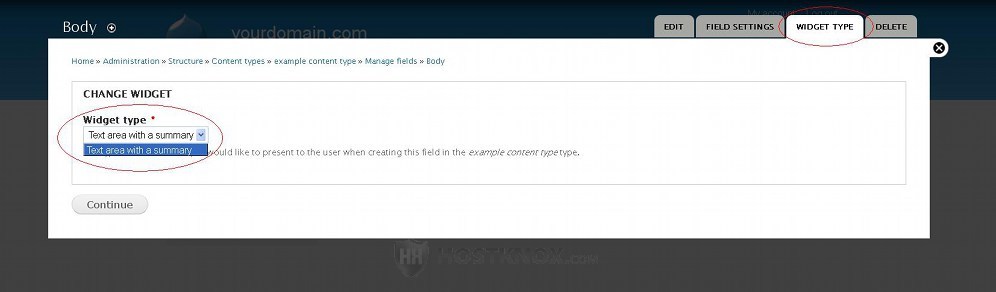
The choice also depends on the field type. For example, for the Long text and summary field type only the widget Text area with summary can be used. However, if there's a choice and you change the widget, don't forget to click on the Continue button to save the change.
The last tab is Delete, and as the name suggest it's for deleting the field.
Back on the Manage Fields page there are a few other things you can do in addition to editing existing fields. You can change the order in which the fields are displayed on the create/edit page for nodes from that content type. This means that this change of positions will only be visible in the admin panel and not on the frontend. To change the order of the fields just hover the mouse pointer over the four-arrow button that's in front of the field's name until the pointer turns into a four-arrow pointer itself. Then press and hold the left mouse button and drag the field to the desired position:
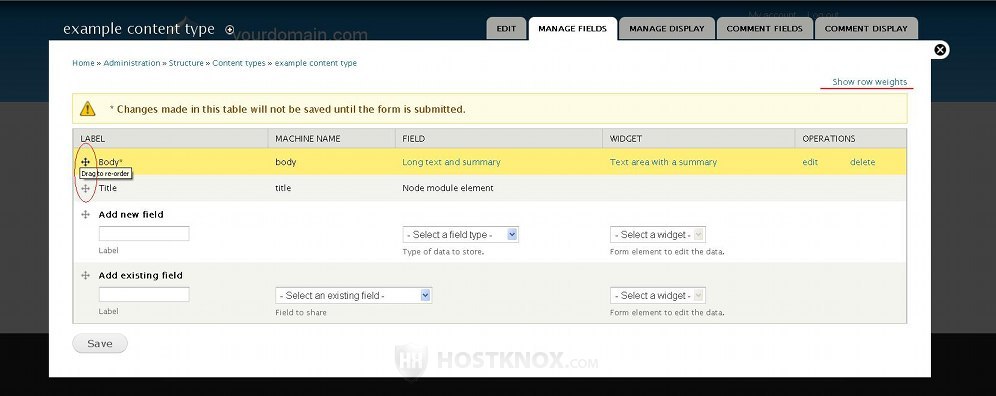
Then click on the Save button at the bottom of the page. There's also another way to change the positions of the fields: by changing the row weights. Click on the Show row weights button that's just above the top right corner of the table. This will display the row weight of each field. Those that have smaller weight are shown above those with bigger weight. For example, if the Body field has a weight of -5 and the Title field has a weight of -4, the Body field will be shown above the Title field on the content create/edit page in the admin panel.
One of the most important things you can do on the Manage Fields page is to add new fields to the content type. To do this, type a label for the field in the Label text area that's provided and from the Select a field type drop-down menu select the type of field that you want to add:
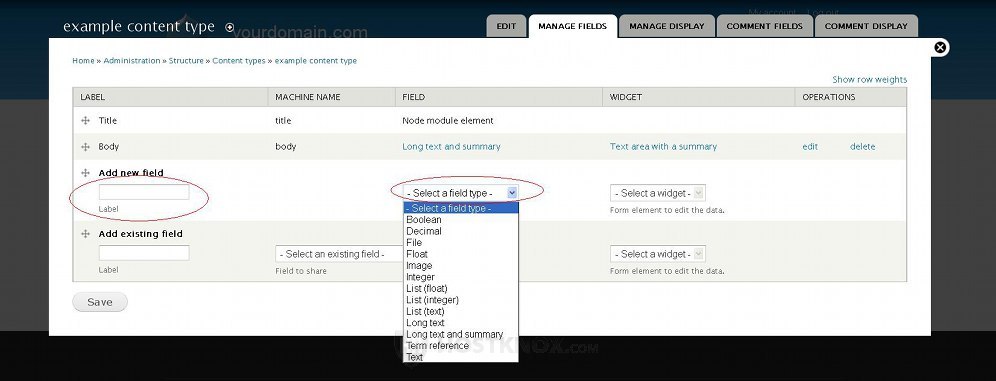
When you type the label in the provided text area, a machine name will be automatically generated based on the label that you type. If there's a field with the same machine name, you'll be asked to change the machine name of the new field. After you select the field type from the drop-down menu, you can change the widget from the Select a widget drop-down menu. Some field types don't offer a choice, while for others you can select from a few widgets. For example, for the term reference field type you can select one of three available widgets. For more information on field types check out the tutorial on field types in Drupal.
After you configure these settings click on the Save button that's under the table. You'll be automatically taken to the page with the field settings for that field type. As we mentioned earlier, once you configure these settings, they cannot be changed. You can change only the general settings displayed by the Edit tab and also the widget. These are the same settings that are shown when you click on the edit button of an existing field.
On the Manage Display page you can change the order in which the fields appear on the frontend. You can choose whether the label of the field should be shown on the frontend. You can also change the format in which the value of the particular field is displayed on the frontend, and for some field types you can also edit some additional settings. The field for the title is not displayed on this page since it cannot be moved to a different position or edited. So for each new content type that you create, if you haven't added any new fields, on this page you will only see the field for the body (Long text and summary field type). By default, nodes are displayed in two views: Default (full view) and Teaser view. You can manage how the fields for each view are displayed. To do this just click on the respective button in the upper right corner of the page:
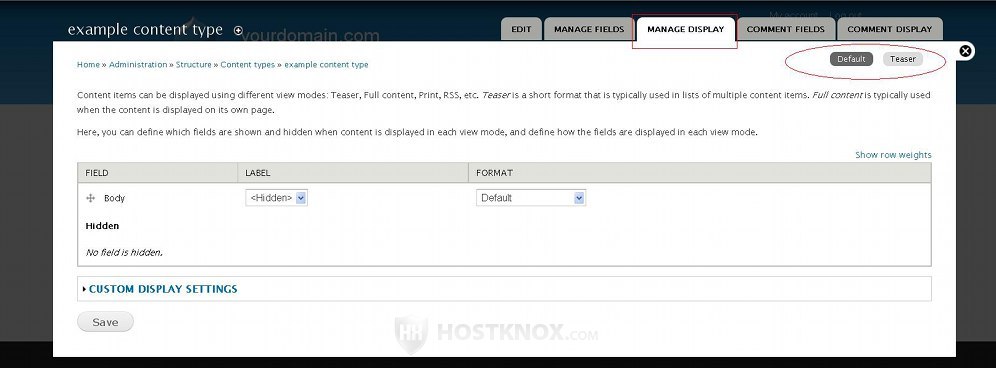
When you open the Manage Display page the table for the fields in the Default view is shown.
The teaser is shown first on the frontend, and if the visitor wants to see the whole node, they have to click on its title or on the read more link to open it in full view. If the content type contains the Long text and summary field type, for example, nodes from that content type will show a summary (or just the beginning of the text) in the teaser view. The article content type is an example of this, and newly created content types also contain that field type by default. Remember that changing the settings in one view, won't affect the other view. For example, if you change the order of the body and the image of the preconfigured article content type for the default (full) view, the order in the teaser view will still be the old one.
The positions of fields are changed in the same way as on the Manage Fields page. Just use the four-arrow buttons in front of the labels of the fields, or change the weight values:
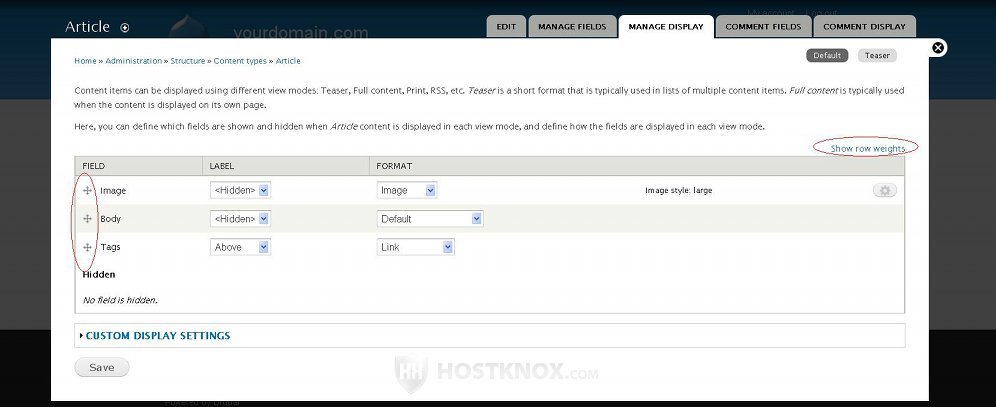
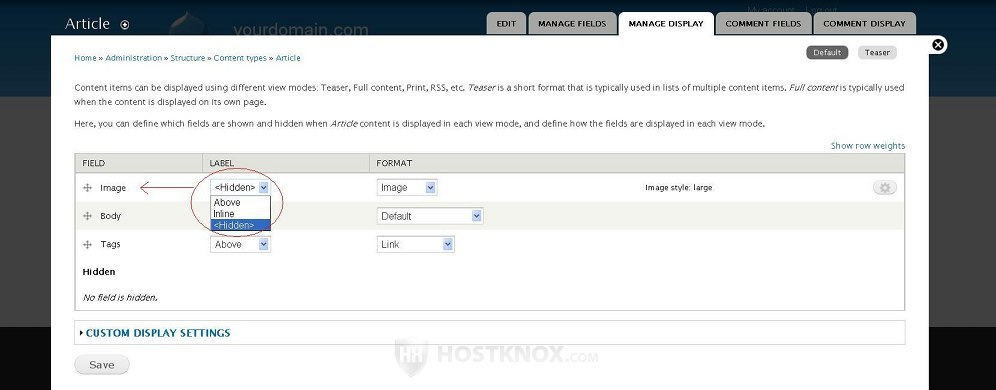
The Label drop-down menus are used to hide or show on the frontend the actual label of the field. For example, if you have an image field type with a label Image and you set the drop-down menu to Hidden, the label will not be shown on the frontend. If, however, you select Above from the drop-down menu, a text Image will be displayed on the frontend above the actual picture. You can also select Inline, which will show the label on the same line with the value for the field (the image in this case):
Keep in mind that when you add new fields this drop-down is set to Above automatically.
From the Format drop-down menu you can change how the data shown by that field will be displayed on the frontend. For example, the Long text and summary field type (labeled Body in our example) is automatically configured to display a filtered text, meaning that the text format (e.g. spacing, new lines, etc.) is shown on the frontend in the same way as you have typed it on the submission form. From the Format drop-down menu you can select for that field type options such as plain text:
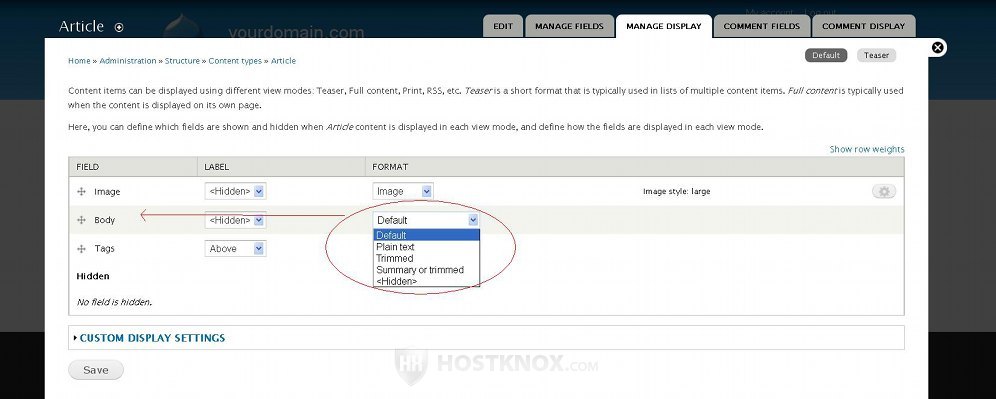
The options that you can choose from this drop-down menu depend on the field type. For any field type you can also select Hidden. If you do that, the field will still be present on the submission for for nodes from that content type, but whatever you input in that field won't be shown on the frontend. In addition to this, the field with its data will be removed from all existing nodes published on the frontend.
On the Manage Display page for some field types, such as image, decimal, float, and integer, there are some additional options that you can change. To see and edit these options click on the button on the right side of the table:
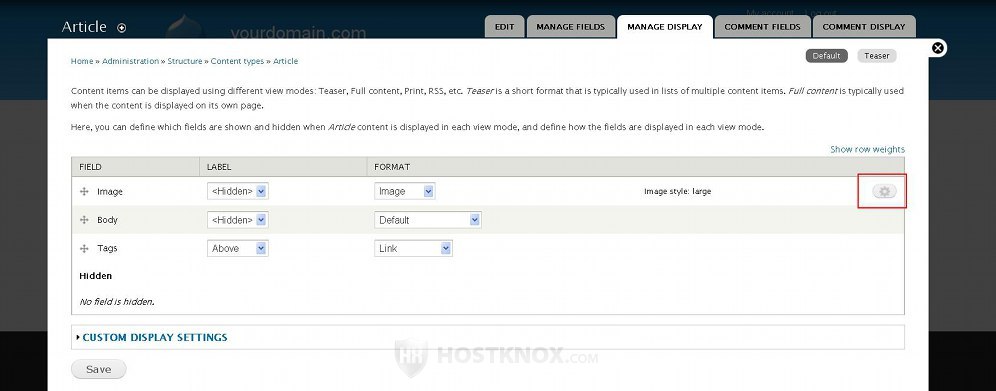
For example, for the image field type you can change the image style that is displayed on the frontend (e.g. large, medium, thumbnail).
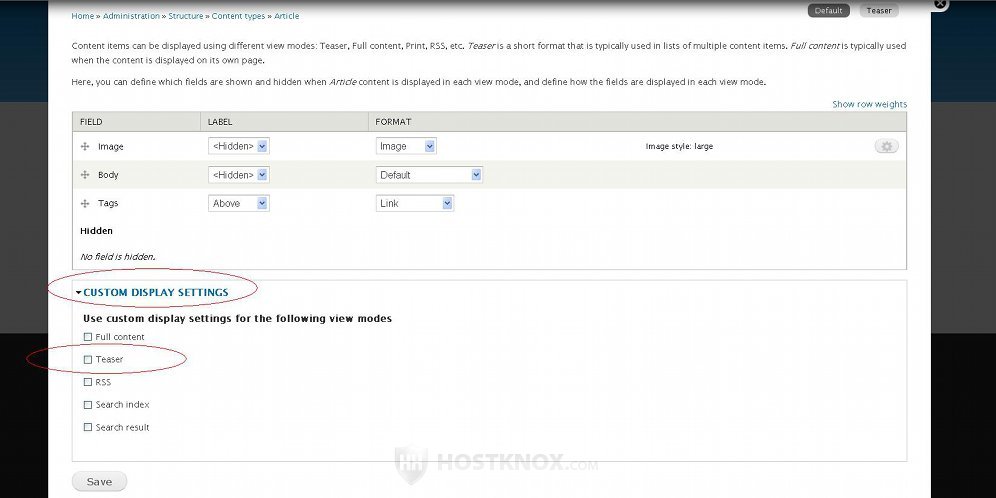
If you make changes to any of the settings, click on the Save button below the table. Don't forget that these changes will apply only to the default/full view. To edit the teaser view, click on the Teaser button in the upper right corner of the page, and make the necessary changes there. If you want to disable the teaser view, click on the Custom Display Settings button that's below the table, unmark the checkbox for Teaser, and click on the Save button:
There are two other sub-tabs with fields that you can edit for the particular content type: Comment Fields and Comment Display.
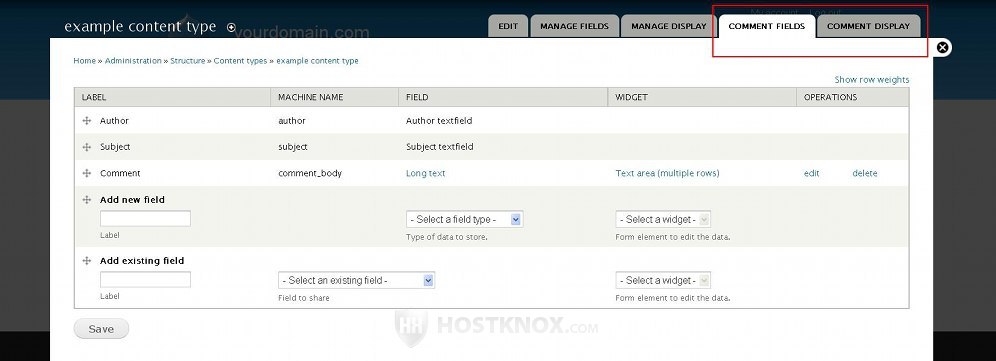
The settings displayed by these tabs are managed in the same way as those for Manage Fields and Manage Display. The difference is that they apply only to the comments for that content type.