Drupal Installation Tutorial
How to install Drupal on your hosting account
In this tutorial we'll describe how to install the CMS application Drupal on your Drupal hosting account. Follow the steps described below.
Create a database for the application
First, you have to create a database for the application and assign a user to it. It's recommended to use a separate database for each application and to add a different user. You'll use the credentials of that user when installing the application. You can create databases from the Databases section of the HostKnox control panel. Just click on the Add Database link on the right, then type the name of the database, the username and password of the user and click on the Add Database button to create the database and the user.
Upload Drupal to your hosting account
Then download to your local computer the archive of the last stable Drupal version. You can do this from the download section of the official Drupal site. After that you have to upload to your hosting account the files that are inside the archive. You can do this in a few ways. One way is to unzip the archive on your local computer and then use an FTP client to upload the uncompressed files to the public_html folder on your hosting account. The uncompressed Drupal archive should contain a directory labeled with the name of the application and its version (e.g. drupal-7.12). All the necessary files and folders are inside that directory. If you want your site to be accessible directly at your domain name (e.g. yourdomain.com), upload the files and folders that are inside the uncompressed directory drupal-x.x to the public_html directory on your hosting account.
Otherwise, if you upload the whole folder itself, your site will be accessible at yourdomain.com/drupal.x.x. You can, of course, rename the folder before or after you upload it to whatever you want (e.g. yourdomain.com/test-site).
Another way to upload and uncompress the Drupal archive that's on your local computer is to do it entirely through the Files section of the HostKnox control panel. You can upload the archive by using the Upload button that's in the black area on the right side of the HostKnox control panel's file manager. After you upload the archive, highlight it by clicking with the left mouse button next to its name and use the Unpack button that appears in the black area on the right to uncompress it. You can then also rename the uncompressed folder, and move it or its content by using the respective buttons.
Of course, you can also upload and uncompress the archive via SSH. For more information on how to do it visit the SSH section in our knowledgebase.
Install Drupal
Once you have Drupal uploaded to your hosting account you have to open with your internet browser the URL address corresponding to the location of the application on your account. For example, if it's in a folder called drupal in the public_html directory, you have to use the URL address yourdomain.com/drupal. This will start the installation wizard which will guide you through the whole process.
First, you'll be prompted to choose a profile:
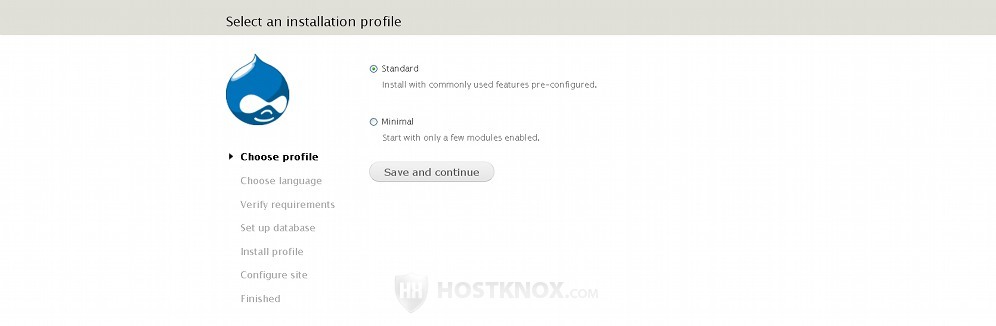
You can choose between Standard and Minimal. The difference between them is that the standard profile has most of the modules that come prepackaged with the installation pack enabled by default. The standard option is selected by default. To proceed with the installation click on the Save and continue button.
The next step is for language selection. Drupal comes only with English built-in as a default language:
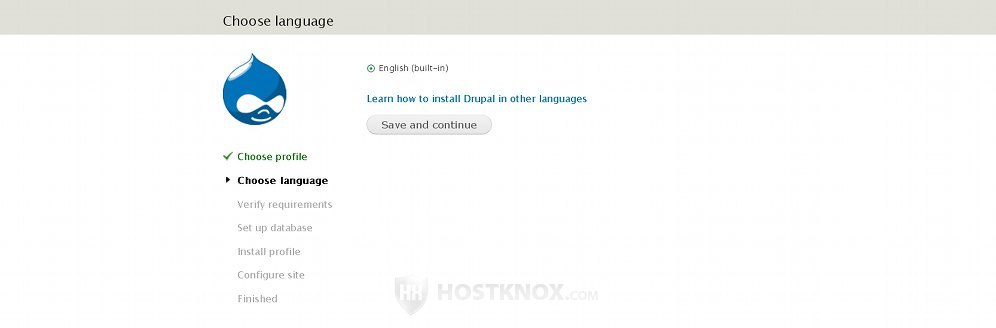
You can install it with another language as a default one. To learn how to do this check out the article on installing Drupal with a different default language. Otherwise, you can install it with English as the default language, and then if you want to, you can add other languages which registered users will be able to choose.
Click on the Save and continue button to go to the next step.
On the next page you have to configure the database settings:
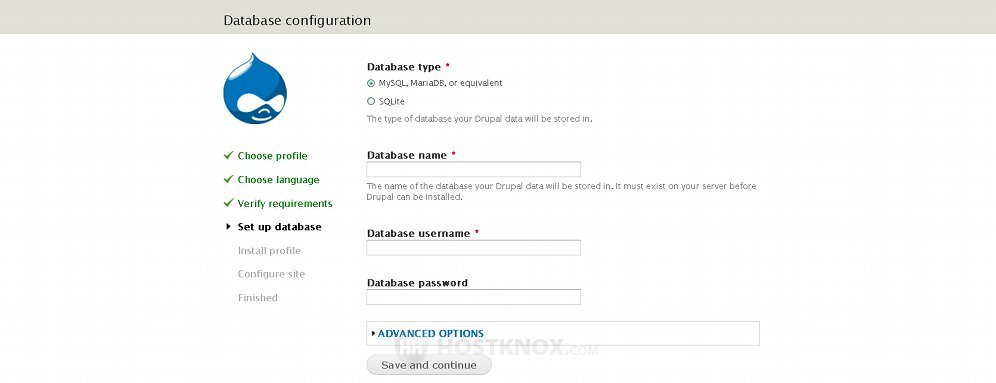
Leave the Database type to MySQL. In the field for Database name type the name of the database that you created for Drupal from the Databases section of the HostKnox control panel. In the fields for Database username and Database password type respectively the username and the password of the user that you added to the database. To see the advanced options just click on the Advanced Options button:
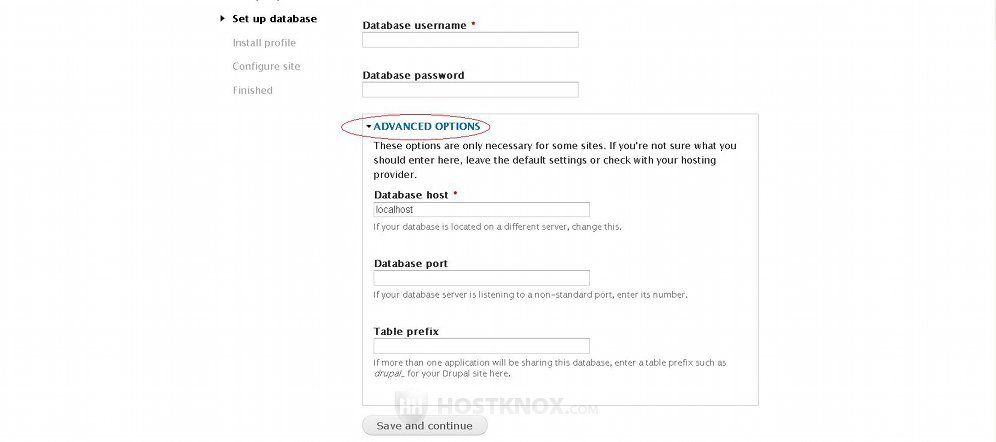
You don't really have to change any of these options. Leave Database host to the default localhost, and leave the field for Database port empty. Although it's not recommended for security reasons, if you decide to install this application in a database with other applications you can set the prefix in the field for Table prefix. By default the Drupal database tables are installed without a prefix. This means that in case you want to put two or more Drupal applications in the same database, you have to set a prefix that should be different for each application (e.g. drupal1_, drupal2_, etc.). When you're done with the settings on this page click on the Save and continue button.
After you do it all the necessary information will be installed in the database.
On the next page you have to configure the site information and your administrator account:
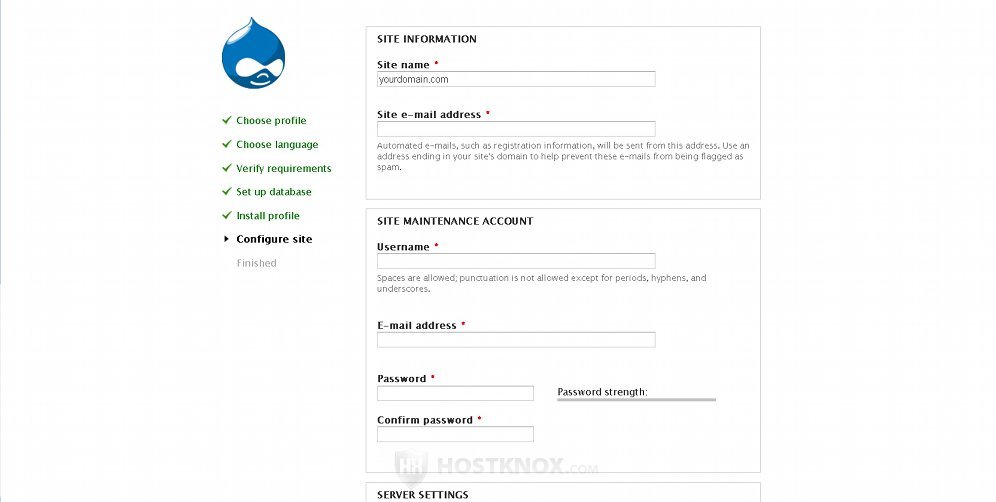
In the Site Information section type the site name in the corresponding field. It can be any name that you want; you can also change it after the installation process is complete. In the field for Site e-mail address type the email address that you want to be used for sending automatic messages. If you want to use an email with your domain name in it, you can create one specifically for your Drupal application from the Email section of the HostKnox control panel. For more information on how to do it check out the tutorial on adding an email account.
In the Site Maintenance Account section you can specify the details for the administrator account that will be created for you. Just type the desired username, password, and e-mail address in the respective fields. Keep in mind that your password should be at least six characters long (preferably use 8-10 characters). For a stronger password use a random string of upper and lower case letters, numbers and symbols.
Further down the same page there are two more sections with options:
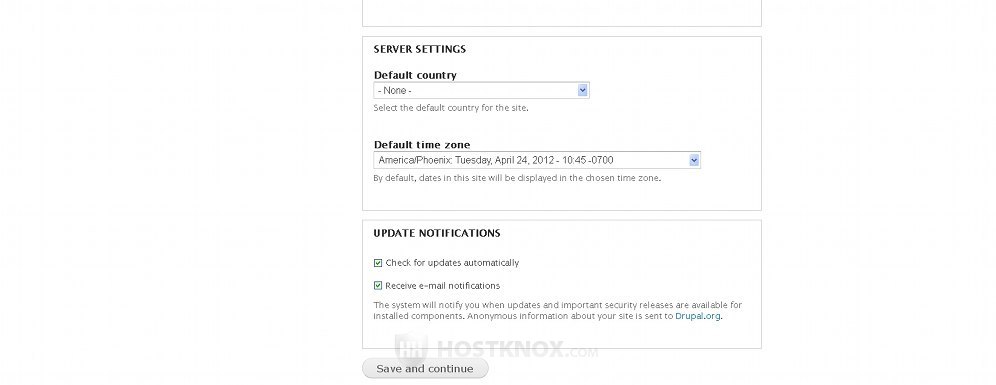
In the Server Settings section you can set the default country for your site and also the default time zone. From the Update Notifications section you can choose whether you want to check automatically for updates and to be notified with email messages about security releases, etc. Both options in this section are enabled by default.
After you configure all the settings click on the Save and continue button to complete the installation.
The last page is just a confirmation of the successful installation:
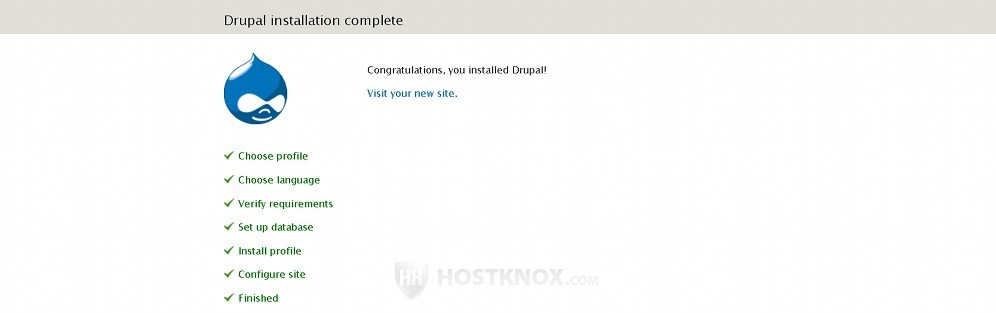
You can use the link on this page to go to your new site.