Drupal 6 to Drupal 7 Upgrade Tutorial
How to upgrade Drupal 6 to Drupal 7
This tutorial is on how to upgrade your Drupal from version 6 to version 7.
First, you have to update your Drupal 6 to the newest stable Drupal 6 release. For more information on how to do it check out the tutorial on updating Drupal to a newer release within the same version. Once you do that you can proceed to upgrading to Drupal 7.
Backup and Maintenance Mode
Before you start the upgrade it's very important to back up the MySQL database used by your Drupal and also all the Drupal files and folders that are on your hosting account. In this way if the upgrade doesn't go smoothly, you can always restore your site. If you need more information on how to perform a back up, check out the tutorial on backing up your site.
Before you start the upgrade process you should also put your site into maintenance mode. Log in to the admin panel of your Drupal, click on Site maintenance and on the page that opens mark the Off-line button and click on Save configuration.
Contributed Themes and Modules
One of the most confusing and time-consuming tasks when upgrading Drupal is connected with third party/contributed modules and themes. If there are installed contributed modules and themes which you don't use any more, uninstall them. You should also check whether the modules and themes that you want to use after the upgrade have a Drupal 7 version. If some of these contributed modules and themes don't have such a version, disable and uninstall them. You'll have to find another alternative for the functions that these modules perform.
Download the Drupal 7 versions of those modules and themes that have such versions. You can do that from the modules section of the official Drupal site. You'll need these new versions later. Before you start the upgrade you should also make sure that the contributed modules and themes are updated to their newest stable Drupal 6 release. You can check whether your contributed themes and modules are up to date in the Available updates report. Log in as an administrator on your Drupal site and go to administer>Reports>Available updates. You can also visit the page of each module on the official Drupal site.
There are some Drupal 6 contributed modules whose functions are integrated as part of the Drupal 7 core modules. So after the upgrade is complete these modules will be redundant. These modules can be divided into two major groups: those that don't require data migration, and those that require data migration. The modules that do not require data migration can be disabled and uninstalled before you begin the upgrade to Drupal 7. The functions that these modules performed will be provided by the core Drupal 7 modules. For example, the Block Node Visibility contributed module for Drupal 6 allows you to select whether a particular block should or shouldn't be displayed on nodes from specific content types; in Drupal 7 you don't need that module because the function is provided by the core. Data migration is not required, but after you upgrade Drupal you'll have to configure the settings so that they are the way the were before the upgrade.
There are some modules which are incorporated as part of the Drupal 7 core but that require data migration after the upgrade. One such module is the widely used Content Construction Kit (CCK). Further down in this tutorial we'll give more details about this particular module. Don't uninstall those modules that require data migration; just disable them before you start the upgrade.
You can check the list of Drupal 6 modules that are part of the Drupal 7 core on the official Drupal site. There's a list of the modules that don't require data migration (the majority of the modules), and a list of those that require data migration (just a few modules).
You should keep in mind that when you disable a module its data is still kept in the database, while when you uninstall a module, the data associated with that module is removed from the database. Uninstalling a module will remove its data from the database but it's files will still be present on your hosting account. So if you're not going to use that module any more, it's recommended to delete its folder from the hosting account. Considering your root Drupal directory is public_html, then you can find the folder for each module and theme respectively in public_html/sites/all/modules and public_html/sites/all/themes. You can delete the folder for each module and theme (with the files inside it) from the Files section of the HostKnox control panel or with an FTP client.
Because of the different module dependencies, when you disable contributed modules in order to be able to disable some particular modules you'll have to disable the modules that depend on them. In any case, you'll have to disable all contributed modules anyway, so keep going until they are all disabled.
So to summarize the things that you have to do with contributed modules before you start the upgrade:
- uninstall any modules and themes that you don't use but for some reason you haven't uninstalled so far
- uninstall the modules and themes that don't have a Drupal 7 version
- uninstall the modules whose function is integrated in the core Drupal 7 modules and that don't require data migration
- remove from your hosting account the folders of all uninstalled modules
- make sure that the rest of the modules and themes are up to date with the newest stable Drupal 6 release
- disable all the contributed themes and modules that are left
- download the Drupal 7 version of those modules and themes that can be used with Drupal 7
Default Theme
Before you upgrade your Drupal 6 you should also switch the default theme to Garland. That's the theme that comes prepackaged with the Drupal 6 installation pack and that's automatically set to be the default one when you install Drupal 6.
Upgrade Process
Now you can proceed with the upgrade itself. Remove/delete all the files and folders from the root Drupal directory on your Drupal hosting account except for the sites folder (it contains all the site specific information and files, contributed modules and themes, etc.). If, for example, your Drupal is installed directly in the public_html directory on your hosting account, meaning the site is accessible at yourdomain.com, then delete all folders and files inside public_html with the exception of sites. You can do that from the Files section of the HostKnox control panel or you can use an FTP client (e.g FileZilla).
Download to your local computer the last stable Drupal 7 release. You can download it from the official Drupal site. Once you have the archive on your local computer, unzip it. It should contain a folder labeled drupal-7.x where x is replaced with the number of the particular release (e.g. drupal-7.14). Inside that folder are all the core Drupal 7 files and folders (e.g. includes, modules, themes, etc.). Using an FTP client upload them to the root Drupal directory (e.g. public_html) on your hosting account.
Now that you have the new files and folders on your account you have to update the MySQL database. You can do that by running update.php. If your site is accessible at yourdomain.com, just open the URL address yourdomain.com/update.php with your internet browser and follow the instructions.
Next, you have to update the contributed modules and themes that have a Drupal 7 version. Although Drupal 7 provides a function for automatically installing modules you have to do that manually. First, remove the files for each module and theme from the hosting account. Using the same example for the location of the root Drupal directory on your hosting account remove/delete the folder for each module and theme respectively from public_html/sites/all/modules and public_html/sites/all/themes. You can delete the folder for each module and theme (with the files inside it) from the Files section of the HostKnox control panel or with an FTP client. Then unzip the archives of the Drupal 7 version of those modules and themes; you should have already downloaded them to your local computer. Then upload the unzipped folder for each module and theme in public_html/sites/all/modules and public_html/sites/all/themes respectively. After that enable the modules from the admin panel of your Drupal and run the update.php script again (e.g. yourdomain.com/update.php).
Keep in mind that some of the core Drupal 7 modules will be disabled after the upgrade. There might also be a slight difference with the modules that are enabled by default when you make a fresh Drupal 7 installation as opposed to upgrading Drupal 6 to Drupal 7. So make sure that you check the core Drupal 7 modules and if there's a function that you need, enable the particular module. For example, there might be a core Drupal 7 module that provides a function which in Drupal 6 is provided by a contributed module, but after the upgrade that particular module might be disabled by default. For instance, the function of the Drupal 6 contributed module Block edit is provided by the core module Contextual links in Drupal 7, and after the upgrade the Contextual links module might be disabled.
Test your site and make sure that everything works. After that disable the maintenance mode.
If you had specifically put some directives in the .htaccess and robots.txt files of your Drupal 6, you'll have to put them again after the upgrade. In case you had made some modifications to core files you'll have to make those again.
Recap
To recap everything that you have to do here is a quick checklist that may help you not to forget anything:
- Update your Drupal to the newest Drupal 6 release.
- Back up the MySQL database used by your Drupal and the Drupal files on your hosting account.
- Put your site into maintenance mode.
- Disable and uninstall unused contributed modules and themes.
- Disable and uninstall contributed modules and themes that don't have a Drupal 7 version.
- Disable and uninstall all contributed modules that are integrated into the Drupal 7 core and that don't require data migration.
- Check to make sure that the contributed modules that are left are updated to their latest Drupal 6 release.
- Disable all the contributed modules and themes that are left.
- Remove the folders for all the uninstalled modules and themes from your hosting account.
- Download the Drupal 7 versions of the modules and themes that can be used with Drupal 7.
- Make Garland the default theme.
- Remove all files and folders from the root Drupal directory on your hosting account with the exception of the sites folder.
- Download to your local computer the last stable release of Drupal 7.
- Unzip the downloaded archive.
- Upload the Drupal 7 files and folders to the root Drupal directory on your hosting account.
- Update the database by running the update.php script (e.g. yourdomain.com/update.php).
- Update all the contributed modules and themes that have a Drupal 7 version and enable the modules.
- Migrate the data for contributed modules that require data migration (e.g. CCK ).
- Run the update.php script again.
- Test your site.
- Turn off the maintenance mode.
- If you had any custom directives in the .htaccess and robots.txt files reapply them. If you had any modifications to the code of core files, you have to reapply those too.
Migrating Content Construction Kit Data
The CCK module is one of the most used Drupal 6 contributed modules. Most of its functions are incorporated in the core Drupal 7 modules so you won't really need it after the upgrade. However, you'll have to migrate its data once the core upgrade is performed. You should have disable the CCK module (and all contributed modules) before the upgrade to Drupal 7. The Drupal 6 version of CCK is actually a bundle of modules, so all of them should be disabled. After the upgrade is performed delete the CCK folder from your hosting account. If your root Drupal directory is public_html, the path would be public_html/sites/all/modules/cck. Delete the whole cck folder with everything inside it.
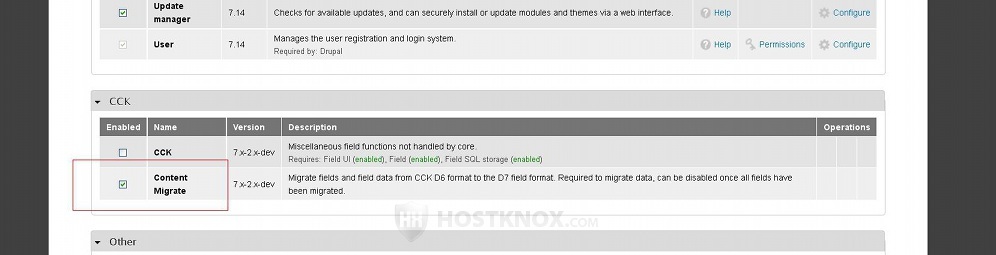
Then download to your local computer the Drupal 7 version of the CCK module. You can find it in the modules section of the official Drupal site. Unzip the downloaded archive. It should contain a folder labeled cck; upload it in the same folder from which you removed the old directory (e.g. public_html/sites/all/modules). The CCK Drupal 7 version contains only a couple of modules. One of them is for migrating the CCK data from version 6 to version 7. Log in to the admin panel of your Drupal, go to the Modules section, mark the checkbox for Content Migrate and click on the Save configuration button at the bottom:
After that go to Structure>Migrate fields. On the page that opens there are three sections: Available fields, Converted fields, Unavailable fields.
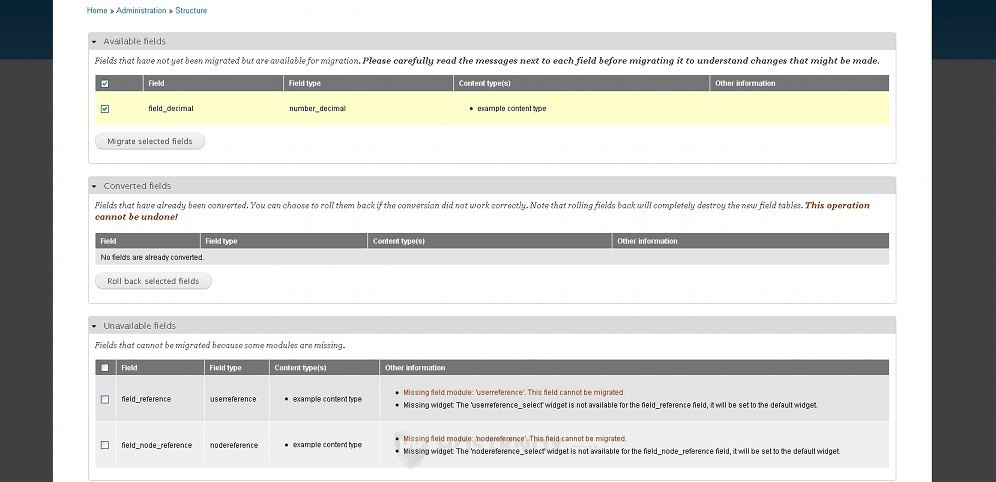
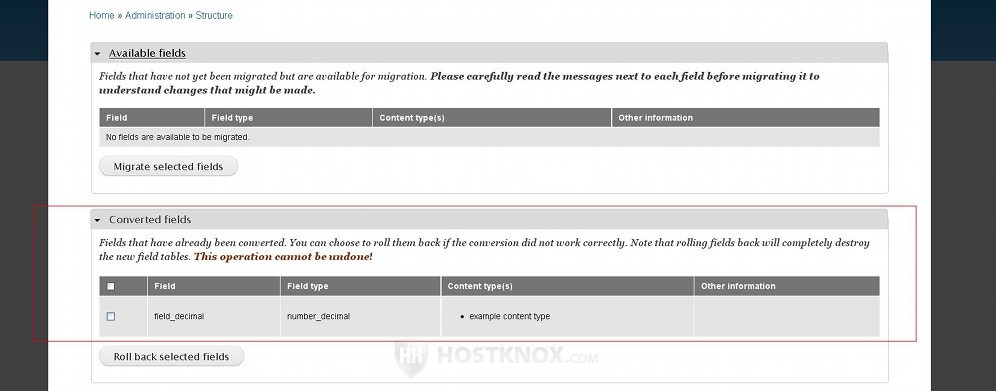
The Available fields section lists all the fields that can be migrated. The Converted fields section lists the fields that have already been converted, and the Unavailable fields section lists the fields that cannot be migrated. The Drupal 7 core supports most of the field types provided by the Drupal 6 CCK module with a few exceptions such as the user reference and the node reference field types. For these field types you have to use another solution such as the Entity Reference module.
Mark the checkboxes for the fields that are listed in the Available fields section and click on the button Migrate selected fields. Once you do this the fields and their data will be migrated. The migrated fields should be listed in the Converted fields section: