Drupal Modules Tutorial
How to install Drupal modules
In this tutorial we'll describe the process of installing Drupal modules. Drupal comes prepackaged with some modules, but you can extend its functionality by adding more. You can do this in a couple of ways. You can use the automatic installer of the administration panel of your Drupal application, or you can do it manually. We'll focus on both methods.
Installing Drupal Modules Automatically
Whichever method you choose to use, the first thing you have to do is to find and download the module that you want to use. You can do this from the modules section of the official Drupal site. After you find the module that you want, download the archive to your local computer. Make sure that it's compatible with the version of your Drupal. You should also keep in mind that some modules require other modules to be installed and enabled so that they can function properly.
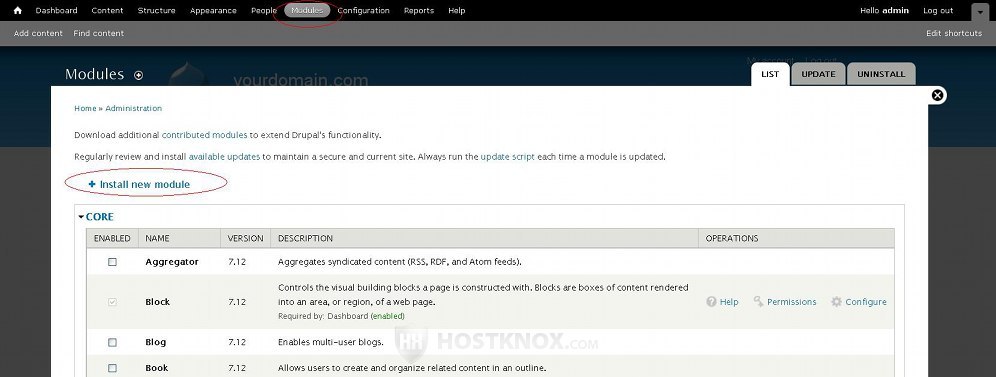
After you download the module archive log in to your Drupal installation as an administrator, then click on the Modules tab and on the page that opens click on the button Install new module:
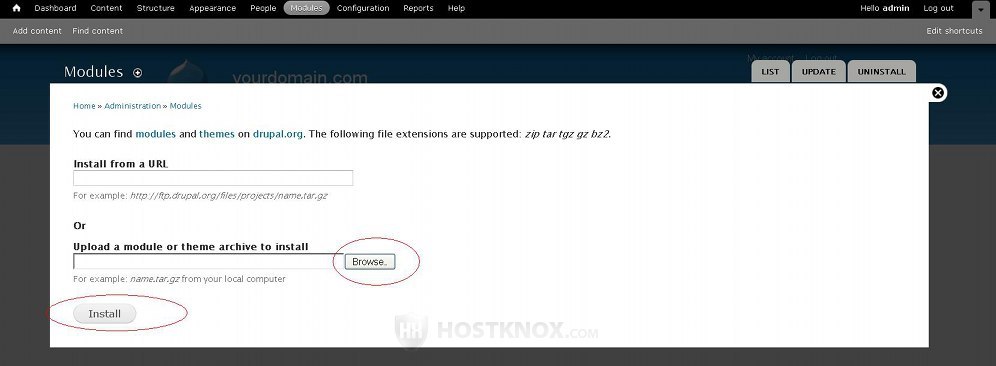
On the next page click on the Browse button to locate the module archive on your local computer and after that click on the Install button:
After you click on the Install button the update manager will install the module package, and on the next page you'll see a confirmation that the installation was successful. The module will be installed automatically in the folder /sites/all/modules on your Drupal hosting account. For example, if you installed Drupal in a folder called drupal directly in the public_html directory on your hosting account, the path to all third party modules that you install with the automatic installer would be public_html/drupal/sites/all/modules.
In our example we've installed a module package for alternative admin menus:
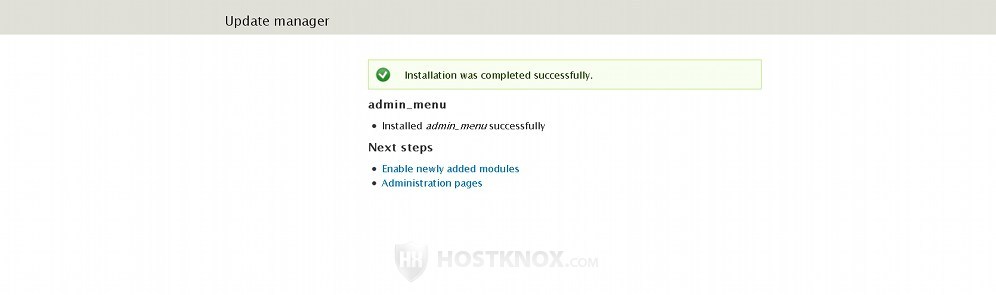
On the confirmation page you can either click on the Administration pages button which will bring you back to the admin panel, or directly on the Enable newly added modules button to enable the installed module(s) and return to the admin panel. In any case, when you go back to the Modules tab of the admin panel check whether the module(s) is enabled, and if necessary, enable it by marking the checkbox in front of it and clicking on the Save configuration button at the bottom of the page. The newly installed module should be listed in a table under the one with the core modules. Many times a module archive actually contains several modules as is the case in our example:
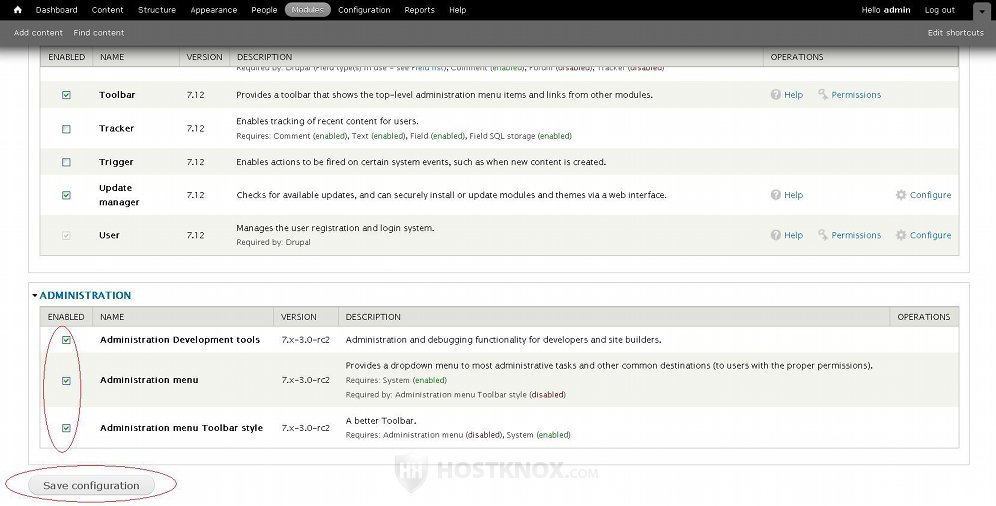
For some modules to function correctly you may need to enable other modules. Next to the name of each module you can see which other modules have to be enabled.
You should also check the module archive on your local computer (or directly the module's folder on your account) for a readme.txt or install.txt file. There should be such a file with additional details. The particular module may have some additional requirements. For instance, in order for the admin_menu module pack that we installed in this example to function properly we also need to disable the Toolbar core module which is responsible for the administration tabs in the navigation bar.
Installing Drupal Modules Manually
To install a Drupal module manually, after you download the module archive from the modules section of the official Drupal site to your local computer, uncompress it and using an FTP client upload the uncompressed folder containing the module files and subfolders to your Drupal hosting account. You have to upload the uncompressed folder to /sites/all/modules on your account. The sites folder is a direct subfolder of the root Drupal directory. For example, if your Drupal is installed in a folder called drupal in the public_html directory on your hosting account, you have to upload the module to public_html/drupal/sites/all/modules.
After you upload it the rest of the process is the same as with the automatic installation. Log in to your Drupal installation as an administrator, go to the Modules tab and enable the module (or modules, if the module package contains more than one module). Inside the module archive there should be a readme.txt or install.txt file which you should check in case you have to do something else for the module to be fully functional.
Alternatively, instead of using an FTP client to upload the module you can also do it from the Files section of the HostKnox control panel. Navigate to /sites/all/modules, use the Upload button that's on the right side to upload the module archive that's on your local computer. Then highlight the archive by clicking with the left mouse button next to its name. An Unpack button will appear on the right side. Click on it to uncompress the archive. After that go to the Modules tab of your Drupal's admin panel to enable the module.