Magento Downloadable Products Tutorial
How to configure and manage downloadable products in Magento
In Magento there are options which allow you to configure and manage downloadable products. You can sell anything that can be downloaded by customers; for example, you can offer music (or any audio files), video files, pictures, etc. In this tutorial we'll show you how to create and configure a downloadable product. We'll concentrate on the settings that are specific to downloadable products. The rest of the settings are configured in the same way as adding a simple product. For general information on how to add products check out the Magento tutorial on adding products.
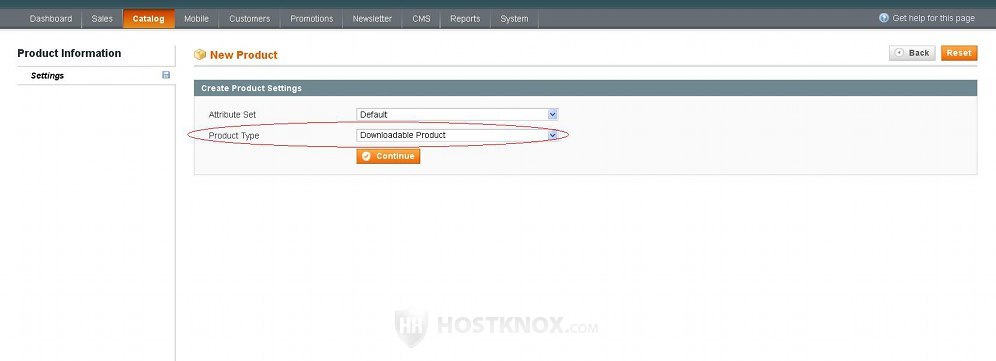
After you log in to the admin panel of your Magento go to Catalog menu>Manage Products and click on the Add Product button. On the next page before you click on the Continue button make sure that you select Downloadable Product from the Product Type drop-down menu:
After that configure the settings displayed by the tabs General, Meta Information, Images, Categories, etc. as with any other product. When you come to the Prices tab:
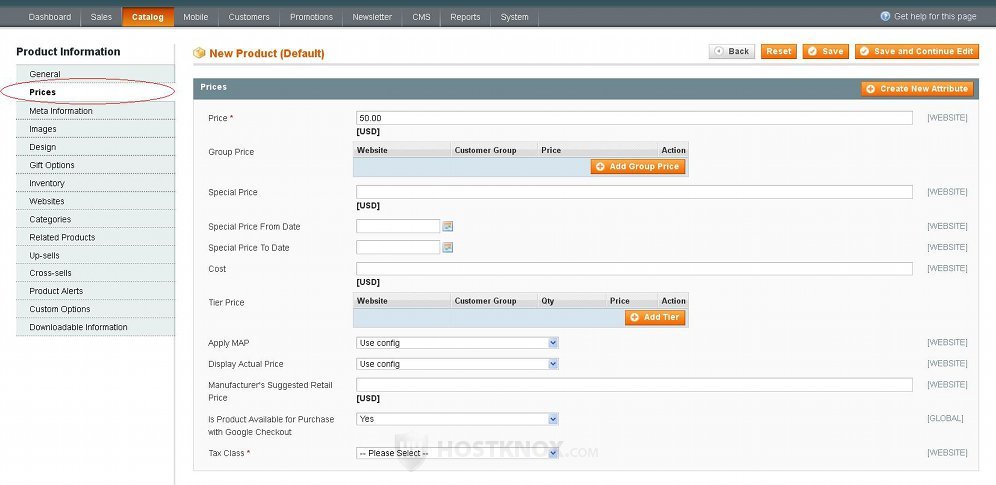
there are some things to consider. In particular, when you add a downloadable product you have to decide whether to specify a price from the Price option or whether to set it to 0. The reason for this is that when you add the actual downloadable items within the downloadable product (we'll come to this further down in the tutorial) you can set a price for each item. That price will be added to the general price that you set from the Prices tab. So if you sell the downloadable product as a whole and you don't allow customers to order separate items within the product (e.g. songs in a music album), then you should set a general price for the whole product. On the other hand, if you allow customers to order single items within the product, then you have to set a price for each item which is then added to the basic price; in this case it will be better to set the base price to zero. This will be easier to understand when we come to configuring the settings of the items within the downloadable product.
With downloadable products usually it's not necessary to manage the stock of the product. So when you configure the inventory settings you can set the Manage Stock option to No:
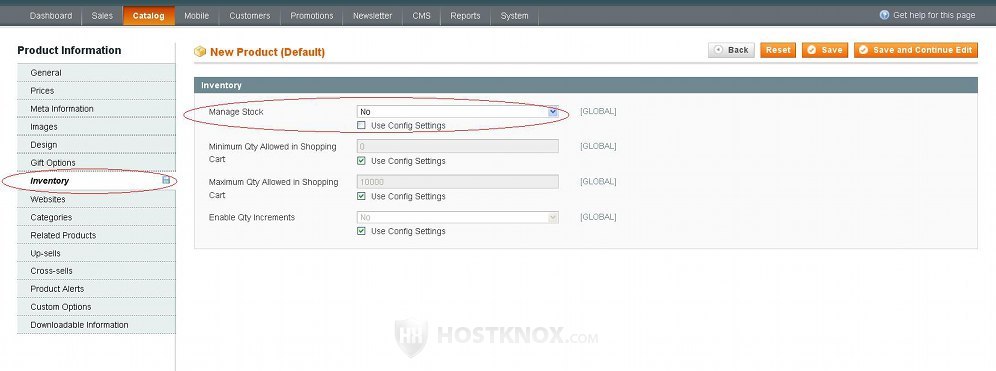
By default, the system Manage Stock setting is enabled, so each new product that you add is preconfigured to manage stock. To override the system setting unmark the checkbox Use Config Settings and change the value from the drop-down menu.
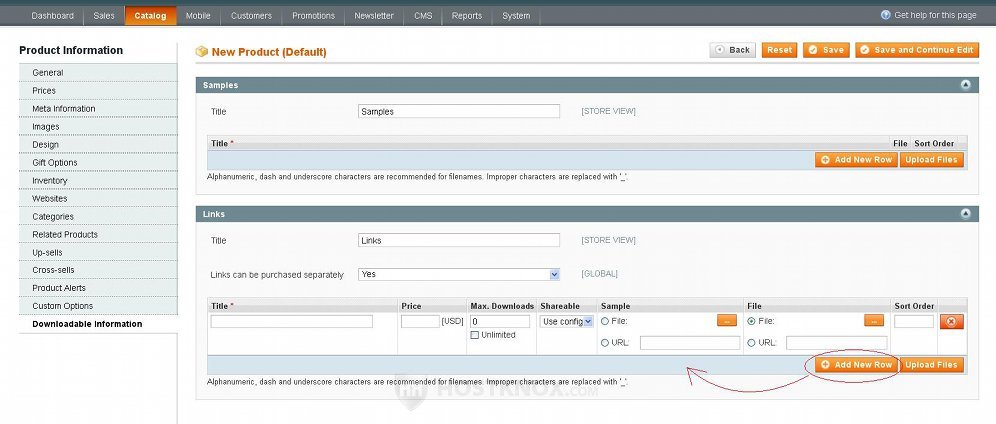
Now let's proceed to uploading and configuring the downloadable items within the product. Click on the tab Downloadable Information on the product settings page. This will display on the right two panels with settings: Samples and Links.
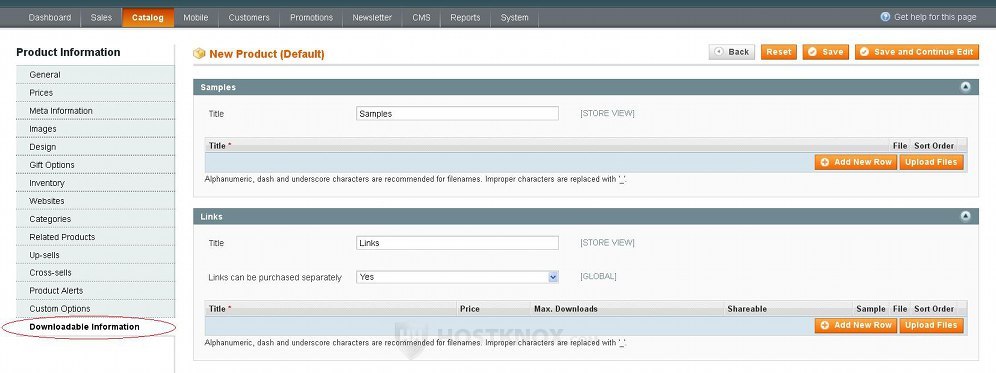
You can use the settings in the Samples panel if you want to upload samples from the downloadable items that you sell. For example, if the items are songs, you can upload the beginning of each song that customers can download and listen for free. Whatever you type in the field for Title will be displayed on the frontend above the links for the samples. To add a sample click on the Add New Row button that's in the table. The options that appear are the same as when adding the links for the actual items that can be purchased; we'll describe those when commenting the settings in the Links panel (in the next a few paragraphs).
The Links panel contains the settings for the items within the downloadable product that customers can purchase and download. A single downloadable product can consists of many downloadable items. For example, you can sell a music album as a single downloadable product, and each song in the album can be uploaded as a separate item. This is convenient if you want to offer customers the chance to buy only a particular song(s) within an album. The first option is labeled Title and by default its value is just Links. That's the text that appears on the product details page on the frontend just above the downloadable items.
The second option is Lines can be purchased separately and it's set to Yes by default. So, if we use the example with the music album as being the whole downloadable product and you upload each song as a separate item, then customers will be able to buy only particular songs. If you don't want customers to be able to buy separate items and you want to require them to buy the whole product, set this option to No.
To add an actual item that customers can buy and download click on the Add New Row button that's in the table. Several settings will appear:
In the Title field type the name of the item (e.g. the name of the song, video file, picture, etc.). In the field for Price you can type a price to be added to the base one that you've set from the Prices tab. As we commented, this depends on what you sell and how you want to sell it. For example, if you allow customers to buy each item separately, then you should use this option to specify the price of the particular item (in this case the base price should be 0). If, on the other hand, you don't allow customers to order each item separately, and you sell the product as a whole, then you can leave this field blank and just specify a base price from the Prices tab. When you set the option Lines can be purchased separately to No, the Price field of each item can't be configured anyway.
By default, the Max. Downloads option is set to 0 (this preconfigured value is determine by the system settings for downloadable products). This means that there's no limit, and so when you save the product the Unlimited checkbox will be automatically marked. If you want to, you can set a limit to the number of times that a customer who has bought the particular item can actually download it. So, for example, if you set it to 3, each customer who buys that item (e.g. a song) will be able to download it using the respective link in their account three times; after they use the link three times it will expire.
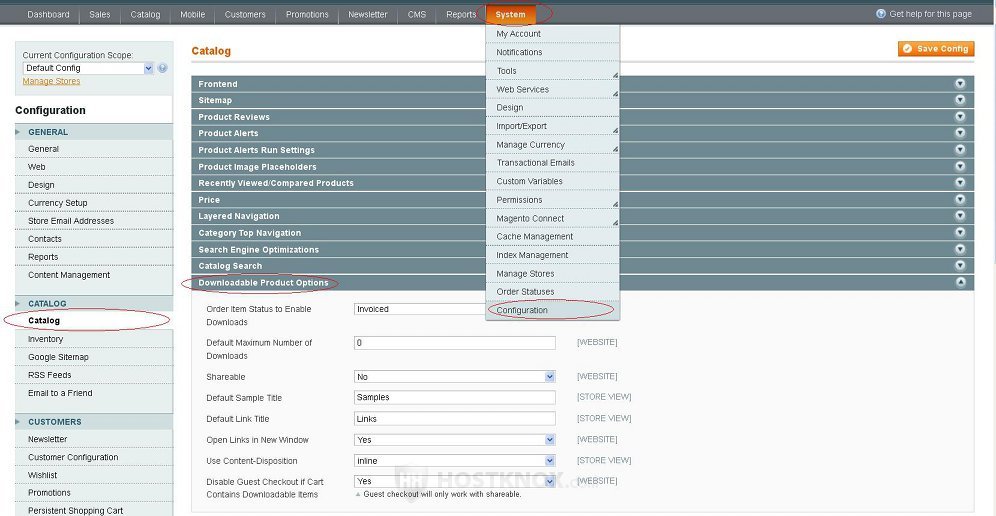
The option Shareable is set to Use config. This means that it's preconfigured with the value of the corresponding system setting. The system Shareable setting, by default, is set to No. This means that the item can be downloaded only by registered customers. If you want guests to be able to order and download this item, set the Shareable drop-down menu to Yes. In addition to this you also have to go to System menu>Configuration>Catalog button in the Catalog section on the left>Downloadable Product Options panel on the right, and set the option Disable Guest Checkout if Cart Contains Downloadable Items to No. Remember that if you allow guests to check out with downloadable items, then the items also have to be shareable. Otherwise, the guest will be allowed to order them but will not be able to download them.
The next option is for a sample of the item:
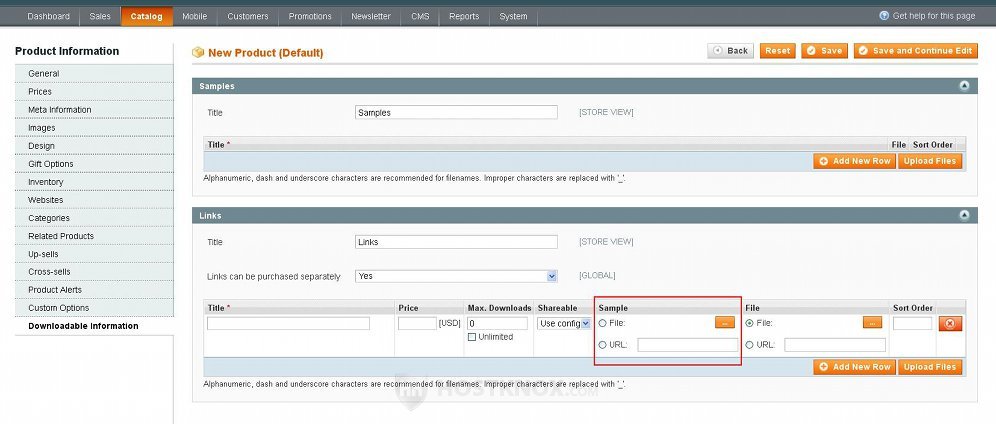
For example, if the item is a song and you have a shorter sample version of the song (e.g. the first 20-30 seconds), then you can upload this sample. To do this mark the File radio button, then click on the button with the three dots that's next to it, use the window that pops out to find the file on your local computer. After you save the changes customers will be able to download the sample free of charge from the product details page of the product. Note that you can also upload samples from the Samples panel that we discussed above. The difference is that the link to the sample that you upload from the Links panel will be shown on the product details page right next to the actual item associated with the sample. Those that you upload from the Samples panel will be listed separately on the same page. We'll illustrate this with an example screenshot a bit further down in this tutorial.
Before you can upload the item you need to specify its path. You can do that from the File column in the table:
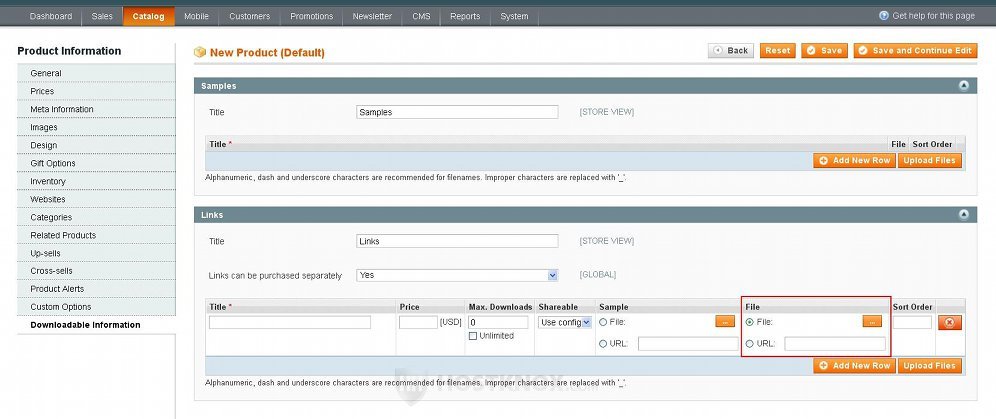
Mark the File radio button that's in the column and click on the orange button with the three dots to locate the file on your local computer.
If you want to put other files in the downloadable product, click on the Add New Row button again and configure the settings. You can add as many items as you want. After you're done click on the Upload Files button to upload the files to your Magento hosting account. The last thing is to click on the Save or on the Save and Continue Edit button that's in the upper right corner of the page.
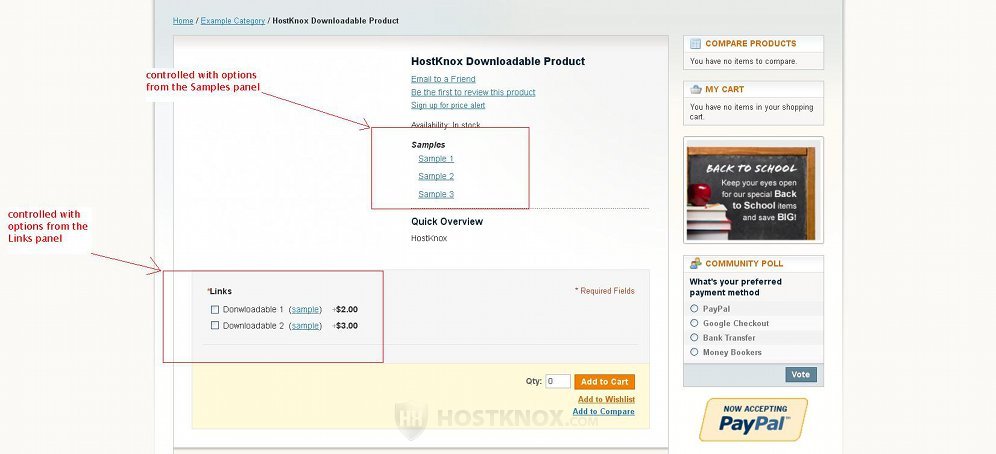
Here is an example screenshot of a product details page of a downloadable product where you can see how the samples uploaded from the Samples panel and those from the Links panel are positioned on the page and what some of the options control on the frontend:
When a registered customer orders a downloadable product they can download the actual items in it using the links in the section My Downloadable Products of their account settings:
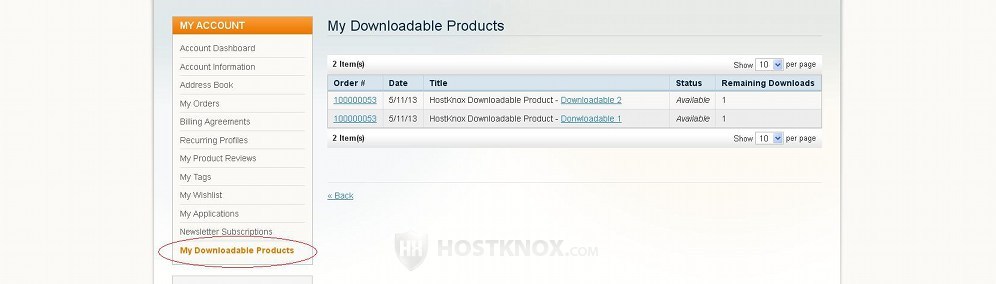
By default, the links will be active once the order is invoiced (meaning the customer has paid for it). Links are also available in the order confirmation email and in the email with the invoice.
If you have enabled guest checkout with downloadable products and you have made those products shareable, the guest customer can download the product using the links in the order confirmation email or in the email with the invoice.
System Configuration Options for Downloadable Products
As we mentioned, when you add the items and samples of a downloadable product some of the options are preconfigured with system values of the corresponding system configuration settings. Although you can override them for each particular downloadable item, if you want to, you can also configure the system settings themselves. Besides that, there are some system settings that cannot be configured per individual product. To configure these settings, in the admin panel go to System menu>Configuration>Catalog button in the Catalog section on the left>Downloadable Product Options panel on the right:
You can set the order status that enables the customer to download the product, you can enable guest checkout with downloadable products, etc. For more information on these settings check out the section Downloadable Product Options in the Magento tutorial on the system catalog settings.