Magento Customers Management Tutorial
How to manage customers in Magento
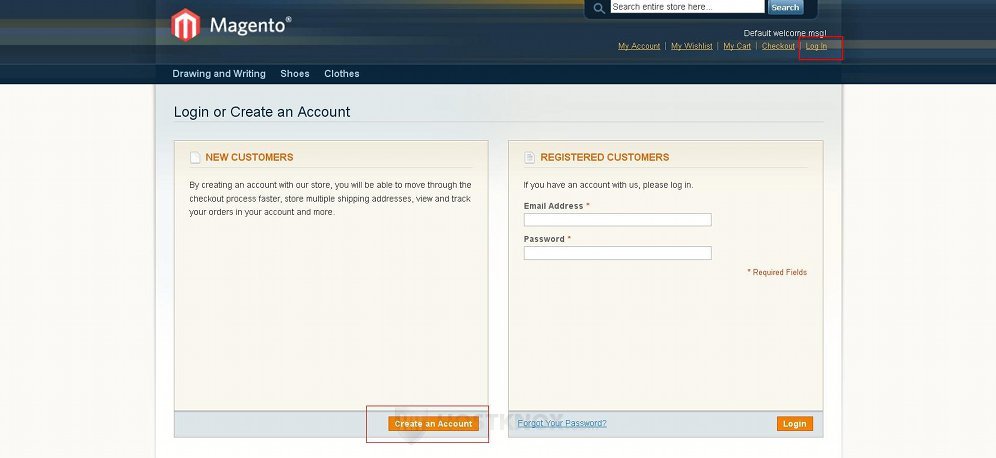
Since Magento is a web application for building and managing an online store, one of the most important aspects is managing your customers. Every visitor on your site can easily create a customer account. For a visitor to log in to their account or to create a new account they just have to click on the Log in link on the frontend of your store. With the default Magento theme this link is displayed in the top right corner of every page. Once the visitor clicks on that link the login form will be displayed. The user only has to type in the corresponding fields the email associated with the account and the password (and to click on the Login button in the bottom right corner of the form):
If the user doesn't have an account, they have to click on the Create an Account button that's on the same page. This will display the registration form:
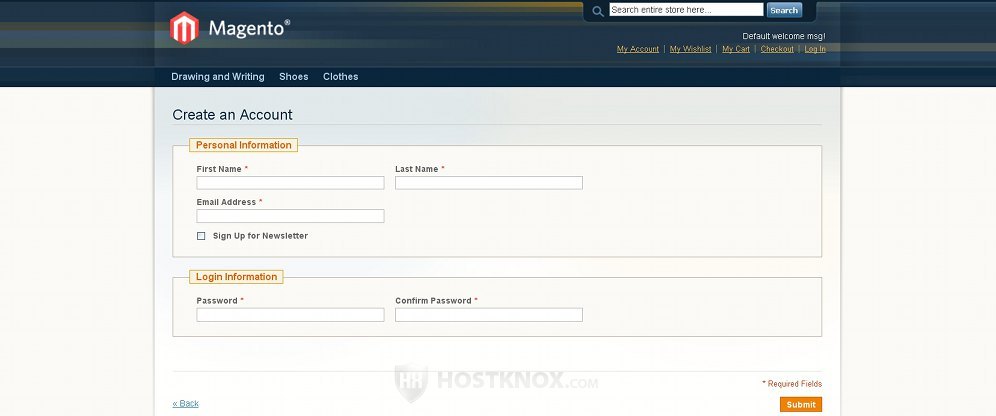
By default, the user only has to type their first and last name, an email address and a password in order to register. No email verification is required. Once the user has an account they can use it to shop on your site. Note that in Magento guest checkout is enabled by default. For more information on how to disable/enable guest checkout and on how to enable/disable email verification check further down in this tutorial.
Once the customer logs in to their account they are redirected to the dashboard of their account:
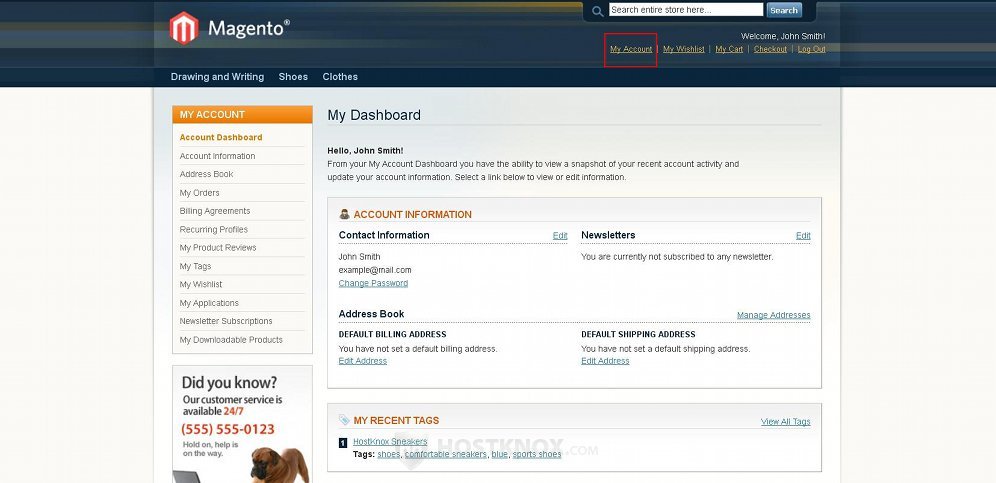
This is the place on the frontend of your site from which the customer can manage their account. They can change the personal information and password, they can add/change their address, view the orders they have made from the account, view the reviews and tags that they have submitted, etc. In the top right corner of every page on the frontend there's a My Account link that opens the dashboard.
If you want to, from the admin panel of your Magento you can disable the login redirect, so that the customer will not be redirected to the dashboard of their account after they log in, instead they will be left on the same page from which they logged in. To do this, in the admin panel of your Magento go to System menu>Configuration, on the page that opens click on the Customer Configuration button that's in the Customers section on the left, then click on the Login Options panel on the right to expand it. The panel contains a drop-down menu labeled Redirect Customer to Account Dashboard After Logging in. Just set it to No and click on the Save Config button in the upper right corner.
Email Verification and Guest Checkout
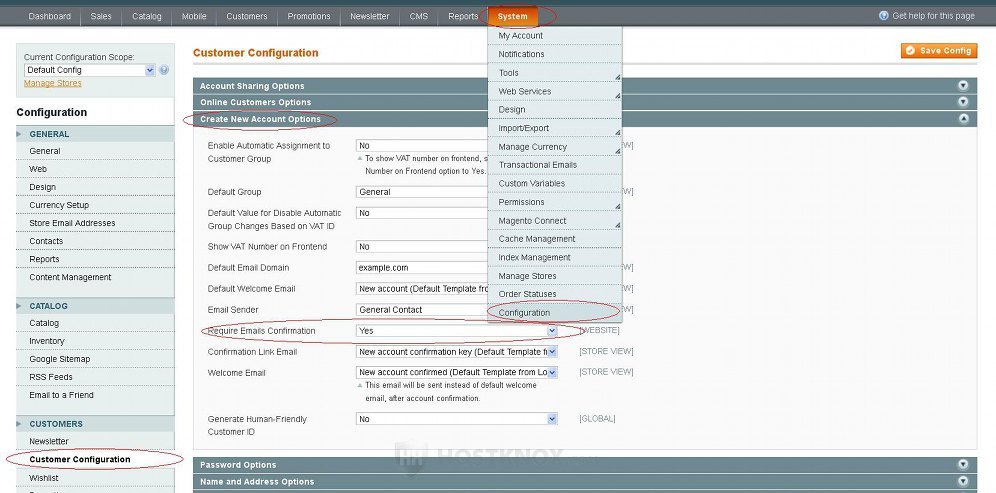
As we mentioned, when new accounts are registered email verification is not required. If you want to verify that the email associated with the account actually exists and to reduce the number of fake accounts, you can enable email verification. To do this, in the admin panel of your Magento go to System menu>Configuration, click on the Customer Configuration button in the Customers menu on the left, from the panels that appear on the right select the Create New Account Options panel, set the Require Emails Confirmation drop-down menu to Yes and click on the Save Config button:
Now when a user registers a new account, before they can log in to their account they have to check the email address that they used to register on your site. Your Magento automatically sends an email to that email address. The email contains a link on which the customer has to click in order to activate the account on your site.
Email verification can help you reduce the chances of bots registering and to discourage some of the troublesome users who don't really want to purchase anything from your store.
By default, guest checkout is enabled in Magento. If you want to, you can allow only registered customers to order products from your store. To do this, in the admin panel of your Magento go to System menu>Configuration, click on the Checkout button that's in the Sales section on the left, then click to expand the Checkout Options panel that appears on the right, set the Allow Guest Checkout drop-down menu to No and set the drop-down menu Require Customer To Be Logged in To Checkout that appears to Yes:
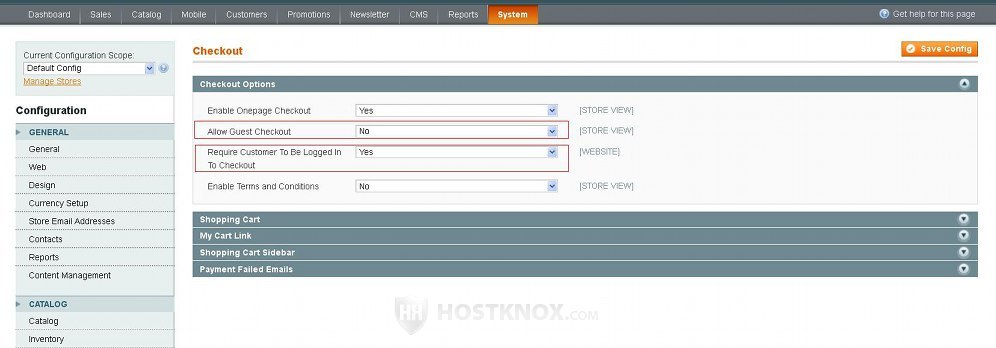
Don't forget to click on the Save Config button.
Managing Customers
From the backend of your Magento you can manage all customer accounts. You can pretty much edit anything connected with an account and you can delete accounts altogether. To manage customer accounts, in the admin panel of your Magento go to Customers menu>Manage Customers. On the page that opens there's a table with the customer accounts. On that page you can perform several actions. To do this mark the checkbox in front of the account(s) in the table, then select the action from the Actions menu in the upper right corner of the table and click on the Submit button that's next to the menu:
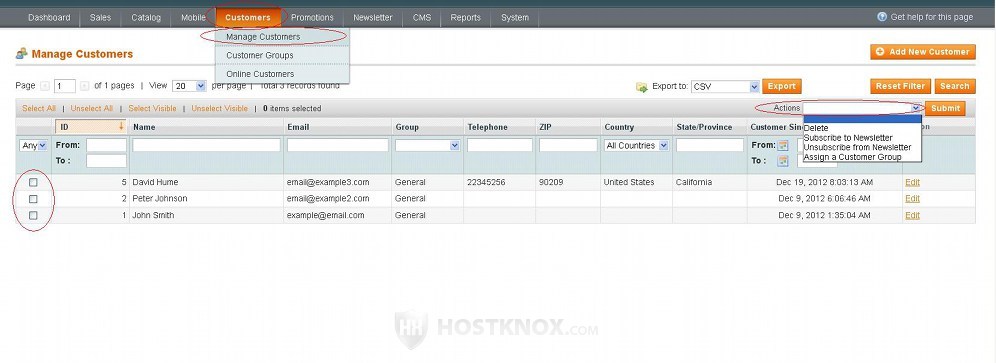
You can subscribe/unsubscribe the customer(s) to/from the newsletter, you can delete the customers or assign them to a different customer group.
On the same page you can add a new account directly from the backend by clicking on the Add New Customer button above the top right corner of the table. To edit an existing account click on its row in the table. When you edit/add an account you'll see some buttons on the left which display different settings related to the account:
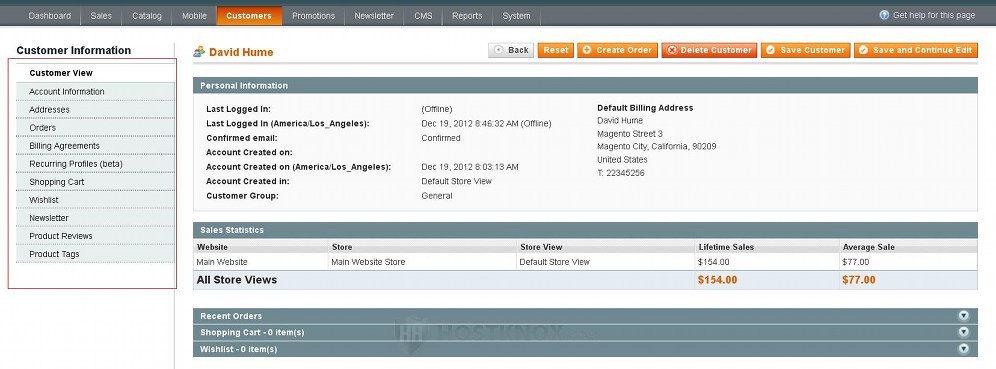
For example, the Customer View button shows a summary of the account (e.g. registration date, last login, sales statistics, recent orders, etc.). From the respective buttons you can edit the account information (name, email, password), the address(es); you can view and manage the orders placed from that account; you can view product reviews and tags added by the customer, and so on. By using the Create Order button that's above the settings you can manually place orders for that customer. If you make any changes don't forget to click on the Save Customer or Save and Continue Edit button.
Customers can also change and view their account information on the frontend from the dashboard of their account.
Customer Groups
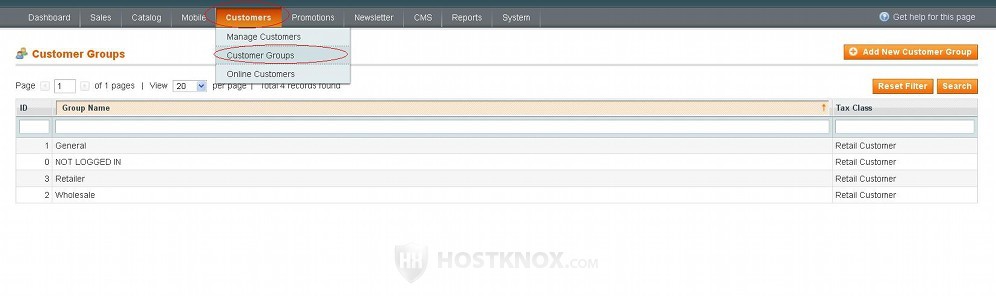
Each customer belongs to a customer group. Magento comes preconfigured with a few customer groups. By default, when a user creates a customer account they are assigned to a group called General. You can set a different tax class for each group; this, of course, will affect the final price of products depending on the group to which a customer belongs. To manage customer groups, in the admin panel of your Magento go to Customers menu>Customer Groups. On the page that opens you'll see a table with the existing customer groups:
To edit an existing group click on its row in the table; to add a new one click on the Add New Customer Group button that's above the top right corner of the table. From the group settings you can set the name of the group and you can choose the tax class:
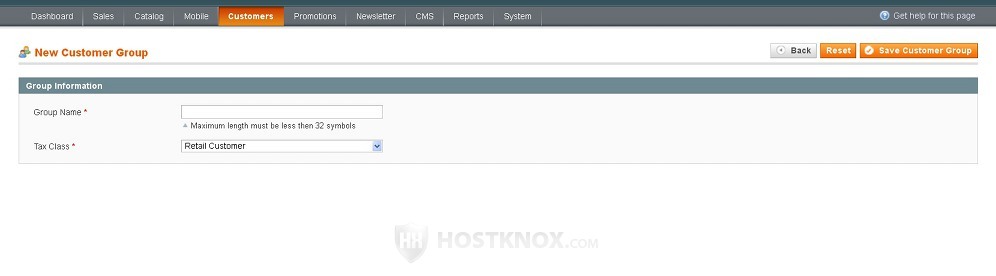
Don't forget to click on the Save Customer Group button.
You can change the group to which a customer(s) belongs from Customers menu>Manage Customers. You can either use the Actions drop-down menu to do that, or you can edit the account of the customer and change the group from there (Account Information button on the left side of the page with the customer's settings).
To change the default customer group to which new customers are assigned, in the admin panel go to System menu>Configuration>Customer Configuration button on the left>Create New Account Options panel>Default Group drop-down menu.
Another thing that customer groups are useful for is to set special discounts that apply only to customers belonging to a particular group(s). You can do that when adding/editing products. Go to Catalog>Manage Products, select the product that you want to edit. On the page with the product settings click on the Prices button on the left. On the right you'll see an option called Group Price; you can use it to set a price for the product that will apply to one or more groups. On the same page you can also set up quantity discounts and you can set a different price for the quantity discount that will apply to a particular customer group.
System Customer Settings
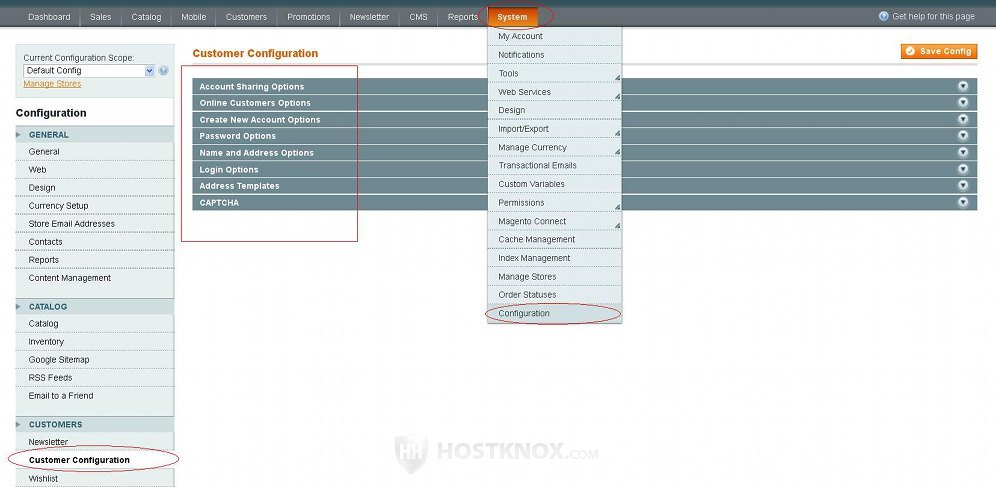
In the admin panel of your Magento there's also a section with general customer settings that affect all customer accounts. To view and configure them go to System menu>Configuration, on the page that opens click on the Customer Configuration button that's in the Customers section on the left. This will display several panels on the right:
Click on each panel to expand it and see the settings it contains. From the Create New Account Options panel, for example, you can change the default customer group to which new customers are assigned, you can enable/disable email verification, you can change the email templates used for the welcome and confirmation link emails sent to customers, etc. From the Password Options panel you can change the email template used for the forgot your password emails, you can set the expiration period of links for restoring passwords (one day by default), etc. From the Name and Address Options panel you can include more fields on the customer registration form; for example, you can include the date of birth and gender, an option for a prefix (e.g. Mr.,Mrs., etc.) and a suffix (e.g. Sr.,Jr.), and if you want to, you can make these fields required.
For more information about the customer configuration settings in Magento, you can check our Magento customer configuration settings tutorial.