Magento Importing and Exporting Customers and Products Tutorial
How to export and import products and customers in Magento
Magento has a functionality that enables you to export the customers and/or products from one Magento installation and import them in another installation or in the same one. This is useful if you want to transfer your products and customers from one shop to another. This functionality can also be used if you want to edit more quickly some of the settings of your products and customers; to do this you can export the products/customers, edit the values in the file in which the exported products/customers are saved and import it back in the same installation.
The exported customers or products are saved in a CSV file (comma-separated values file). If needed you can then edit the file and import it in a Magento installation. The file can be edited with a simple text editor (e.g. Notepad, Wordpad) or with a spreadsheet application such as Microsoft Excel or Open Office spreadsheet. It's recommended that you use a spreadsheet application to edit CSV files because you'll find it less confusing, and you're less likely to make mistakes.
There's always the chance that importing a CSV file may mess up your shop. So it's necessary that you have a recent backup of the database and of the files. If you're not sure how to do that check out the tutorial on backing up your site. A good idea is to have a separate installation just for testing and development; you can use it to test the import/export functionality.
Exporting Products and Customers
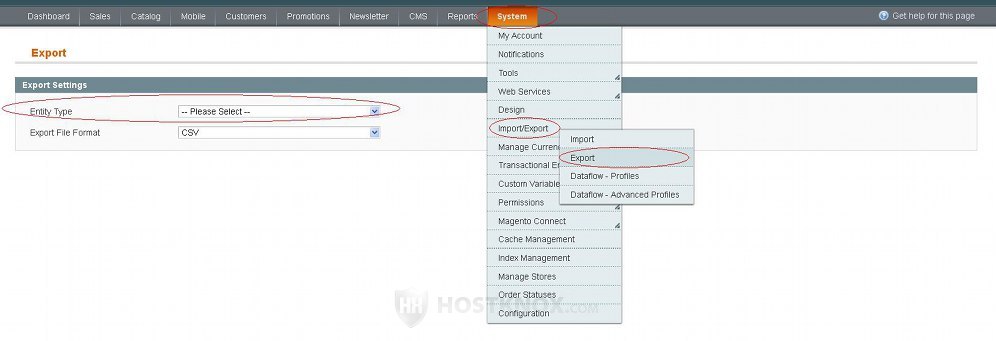
To export products or customers log in to the admin panel of your Magento and go to System menu>Import/Export>Export. On the page that opens select whether you want to export customers or products from the Entity Type drop-down menu:
You can't export customers and products in one CSV file so you have to do it per entity type. Whether you select customers or products in both cases a list of the attributes associated with that entity type will appear:
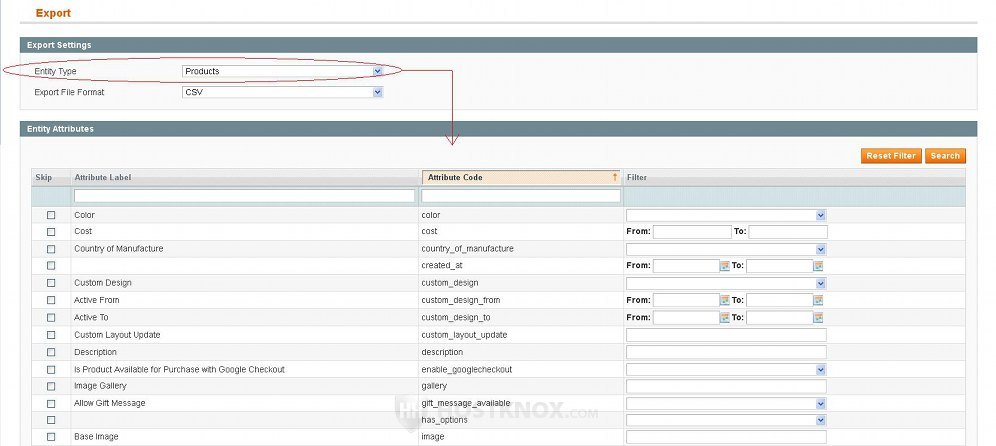
This is a list of all the attributes associated with the entity type (products or customers). All the system attributes that come preconfigured with Magento are included and also custom ones that you have created (if any). All of these attributes and their values for the products/customers will be included in the CSV file. You can exclude an attribute and its values from the file by marking the Skip checkbox for that attribute. You shouldn't exclude any system attributes. These are the attributes that come with every Magento installation and that are required. In general you'll probably have less problems if you don't skip any attributes.
Under the table with the attributes there's a Continue button:
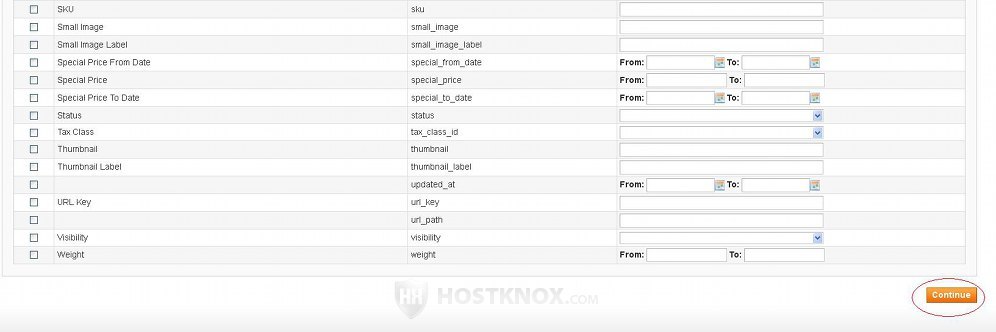
Click on it to export the products/customers and save the CSV file on your local computer.
Importing Products and Customers
Once you have the CSV file with the exported products/customers you can edit it. You can do that, for example, if you want to update the options of many products/customers in the same installation from which you exported the file. Instead of doing that from the admin panel you can save some time by exporting the CSV file, editing it and then importing it back in the same shop.
Of course, you can also make changes to a CSV file that you're going to import in a different installation. In fact it's very likely that you'll have to do that in order to be able to import the CSV file.
To edit the CSV file open it with a spreadsheet application like Microsoft Excel or Open Office Spreadsheet. The first row in the table lists the attributes using the attribute code (e.g. sku, _attribute_set, _type, _category, etc.). In each column underneath the attribute codes you'll see the values for that attribute for each product/customer:
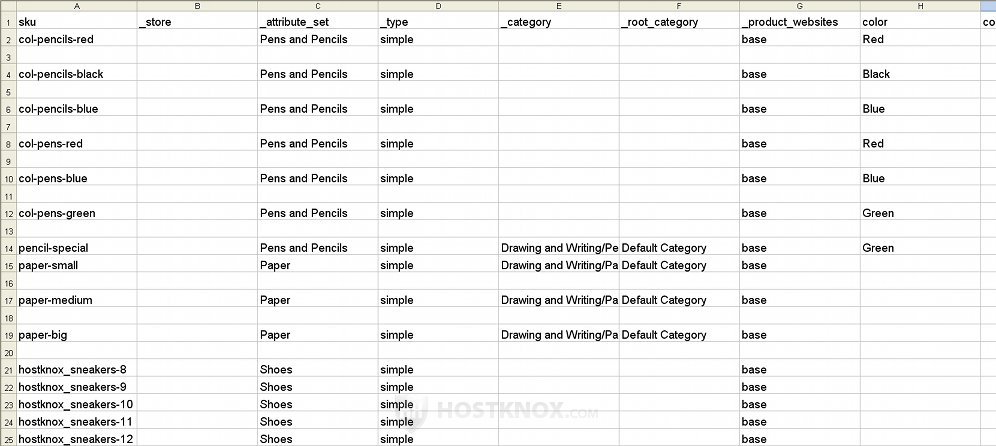
In our example screenshot above we've opened a CSV file with exported products.
When you save the file after you've edited it make sure that you keep it's format. So, for example, if you've used Microsoft Excel you'll see a message like this one:

Just click on the Yes button.
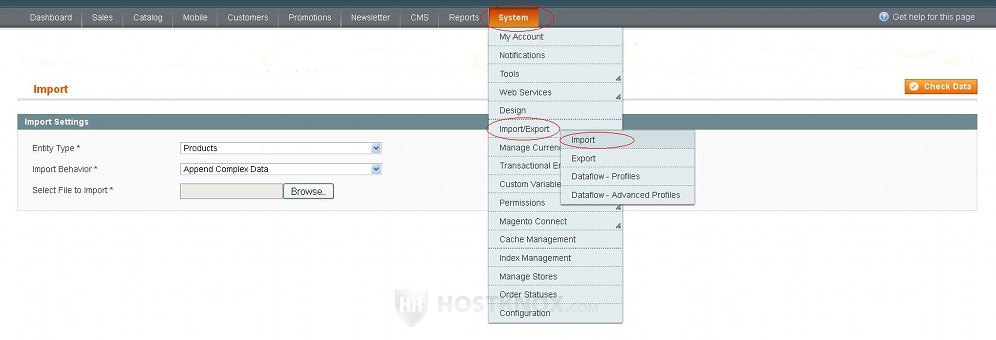
To import products/customers into a Magento installation, log in to the admin panel of that installation and go to System menu>Import/Export>Export. On the page that opens there are a few options:
From the Entity Type drop-down menu select whether you want to import products or customers.
From the Import Behavior drop-down menu you can select how the data should be imported. There are three options: Append Complex Data, Replace Existing Complex Data, Delete Entities. In case you want to import new products or update existing ones you can safely choose either Append Complex Data or Replace Existing Complex Data. In both cases if there are new products/customers in the CSV file as compared to those in the installation in which you're importing the file, the new products/customers will be imported and existing products/customers in the installation will not be deleted or modified; if there are the same products/customers in the CSV file and in the installation and there are some changes in the values of the attributes for these products/customer, the products/customers will be updated with the values from the CSV file. Products are identified as the same in terms of the value of the SKU option (the unique identifier of the product), while for customers this is the email address option.
So, for example, let's say that in the installation in which you're going to import a CSV file there's a products with the value product_1 for SKU and in the CSV file there's also a product with the same SKU; all the rest of the options (e.g. name, description, status, etc.) have the same values. You edit the name and price for this product in the CSV file and you import it in the installation, then the product in the installation with product_1 for SKU is updated with the new name and price that were set in the CSV file. It's still the same product and the rest of its options are unchanged regardless of whether you choose Append Complex Data or Replace Existing Complex Data as import behavior.
Using the same example if in the CSV file you change the SKU of this product from product_1 to something else and there's no product with the same SKU in the installation, then it will be added as a new product in the catalog and it will have exactly the same values for the other settings as the product in the installation that has a SKU of product_1. The same applies to customers but in this case the email which is associated with the customer is what's used to define the customer as the same or a different one.
The difference between the two behaviors is that with Append Complex Data duplicate records are created when updating existing products, and this sometimes may cause problems. For example, let's say that you've exported the products from an installation, you've edited some of the values in the CSV file and you import the file in the same installation. One of the products, however, has two custom options (created from the Custom Options button on the left side of the product settings page in the admin panel). One option is for selecting a color and the other for adding a custom text. After you import the CSV file using the Append Complex Data import behavior this product will have two options for choosing a color and two for adding custom text. They will be visible both on the frontend and on the backend.
With the Delete Entities option of the Import Behavior drop-down menu you can delete the products/customers. It will delete the products/customers with matching SKUs or emails respectively. For example, let's say that you have a CSV file with fifty products. You're going to import it in an installation with eighty products and fifty of those products have matching SKUs with those from the CSV file. Then after you import the CSV file those fifty products will be deleted and the other thirty will be left unchanged. If in the CSV file there are products that cannot be matched with the existing ones in the installation, then you won't be able to import it (this is only true for the Delete Entities import behavior).
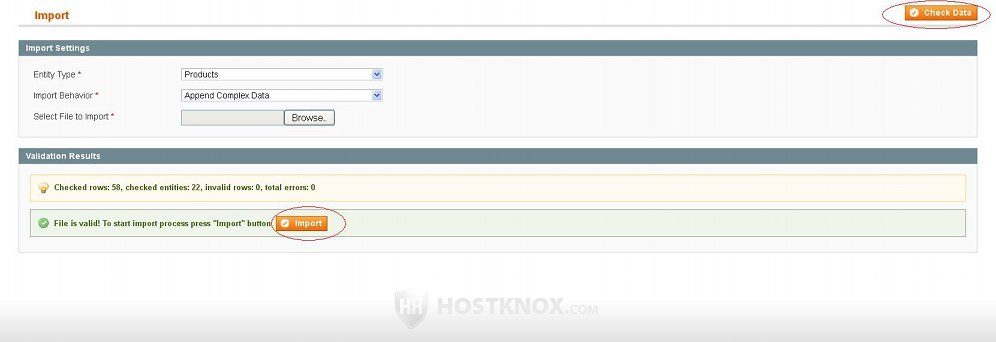
Use the Browse button to locate the CSV file on your local computer and then click on the Check Data button that's in the upper right corner. Magento will check the CSV file, and if everything is compatible with the installation in which you want to import it, you'll receive a message that the file is valid. An Import button will appear, so just click on it to import the CSV file:
Unfortunately, more often than not when checking the CSV file some errors will occur. This is more likely to happen when importing products. Here are a few things to consider when importing products:
- If the products that you exported have custom attributes and attribute groups and you're going to import them in an installation that doesn't have those attributes and attribute groups created, you have to add the attribute groups and attributes in this installation with the same names as they exist in the one from which you exported the products.
- The category names also have to match. You can create the necessary categories in the installation in which you're going to import the products. The names of the categories have to be the same as those of the installation from which you exported the CSV file. Instead of creating new categories you can edit the CSV file and change the names of the categories there with ones that exist in the shop in which you're about the import the file.
- In the CSV file there shouldn't be empty values for required attributes such as name, price, description, email address (when importing customers), etc.
- You can't import bundle products. When checking the CSV file you'll get errors for the rows corresponding to the bundle products in the file. You may also have problems with configurable products. But you can import the simple products associated with complex product types.
- You'll also get an error if website and store view codes don't match. Websites and store views are edited and added from System menu>Manage Stores. The default website that comes preconfigured with Magento has the code base. If you haven't edited it in the installation from which you exported the CSV file and in the one in which you will import it, you have nothing to worry about. Otherwise, you have to either edit the settings in the admin panel (in System>Manage Stores), or you have to edit the respective column in the CSV file. This is true both for products and customers.
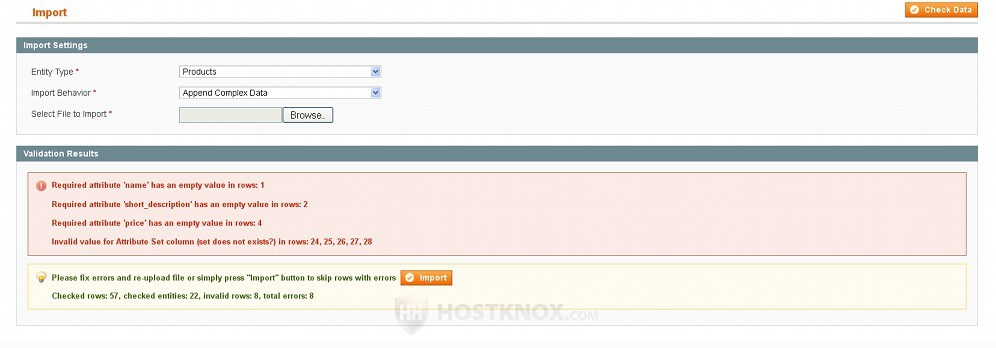
As we said it's likely that when checking the CSV file you'll receive some error message. It will inform you about the likely reason and the row(s) in the CSV file on which the problem was encountered. For instance, in the example screenshot below there are empty values for required attributes (e.g. name, short_description, price) in rows 1, 2 and 4, and in rows 24, 25, 26, 27 and 28 there are values for an attribute set (e.g. the name of the attribute set) that doesn't exist in the installation in which we're going to import the CSV file:
In this case the CSV file has to be edited supplying values for the required attributes:
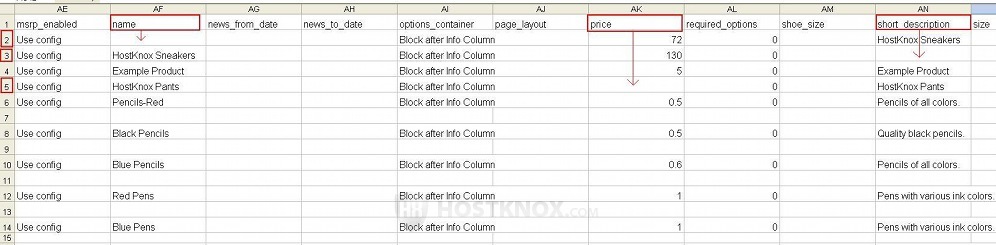
Note that in the error message the rows are labeled as 1, 2 and 4, while in the spreadsheet the corresponding numbers are 2, 3 and 5. This is because the first row in the spreadsheet is actually for the names of the attributes and it is not counted when Magento checks the CSV file.
The last example error is for an attribute set that's specified in the CSV file but doesn't exist in the installation in which the file is to be imported. In this case an attribute set with the same name has to be created from the admin panel of the Magento in which the file is going to be imported. If needed, custom attributes should also be created and added to the attribute set. For a list of the actual attributes that belong to that attribute set we can refer to the admin panel of the Magento from which the CSV file was exported (Catalog menu>Attributes>Attribute Sets).
Once you've dealt with such problems and errors and removed them, in System>Import/Export>Import click on the Browse button again to locate the edited CSV file on your local computer, click on the Check Data button and if there are no more errors click on the Import button. Then check the list of the imported products/customers from Catalog>Manage Products or Customers>Manage Customers respectively to make sure that everything is as it should be.
Additional Information
- When exporting and importing products, the product images are not transferred. This, of course, is only of concern if you're importing the products in a different installation. There are a few things that you have to do to make the product images visible on the frontend of the Magento in which you're importing the products.
First you have to create in the media folder of the installation in which you want to import the products and images a directory called import. For example, if that Magento instance is installed directly in the public_html folder of your Magento hosting account, meaning the frontend is accessible at yourdomain.com, then you need to create in public_html/media a folder labeled import. Then in that folder you need to upload all the product images. You can create the folder and upload the images with an FTP client or from the Files section of the HostKnox control panel.
Then you need to edit the CSV file with the exported products. You have to edit the information for three attributes. These are the columns labeled image, small_image and thumbnail. In these columns you'll find the path to the image for each product and the name of the image (of course, provided the product has any images associated with it). They look like this /i/m/image_name.jpg where i and m are replaced with the actual first two letters of the name of the image. What you need to do is to change the path to point directly to the image so that it looks like this /image_name.jpg. Don't forget the forward slash at the beginning:

Don't forget that you need to edit the image paths and names in the columns labeled image, small_image and thumbnail. You have to make sure that the names of the images in the CSV file match those that you uploaded on your Magento hosting account in /media/import.
After you edit the CSV file import it in Magento.
- When editing a CSV file, as you have probably noticed, the values of some attributes appear on the frontend and backend of Magento exactly in the same way as they are specified in the CSV file. What's meant by this is that, for example, what you see in the CSV file for such attributes as name, description, price, email address, etc. is what's displayed on the frontend and backend. Other attributes, however, are set in the CSV file to either 0 or 1. In this case 0 stands for disabled and 1 for enabled. When it comes to products some such attributes are, for example, status and enable_googlecheckout. There are still other attributes whose values have different meaning. One such example is the visibility product attribute; in that case 1 stands for Not Visible Individually, 2 stands for Catalog, 3 is for Search, and 4 is for Catalog, Search.