Magento Terms and Conditions Tutorial
How to manage Terms and Conditions in Magento
If your store has terms and conditions and you want customers to be aware of them, and possibly required to accept them before they place an order, you can easily do these things with the available settings in the admin panel of your Magento.
In case you just want to have a page with the terms and conditions that can be viewed by customers if they want to, then you can add a CMS page and put a link to that page somewhere on the frontend (e.g. the top menu, the footer, etc.). You can add and manage pages from CMS menu>Pages. If you need more information check out the tutorial on managing CMS pages in Magento.
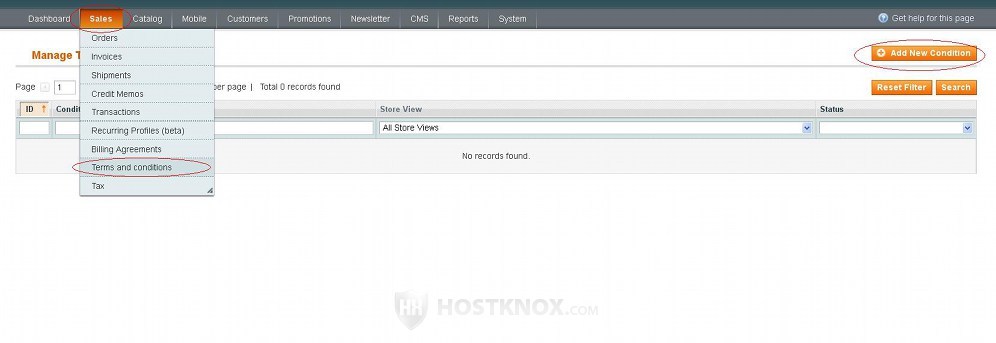
If you want your terms and conditions to be shown during the checkout process, and you want to require customers to accept them in order to be able to place an order, you can also do that by using the available settings in the admin panel. To do this go to Sales menu>Terms and conditions. On the page that opens you'll see a table with the terms and conditions that you've added (if any). To edit existing terms and conditions click on the particular row in the table. To add terms and conditions click on the Add New Condition button that's in the top right corner of the page:
On the page that opens you'll see the settings that you have to configure to add the terms and conditions:

These settings are:
- Condition Name - in this field just type the name that you want.
- Status - by default, this is set to Disabled. If you want these terms and conditions to be visible on the frontend set it to Enabled.
- Show Content as - from this option you can select whether you're going to input the text for the terms and conditions by using plain text or whether you're going to put some styling with the help of HTML tags. If you're not familiar with HTML, you better leave this option to the default value Text. Otherwise, if you have some basic knowledge of HTML and you want to add some styling/formatting to the text (e.g. bold or italicized words, etc.), you can set this option to HTML. Whichever of the two you select, the text for the terms and conditions is typed in the text area labeled Content (further down on the same page).
- Store View - this is a list of the store views that you've created. Select the ones on which you want the particular terms and conditions to be displayed. To select more than one press and hold the Ctrl button on your keyboard and click with the left mouse button on the names of the store views in the list.
- Checkbox Text - as we mentioned, in addition to the terms and conditions text itself a checkbox is displayed which the customer has to mark in order to accept the terms and conditions. In the text area Checkbox Text you can type the text to be shown next to the checkbox (something like I agree with the Terms and Conditions or I accept, etc.).
- Content - in this text area you can type the actual terms and conditions. There's no built-in text editor for this so you can type it in plain text. In case you want to format the text you have to use HTML tags; for this purpose you have to select HTML from the Show Content as option.
- Content Height (css) - you can use this option to specify the height of the text area that will be used on the frontend to display the terms and conditions. Just type the number in the field (it's in pixels). If you don't type any number, a text area with a preconfigured size will be used.
When you're done with the settings don't forget to click on the Save Condition button.
To display the terms and conditions at the Order Review step of the checkout process and to require customers to accept them, you need to enable one more option. In the admin panel of your Magento go to System menu>Configuration>Checkout button in the Sales section on the left>Checkout Options panel on the right. Expand the panel and set the drop-down menu Enable Terms and Conditions to Yes:
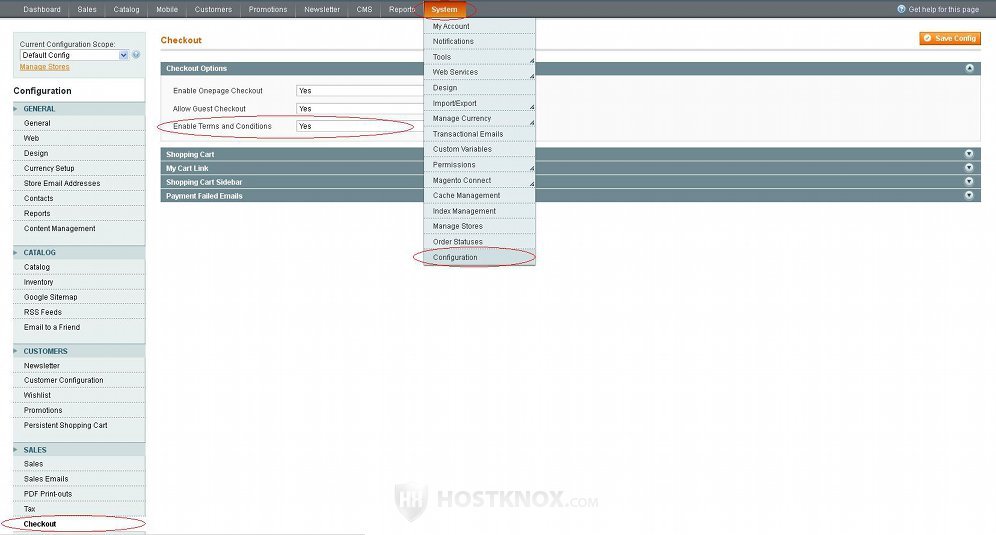
Don't forget to click on the Save Config button.