Magento Layered Navigation Tutorial
How to manage layered navigation in Magento
Layered navigation is used to make it easier for customers to find the products that they need based on the price and product attributes. With the default Magento theme that comes with the installation package, as well as with many other themes, the layered navigation block is displayed in the left column of the frontend.
When a customer opens a product category on the frontend the layered navigation menu is displayed and by clicking on the links in it the customer can filter the products in the category based on various criteria:
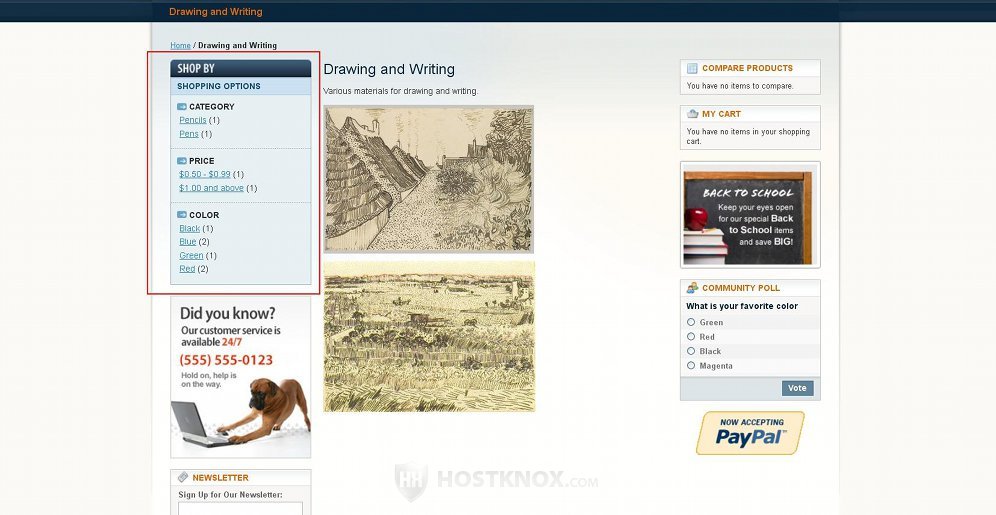
By default, layered navigation will display links to the subcategories in the particular category, but you can also configure different product attributes such as color and size to be used as filters in layered navigation. For this to happen you have to edit the display settings of the category and you also have to edit the settings of the particular attributes to make sure they are filterable. We'll come to this later in this tutorial.
First let's review the global layered navigation settings.
Global Layered Navigation Settings
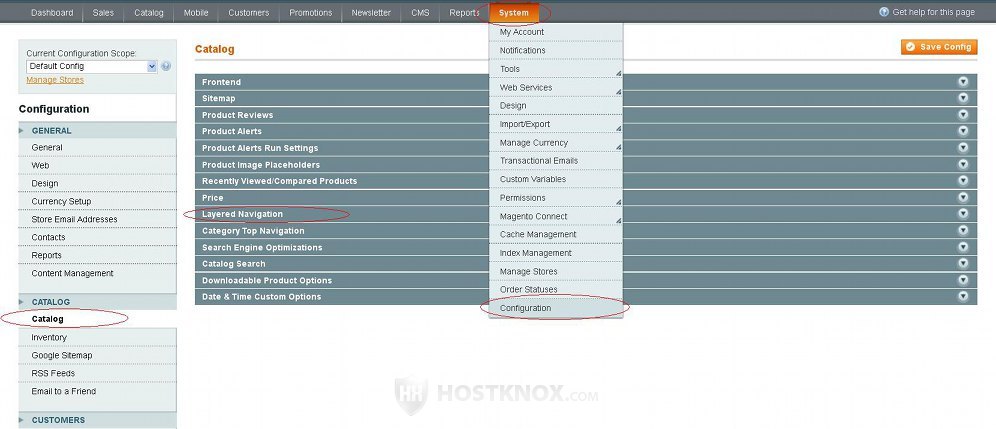
To change the system layered navigation settings that apply to all categories, log in to the admin panel of your Magento, go to System menu>Configuration, then click on the Catalog button that's under the Catalog menu, and on the page that opens click on the Layered Navigation panel:
The panel will expand and show the available options:
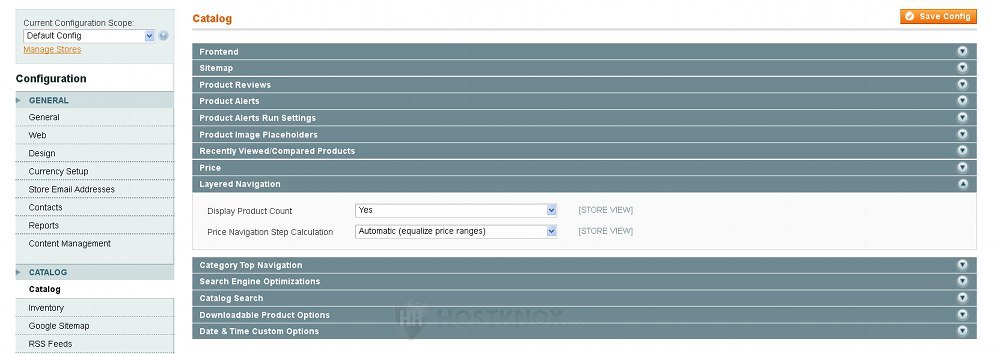
These options are:
- Display Product Count-this is set to Yes by default. This means that the layered navigation block will show the number of products that match a particular value. The number is shown in brackets after the filter. For example, if there are three products that match the color green, the number three will be displayed after the filter green in the layered navigation block.
- Price Navigation Step Calculation-this option is set to Automatic (equalize price ranges) by default. This means that Magento will automatically configure the price steps based on the prices of the products in the category. If you want to, you can set the price steps manually. Just select Manual from the drop-down menu. A couple of options will appear from which you can select the default price step and the maximum number of steps that can be shown in the layered navigation menu. Keep in mind that you can overwrite the default price step for a particular category by editing the display settings of that category; this will not affect the rest of the categories. The Price Navigation Step Calculation drop-down menu also has an option Automatic (equalize product counts).
If you make any changes, don't forget to click on the Save Config button at the top. If you make changes, you may also have to reindex data from System>Index Management; in this case you'll receive a message at the top of the admin panel (just below the top navigation bar).
Category Layered Navigation Settings
When you create/edit product categories there are some settings connected with layered navigation. To access them go to Catalog menu>Manage Categories, select the category that you want from the list on the left and click on the Display Settings tab that's above the category settings. There are two options that are directly related to layered navigation. These are Is Anchor and Layered Navigation Price Step:
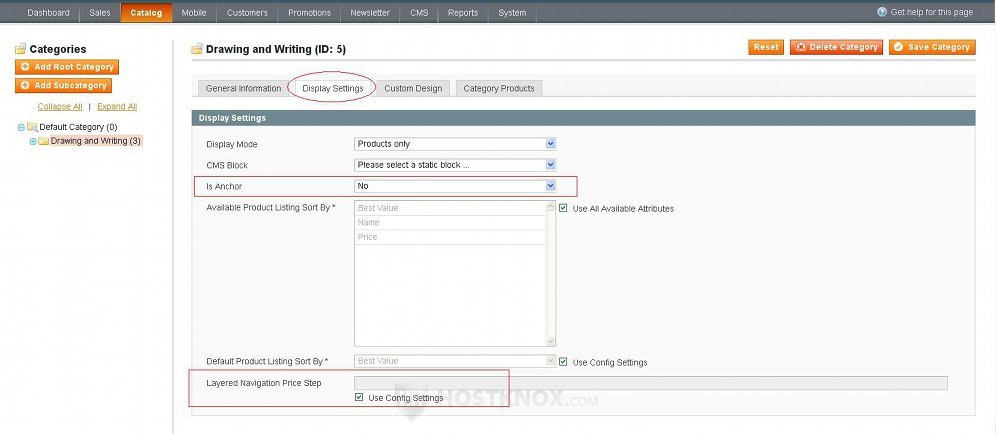
From the option Layered Navigation Price Step you can put a specific price step for this category. It will overwrite the global layered navigation price step that's configured from System>Configuration>Catalog>Layered Navigation, no matter whether it's configured to be automatic or manual. Just unmark the checkbox for Use Config Settings and type the price step (e.g. 50) in the field.
The Is Anchor drop-down menu is set to No by default. If you want the product attributes (e.g. color, size) that are filterable to be shown in the layered navigation block, set the drop-down menu to Yes. Read the next section in this tutorial to learn how to make attributes filterable.
If you make changes, don't forget to click on the Save Category button.
Attribute Layered Navigation Settings
Product attributes have a few options connected with layered navigation. What's important is that some of them have to be configured in a particular way so that the values of that attribute can be displayed in the layered navigation block. To edit/create attributes go to Catalog menu>Attributes>Manage Attributes. On the page that opens there's a table with the existing attributes:
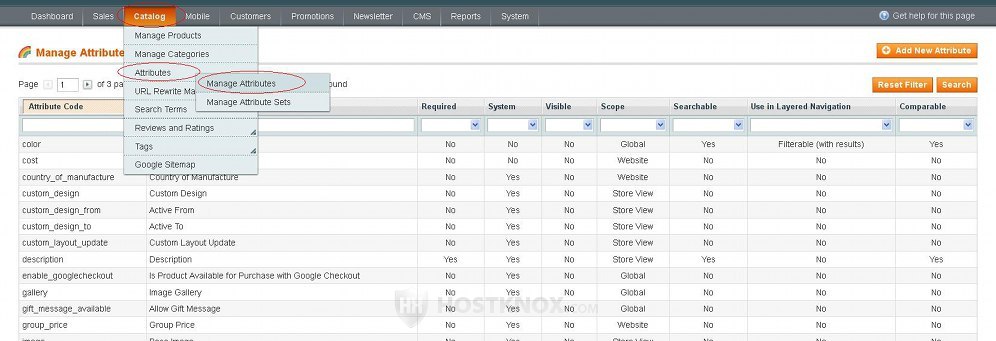
To edit an attribute click on its row in the table and to create a new one click on the Add New Attribute button above the upper right corner of the table. In any case this will display the attribute settings:
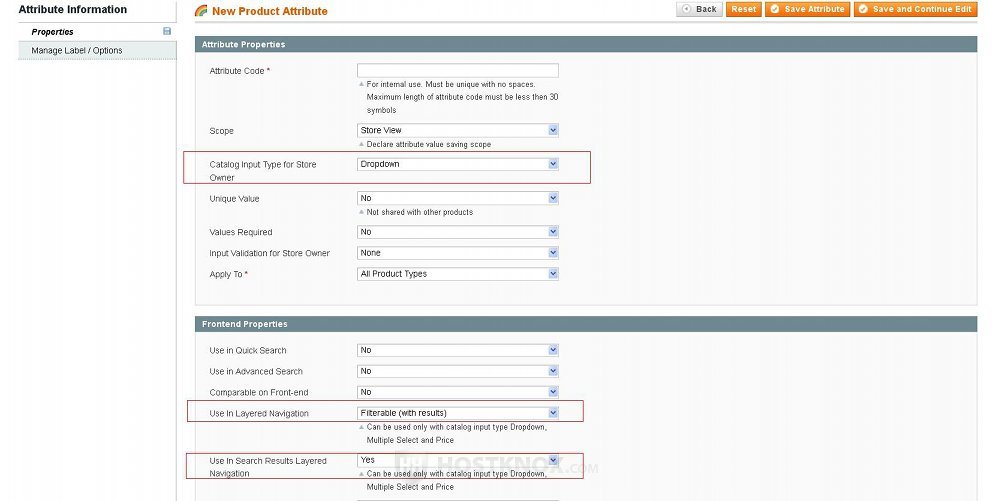
The options that are related to layered navigation are Catalog Input Type for Store Owner, Use in Layered Navigation and Use in Search Results Layered Navigation. The first two are more important. The Catalog Input Type has to be set to Dropdown, Multiple Select or Price so that the values of the attribute can be used with layered navigation. When the input type is set one of these three values you'll be able to set the drop-down menu for the option Use in Layered Navigation to Filterable (with results) or to Filterable (no results). The difference is that in the first case the value will be shown in the layered navigation menu only if there are products that match that value, while with Filterable (no results) the value will be displayed even if there are no products matching the value. Don't forget to click on the Save Attribute button in the upper right corner.
Don't forget that, as we already said, in order for the values of this attribute to be visible in the layered navigation block, the category (categories) containing the products with that attribute has to be anchored, meaning that its Is Anchor option has to be set to Yes.