Magento Multilingual Store Tutorial
How to create a multilingual Magento store
When you install Magento on your account, by default the frontend and backend are in English. You can add any language to your Magento and translate the text that appears on the frontend (and also on the backend, if you want to). In this way you can let the customer choose the language in which they want to view the site provided the particular language is available. The process of creating a multilingual site can be broken down into several steps. You have to create a store view for the particular language. You have to translate the default texts like the names of the various blocks (e.g. Compare Products, My Cart, etc.) and links (e.g. My Account, My Wishlist,etc.); you can do that by installing a language pack and/or by using the built-in developer tool for translating the default strings of text. You also have to translate the product and category names, descriptions, etc. You can do that by editing each product and category.
Let's examine these steps in more details.
Adding a Store View and Changing the Default Store View
In order for the frontend of your store to be displayed in different languages you have to add a store view for each language. Although store views can be used for other purposes they are primarily used for creating multilingual stores. Each store view corresponds and is assigned to a language. By default, a Magento installation without sample data comes preconfigured with a single store view called Default Store View, while if you installed Magento with sample data, it should have three store views: English, French and German. Note that having a store view and switching to it on the frontend (or backend) doesn't mean that the site will be translated in the particular language. For this to happen you also have to install the corresponding language pack (or translate the default text strings manually), and you have to edit and translate the relevant options of the existing categories and products in the particular store view. We'll come to this further down in this tutorial.
You can add new store views or edit the existing ones from the admin panel of your Magento. To do this go to System menu>Manage Stores. On the page that opens you'll see a table with three columns; the first one for the website, the second one for the store and the third one for the store view. It represents the website(s) with each store and store view. To edit an existing store view click on its name in the table; to add a new one click on the Create Store View button that's above the top right corner of the table:
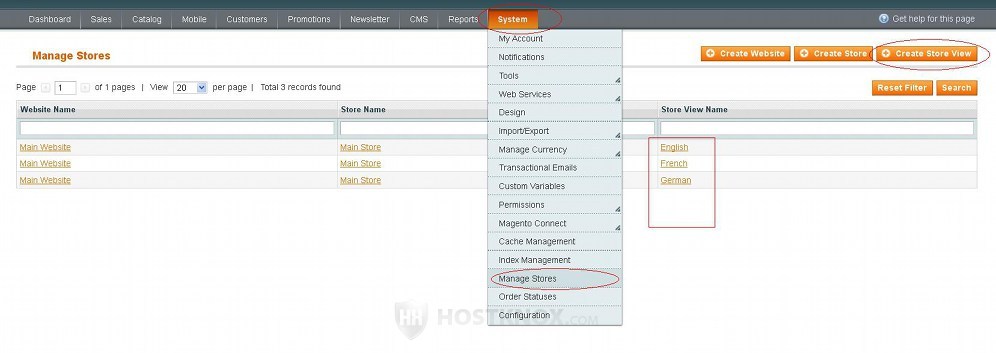
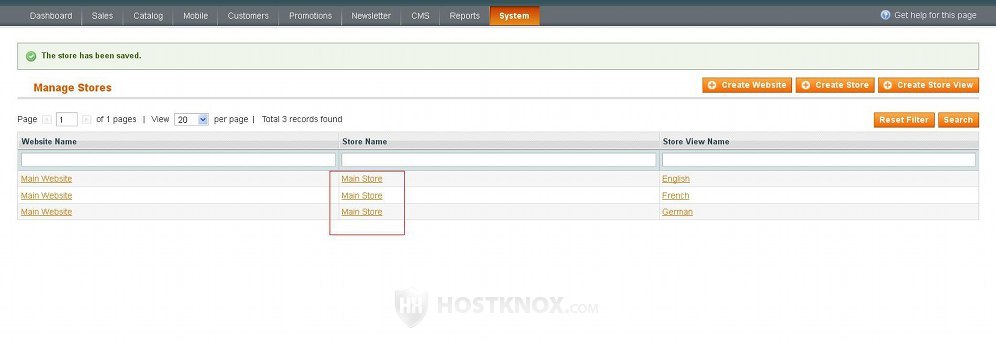
For example, in a default Magento installation with sample data there's one store called Main Store with three store views (English, French, German). You can also edit the settings of an existing store or a website by clicking on its name in the table, and you can add a new store or website by clicking on the respective button above the table and configuring the options.
When you add/edit a store view you'll see the following options:
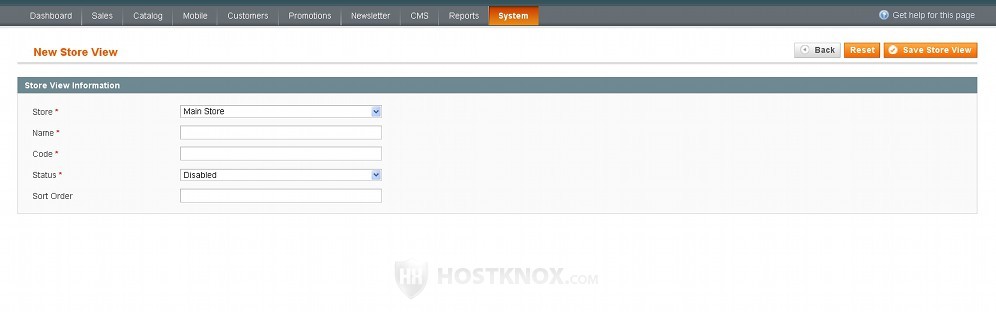
From the Store drop-down menu you can select the store to which you want the store view to belong. This only matters if you have set up a multistore; otherwise, it will be set to the only available store. In the field for Name type the name of the store view as you want it to appear in the various menus on the frontend and backend (e.g. Swedish). In the field for Code type some value. It's for internal use so use lowercase letters, and if it contains more than one word, you can separate them with underscores. Use something that's meaningful to you. For example, just use the name of the store view (e.g. swedish) or you can use a combination of the website name and the store view (yourdomain_swedish). If you want customers to be able to select this store view on the frontend set the Status drop-down menu to Enabled. You can use the Sort Order option to set the position in which you want the store view to appear in the various menus in relation to the other store views.
After you're done with the settings don't forget to click on the Save Store View button in the upper right corner.
One of the store views is the default one which means that when a customer goes to the URL address of your store (e.g. yourdomain.com) this default store view will be displayed. In a Magento installation with sample data that's the English store view (with no sample data there's only one store view). To change the default store view you need to edit the settings of the store to which it belongs. In the admin panel go to System>Manage Stores and on the page that opens click on the store's name in the table:
On the page that opens select the store view from the Default Store View drop-down menu:
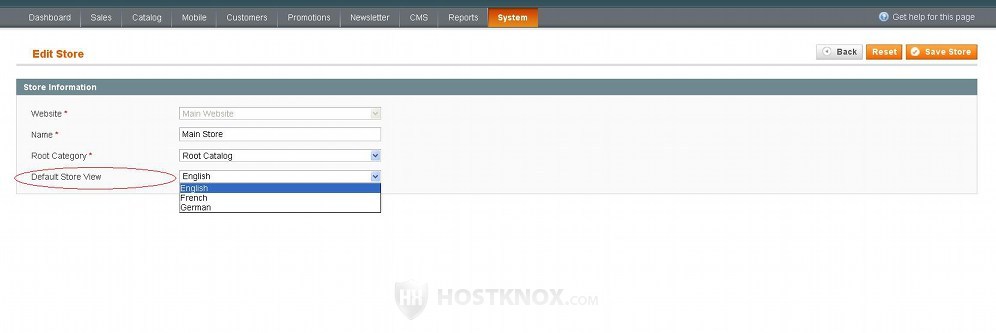
Then click on the Save Store button.
Installing a Language Pack/Translating Text Strings
Once you create the store view(s) you need to install the language pack for the respective language. The language pack contains files with translations of the default text strings that appear on the frontend and in the admin panel. When these files are uploaded in the respective location on your hosting account and a user selects the store view associated with these files, the text strings will be automatically displayed in the respective language. You can also manually translate/edit any default text string. We'll come to this a bit later.
You can download language packs from the translations section of the official Magento site. There you'll see a table with the available language packs. Note that many are not a hundred percent complete. Click on the Select button of the language and on the following page click on the Package link to download to your local computer a zipped package of the necessary files. After that unzip the archive. The name of the unzipped folder should be an abbreviation of the language; for example, if the language is Swedish the folder will be named sv_SE (all language packs are named in this pattern of a lowercase abbreviation followed by an underscore and an uppercase abbreviation). If you open the folder it should contain another one labeled app which in its turn contains the subfolders design and locale. The locale subfolder contains a folder that's again named as the top level folder sv_SE (the whole path to the folder being sv_SE/app/locale/sv_SE). This folder contains the files with the translations and this is the folder that you need to upload to the respective location on your Magento hosting account.
If, for example, your Magento is installed directly in the public_html folder on your hosting account, making the store accessible at yourdomain.com, then you need to upload the above mentioned folder to public_html/app/locale. You can do that with an FTP client (e.g. FileZilla).
Before you can see the translations on the frontend (or backend) you have to change the locale settings for the particular store view. Check the next section in this tutorial to learn how to do it.
As we mentioned, some language packs are not a hundred percent complete or there might be no language pack for the language that you want to add. In such cases you can translate default text strings yourself. This is also useful if you don't like the way some particular text is translated. Magento has a built-in tool that allows you to do that. In the admin panel of your store go to System menu>Configuration, then click on the Developer button that's in the Advanced section on the left. From the panels that appear on the right click on the Translate Inline panel to expand it and if you want to change text strings that appear on the frontend, set the Enabled for Frontend drop-down menu to Yes. In case you want to translate text that's displayed on the backend set the Enabled for Admin drop-down menu to Yes. Note that when you edit text on the frontend it's a good idea to restrict this tool so that it can be used only by you (from your IP address). This can be done from the Developer Client Restrictions panel. Type your IP address in the field for Allowed IPs. If you don't do it, other people visiting the frontend of your site will be able to edit the text strings.
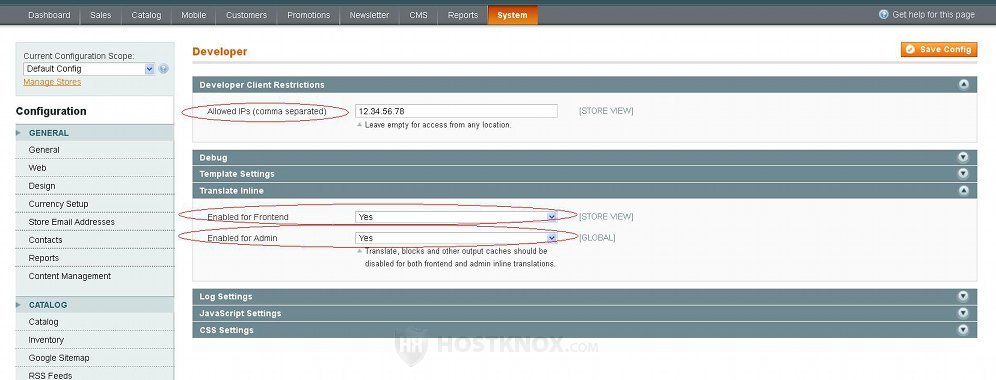
Don't forget to click on the Save Config button.
Before you start editing the translations it's useful to disable the cache from System>Cache Management (at least the blocks HTML output and translations cache types). Otherwise, you'll have to flush the cache each time you edit a text string in order to be able to see the result after refreshing the page.
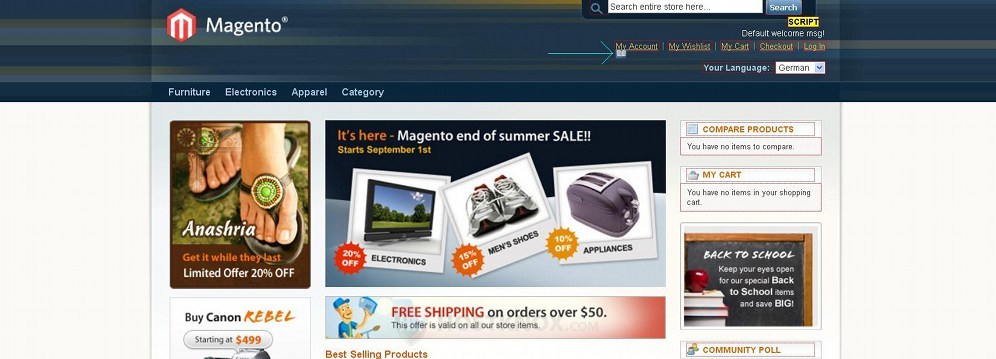
If, for example, you enabled the tool for the frontend, refresh the frontend of your site and you'll see each text string that can be edited encircled with red. First, select from the respective drop-down menu (e.g. Your Language) the store view that you want to edit. Then hover the mouse pointer over a text string and a little button in the form of a text book will appear:
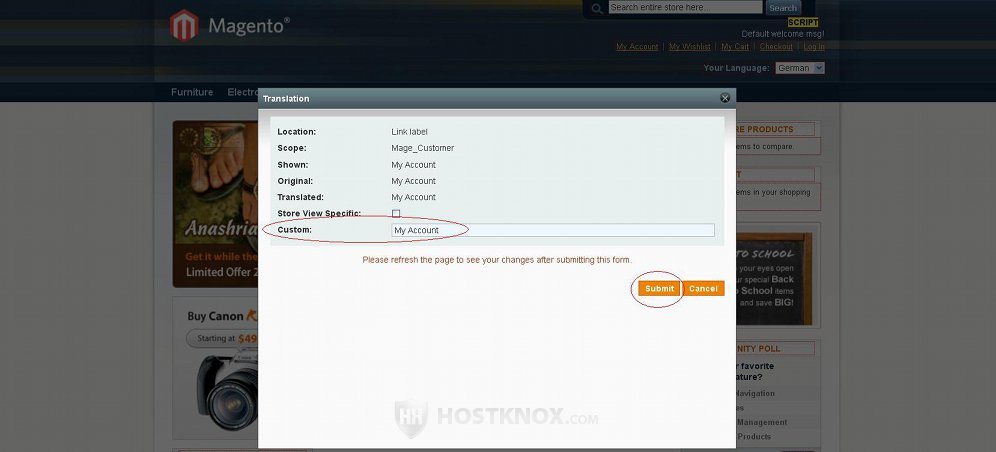
Click on the button and a window will pop out. Type the text that you want in the field for Custom and click on the Submit button:
Then refresh the frontend to see the result. After you're done, if you disabled some or all cache types, go to System menu>Cache Management in the admin panel and enable the cache.
Changing Locale Settings
After you create the store view and you upload the language files for the particular language you need to change the locale option of the store view in order for the translations to be seen on the frontend. To do this, in the admin panel go to System menu>Configuration and select the store view (e.g. Swedish) from the Current Configuration Scope drop-down menu in the upper left corner. Then click on the General button in the General section on the left, expand the Locale Options panel on the right, unmark the Use Website checkbox that's next to the Locale drop-down menu and set the drop-down menu to the same language (e.g. Swedish):
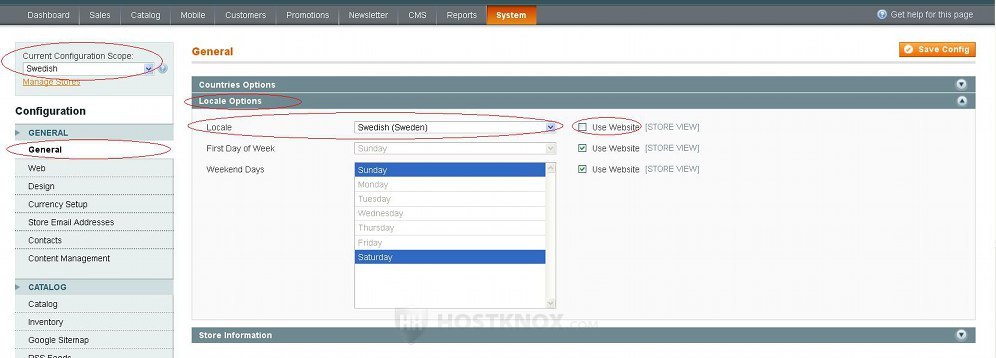
Don't forget to click on the Save Config button.
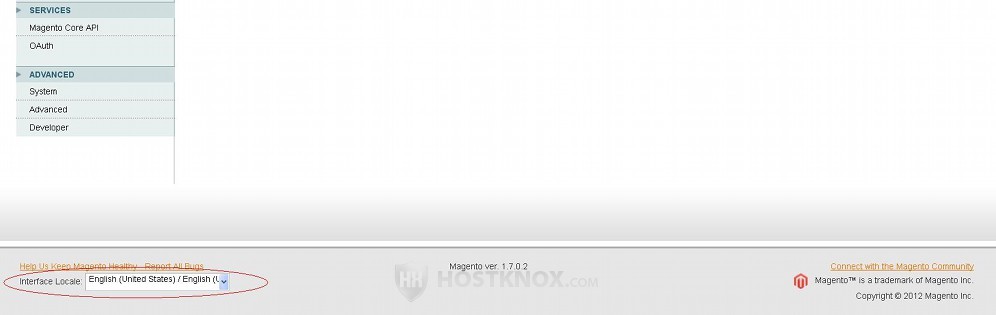
If you want to have your backend translated into the language that you uploaded on your hosting account, scroll down to the bottom of the admin panel and select the language from the Interface Locale drop-down menu:
Product and Category Translations
Product and category names, descriptions, etc. have to be translated individually for each store view. To translate the various product options whose values appear on the frontend, in the admin panel go to Catalog menu>Manage Products, find the product in the table that appears and click on its Edit button. On the page with the product settings select the store view from the Choose Store View drop-down menu in the upper left corner, then unmark the Use Default Value checkbox next to the option that you want to edit and change the value for the option:
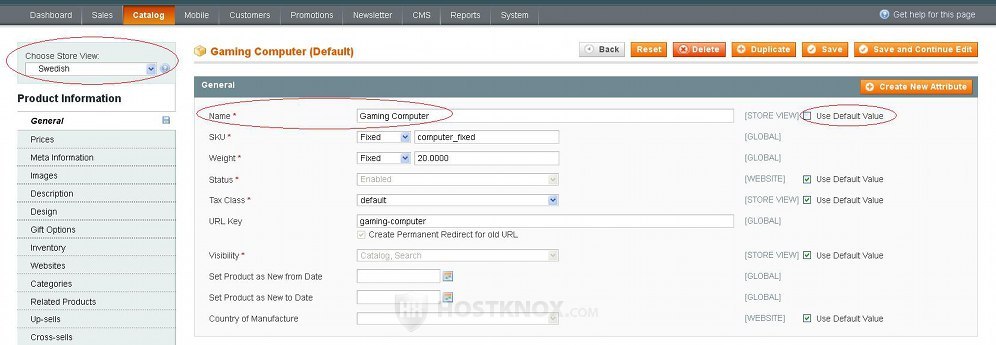
After you're done with all the settings that you want to edit don't forget to click on the Save or on the Save and Continue Edit button.
Categories are edited in a similar way. In the admin panel go to Catalog menu>Manage Categories, select the category that you want to edit from the list with the existing categories on the left, select the store view from the Choose Store View drop-down menu in the upper left corner, unmark the Use Default Value checkbox for the option that you want to change and edit the option:
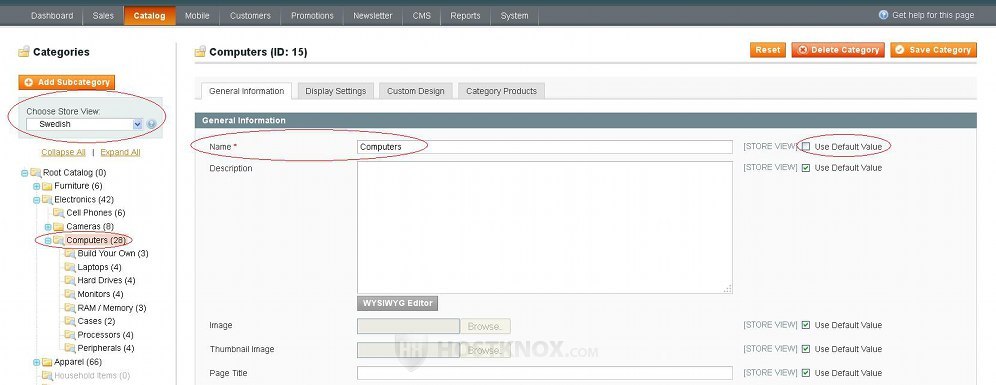
Then click on the Save Category button.
Of course, you don't have to change all settings. It only makes sense to edit the values of settings such as name and description.
After you're done with the product and category options flush the Magento cache, refresh the frontend of your site and change the store view to the one you edited to see the result.