PrestaShop 1.5/1.6 Customers Tutorial
How to manage customers in PrestaShop 1.5 and 1.6
In this tutorial we'll concentrate on how to manage your customers. From the admin panel of your PrestaShop you can add new customers, edit and delete existing customers, view the personal information and orders placed by each customer. There are also settings with which you can make some of the optional customer information required, so that people have to provide it when registering on the frontend, and also when administrators register customers from the backend. In the admin panel of your PrestaShop there are also some settings related to the frontend customer registration process and to making the phone fields required or not; we've reviewed these settings as well.
Note that we have separate tutorials on how to manage customer addresses and on how to manage customer groups. In our PrestaShop knowledgebase there are some additional articles concerning customers and the registration of customers. In the last section of this tutorial we have included links to such articles.
In this tutorial we'll show you:
- how to access the customers section in the admin panel of PrestaShop
- how to add new customers
- how to edit and delete customers
- how to enable and disable customer accounts
- how to view information about customers
- how to make required or not fields for customer information
- how to add or remove the address information from the registration process, how to make the phone fields required or optional, and what the other general customer options are
- links to other HostKnox tutorials and articles on managing customers in PrestaShop
In this tutorial we've used as a basic example PrestaShop 1.6. The screenshots are also from that PrestaShop version. Although the design of the admin panel is different than that of PrestaShop 1.5 the options related to managing customers are practically the same. If there are some differences we'll make notes about that in the tutorial.
Access the Customers Section in the Admin Panel
The admin panel of your PrestaShop has a separate menu labeled Customers. It has several sub-menus with various settings related to customers. To add new customers and manage the basic options and information of the existing ones, go to Customers menu>Customers sub-menu. On the page that opens you'll see a table with the currently registered customers:
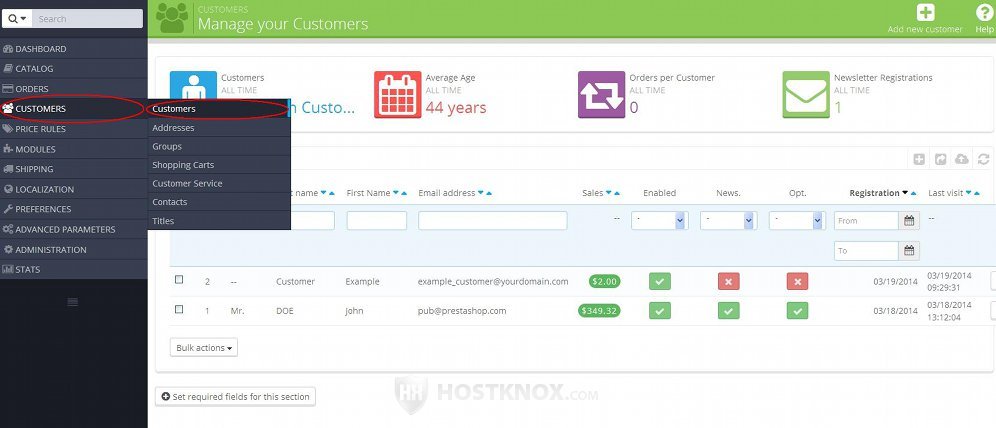
By default, PrestaShop comes with one sample customer (John DOE). The table shows basic information about each of the registered customers. You can use the filtering options at the top of the table to find a customer(s).
Add New Customers
Usually users register themselves from the frontend of your store. We recommend that you register an example user from the frontend of your site, so that you know what the process is and what your customers have to do in order to register. By default, when customers register themselves on the frontend they are only required to provide their first and last name, an email address and a password. Optionally, they can also select their gender, specify their date of birth, sign up for your newsletter (if you have any) and agree to receive special offers from your partners. By default, the registration form does not contain settings for providing an address. This is done after the customer registers. If you want to, you can require customers to provide an address during the registration process. You can find the settings for doing this by going to Preferences menu>Customers sub-menu in the admin panel. For more information check out the section in this tutorial on how to manage the customer registration settings.
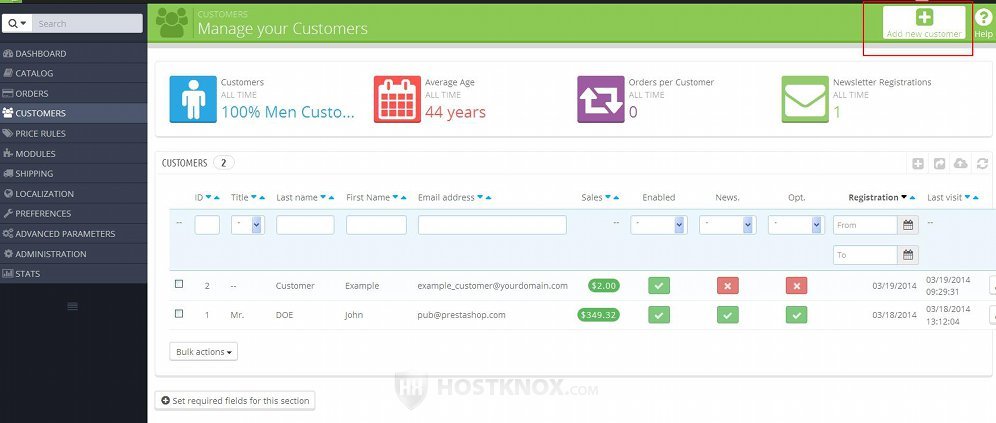
You can also register new customers from the back office of your PrestaShop. To do this, go to Customers menu>Customers sub-menu in the admin panel and click on the Add new customer button that's in the top right corner of the page that opens (in PrestaShop 1.5 the button is labeled Add new):
This will open the form for adding new customers. The form for editing customers contains the same settings.
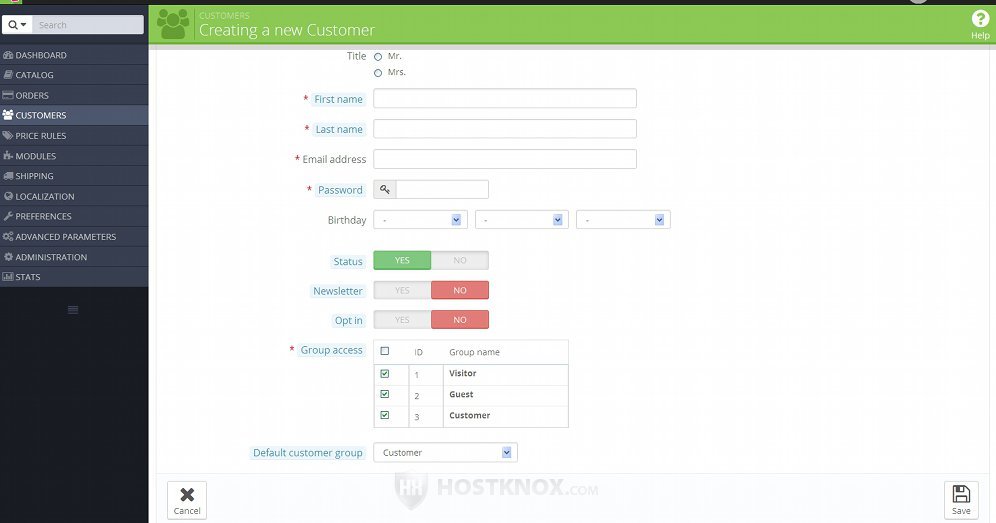
The options are:
- Title - the default titles that you can select from are Mr. and Mrs. So from this option you can select the gender of the customer. It's optional so you don't really have to choose anything in order to be able to add the customer.
You can add additional titles that you can choose from (e.g. Dr., Professor, etc.). You can do this from Customers menu>Titles sub-menu in the admin panel. - First name - type the first name of the customer. This is a required field.
- Last name - put the last name of the customer. This is also a required option.
- Email address - in this field type the email address of the customer. Customers log into their accounts on your site with the email address and the password for the account. So the email address is also the login name.
- Password - type a password for the customer. It has to be at least five characters long. Each customer can change their password from their account settings once they log in.
- Birthday - you can use this option to specify the birth date of the customer. It's not required.
- Status - by default, this option is enabled which means that after you add the customer the account will be active. If you want to deactivate the customer account, disable this option.
- Newsletter - if you publish a newsletter and you want the customer to receive it on their email address, enable this option. It's disabled by default. Customers can subscribe/unsubscribe at any time from their customer account settings.
- Opt in - if the customer wants to receive special offers from your partners, you can enable this option. Once the account is created the customer can subscribe/unsubscribe at any time using the respective option in the account settings.
- Group access - this option lists all customer groups that you've created and from it you can choose to which customer groups should the customer belong. One customer can belong to many customer groups. You can use customer groups to set up various discounts and promotions and also to limit the access to categories and products. PrestaShop comes preconfigured with the customer groups Visitor, Guest and Customer. The Visitor group is for all unauthenticated visitors on your site, Guest is for people who check out as guests (guest checkout is disabled by default) and Customer is the most basic customer group to which all registered customers belong by default. For more information on customer groups read the tutorial on how to manage customer groups in PrestaShop.
- Default customer group - from this drop-down menu you can select the default customer group of the customer. It's set to the general Customer group that's for all registered customers.
After you're done with the options click on the Save button.
Keep in mind that by default when a person registers a customer account using the form on the frontend, a welcome email message will be sent automatically to the email address for the account (it contains the login credentials). However when you add a customer from the back office as shown above, no such email will be sent. So in this case you have to send the login credentials to the customer.
Note that if you enable the business-to-business mode, some additional settings will be available on the form for adding/editing customer accounts. The mode can be enabled from the general customer settings that are available when you go to Preferences menu>Customers sub-menu in the admin panel. For more information on these options check the section in this tutorial on how to manage the general customer options in PrestaShop.
Edit and Delete Customers
To edit the account information (e.g. name, email address, password, customer group, etc.) of existing customers, in the admin panel of your PrestaShop go to Customers menu>Customers sub-menu, and in the table that lists the customers click on the Edit button for the particular customer:
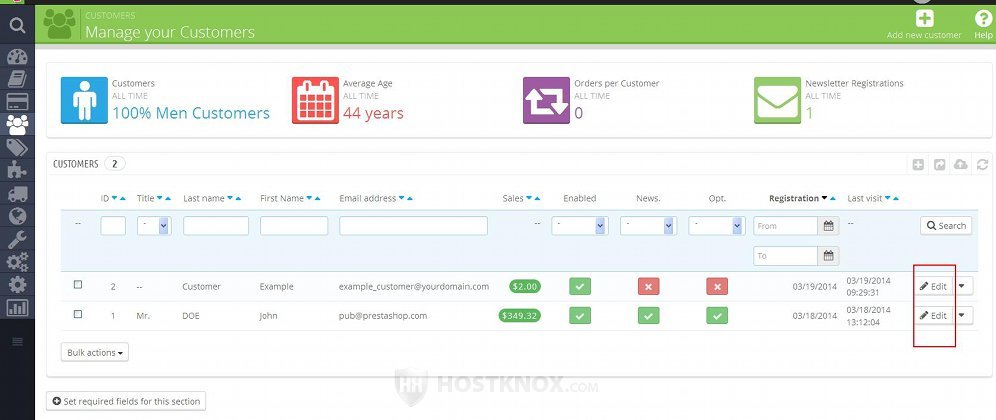
In PrestaShop 1.5 the button is not labeled; it's an icon that looks like a pencil.
The options on the edit form are the same as those on the form for adding new customers. For information on these options check the section in this tutorial on how to add new customers.
To delete a customer, after you go to Customers menu>Customers sub-menu click on the arrow button that's next to the Edit button for the customer that you want to delete and then click on the Delete button in the drop-down menu that appears:
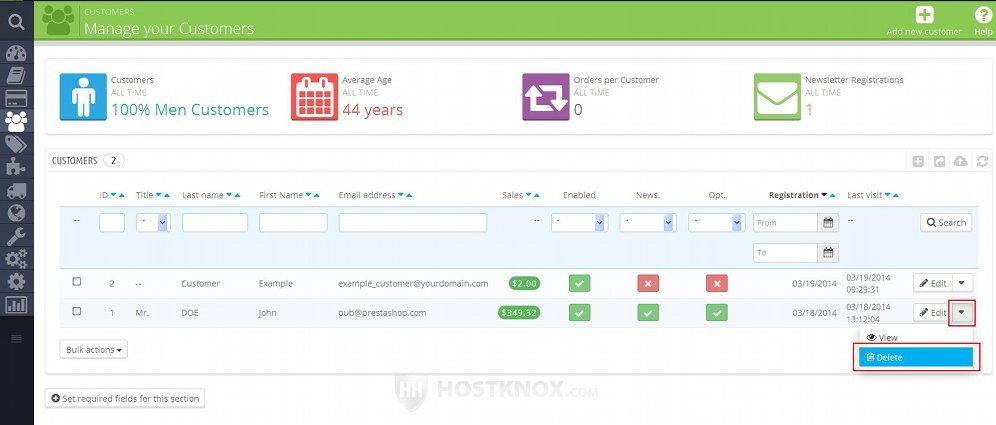
In PrestaShop 1.5 there's no such drop-down menu; the Delete button is in its own column in the table and it looks like a trash can.
If you want to delete more than one customer at the same time, mark the checkbox for each customer (in the first column of the table) and from the Bulk actions drop-down menu that's under the table select Delete selected.
After you click on the Delete button a menu will appear at the top of the page asking you what you want to do with the customer information that's stored in the database:

You can remove from the database all the data related to the customer. This will remove the customer's account and addresses, but the orders placed by the customer (if any) will still be listed in the admin panel. Deleting a customer in such a way means that a customer can register with the same email address as the email of the customer you deleted. Alternatively, you can remove the customer account but keep the customer information in the database; in this way an account can't be registered with the same email address.
Enable and Disable Customers
You can activate and deactivate customer accounts. If an account is disabled, the user will not be able to log into their account and place orders through that account. By default, when a visitor registers a customer account it is activated. When you add a customer account from the admin panel the option for the status of the account is also set to active by default.
You can enable/disable customer accounts directly from the table that lists the customers. When you go to Customers menu>Customers sub-menu in the admin panel you'll see a column labeled Enabled in the table with the existing customer accounts. It shows whether each customer account is active or not:
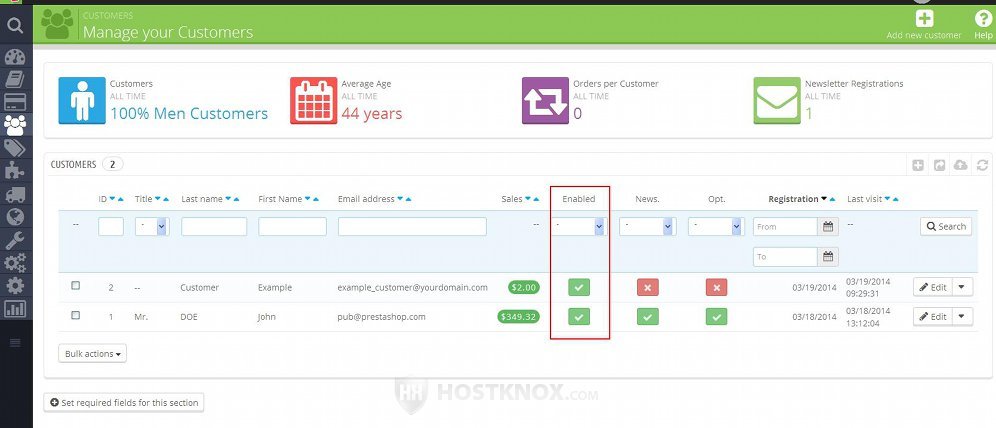
A green check mark indicates that the account is enabled. If you click on it, it will turn into a red X mark and the account will be disabled. Clicking on a red X mark will turn into a green check mark and the account will be enabled.
You can also enable/disable an account by going to its edit form and configuring the Status option.
View Customer Information
To view not only the personal information of a customer but all the information related to a customer, go to Customers menu>Customers sub-menu in the admin panel, in the table with the customers click on the arrow next to the Edit button for that customer and in the drop-down menu that expands click on View:
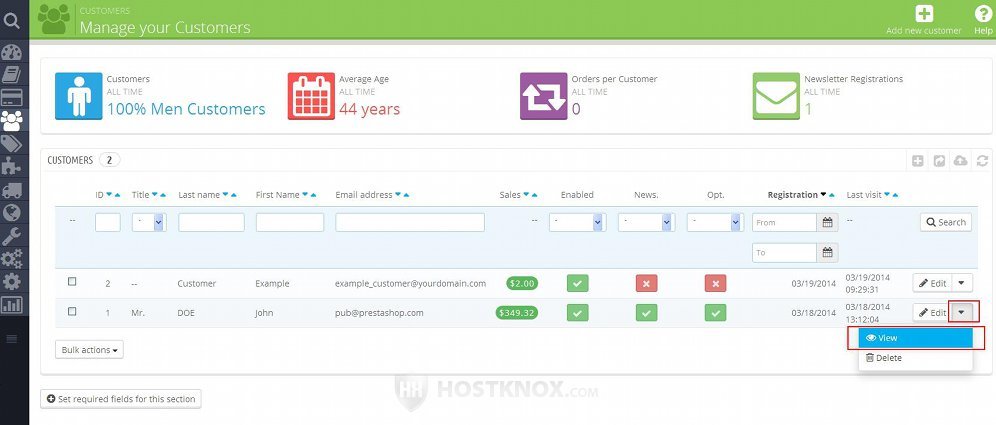
In PrestaShop 1.5 there's no such drop-down menu; the View button is shown directly in the table and it looks like a small magnifying glass.
After you click on the View button a new page with the customer information will open. The information there's is organized into separate blocks:
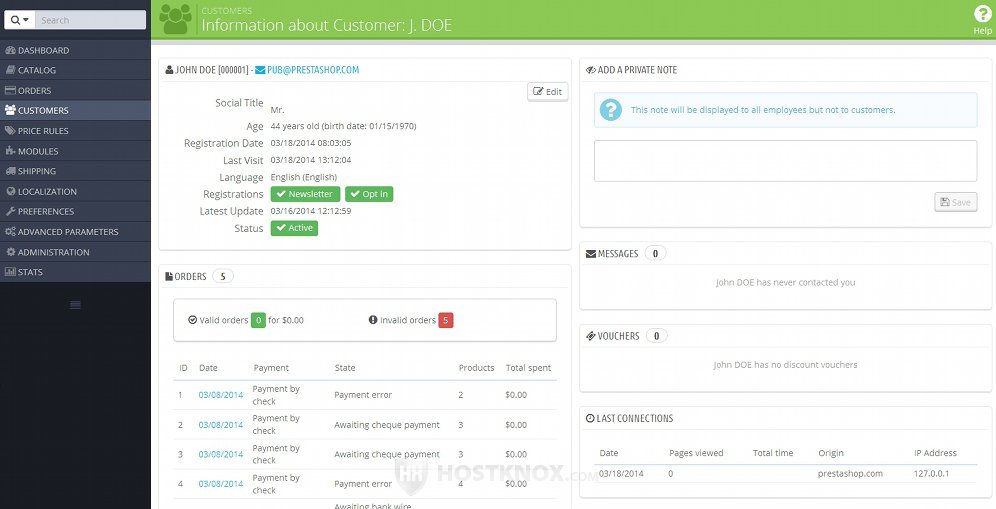
You can view the personal information of the customer, the addresses of the customer, the orders the customer has placed, a list of the ordered products, the messages (if any) that the customer has sent you, a list of the vouchers (if any). You can also add some notes about the customer.
On this page you can also perform various actions. In most cases you'll be redirected to the place in the admin panel where the particular thing is managed. For example, if you click on the date of an order, you'll be redirected to the page that shows all the details about the particular order, and from where you can manage the order.
Set Required Fields for Customer Information
When you go to Customers menu>Customers sub-menu in the back office, you'll see at the bottom of the page a button labeled Set required fields for this section. If you click on it a list of some fields will appear. These are fields that appear on the customer registration form on the frontend and on the form in the admin panel for adding customers:
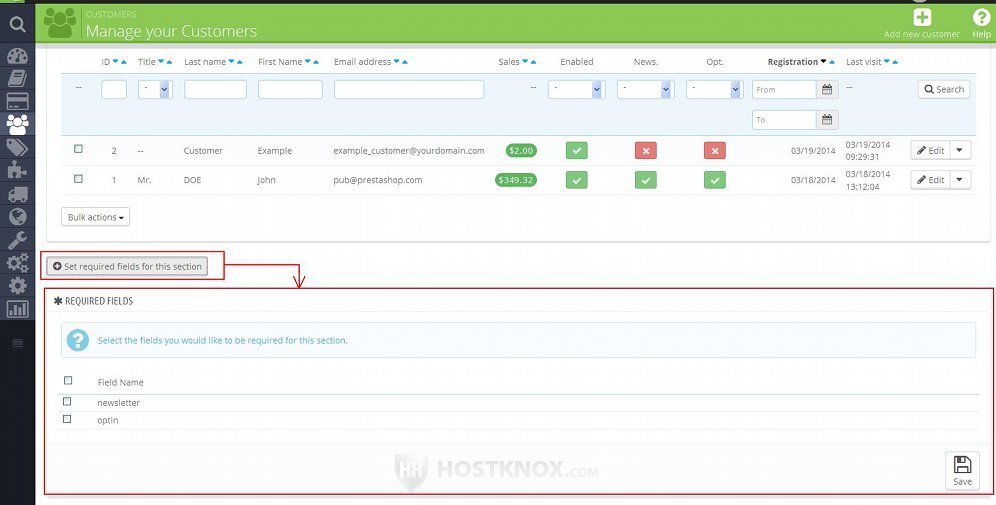
This list includes the fields for the Newsletter and Opt in options. You can use this list to make required fields that are otherwise optional. For example, when customers register an account they can optionally subscribe to your newsletter. If you want to make the subscription required, mark the checkbox for newsletter.
Note that if you make any of the fields required this will make them required both on the registration form on the frontend and on the add/edit customer form in the admin panel. However, they will not be marked with a red asterisk as the fields that are required by default.
In a similar way from the page for managing customer addresses (e.g. Customers menu>Addresses sub-menu) you can also make required fields that appear on the address form (e.g. phone number, company, etc.). For more information check the tutorial on how to manage customer addresses in PrestaShop.
Customer Registration Settings and Other Customer Options
There are some general customer options that apply to all customers. To configure them, go to Preferences menu>Customers sub-menu in the admin panel. This will display a page with several options related to customers:
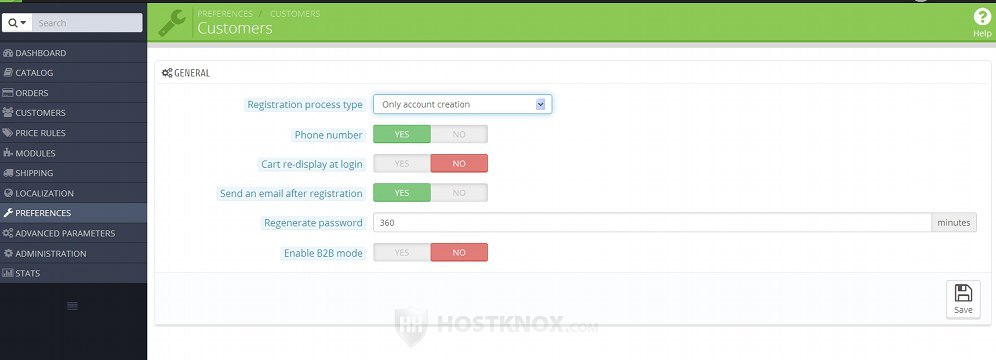
The options are:
- Registration process type - by default, this option is set to Only account creation. This means that when a customer creates an account on the frontend, they only have to provide their name, an email address and a password; they don't have to add an address. This can be done after the customer registers. They'll be required to do it during their first order, or they can do it before that from the account settings. If you set this option to Standard (account creation and address creation), then during the registration process customers have to add an address in order to be able to register.
- Phone number - by default, this option is set to Yes. This means that when a customer adds or edits an address they will be required to provide a phone number. There is a field for a home number and for a mobile number and the customer has to provide at least one. This applies to the frontend registration process (if you have selected the Standard registration type), to the frontend customer account settings of registered customers, and to the backend form for adding/editing customer addresses. So, for example, if a registered customer adds or edits an address from their account settings, they'll be required to provide one phone number. If you don't want customers to be required to provide a phone number, set this option to No. The phone fields will still be present on the address form but they will not be required. With minor code modifications you can remove the phone fields altogether. Check the last section in this tutorial to find the links to the articles that will show you how to do this.
- Cart re-display at login - by default, this option is disabled. This means that if a customer puts products in the cart and signs out without removing them or proceeding to checkout, then the next time they log in the cart will be empty. If you enable this option, the next time the customer signs in the products will still be in the cart.
- Send an email after registration - this option is enabled by default. This means that after a customer registers and account on the frontend of your site, they will receive an email message to the email address associated with the account. This is a welcome email that contains the password and email address that are used as login credentials for the particular customer account. If you don't want such an email to be sent, set this option to No. Note that regardless of whether this option is enabled or not, when a customer account is added from the admin panel by you or another person who has the privileges to access the admin panel and create accounts, no welcome email message will be sent.
- Regenerate password - with this option you can set the time that has to pass in order for a customer to be able to change their password. It's in minutes and it's set to 360 (which equals six hours). So if a customer changes their password they won't be able to change it again in the next six hours.
- Enable B2B mode - by default, this option is disabled which means that each customer is treated as an individual person. If you enable the business-to-business mode, a customer will be treated as a company. Enabling this option will add some more fields/settings to the registration form on the frontend, to the customer account settings on the frontend, and also to the form for adding/editing customers in the admin panel.
If you make any changes to the general customer options don't forget to click on the Save button.
Other Tutorials and Articles on Managing Customers
As we mentioned at the beginning of this tutorial, in the back office there are separate sections for managing customer addresses and customer groups. We have separate tutorials for both. If you want to export customers from one PrestaShop instance and import them into another, we have a tutorial about that too. It's a general tutorial which explains how to export and import any type of data (e.g. products, categories, customers). So for more information check out:
- how to manage customer addresses in PrestaShop
- how to manage customer groups in PrestaShop
- how to export and import data in PrestaShop
In our knowledgebase there are also individual articles related to customer registration and to managing customers:
- how to make optional or remove the phone fields from the customer registration form in PrestaShop
- how to make optional or remove the phone fields from the customer account settings in PrestaShop
- how to remove the Company field from the registration form and the customer account settings in PrestaShop
- how to enable guest checkout in PrestaShop
- how to export customer information from PrestaShop using phpMyAdmin