PrestaShop 1.5/1.6 Themes Tutorial
How to install and switch themes in PrestaShop 1.5-1.6
The theme determines the layout and design of the frontend of your site. PrestaShop comes with a default theme. The admin panel offers some options with which you can modify that theme; you can also customize it by manually modifying the theme's files, provided you know how to do that. Another way to change the look of your site's frontend is by installing other themes. You can install one or more themes and then set the current theme to be any of the installed themes. In the admin panel of your PrestaShop there are options with which you can quickly and easily install new themes; it's also possible to install themes by manually uploading them to your PrestaShop hosting account.
In this tutorial we'll go over the following:
- how to find and download themes
- how to upload and install themes automatically from the admin panel
- how to switch between installed themes
- how to install themes manually
- links to other of our tutorials and articles related to managing themes
In this tutorial we've used as a basic example PrestaShop 1.6. The screenshots are also from that PrestaShop version. Although the design of the admin panel is different than that of PrestaShop 1.5, themes are installed and managed in pretty much the same way in both versions. If there are some differences we'll make notes about that in the tutorial.
Find and Download Themes
There are many sites that offer free and paid PrestaShop themes. You can always use a search engine to look for such sites. A reliable place where you can find templates is the official PrestaShop site. In the addons section of the official PrestaShop site you can find many themes (as well as modules). Most of the themes there are paid. You can also browse through the themes in the addons section of the official site from the admin panel of your PrestaShop. You can do that either by going to Modules menu>Modules & Themes Catalog sub-menu or to Preferences menu>Themes sub-menu.
Another place on the official site where you can find free themes is the free themes section of the forum.
Although it's possible to install a theme by using directly the URL address that points to the archived theme, we recommend that you download the theme (it's usually in ZIP format) on your local computer. You can then proceed with the installation of the theme.
Before you install the theme make sure that it's compatible with your PrestaShop version. It's also a good idea to have a test site on which to install the theme first, check whether everything works properly and then install it on your live site.
Install Themes Automatically
The admin panel of PrestaShop has built-in options with which you can upload and install themes. In PrestaShop versions older than 1.6 there's a core module that comes prepackaged with PrestaShop and that's used for importing and exporting themes. Beginning with PrestaShop 1.6 the options for importing and exporting themes don't come as a separate module, but are part of the admin panel itself. So to install a new theme, after you log into the admin panel go to Preferences menu>Themes sub-menu and on the page that opens click on the button Add new theme:
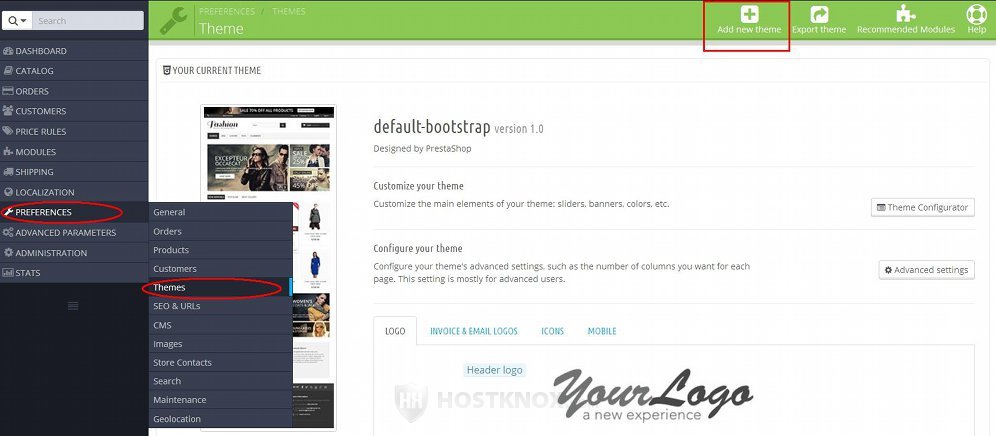
Note that if in PrestaShop 1.5 you go to Preferences menu>Themes sub-menu and you click on the Add new button this will open the options for creating a new theme and not the ones for installing a theme. As we mentioned, in PrestaShop 1.5 (and earlier versions) the settings for installing themes come as a core module. So in this case, to install a new theme, go to Modules menu>Modules sub-menu, select the Administration section, in the list with the modules find the module Import/export a theme and click on its Configure button.
On the page with the settings for installing themes there are three variants from which you can choose:
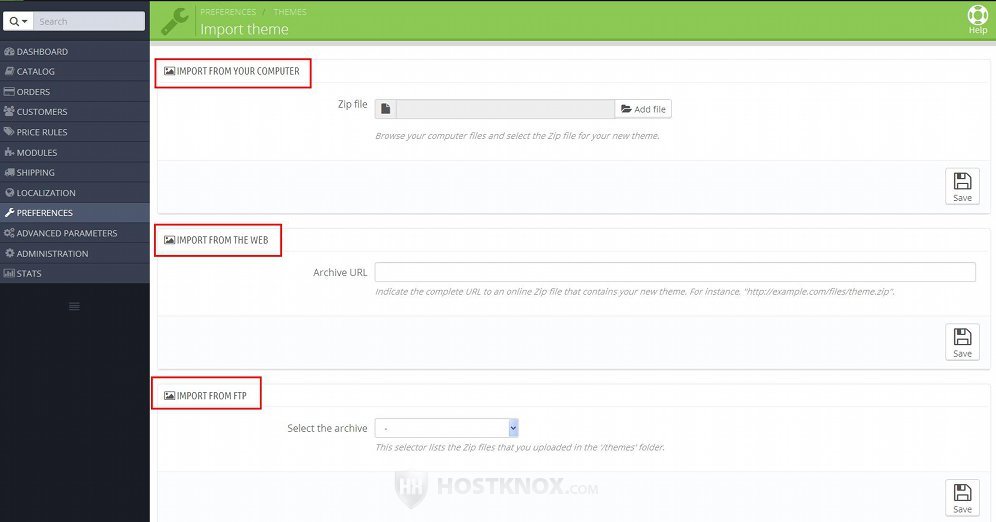
So you can install the new theme by using one of these three options:
- Import From Your Computer - this is the most common way for installing themes. In order to install a theme with this method you need to have the theme downloaded to your local computer. Click on the Add file button (in PrestaShop 1.5 it's labeled Browse), locate the theme on your computer and then click on the Save button that's under the field (in PrestaShop 1.5 it's labeled Next). PrestaShop will automatically upload the theme in the correct folder on your PrestaShop hosting account and the theme will be installed.
Note that in order to be able to upload the theme with this method it has to be in ZIP format. - Import From The Web - with this method for installing themes, you don't need to have the theme on your local computer. In the field for Archive URL you need to put the full URL that points to the theme (e.g. http://some-site.com/theme.zip). This is the URL from which otherwise you can download the theme. After you put the URL in the field click on the Save button that's under it to continue (in PrestaShop 1.5 the button is labeled Next).
- Import From FTP - in this section you'll see a drop-down menu Select the archive. With this method first you need to manually upload the archived theme (in ZIP format) in the themes folder of your PrestaShop hosting account. If you have zipped themes uploaded in that folder, you'll see them listed in the drop-down menu Select the archive. Select the theme and click on the Save button that's under the menu (in PrestaShop 1.5 the button is labeled Next).
After you click on the Save button for any of the three methods the theme will be installed and you'll be brought back to Preferences menu>Themes sub-menu where the new theme will be listed. Note that unlike previous versions, in PrestaShop 1.6 when you install a new theme it's not automatically set as the currently active theme. If you want it to be the active theme, once it's installed you have to specifically switch to that theme and make it the default one.
Since each theme has its own layout, the theme that you install has its own configuration in terms of which core modules should be enabled and disable, and, depending on the theme, it may come with some of its own specific modules that have to be installed in order for the theme to look and function the way it's supposed to. In PrestaShop 1.6 the theme configuration can be edited when you set the theme as the active one. For more information on this check the section in this tutorial on switching themes.
In PrestaShop versions older than 1.6 (such as PrestaShop 1.5) the installed theme is automatically set as the currently active one. So in PrestaShop 1.5 after you select the install method and you continue to the next step of the installation process you'll be presented with a list of modules that have to be enabled and disabled (and optionally installed, if the theme comes with modules):
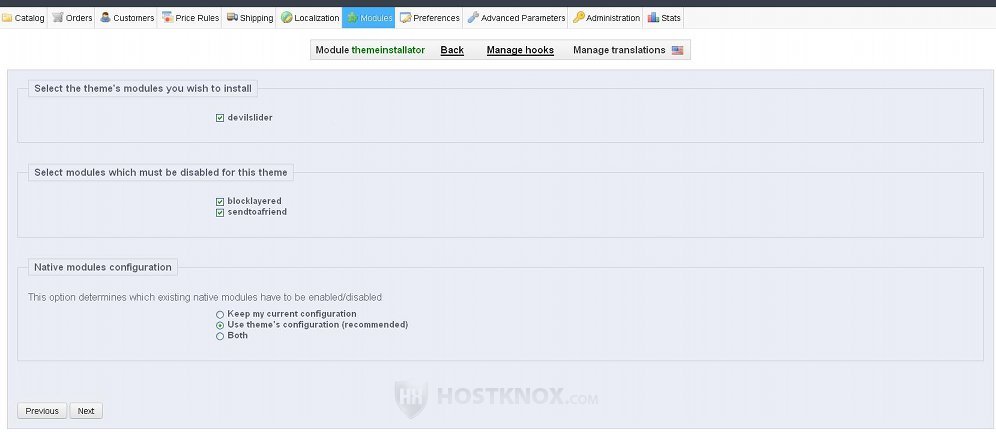
It's recommended that you mark the checkboxes for all modules that come with the theme and have to be installed (if any), and also the checkboxes for the existing modules that have to be enabled and disabled. It's also recommended that in the section Native modules configuration you keep marked the radio button for using the theme's configuration. After that click on the Next button, on the following page click on Finish and the theme will be installed and set as the currently active theme.
As we mentioned, in PrestaShop 1.6 the configuration of the new theme is managed when you make it the current theme.
Switch Between Themes
To change the currently active theme with any of the installed themes, go to Preferences menu>Themes sub-menu in the admin panel. On the page that opens you'll see shown the current theme; on the same page there's a section labeled Select a Theme that lists the installed theme. To switch to any of these themes, hover the mouse pointer over the screenshot of the theme and click on the Use this theme button that appears:
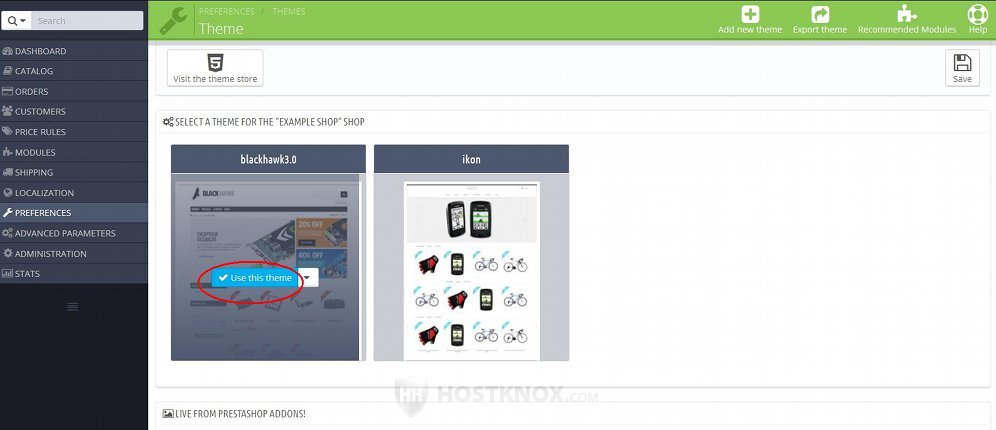
In PrestaShop 1.5 there's no such button. You just need to click on the screenshot of the theme (or on the radio button under it) and then click on the Save button.
On the page that opens after you click on the button Use this theme you can change the theme's configuration in terms of the modules to be enabled, disabled and installed (if the theme comes prepackaged with some specific modules):
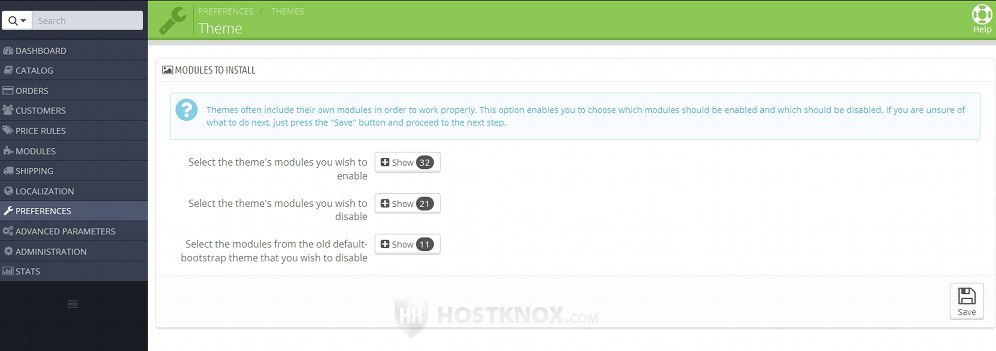
Each theme has its own layout and makes use of a different combination of the core modules. In addition to this some themes come prepackaged with their own modules. So on this page you'll see a list of the modules that should be enabled and disabled, and if the theme comes prepackaged with some modules there will also be a list with the modules to be installed. To see the actual list click on the particular Show button. By default, all checkboxes are marked. If you want the theme to look the way it's designed to look, the best thing is to leave all options marked and click on the Save button. Of course, you can change the configuration, and even after you activate the theme you can always enable/disable modules (from Modules menu>Modules sub-menu).
As we explained in the previous section of this tutorial, in PrestaShop 1.5 the theme's module configuration is managed during the installation process.
Install Themes Manually
If for some reason the theme that you've chose can't be installed with the automatic theme installer, or you prefer not to use it, then you can install the theme manually.
To do this, after you download the zipped theme on your local computer, unzip the archive. The unzipped theme folder is labeled with the name of the theme. Usually, inside this folder there's a folder named themes, a config.xml file, possibly some files with installation instructions and information about the theme, and if the theme comes with some modules, there will be a modules folder. The described folder structure may not be the same for every theme, but generally most themes use it. In the themes folder there should be another folder labeled with the name of the theme (e.g. example_theme), and inside that folder are all the files and folders of the theme. You have to upload that folder (e.g. example_theme) to the themes folder that's in the root directory of your PrestaShop hosting account.
If the theme comes with modules, you should upload each directory that's in the above mentioned modules directory to the modules directory of your PrestaShop. First, however, it's not a bad idea to check whether you already have some of those modules on your PrestaShop account. If you do, and they are newer versions than the one(s) packaged with the theme, then you don't have to upload them.
So, for example, if your PrestaShop is installed directly in the public_html directory on your PrestaShop hosting account (making the URL of the frontend yourdomain.com), then you should upload the theme in public_html/themes. Using the same example, if the theme has modules, you have to upload them in public_html/modules.
You can upload the theme with an FTP client (e.g. FileZilla). For more information on how to configure and use FTP clients check our FTP tutorials.
After you upload the theme you can make it the active theme. Go to Preferences menu>Themes sub-menu and click on the Use this theme button for the theme. On the following page you can manage the theme's configuration as explained in the section in this tutorial on switching themes. If the theme has its own modules and you uploaded them, you'll be able to select whether to install them during the activation of the theme from the admin panel.
If you use PrestaShop 1.5 and the theme has modules that you've uploaded, you'll have to manually install them from Modules menu>Modules sub-menu in the admin panel.
Links to Tutorials and Articles on Managing Themes
You may also find useful our other tutorials and articles related to themes: