PrestaShop 1.5/1.6 Product Preferences Tutorial
How to configure and manage the options for the general product preferences in PrestaShop 1.5-1.6
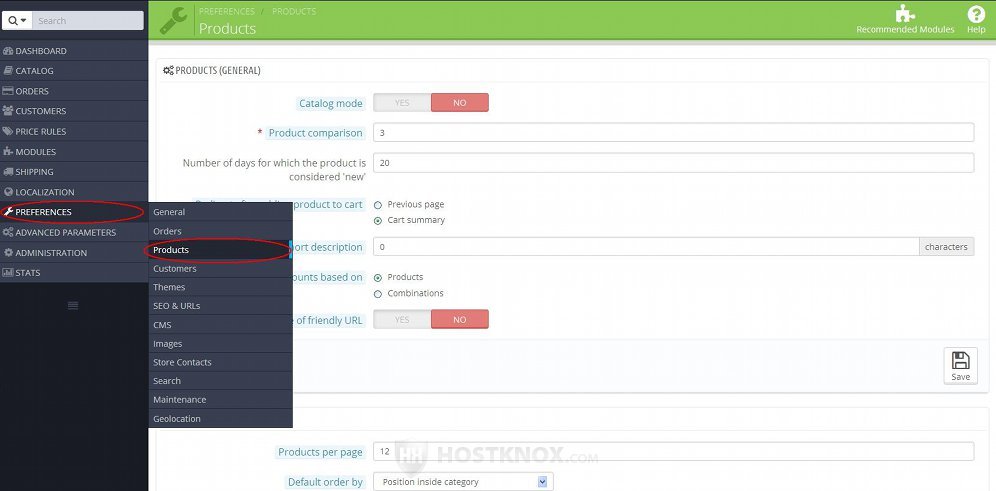
In PrestaShop there are some product options that apply to all products. To configure these options go to Preferences menu>Products sub-menu in the admin panel. On the page that opens the options are divided into several sections:
The options apply to all products, but for some of the options there's a corresponding option on the form for adding and editing products with which you can overwrite the general product option, so that the option has a different value for the particular product.
In this tutorial we'll go over the options in the sections that are on the Products Preferences page. At the end of the tutorial we have also included links to other tutorials and articles related to managing products.
We'll show you:
- how to configure the options in the Products (General) section
- how to configure the options in the Pagination section
- how to configure the options in the Product Page section
- how to configure the options in the Products Stock section
- links to other tutorials and articles on managing products
In this tutorial we've used as a basic example PrestaShop 1.6. The screenshots are also from that PrestaShop version. Although the design of the admin panel is different than that of PrestaShop 1.5 the options for product preferences are practically the same in both versions. If there are some differences we'll make notes about that in the tutorial.
General Product Options
After you go to Preferences menu>Products sub-menu in the admin panel the first section on the page that opens is labeled Products (General):
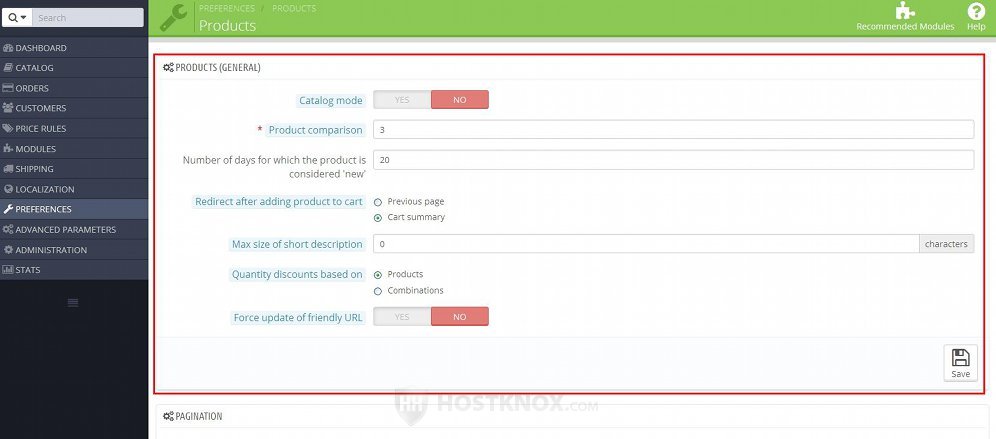
It contains the following options:
- Catalog mode - by default, this option is disabled which means that products can be ordered on your site. If you enable this option, your store's frontend will function only as a catalog from which products cannot be ordered; the prices and Add to cart buttons of all products will be removed from the frontend, as well as all elements that have something to do with placing orders.
- Product comparison - on category pages on the frontend there's a function with which customers can compare products. It compares the features of products. With this Product comparison option you can set the maximum number of products that can be compared at a time. If you set this option to 0, the product comparison function will be disabled. For information on product features check out the tutorial on how to add and manage product features in PrestaShop.
- Number of days for which the product is considered 'new' - by default, this is set to 20 which means that after you add a new product it's considered new for 20 days. On the frontend there's a block New Products that lists the new products; there's also a page that displays all new products. If friendly URLs are enabled and the homepage of your store is yourdomain.com, then the URL of the page that shows new products will be yourdomain.com/new-products.
The block that shows new products on the frontend is displayed thanks to the module New products block. The module is enabled by default which means that the block is shown on the frontend. From the options of the module you can set the maximum number of products that are displayed by the block; there are also some other options. To configure them go to Modules menu>Modules sub-menu in the admin panel, find the module New products block and click on its Configure button. By default, the module is shown in the left column on the frontend. You can configure where it's shown by changing its position. You can do that from Modules menu>Positions sub-menu. - Redirect after adding product to cart - with this option you can select where the customer should be redirected after they place a product in the shopping cart. You can select either the cart summary page or the previous page visited by the customer. Note that this applies only to non-AJAX versions of the cart which means that in many cases it will not affect the frontend at all. So, for example, with the default theme and settings of PrestaShop 1.6 when a customer puts a product in the cart a pop out window will ask them whether they want to check out or continue shopping, regardless of what you have selected from this redirect option.
- Maximum size of short description - as you know, for each product you can type a short description and a detailed one. The short description is shown on category pages and on the product's page on the frontend (this also depends on the theme). With this option you can configure the maximum length (in characters) of the short description. For example, if you put 200 in the field, the maximum allowed length of the short description will be 200 symbols. When you type a longer short description while adding/editing a product you will not be able to save the product. A warning message will appear informing you about the limit. If you put 0 for the maximum size of short description, there will be no limit.
Note that if you set a limit and there are existing products with longer short description, the description will not be removed from the frontend. However, if you edit such a product you won't be able to save it unless you shorten the description. - Quantity discounts based on - you can select whether quantity discounts should be based on the number of ordered units of a product or on the units of product combinations.
- Force update of friendly URL (this option is not available in PrestaShop 1.5) - by default, this option is disabled. If you want friendly URLs to be force updated on every save, enable this option.
If you make any changes don't forget to click on the Save button.
Pagination Options
The second section on the Products Preferences page is Pagination. It contains a few options related to how products are displayed on category pages on the frontend:
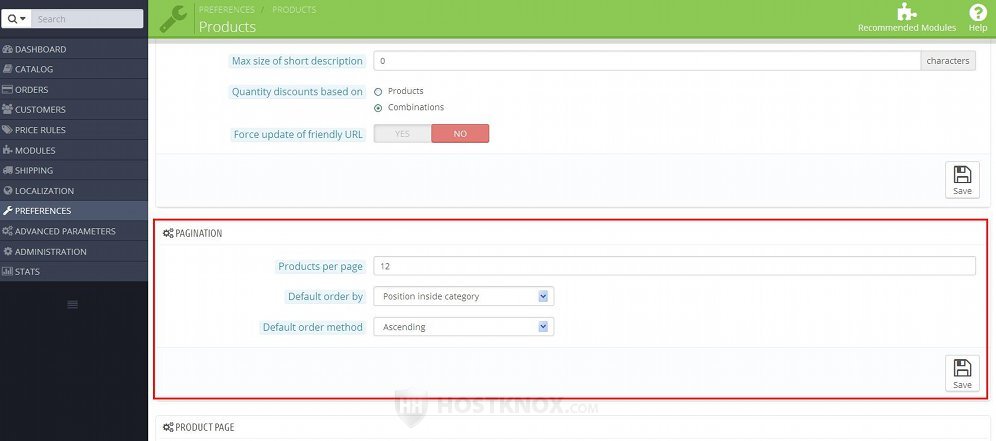
The options are:
- Products per page - from this option you can select how many products should be shown on each category page on the frontend.
- Default order by - from this drop-down menu you can select how products should be ordered on category pages on the frontend. This is the default order that's used when a customer opens a category. You can select the default order to be based on the product's name, price, add date, date of last modification, position inside category (product ID), quantity, reference.
Note that on category pages on the frontend there's a Sort by drop-down menu from which customers can change the default order. - Default order method - from this drop-down menu you can select whether the default order method should be ascending or descending. For example, if from the Default order by option you select Product price and from this option you select Ascending, then on category pages on the frontend the cheapest products will be first and the most expensive ones will be last. If in the same situation you select Descending from this option, then the most expensive products will be shown first and the cheapest ones last.
From the Sort by menu on category pages on the frontend customers can change the default order method.
If you make any changes don't forget to click on the Save button.
Product Page Options
The next section on the Products Preferences page is Product Page. It contains some options that affect product pages on the frontend:
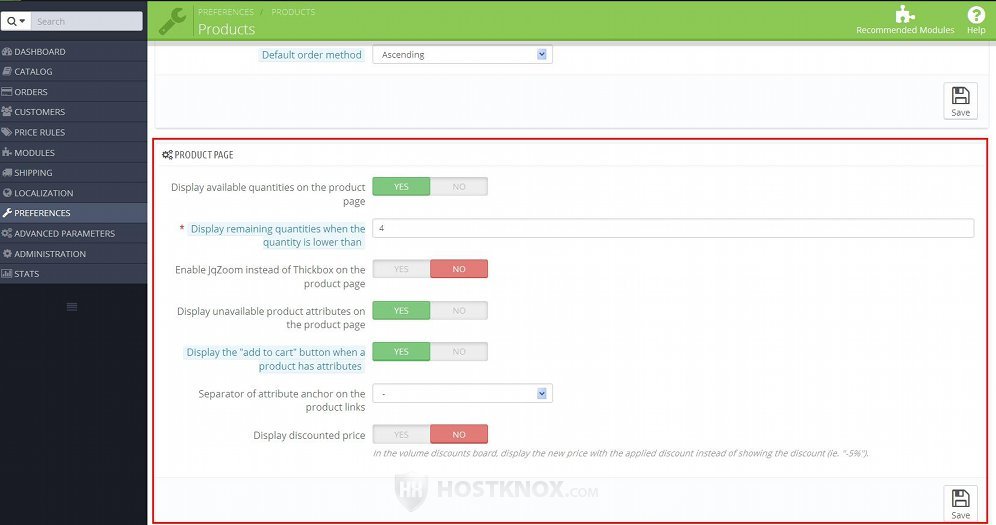
The options are:
- Display available quantities on product page - with this option you can control whether the stock of a product is shown on its page on the frontend. If a product has combinations, the quantity of the particular combination is shown when the customer selects that combination; otherwise, the quantity of the default combination is shown. If you don't want customers to be able to see what the quantities of products are, set this option to No.
- Display remaining quantities when the quantity is lower than - when the quantity of a product is lower than the specified number a message is shown on the product's page on the frontend informing the customers that there are few items of the product left in stock. If you want to disable this option so that no warning message is shown, set it to 0.
From the options of each particular product you can type a specific message to be shown when the product is in stock, and if you allow this product to be backordered, you can type a message to be shown when the product is out of stock (informing the customers that they can backorder the product). For more information on these options check the section on how to manage product quantities in the tutorial on how to add and edit products in PrestaShop. - Enable jqZoom instead of Thickbox on the product page - when a customer goes to the page of a product on the frontend a picture of the product is shown (provided you have uploaded one). With this option disabled when a customer clicks on that image a window pops out showing the original image (which is usually bigger). When this option is enabled, meaning jqZoom is used, and a customer hovers the mouse pointer over a product image, then the original image will appear automatically.
- Display unavailable product attributes on the product page - as you know, you can add combinations to a product with the help of attributes. With this option you can control whether an attribute can be selected on a product's page on the frontend, if the the product combination which uses that attribute is no longer in stock. For example, let's say that the particular product is a T-shirt. You sell this T-shirt in three sizes: small, medium and large. On the page of the product on the frontend there's an option from which customers can select which size they want to order. Let's say that the medium size is no longer in stock. If the option Display unavailable product attributes on the product page is set to Yes, then the medium attribute value will still be present on the product's page on the fronted. If a customer selects it, a message will appear that the particular combination is currently out of stock. If the option is set to No, then the medium attribute value will not appear at all on the product's page on the frontend.
If you need information on how to create product combinations and manage attributes, check the tutorial on how to add and manage product attributes in PrestaShop and the one on how to add and manage product combinations in PrestaShop. - Display the "add to cart" button when a product has attributes - this option affects category pages. It's enabled by default which means that if a product has different combinations, the Add to cart button for that product is shown on category pages. When a customer clicks on the button the default product combination is put in the cart. If you set this option to No and a product has combinations, then the Add to cart button for that product will not be shown on category pages. The customer will have to go to the product's page and order the product from there. In this way customers will see that the product has different combinations and select one.
- Separator of attribute anchor on the product links (this option is not available in PrestaShop 1.5) - by default, it's set to a hyphen; the other option is a comma. If a product has combinations, each combination has its anchor/URL with which that combination is accessed on the frontend. Let's say that you have a product that has the URL yourdomain.com/14-product-name.html (the number is the ID of the product), and you offer the product in different size and color combinations. With the default hyphen separator the URL of a combination will have the form yourdomain.com/14-product-name.html#/size-s/color-green. If you change the separator to a comma, the same URL will have the form yourdomain.com/14-product-name.html#/size,s/color,green.
- Display discounted price - when there are quantity discounts enabled, on the product page of each product to which the quantity discount applies there's a table that shows what the discount is and the number of items that have to be ordered for the discount to apply. This option affects how the price in that table is displayed. If this option is disabled, then in the table the discount amount is shown. For example, if the discount is $20 per unit of the product, then in the table $20 will be shown as the discount. If this option is enabled, the discounted price is shown instead of the discount amount that's subtracted from the base price. So, for example, if the price of the product is $100 and the discount is $20, then in the table the price of $80 will be shown.
If you make any changes to these options don't forget to click on the Save button.
Products Stock Preference Options
On the page that opens when you go to Preferences menu>Products sub-menu you'll also see a section labeled Products Stock:

In it you'll find a few options related to managing the stock of your products:
- Allow ordering of out of stock products - with this option you can allow or deny backorders. If you want customers to be able to order a product when it's out of stock, set this option to Yes. From the quantity options of each product you can overwrite this global option. Otherwise, when you add new products they will be automatically configured with the value of this global option. If you want to, you can overwrite it and choose whether the particular product can be backordered or not, regardless of how the global option is set. You can do this from the Quantities tab on the form for adding/editing products. For more information check the section on how to manage product quantities in PrestaShop in the tutorial on adding and editing products.
Note that if you have specifically set a product to deny or allow backorders, it will not be affected by how the global option for backorders is set. - Enable stock management - this is an essential option. It's enabled by default. This means that PrestaShop will automatically take care of the basic stock management: when a product is ordered, the ordered quantity will be subtracted from its stock; when an order is canceled the ordered product items will be returned to the stock, etc. There are very few cases when you might need to disable this option. For example, you can do it if you sell only virtual products and you don't need to manage any stock options.
- Enable advanced stock management - this option is disabled by default. If you enable it, this will make available a lot of additional options for managing stock. In most cases you won't need such complex stock management, but depending on your store(s) and needs it may be helpful. When you enable it a whole new menu with several sub-menus will appear on the left. It's labeled Stock. When this option is enabled, you can choose from the quantity options of each product whether you want to use advanced stock management with the particular product.
- New products use advanced stock management (this option is not available in PrestaShop 1.5) - this option is only of concern if you have enabled advanced stock management from the above option. In such a case with this option you can select how the advanced stock management option of each new product that you add should be configured. If this option is enabled, each new product that you add will be automatically configured to use advanced stock management.
Note, however, that regardless of how this option is configured you can select from the quantity options of each particular product whether that product should use advanced stock management. So you can overwrite this option per product from the options of each product. You can do that from the Quantities tab on the form for adding/editing products.
If you make changes don't forget to click on the Save button.
Links to Tutorials and Articles on Managing Products
We have a general tutorial on how to add and edit products, detailed tutorials discussing all the options on the form for adding and editing products, and some other tutorials related to products:
- how to add and edit products in PrestaShop
- how to add and manage product combinations in PrestaShop
- how to add and manage product features in PrestaShop
- how to add and manage product customizations in PrestaShop
- how to add and manage product attachments in PrestaShop
- how to create product packs in PrestaShop
- how to add virtual products in PrestaShop
- how to add and manage product attributes in PrestaShop
- how to add and manage product manufacturers in PrestaShop
- how to add and manage product suppliers in PrestaShop
- how to add and manage product tags in PrestaShop
In our knowledgebase there are some shorter separate articles related to managing products:
- how to change the number of products shown on category pages in PrestaShop
- how to disable the product comparison function in PrestaShop
- how to hide stock quantities from being displayed on the frontend in PrestaShop
- how to increase the allowed length of product names in PrestaShop
- how to remove the "Add to cart" button from category pages for products with attributes in PrestaShop
- how to remove the "New" text indicating newly added products in PrestaShop
- how to remove the "Sort by" menu from product category pages in PrestaShop
- how to use phpMyAdmin to move products from one category to another in PrestaShop