PrestaShop 1.5/1.6 Languages and Translations Tutorial
How to install and manage languages and translations in PrestaShop 1.5-1.6
You can have your PrestaShop translated in different languages. In this way you can offer your customers the option to choose in which of the available languages to view the frontend of your site. Of course, you can also change the language in which the admin panel is displayed. The easiest way to do this is by installing language packs. In addition to this, in the admin panel there are options with which you can edit the translations of any of the installed languages, and you can also provide translations for those of the default phrases and options that are not translated.
Note that the language packs are for translating the default phrases and options that appear on the frontend and backend. The names and descriptions of products and categories, for example, can be translated when adding/editing the product or category.
In this tutorial we'll go over the different methods of installing languages. You can use the one that's most convenient to you. We'll also go over the process of changing and managing translations.
We'll show you:
- how to install a language by importing a localization pack
- how to add and update language packs automatically
- how to create/add languages
- how to install languages manually
- how to add, edit and manage translations
- how to enable, disable, delete and edit the options of installed languages
- how to change languages on the frontend and backend
- how to export languages
- how to copy data from one language pack to another
In this tutorial we've used as a basic example PrestaShop 1.6. The screenshots are also from that PrestaShop version. Although the design of the admin panel is different than that of PrestaShop 1.5, languages and translations are installed and managed in pretty much the same way in both versions. If there are some differences we'll make notes about that in the tutorial.
Install Languages by Importing Localization Packs
PrestaShop 1.5 introduced options with which you can import localization packs for different countries. In this way you can easily import content related to a specific country: its language(s), currency, taxes, etc. To do this, go to Localization menu>Localization sub-menu in the admin panel. On the page that opens there's a section Import a Localization Pack:

From the options there select the country from the drop-down menu, choose the content that you want to import; make sure that the checkbox for Languages is marked. Then click on the Import button. PrestaShop will automatically take care of the rest. For some more information you can also check the part on importing localization packs in the tutorial on how to manage the localization settings in PrestaShop.
Add and Update Language Packs Automatically
If you want to install one or more languages without importing any other content, or you want to update an installed language pack, you can do that with a specific tool in the admin panel with which you can automatically install and update languages. To use this tool, go to Localization menu>Translations sub-menu in the admin panel. On the page that opens there's a panel labeled Add/Update a Language:
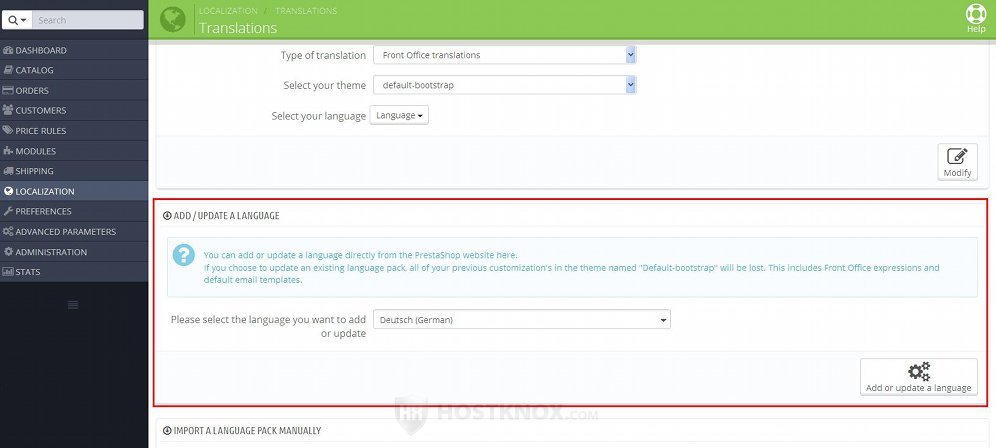
From the drop-down menu select the language that you want to add or update and click on the button Add or update a language. When you do this your PrestaShop will automatically download the language pack from the official site and it will unpack and put it in the translations folder on your PrestaShop hosting account.
You can select and install a new language or you can update the installed languages. When new PrestaShop versions come out and you update your PrestaShop, you may need to update the installed languages, or manually edit the translations. Note that depending on the version, the language pack for a specific language for that PrestaShop version may not be a hundred percent complete. This means that not all the default text strings are translated. In the translations section on the official PrestaShop site you can find the extent to which a language pack for a particular version is complete. From there you can also download language packs in case you want to install them manually.
Add/Create Languages
If you want to, you can add a new language without installing a language pack. This will create a language for which the default text strings will not be translated. This is useful if you want to translate it yourself and create your own language pack, or if you want to manually upload a language pack.
Note that if you want to import a language pack manually, you don't have to create it first, as described in this section. You can do it, but it's not necessary. When you import the language, if there's no such language created, it will be created automatically. For information on how to install language packs manually check the next section of this tutorial.
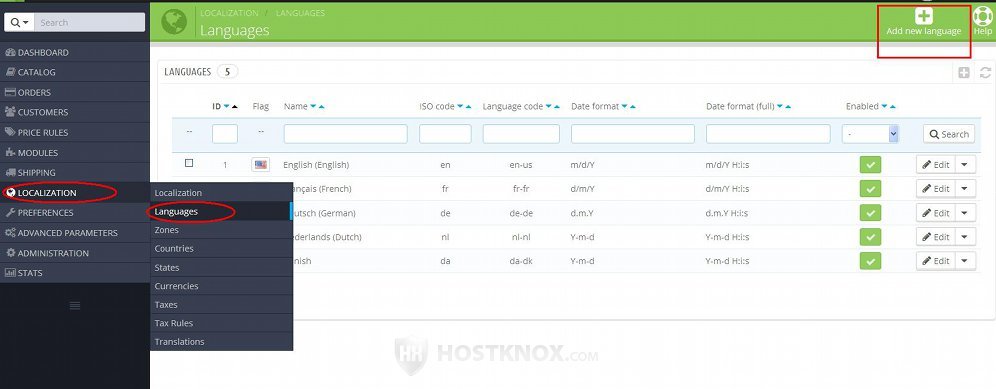
To create a language, go to Localization menu>Languages sub-menu and click on the button Add new language (in PrestaShop 1.5 it's labeled Add new):
This will open the form with the settings for adding a new language:
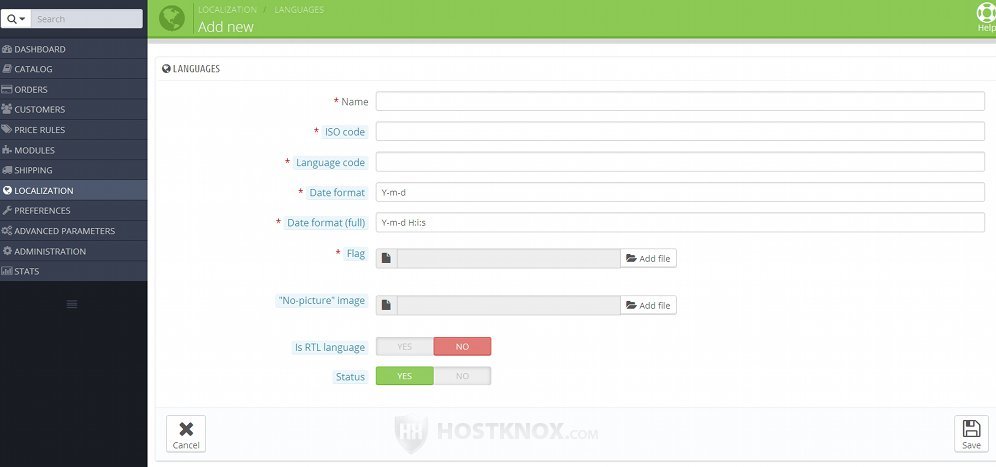
The form contains the following settings (the required ones are marked with red asterisks):
- Name - simply type the name of the language.
- ISO code - this is a two-letter ISO code that's used for representing the name of the language (e.g. en for English). The exact ISO format that's used is ISO 639-1. If you are not sure what code to put and you're going to import a language pack manually, you can check the name of the archived language pack. Language pack archives are usually labeled with the two-letter ISO code of the language. You can also use a search engine (e.g. Google) to look for the ISO code of a particular language.
After you put the ISO code in the field, if there's a language pack available for that language on the official PrestaShop site, a link for downloading it will automatically appear under the options. - Language code - this option is for the IETF language tag. This tag consists of two parts separated with a hyphen (e.g. en-US). The first part is the two-letter ISO code for the language (as specified in the previous option). The part after the hyphen is the two-letter ISO code for the country with which the language is associated; for this country code the used format is ISO 3166-1 alpha-2. For instance, the code for the United States is US, for France its FR, etc. It's in uppercase.
- Date format - with this option you can specify how the date is to be displayed, meaning the order of the year, month and day. The year is represented with a Y, the month with m and the day with d. So, for example, if you put Y-m-d, the year will be shown first, then the month and the day. Instead of hyphens you can also use other separators between the letters; for example, you can use forward slashes (e.g. Y/m/d).
- Date format (full) - this is similar to the previous option, but in this case you can also specify the time format. In the part for the time format H stands for the hour in a 24-hour format (e.g. from 00 to 23), i is for the minutes and s for the seconds. They are separated with colons (e.g. H:i:s). So, for example, the full date format can be represented like this: Y-m-d H:i:s.
- Flag - this option is for uploading an image of the flag of the country with which the language is associated. You can find a suitable image on the Internet. After downloading it to your local computer, and before uploading it to your PrestaShop using this option, it's a good idea to resize/crop it to suitable dimensions (16 x 11 pixels).
- "No picture" image - this option is not required. If you want to have a specific image that's shown for those products for which you haven't uploaded an image, you can use this option to upload such an image. It will be shown when the site is viewed in the particular language. Before you upload the picture you should resize/crop it to the dimensions of product images. These depend on the settings of your images (e.g. 250 x 250 pixels).
- Is RTL language - if the language is written right to left, mark Yes for this option.
- Status - with this option you can enable and disable the language. By default, the language is enabled which means that visitors will be able to select it on the frontend of the site.
After you're ready with the options click on the Save button.
Don't forget that creating a language like this will not add any actual translations. The default expressions will be shown when this language is selected. You can translate the text strings yourself, or you can import a language pack manually, as explained in the next section.
Install Language Packs Manually
In addition to the two ways for installing languages automatically that we described in the previous sections of this tutorial, you can also install languages manually. You can do this by uploading an archived language pack. There are options for that in the admin panel. This is useful if you want to import a custom language pack that you or somebody else has created or modified, or if for some reason you don't want to install a language using the options for automatically installing languages.
First, you need to have on your local computer the language pack archived in GZIP format. If you want to use a language pack from the official site, you can download it from the translations section of the PrestaShop site.
Once you have the language pack on your local computer, go to Localization menu>Translations sub-menu in the admin panel and on the page that opens scroll down to the panel labeled Import a language pack manually:
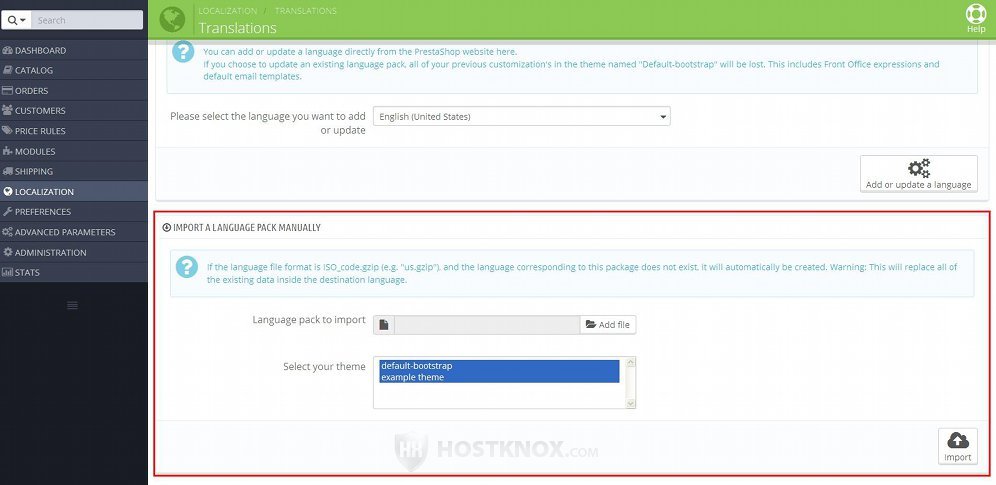
There's an option from which you can select to which of the installed themes you want the language to apply. To mark/unmark more than one theme, press and hold the Ctrl button on your keyboard and click on the names of the themes with the left mouse button.
To select the language pack that's to be imported, click on the Add file button (in PrestaShop 1.5 it's labeled Browse) and use the window that pops out to find the file on your local computer. Then click on the Import button that's under the options.
As we mentioned, you don't have to create the language beforehand (from Localization menu>Languages sub-menu). If there's no such language created, it will be created automatically after you import the language pack.
Modify Translations
You can modify the translations for any of your installed languages. You can also add translations for those expressions that are not translated in the particular language. To do this, go to Localization menu>Translations sub-menu in the admin panel. At the top of the page that opens there's a section labeled Modify translations:
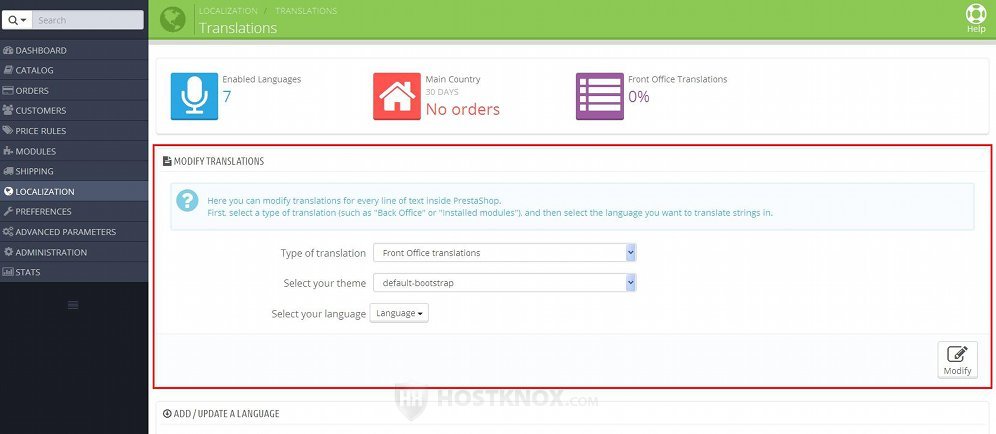
There's a drop-down menu from which you can select the type of translation that you want to modify. For example, if you select Front Office translations you can modify the default text strings that appear on the frontend.
There's another drop-down menu from which you can select the theme. Then select the language and click on the Modify button to continue to the page with the translations. In PrestaShop 1.5 there's no such button and the language is not selected from a drop-down menu; instead, there are country flags for each of the installed languages. When you click on a flag this will open the page with the translations.
On the page with the translations the different expressions are grouped into fieldset. To modify the translations in a fieldset click on its name and a panel will expand:
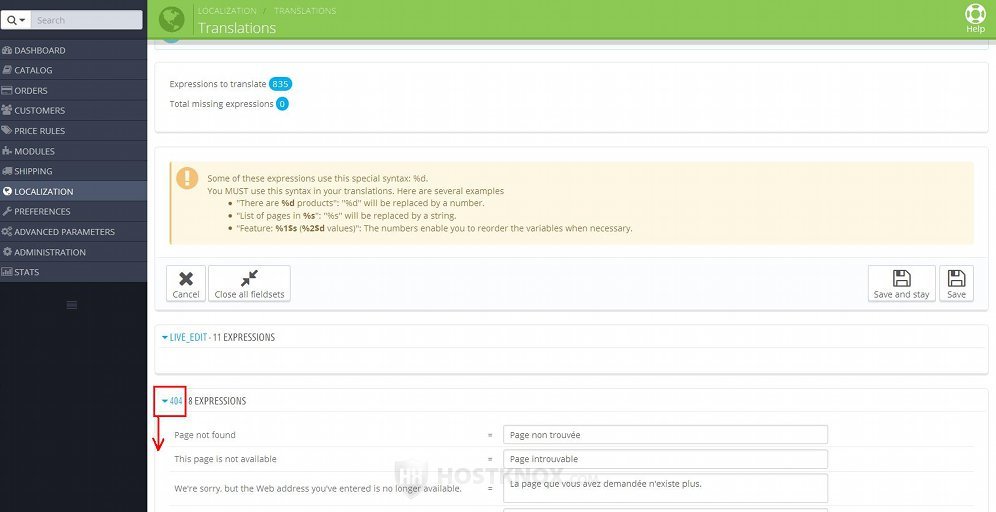
On the left side you'll see the default expression/text string and on the right side there's a field for the translated expression. You can modify it, or if the field is empty you can add a new translation.
At the top of the page there's a button for closing/expanding all fieldsets with expressions. If you have troubles finding an expression, you can expand all fieldsets and use the search/find function of your web-browser.
To save the changes, click either on the Save and stay or on the Save button.
Enable, Disable, Delete and Edit the Options of Languages
By default, when you import a new language it's enabled which means that it can be selected by visitors on the frontend of the site. If you don't want to delete a language, but you don't want customers to be able to select it, you can disable it. If you want to completely remove a language, you can delete it. You can also edit the options of an installed language (e.g. ISO codes, date format, flag, etc.).
To do these things, go to Localization menu>Languages sub-menu in the admin panel. On the page that opens there's a table with the installed languages. In the table there's a column Enabled that indicates which languages are enabled and which are disabled:
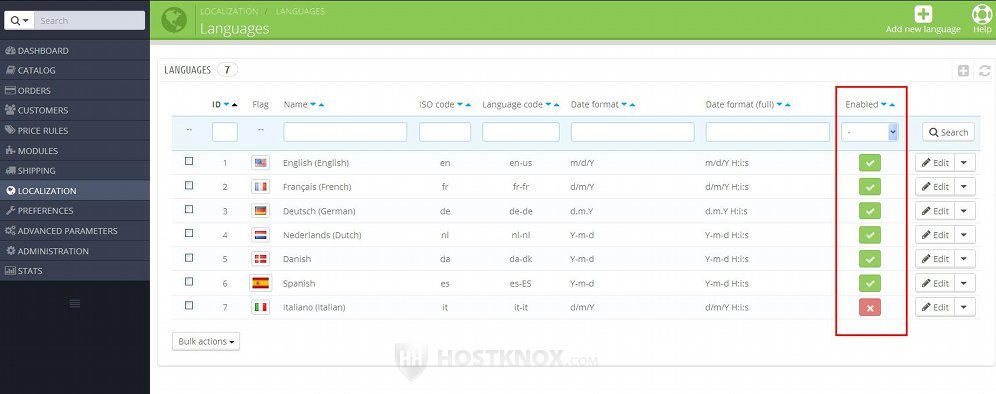
The enabled languages are indicated with a green checkmark and the disabled ones with a red X sign. To enable/disable a language, click on the checkmark or X sign and it will turn into the opposite symbol.
To edit the options of a language, click on its Edit button in the table:
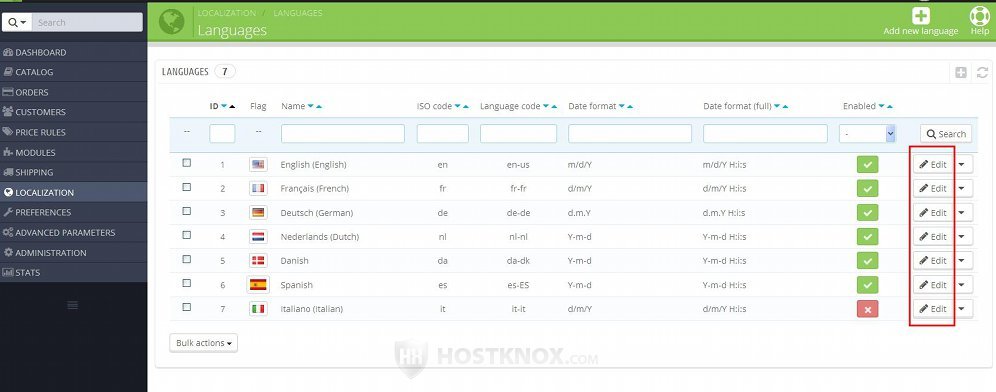
This will display the settings of the language. They are the same as when adding a new language. For a detailed description of these options check the section in this tutorial on adding languages.
In PrestaShop 1.5 the Edit button is not labeled. It's an icon that looks like a pencil.
To delete a language, click on the arrow next to its Edit button and from the drop-down menu that appears select Delete:
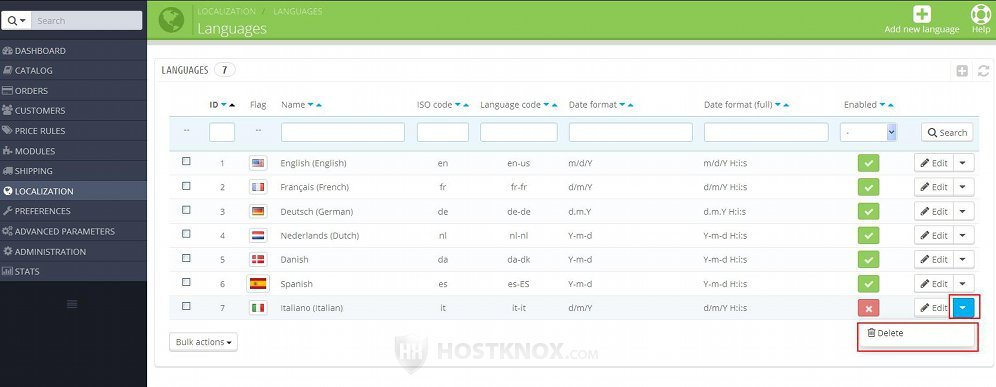
In PrestaShop 1.5 the button for deleting is an icon that looks like a trash can.
Change Languages on the Frontend and Backend
On the frontend of your site visitors can switch between the installed and enabled languages from the language block. It's usually positioned in the header of the site, but this may be theme-specific.
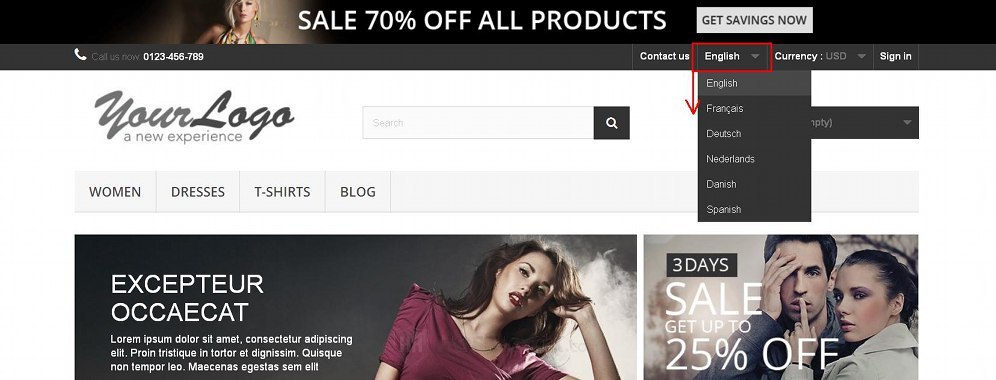
The language block is displayed by the module with the same name. It's a core module that comes prepackaged with PrestaShop, and it's installed and enabled by default. To check that it's enabled and to manage that module go to Modules menu>Modules sub-menu in the admin panel, on the page that opens select Front Office Features and find the module Language block.
You as an administrator and other users to whom you've given access to the admin panel can select one of the installed languages in which they want to see the admin panel displayed. This is done from the preferences of the account. Click on the name in the upper right corner of the admin panel and from the drop-down menu that appears select My Preferences. Then on the page that opens the language can be selected from the drop-down menu Language:
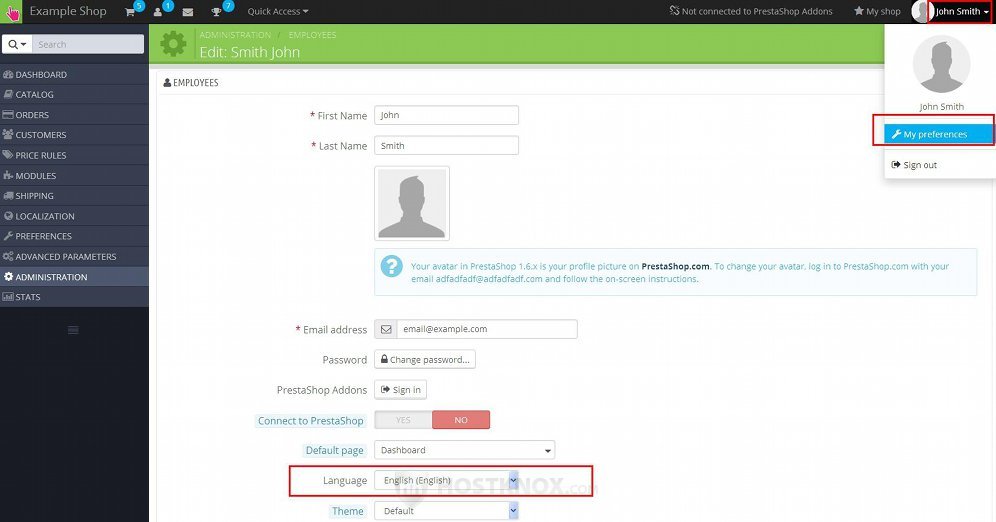
If you make changes don't forget to click on the Save button.
Export Languages
In the admin panel there are options with which you can export any of your installed languages. Usually this is used when you have a language(s) for which you have modified the translations. By exporting such a language you can back it up and it can also be installed on other PrestaShop instances.
To export a language, go to Localization menu>Translations sub-menu, scroll down the page to the section Export a Language:
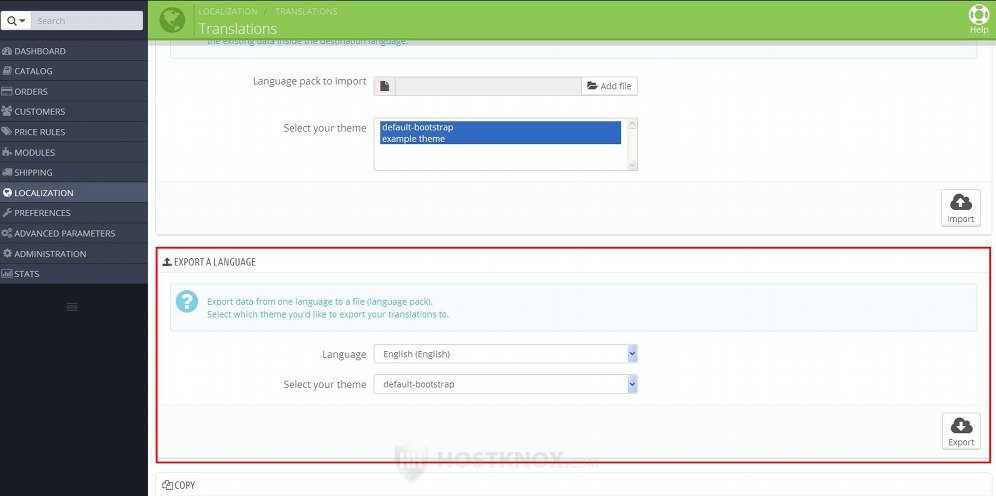
From the drop-down menu Language select the language that you want to export; from the other menu select the theme and click on the Export button. The language files will be packed into a single file and a window will pop out with which you can save that archive on your local computer.
Copy Languages
If you need to do that, you can quickly copy the data from one language into another. To do this, go to Localization menu>Translations sub-menu and scroll down the page to the panel Copy:
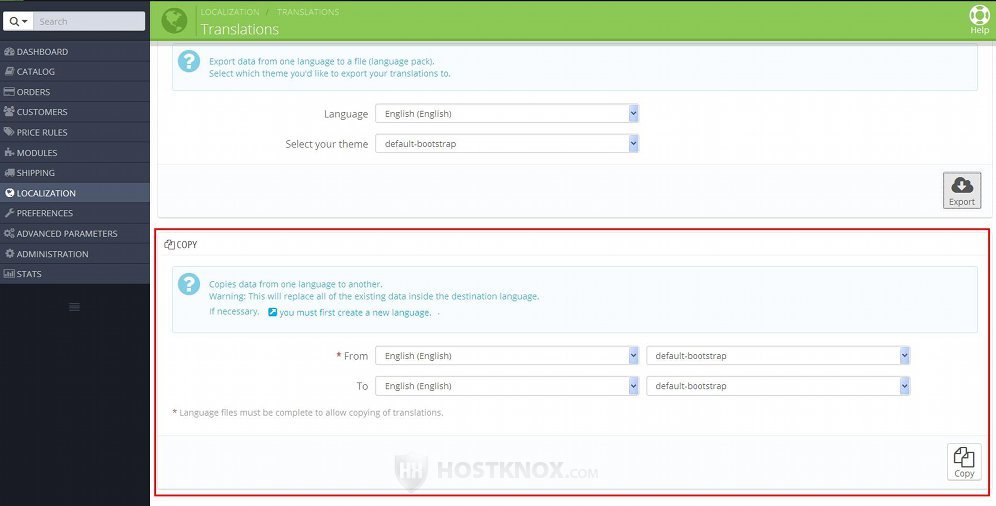
There you'll find options for selecting the language and theme from which you want to copy the data and the language and theme to which you want to copy it. After that click on the Copy button.