PrestaShop 1.5/1.6 Orders Tutorial
How to manage orders in PrestaShop 1.5-1.6
PrestaShop has all the necessary options for managing the orders placed by customers. There's a section in the admin panel that lists all orders regardless of what their current status is. From there you can view the details of any of the orders. From that page with the details of the particular order you can perform various actions: change the status of the order, change the quantity and/or products in the order, apply discounts, edit the shipping and billing addresses, send a message(s) to the customer, etc.
We'll show you:
On the page with the order details there are several blocks with information and settings. We'll go over all of them:
- how to scroll between the order details pages of different orders and use the buttons at the top of the page
- how to change the status of an order and view its documents (e.g. invoice, delivery slip, etc.)
- how to view the customer information of the customer who placed the order and attach private notes to the order
- how to send messages to the customer regarding the order
- how to view the information related to shipping and merchandise returns
- how to view and edit the shipping and billing addresses associated with the order
- how to view the payment information
- how to view and manage the products in the order
- how to edit the price and quantity of ordered products
- how to remove products form an order
- how to add products to an existing order
- how to add a discount to an order
- how to mark returned products
- how to add a partial refund to an order
- how to add a standard refund to an order
At the end of the tutorial we have also included a section that lists links to other of our tutorials related to orders:
In this tutorial we've used as a basic example PrestaShop 1.6. The screenshots are also from that PrestaShop version. Although the design of the admin panel is different than that of PrestaShop 1.5 the options for managing orders are practically the same in both versions. There are some differences regarding the way in which the blocks with the information and options are arranged on the page showing the order details of an order, but the actual options are essentially the same. We'll make notes about that in the tutorial.
Access the Orders Section in the Admin Panel and View the Details of an Order
To view a list of all the placed order, after you access the back office of your PrestaShop go to Orders menu>Orders sub-menu. On the page that opens you'll see a table with all the placed orders:
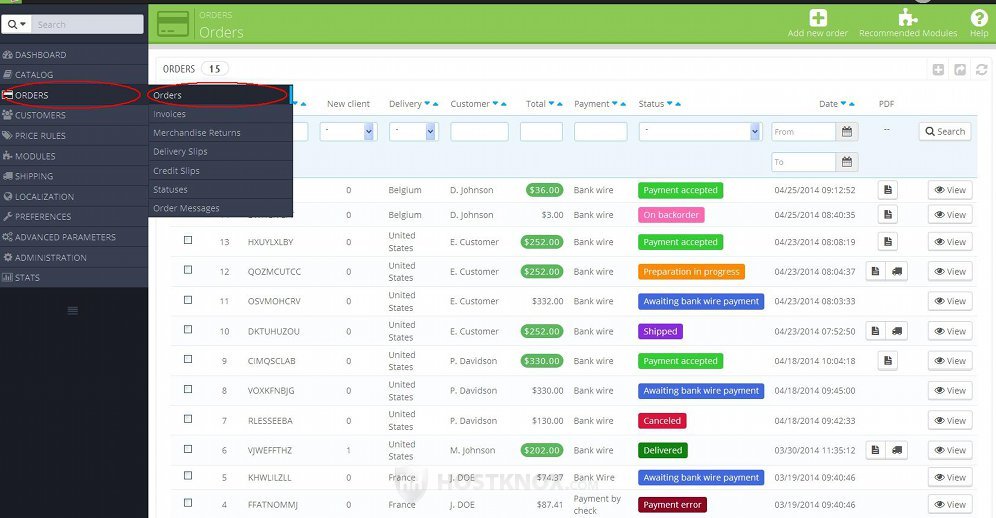
The table shows the ID number of each order, its reference code, the country to which it has to be delivered, the name of the customer, the total amount of the order, the payment method and the date it was placed.
You can change the pages in the table using the options below or under it (depending on the PrestaShop version). If you want to find one or more orders based on different criteria (e.g. customer, status, etc.) you can use the filtering options at the top of the table.
To view all the details of an order either click on its row in the table or on its View button:

In PrestaShop 1.5 the View button is not labeled; it's an icon that looks like a magnifying glass.
After you click on the button this will display all the order details for the particular order. On the page that opens there are several blocks with information and options:
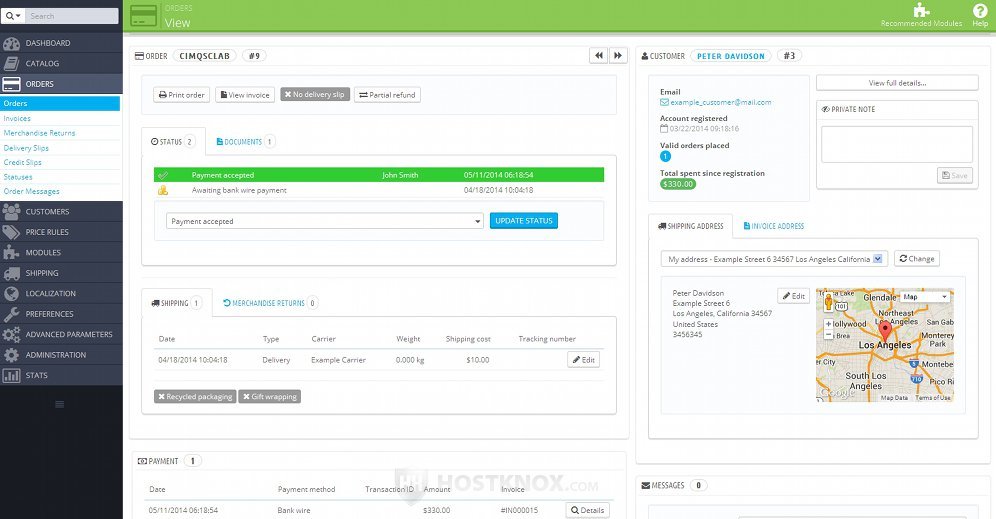
Each block displays some information related to the order and the customer who placed the order. Read the next sections in this tutorial for a review of these blocks and the options they provide.
Top Buttons on Order Details Page
At the top of the page with the order details, just above the blocks with the information and options there are a few buttons with which you can do various things. There are arrows with which you can open the order details page of the previous or the next order. There are also buttons with which you can print the order information, download and view a PDF file of the invoice, the delivery slip; there's a button for partial refunds:
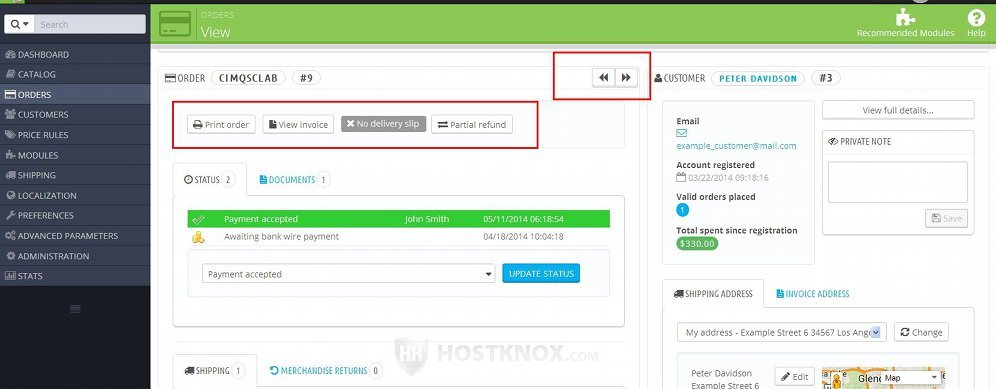
The arrows for going to the order details page of the previous or next order are available at all times. When it comes to the other buttons, the status of the order determines which ones are active. They are:
- Print order - this option is in fact also available regardless of the status of the order. You can use it to print the order information.
- Cancel products - this button is available before the status of the order changes to Payment accepted. When you click on it the page will automatically scroll down to the Products block. For each product there will be a checkbox and a text field. Mark the checkbox for each product that you want to cancel, and if there's more than one unit ordered from the product, you can specify in the text field the number of units that you want to cancel. After that click on the Cancel products button that's under the products. This will remove the selected product(s) from the order and will automatically put them back in stock. If the payment for the order is accepted but you want to remove products from the order, you can do that with the Delete button for the particular product in the Products block. For more information check the section in this tutorial on removing products from an order.
- View invoice - the invoice is automatically generated after the status of the order is changed to Payment accepted. When you click on the View invoice button a window will pop out with which you can download and view a PDF file of the invoice.
- View delivery slip - this button activates after the delivery slip is generated. This happens automatically after you change the status of the order to Preparation in progress (or to Shipped). By clicking on this button you can download and view the delivery slip in PDF format.
- Partial refund - this button becomes available when the status of the order changes to Payment accepted. You can use it to refund any of the products in the order. When you click on it this will automatically display the Products block that's on the same page with the necessary refund options with which you can refund products (e.g. damaged products). For more information on this check the section on partial refunds in this tutorial.
- Standard refund - available when merchandise returns are enabled (from Orders menu>Merchandise returns sub-menu) and before the order is shipped. So, for example, if the status of the order is Payment accepted or Preparation in progress and merchandise returns are enabled, then this button will be available. If, however, the status is changed to Shipped (or to a more advanced stage of the order process), then the button will no longer be available. When you click on it you'll be automatically brought down to the Products block on the same page. There you'll find the necessary options for marking the standard refund. For more information check the section in this tutorial on standard refunds.
- Return products - this button becomes available after the status of the order is set to Shipped. Note that merchandise returns are disabled by default. To enable the use of this button and all the options related to merchandise returns, you have to enable merchandise returns from Orders menu>Merchandise Returns sub-menu. If a customer returns one or more products from the order, you can use this button to mark the product(s) as returned, and optionally to re-stock the product, generate a credit slip and/or a voucher. After you click on the button you'll be brought down the same page to the Products block where you'll see the options associated with product returns. For more information check the section in this tutorial on product returns, and also the tutorial on how to manage merchandise returns in PrestaShop.
Note that in PrestaShop 1.5 the layout of the buttons is a bit different, but all of them are at the top of the order details page.
Order Status and Documents
At the top of the order details page you can see the current status of the order and there's a drop-down menu with which you can change the status of the order:
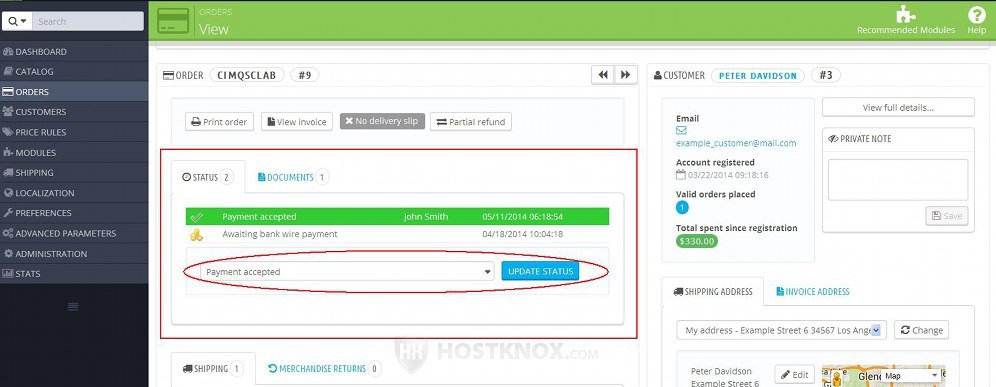
To change the status, select it from the drop-down and click on the button Update Status that's next to it (in PrestaShop 1.5 the button is labeled Add).
You can set the status according to the stage at which the order is at the moment. For example, after you send the order to the customer you can change the status to Shipped, and after the customer receives the order you can set it to Delivered. Note that depending on the payment method that is used the status is often automatically set to Payment accepted. This happens, for example, with online payment methods with which the payment is performed while placing the order (e.g. PayPal). With other payment methods you have to change the status manually after you receive the payment (e.g. bank wire, check, etc.).
Customers can view the status of all their orders from the Order History section of their account settings on the frontend of your store. Depending on the particular status, PrestaShop will automatically send an email to the customer's email address when the status of the order is changed. For example, when the status of the order is changed to Payment accepted or Shipped, an email will be sent to the customer, while when the status is changed to Delivered no mail will be sent to the customer.
The same block that contains the option for the order status has another tab labeled Documents. Click on it to see the documents associated with the order:
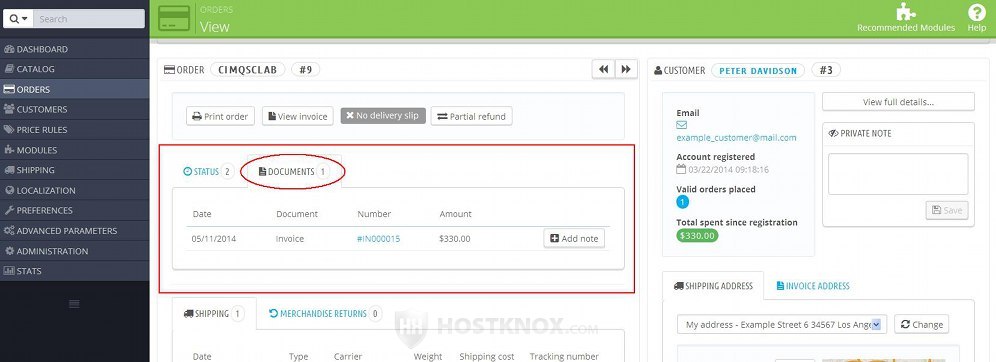
It lists documents such as the invoice and delivery slip. If you click on the reference number of the document a window will pop out with which you can download/view it in PDF format. As we mentioned, the invoice is generated automatically when the status of the order is changed to Payment accepted, and the delivery slip is generated automatically when the status is changed to Preparation in progress (or to Shipped). If the status is still not changed to Payment accepted which in turn means that there's no invoice yet, but you want to generate an invoice, click on the Generate invoice button that's available in the Documents block. Once the invoice is generated that button will be removed.
If you want to, you can add some note regarding the invoice. Just click on the Add note button and use the text area that appears. The note will be added to the actual PDF invoice.
Note that in PrestaShop 1.5 the status and documents are not managed in the same block with two tabs. Instead of this the documents are displayed in a separate Documents block. It's at the top of the right page column. Otherwise, all the options are the same.
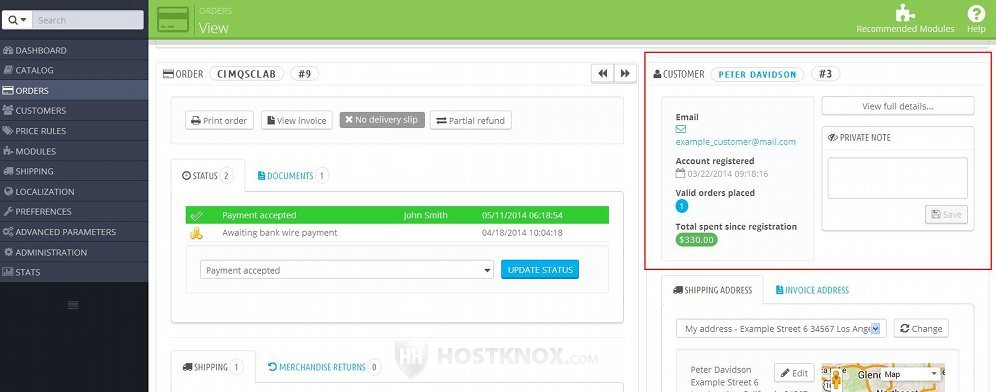
Customer Information
On right side at the top of the page with the order details there's a Customer block (it's labeled Customer information in PrestaShop 1.5) that lists some general information about the customer who placed the order:
In PrestaShop 1.5 the block is the second one in the left column.
The block shows the name and email address of the customer, the date the account was registered, the number of placed orders and the total amount spent since registration (the amount for all the placed orders). If you want to view all the details about this customer, click on the button View full details. This will redirect you to the page that shows the full customer information. In PrestaShop 1.5 there's no such button; instead just click on the name of the customer. In both cases the customer information that is displayed is the same one that you can access by going to Customers menu>Customers sub-menu and selecting the customer from the table with the existing customers.
In the Customers block there is also a text area which you can use to add a private note (this is not available in PrestaShop 1.5). Just type the note in the text area and click on the Save button under it. This note can only be viewed in the admin panel. It's not sent to the customer and it's not to be confused with the messages that can be sent to the customer from the Messages block on the same page, or from Customers menu>Customer Service sub-menu in the admin panel. The private note is shown not only on the order details page in the admin panel but also on the page with all the customer details. That's the page that can be viewed when you go to Customers menu>Customers sub-menu and you select the particular customer.
Messages
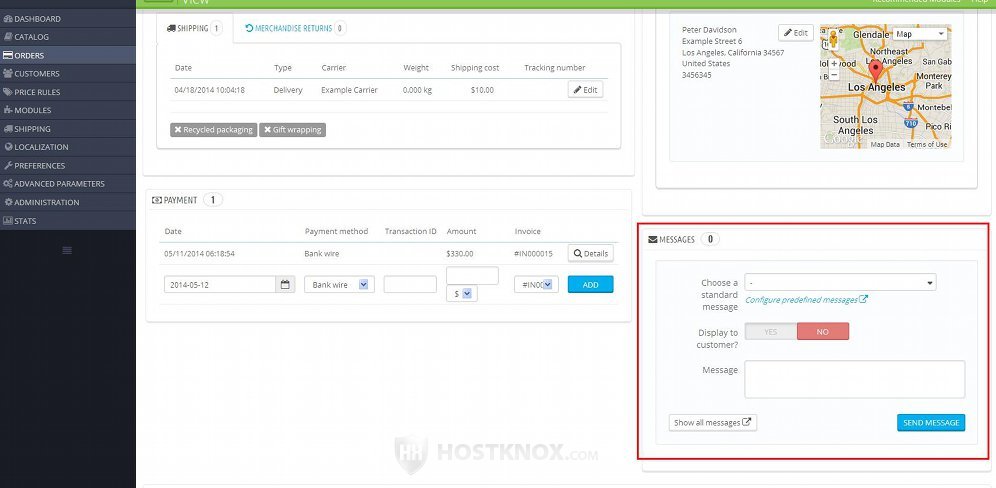
On the order details page there's a block which can be used to send messages to the customer:
In PrestaShop 1.5 the block is labeled New message; it's the last block at the bottom of the page, and to view its options you have to click on the respective Click here button that's in it.
You can use this block either to type a message that can be viewed only by employees in the admin panel, or to send a message that can also be viewed by the customer. It can be anything concerning the order. The block contains the following options:
- Choose a standard message - instead of typing a new message you can choose from preconfigured messages that you have typed in advance. These messages can be selected and sent for any order. This is useful for standard messages (e.g. an apology for a delay) so that you don't have to type it each time that you have to send such a message. The preconfigured messages can be added and edited from Orders menu>Order Messages sub-menu. For more information check the tutorial on how to add and manage preconfigured order messages.
- Display to customer? - by default, this is set to No. This means that the message will not be sent to the customer and can be viewed only in the admin panel (from Customers menu>Customer Service sub-menu). If you set this to Yes, the message will be sent to the customer. It will be sent to the email address of the customer, and can also be viewed from the account of the customer on the frontend of your site. To do this, the customer has to open the page with the order history and view the details for the particular order.
- Message - if you don't choose to send a preconfigured message, in this text area type the content of the actual message.
After you're ready with the options click on the Send message button (in PrestaShop 1.5 it's labeled just Send).
Shipping and Merchandise Returns
Another block on the order details page is the one that shows shipping information and information related to merchandise returns (if any). The block has two tabs: one for the shipping information and the other one for merchandise returns; in PrestaShop 1.5 these are two separate blocks listed one after the other in the right column of the page.
The block with the shipping information is not to be confused with the one that shows the shipping address. This one shows the chosen carrier, the weight of the package and the shipping cost:
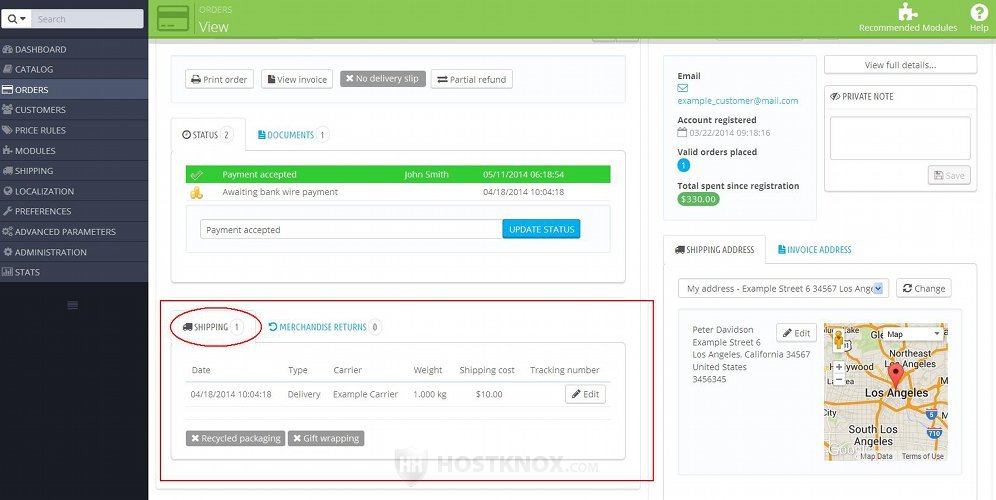
It's also indicated whether recycled packaging and/or gift wrapping is used. There's an Edit button with which you can edit only the tracking number.
The Merchandise returns tab lists merchandise returns regardless of the current status of the return. If a customer requests to return one or more products from the order, this will be listed:
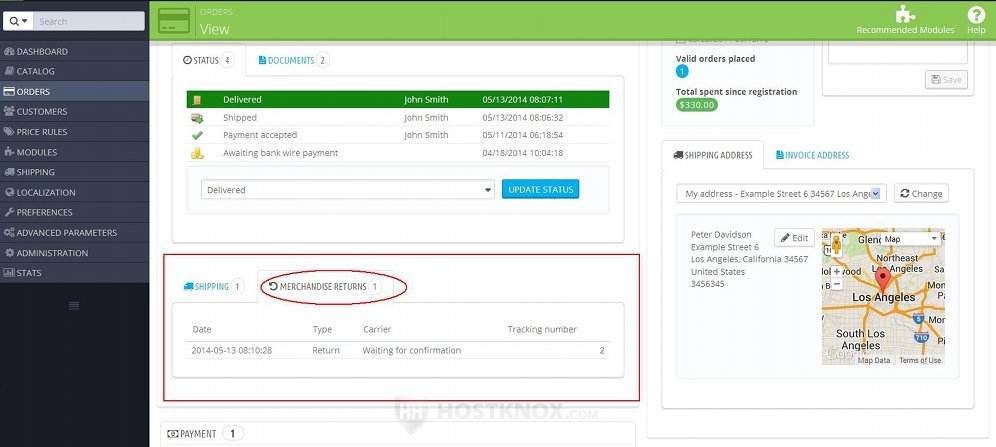
For the merchandise return to be listed there the customer needs to initiate the return from the their account settings on the frontend of your site. Note that merchandise returns are disabled by default. You can enable them and view all such merchandise returns from Orders menu>Merchandise Returns sub-menu. From there you can also change the status of each return. In addition to this from the options of each order you can refund and restock the returned products. For a detailed description of the whole return process check the tutorial on how to manage merchandise returns in PrestaShop. The sections in this tutorial on product returns and partial refund will also provide you with some additional information concerning merchandise returns.
Shipping and Billing Addresses
On the page with the order details there's a block that shows the shipping and invoice address of the customer (they may be different). At the top of the block there are a couple of tabs with which you can view the shipping and billing address respectively:
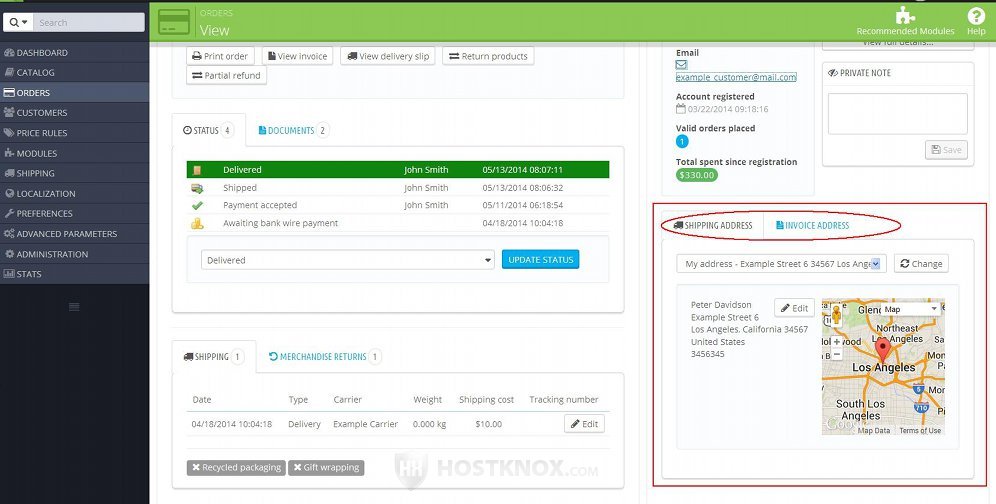
In PrestaShop 1.5 there are two separate blocks displaying the shipping and billing addresses.
A customer account can have many addresses associated with it, so you have to carefully check the specified address. Customers also have the choice to select one addresses as the shipping address and a different one for billing.
From this block you can also change the address by selecting one of the other registered addresses associated with the particular customer. Just select the address from the drop-down menu and click on the Change button next to it. If you click on the Edit button this will open the form from which you can edit the address. If you need to add a new address which you then can select, you can do this from Customers menu>Addresses sub-menu. From there you can manage all customer addresses. For more information check the tutorial on how to manage customer addresses in PrestaShop.
The block also displays a Google map that shows the location of the address. In PrestaShop 1.5 the map is not shown by default; you have to click on the small Google icon on the right side of the block.
Payment Information
The Payment block on the order details page shows information about the payment method that was used, the paid amount and the number of the invoice issued for the order:
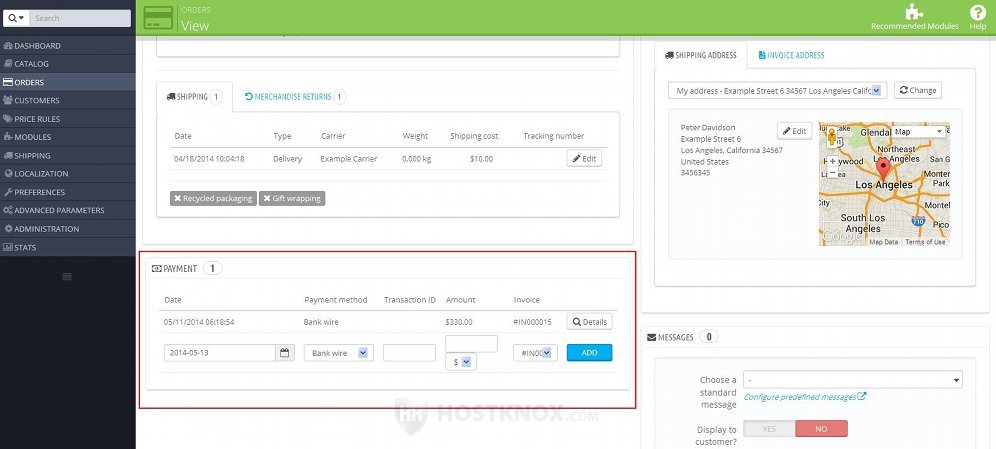
If you click on the Details button, that will give some more details (if any) about the payment. In PrestaShop 1.5 this button is not labeled; it's an icon that looks like magnifying glass.
If the payment hasn't been accepted yet, with the options and the Add button at the bottom of the block you can add the payment manually. You can change the payment method and currency from the respective drop-down menus, then type the price in the field for Amount and click on the Add button.
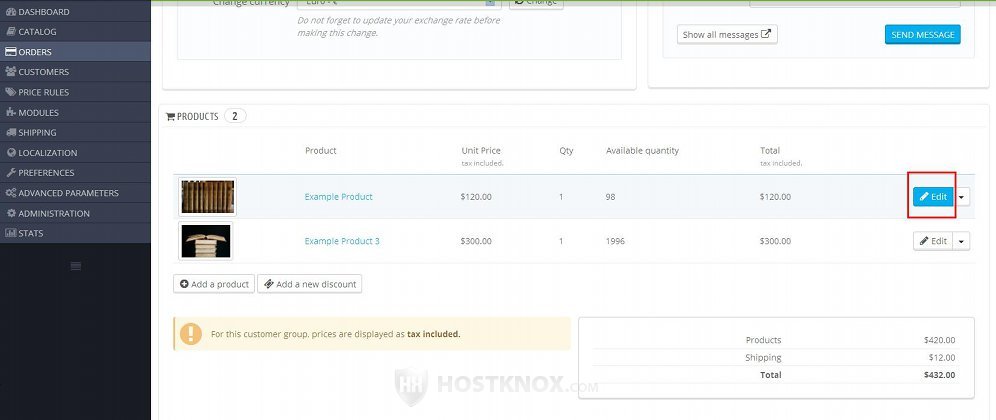
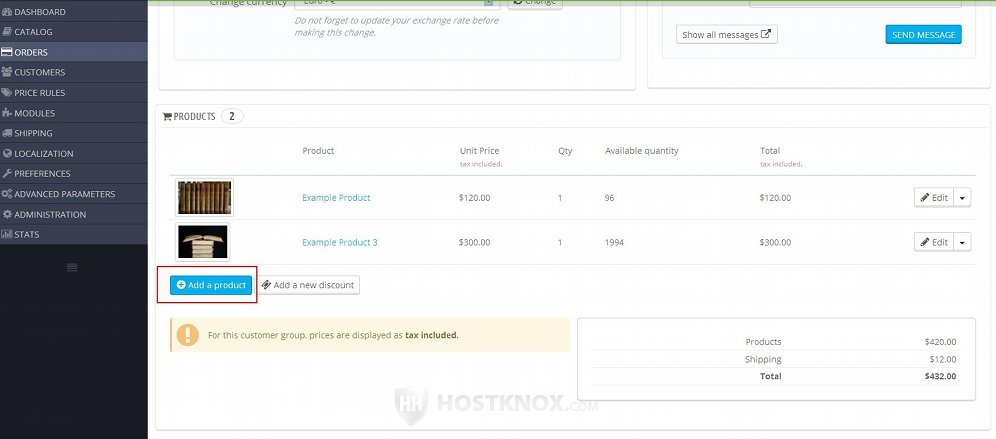
Products
The block Products on the page with the order details lists the products in the order. Each product is shown with its image (if you have uploaded one for the product), its price, the number of ordered units from that product, the refunded and returned units (if any), the total available quantity from that product and the total amount the customer spent for the product:
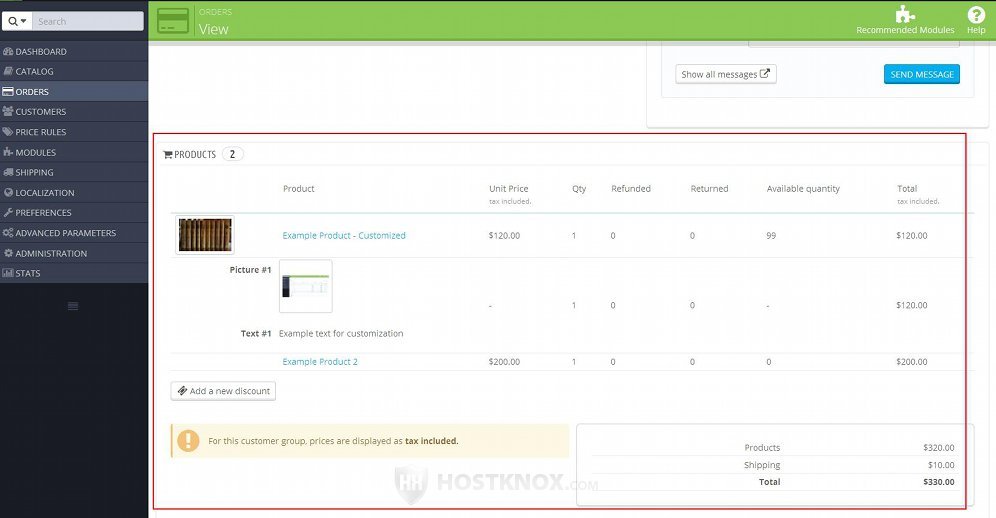
If there's a customizable product and the customer has uploaded a picture and/or a text with which the product to be customized, they are shown under the particular product:
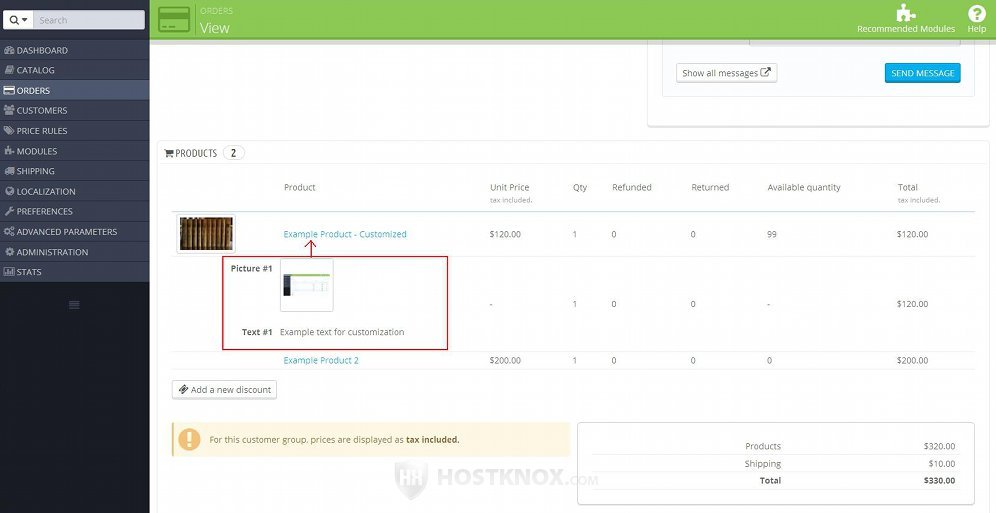
If you click on the image for customization a window will pop out with which you can view and download the image in its original size. For more information on product customizations check the tutorial on how to add and manage product customizations in PrestaShop.
Using the respective buttons you can do several things from the Products block. The available options also depend on the status of the order. For example, if the status is Shipped or Delivered, you'll not be able to remove products from the order or add more units of the current products in the order or add new products. If the order is in the earlier stages of the order process and is not yet shipped you'll be able to do these things.
Edit the Price and Quantity of Ordered Products
To edit the ordered quantity of a product that's already in the order or change the price, in the Products block on the order details page click on the Edit button for the product:
In PrestaShop 1.5 the button is not labeled; it's an icon that looks like a pencil.
After you click on the button some fields will appear with which you can change the price (tax included and excluded) per unit, and a field which you can use to change the ordered quantity:
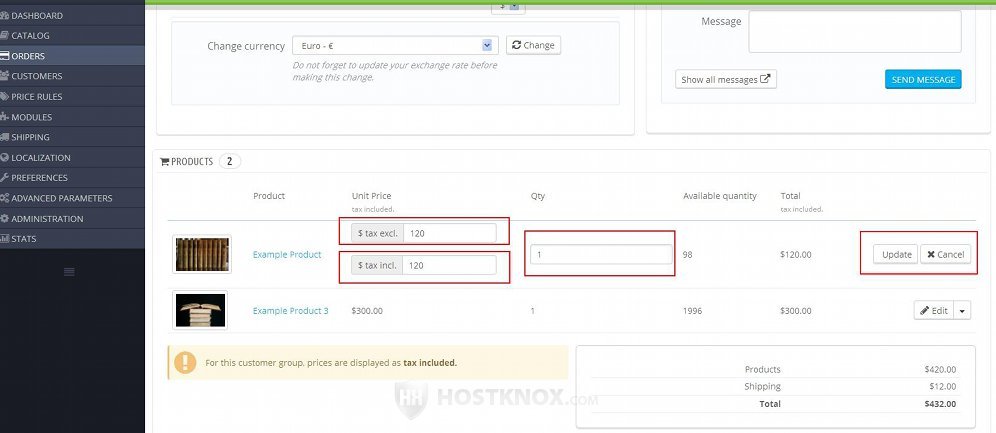
If you make any changes and you want to keep them click on the Update button. Otherwise, click on the Cancel button.
Keep in mind that you can edit the price and quantity of the ordered products only if the status of the order has not reached the Shipped status. If the status is one of the earlier ones in the order process (e.g. Awaiting payment, Payment accepted, etc.), then you can edit the quantity and price of the ordered products.
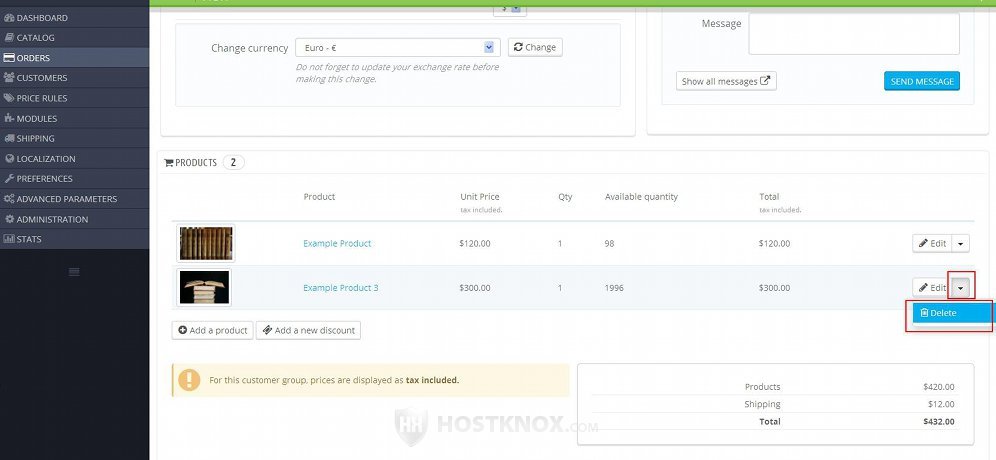
Delete Products from an Order
To remove a product from an order, in the Products block on the order details page click on the arrow next to the Edit button for that product and from the drop-down menu that appears select Delete:
In PrestaShop 1.5 there's no such drop-down menu. The delete button is an icon that looks like a trash can.
As with editing the price and quantity of products in orders, you can only remove an ordered product from an order if the status of the order has not reached Shipped. If the status of the order is one of the earlier ones in the order process, the button for deleting products from the order will be active.
Add Products to an Order
In the Products block on the order details page there's a button for adding products to the order. To add new products to the order, click on the Add a product button that's in the block (in PrestaShop 1.5 it's above the product list):
This will display a few options:
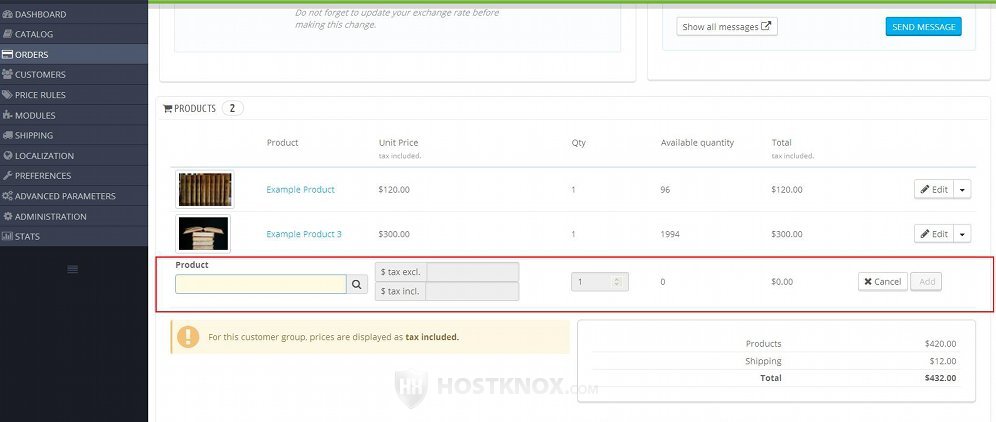
Start typing the name of the product in the search field and a drop-down menu will appear from which you can select the product. When you do that the fields for the price will automatically fill with the price of the product. You can edit it, as well as the quantity. After that click on the Add button that's on the right.
You can add a new product to an order before it's shipped. After the status of the order is changed to Shipped, the button for adding a new product to the order will be removed from the Products block.
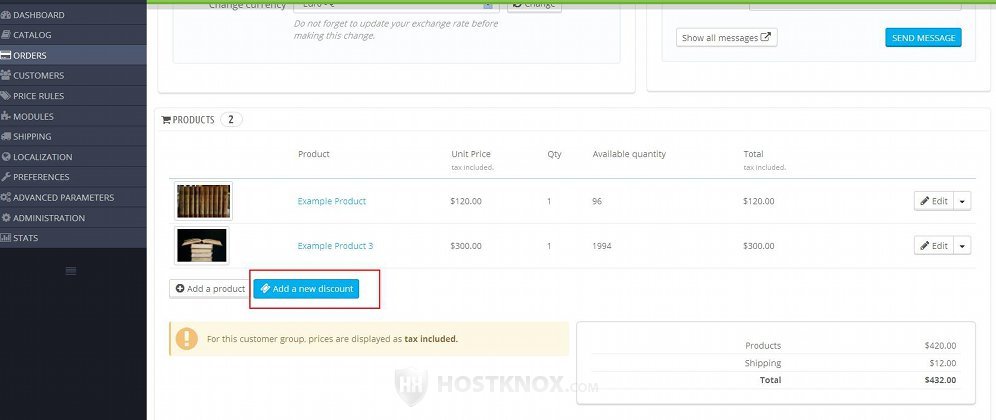
Add Discounts to an Order
Another thing you can do from the Products block on the order details page is to add a discount for the order. To do this, click on the button Add a new discount:
This will display a panel with a few options:
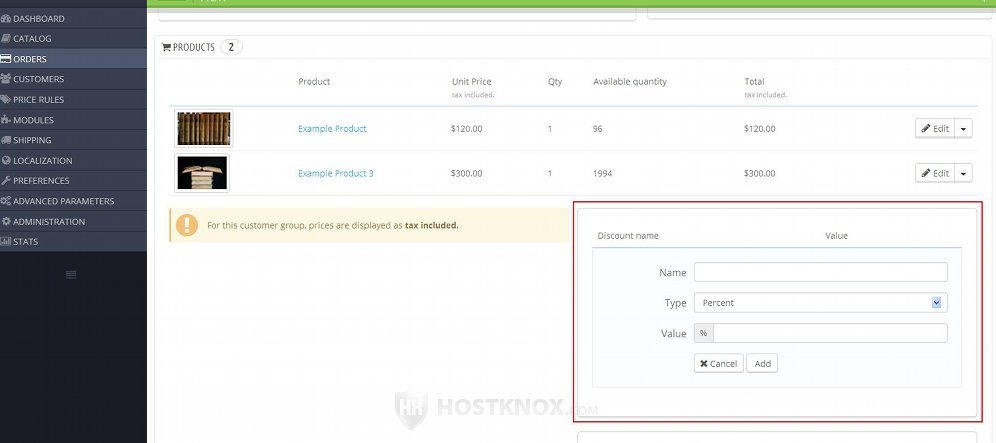
Type a name for the discount in the Name field. From the Type drop-down menu select whether you want the discount to be calculated as a percentage from the price or you want it to be a fixed amount; you can also choose an option for free shipping. In the Value field type the discount; depending on what you choose from the Type drop-down menu, the number for the value is either a percentage or a sum. After that click on the Add button or on the Cancel button, if you change your mind. If you have already added the discount but you want to remove it, there's a delete button with which you can do that.
Note that a discount like this can be added regardless of the status of the order. So you can actually add a discount after the payment is accepted in which case you'll have to send back to the customer the amount for the discount.
Returned Products
If a customer returns one or more products from an order, you can mark those products in the order as returned. Note that by default merchandise returns are disabled which means that the options in the admin panel for managing merchandise returns are not available. You can enable merchandise returns from Orders menu>Merchandise Returns sub-menu.
After a customer returns the product(s) in question you can mark them as returned in the order. To do this, after you open the page with the order details click on the button Return products at the top of the page. For more information on the buttons at the top of the order details page check the section in this tutorial on top buttons on the order details page. The button Return products will become available if merchandise returns are enabled and the status of the order is set to Shipped (or Delivered). When you click on the button you'll be brought down the same page to the Products block. For each of the ordered products there will be a checkbox available, and if there's more than one unit ordered from the particular product, there will also be a field. At the bottom of the block there are a few checkboxes:
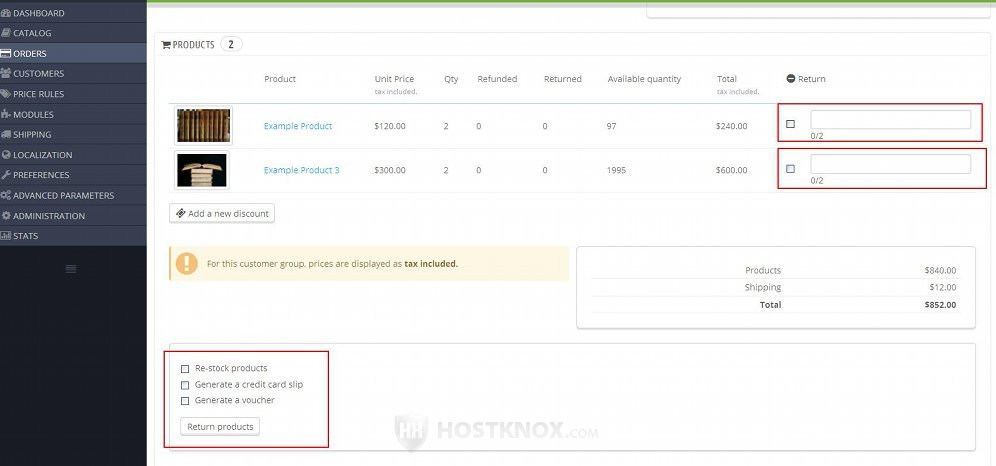
To mark a product as returned, mark its checkbox. In case there is more than one unit ordered from the product, there's a text field available. If not all units from the product were returned, then put the number of the returned units in the text field.
Under the table with the products there are three checkboxes:
- Re-stock products - if you want the returned products to be put back in stock (e.g. they are not damaged) mark this checkbox. After you click on the Return products button at the bottom the marked products will be put back in stock.
- Generate a credit card slip - if you want a credit slip to be generated, mark this button. The generated credit slip will be for the amount of the returned products. All credit slips can be viewed and downloaded from Orders menu>Credit Slips sub-menu in the admin panel.
- Generate a voucher - if you want a voucher to be generate for the amount of the returned products, mark this checkbox. The voucher can be used by the customer for getting a discount for one of their next orders. To view and manage the voucher(s) of a customer go to Customers menu>Customers sub-menu and click on the particular customer in the table with the existing customers. On the page with all the details about the customer you'll see listed the vouchers (if any).
If you generate a credit slip and/or a voucher, PrestaShop will inform about that the customer by automatically sending them an email(s) to their email address. Customers can view their credit slips and vouchers from their account settings on the frontend of your site.
Note that generating a credit slip and/or a voucher will not mark the returned products as refunded. You can do that with the Partial refund button or the Standard refund button.
Keep in mind that if a product is first marked as refunded, then you won't be able to mark it as returned. If first you mark it as returned then you can also mark it as refunded.
For a more detailed description of how to manage product returns check the tutorial on how to manage merchandise returns in PrestaShop.
Partial Refunds
Refunds are usually associated with merchandise returns, but not necessarily. You can refund the full price of a product or just part of it even if the customer doesn't return that product. Note however that if you first mark a product as refunded, then you can't mark it as returned. If you want a product to be marked both as returned and refunded, first you have to mark it as returned and then as refunded.
In the Products block on the order details page there are options with which you can manage refunds. To see and configure these options, first you have to click on the button Partial Refund that's at the top of the order details page. Check the section on the top buttons on the order details page in this tutorial for more information on this and the other top buttons.
As we mentioned, the button is available after the status of the order is changed to Payment accepted. It can then be used regardless at what later stage of the order process the particular order is. With it you can mark and manage the refund of some or all of the products in the order, or in case there is more than one unit ordered per product you can manage the refund of some or all of the units. When you click on it you'll be automatically brought to the Products block on the same page. For each of the ordered products there are a couple of fields available, and at the bottom of the block there are a couple of other options:
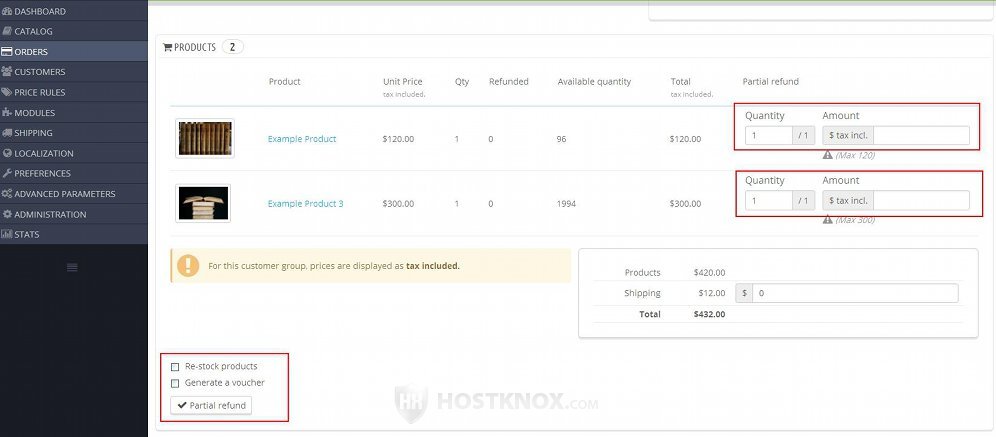
For each product there are a couple of options:
- Quantity - in this field you can type the units that you want to refund. By default, all the ordered units are put in the field. If you don't want to refund a product, make sure that you put 0 in this field. Otherwise, it will be refunded even if you leave the field for the amount blank.
- Amount - in this field you can type the amount that you want to refund. It can be the full price or just part of it. If you leave the field for the amount blank, the full amount for the specified quantity will be refunded.
Under the products there are a couple of checkboxes:
- Re-stock products - if you want the refunded products to be included back in the stock, mark this checkbox. If before refunding the product(s) you have marked it as returned as explained in the previous section of this tutorial, be careful not to restock the product(s) twice. When you mark a product as returned you also have the choice to restock it. So if then you mark the same product as refunded and you again mark the checkbox for restocking, then the same product will be restocked twice.
- Generate a voucher - if you want to generate a discount voucher, mark this checkbox. The generated voucher will be for the specified sum for refunding. If you generate a voucher, the customer will be automatically informed about this with a message sent to their email address. The customer can use the voucher for one of the next orders. Customers can also view their vouchers from their account settings on the frontend of your site. In the admin panel you can manage the vouchers of a customer from the page that lists all the details about the customer; to view this page go to Customers menu>Customers sub-menu and select the customer from the table with the existing customers.
After you're ready with the options click on the button Partial refund that's under them. After you do that in the table with the products on the order details page it will be indicated which products are refunded. Note that in the customer account on the frontend refunds are not indicated, nor does PrestaShop automatically inform the customer via email about the refund (unless you change the status of the order to Refund). The customer will receive an automatic email only if a voucher has been generated. So you have to make sure that the customer is informed about the refund.
Standard Refund
At the top of the order details page there's a button Standard refund. Whether the button will be actually there depends on the status of the order and on whether merchandise returns are enabled. Unlike the button for partial refunds which is available regardless of whether merchandise returns are enabled, the button for standard refund is only available if merchandise returns are enabled. They are disabled by default and can be enabled from Orders menu>Merchandise Returns sub-menu. The other condition for the button to be available is for the order to be paid for but still not shipped. So if the order status is Payment accepted or Preparation in progress, the button will be available. If it's Shipped or Delivered, the button will no longer be available.
When you click on the Standard refund button this will automatically scroll down the page to the Products block and the options for the refund will be displayed. The standard refund offers fewer options than the partial refund. These include a checkbox and a text field for each of the ordered products, and a couple of checkboxes under the product list:
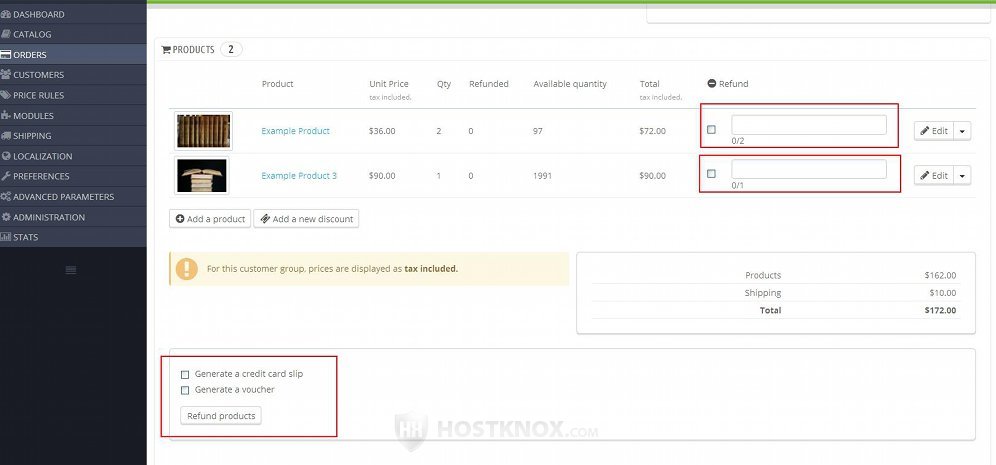
For each product there's a checkbox and a text field. Mark the checkbox(es) for the product(s) that you want to refund. This will automatically put in the field all the ordered units from the product. If more than one unit from the product is ordered and you don't want to refund all units, put in the field the number of the units that you want to refund. Unlike the partial refund with which you can specify either the whole sum paid for the product or just part of it, with the standard refund the whole price of the product is refunded.
Under the table with the products there are a couple of checkboxes:
- Generate a credit card slip - if you want a credit slip to be generate mark this checkbox. In case you generate a credit slip, PrestaShop will automatically send an email to the customer informing them about it. The customer can view and download the credit slip from their account settings on the frontend of your site. You can view and download all credit slips from Orders menu>Credit Slips sub-menu in the admin panel.
- Generate a voucher - if you want a voucher for the refunded sum to be generated, mark this checkbox. The customer can use the voucher to get a discount for one of their next orders from your store. If you generate a voucher, PrestaShop will send automatically an email to the customer informing them about it. The customer can view the voucher from their account settings on the frontend of your site. You can manage the vouchers of a customer from the page with the customer details. To open that page go to Customers menu>Customers sub-menu in the admin panel and click on the customer in the table with the existing customers.
Note that unlike partial refunds, with the standard refund there's no checkbox for restocking the product(s); since the standard refund can be performed only before the order is shipped it's assumed that there's nothing wrong with the product (e.g. they are not damaged) and so they are automatically restocked. After you're done with the options click on the button Refund products at the bottom.
After you perform the refund you can change the status of the order to Refund.
Links to Tutorials and Articles on Managing Orders
We have a bunch of tutorials related to managing orders:
- how to add orders manually from the admin panel in PrestaShop
- how to manage invoices in PrestaShop
- how to manage delivery slips in PrestaShop
- how to manage merchandise returns in PrestaShop
- how to manage credit slips in PrestaShop
- how to manage order statuses in PrestaShop
- how to manage preconfigured order messages in PrestaShop