PrestaShop 1.5/1.6 Delivery Slips Tutorial
How to manage delivery slips in PrestaShop 1.5-1.6
Delivery slips are used to confirm that the delivered order contains all the ordered products. It can be printed and put in the order before sending it to the customer. The customer can then use it to verify that all the products are actually present in the package. At least that's its purpose, but, of course, you're not required to do this.
The delivery slip itself contains a list of the products that are in the particular order, as well as the total amount paid, the payment method and the carrier used for delivering the order.
In PrestaShop a delivery slip is generated for each order automatically after you change the status of the order to Preparation in progress or to any of the following statuses in terms of the order's progress (e.g. Shipped, Delivered). You can download the delivery slip for an order from the order details page in the admin panel. There's also a section in the admin panel for managing delivery slips. From it you can generate a PDF file that contains all the delivery slips created during a specified period of time, and you can also configure some options related to delivery slips.
Delivery slips can be downloaded only from the admin panel. In the customer account settings on the frontend there are no options for that.
In this tutorial we'll show you:
- how to download a delivery slip from the order details page in the admin panel
- how to generate a PDF file with many delivery slips in it
- how to configure the delivery slip options
- links to tutorials on managing orders
In this tutorial we've used as a basic example PrestaShop 1.6. The screenshots are also from that PrestaShop version. Although the design of the admin panel is different than that of PrestaShop 1.5 the options for delivery slips are practically the same in both versions. If there are some differences we'll make notes about that in the tutorial.
Download a Delivery Slip for an Order
If you want to download the delivery slip for an order, you can do this from the order details page. Go to Orders menu>Orders sub-menu in the admin panel and select the order from the table with the existing orders. At the top of the order details page there's a button View delivery slip:
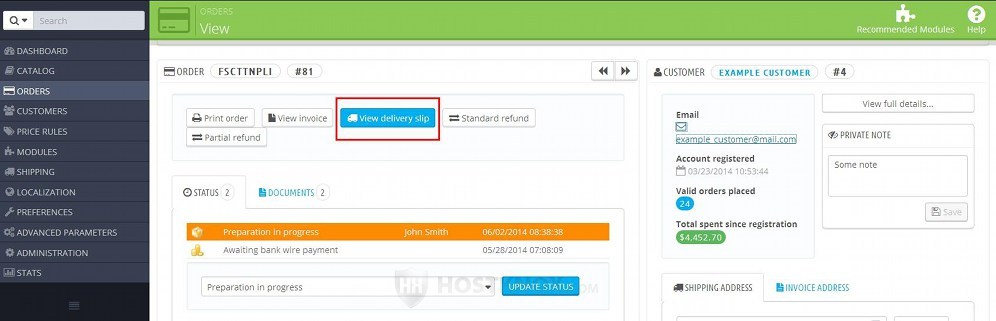
Click on the button and use the window that pops out to download the delivery slip on your local computer.
There's another way you can download the delivery slip from the order details page. On the page there's a block with the tabs Status and Documents at the top (in PrestaShop 1.5 these are two separate blocks). Click on the Documents tab to see the documents associated with the order. The delivery slip is also listed there. Click on its ID number in the Documents block:
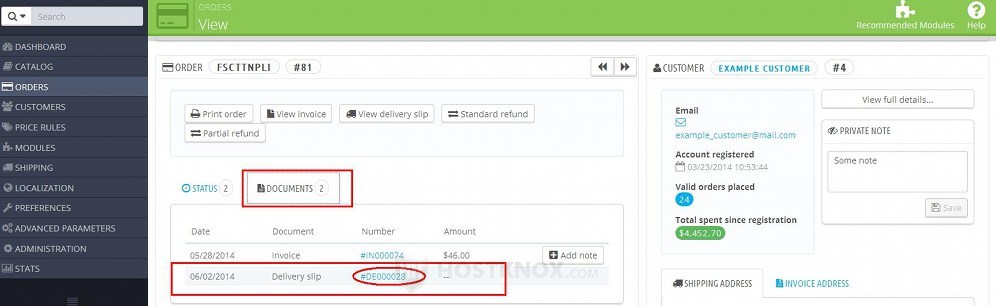
A window will pop out with which you can download the delivery slip.
The delivery slip for an order becomes automatically accessible after the status of the order is changed to one that allows the downloading of delivery slips. So this depends on the settings of the order statuses. With the default configuration of the existing statuses that come prepackaged with PrestaShop the first one that provides a delivery slip (in terms of the order's progress) is Preparation in progress. The statuses that come after it (e.g. Shipped, Delivered) are also configured to allow the downloading of delivery slips. If you need information on how to configure the settings of order statuses, check the section on how to add and edit order statuses in the tutorial on managing order statuses.
You don't have to do anything additional to create a delivery slip. It's automatically created when the status of the order is changed to one that shows delivery slips. For more details on how to change the status of an order check the section on how to change the status of an order in the tutorial on managing orders in PrestaShop.
Generate a PDF File with Many Delivery Slips
If you want to download the delivery slips for many orders, you don't have to do that from the order details page of each individual order. There's a section in the admin panel from which you can generate a PDF file that contains the delivery slips created during a specified period of time. To do this, go to Orders menu>Delivery Slips sub-menu. On the page that opens there's a block Print PDF Delivery Slips:
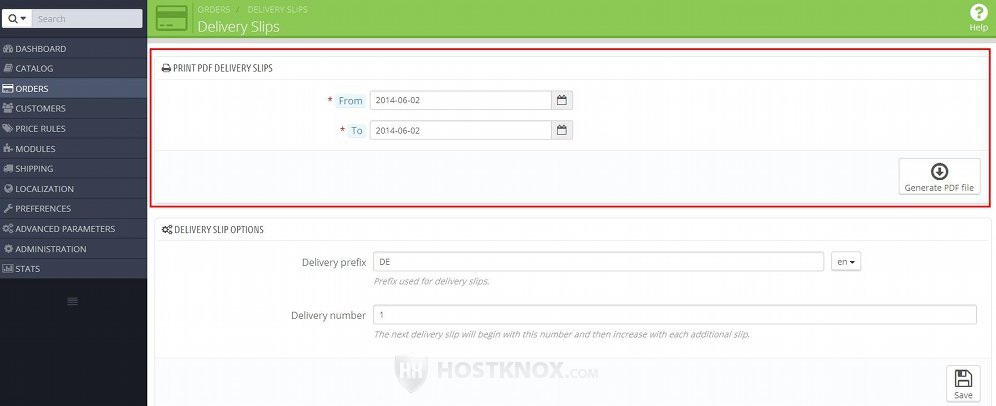
Use the fields From and To to specify the dates. Just click in the field and use the calendar the pops out to select the date. After that click on the button Generate PDF file. A window will pop out with which you can download the PDF file on your local computer. The file will contain all delivery slips created in the specified period. Note that what's taken into account is not the date the order was placed, but the date on which the delivery slip for that order was created. This in turn means that this is the date on which the status of the order was changed to one that generates a delivery slip (Preparation in progress, Shipped, etc.).
Delivery Slip Options
In the Delivery Slips section in the admin panel there are some options related to delivery slips. To configure them, go to Orders menu>Delivery Slips sub-menu and on the page that opens you'll see a block labeled Delivery Slip Options:
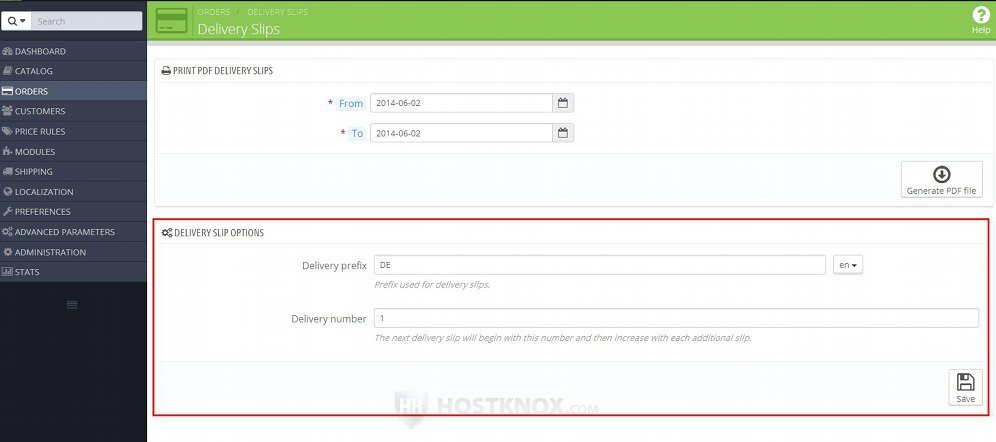
It contains the options:
- Delivery prefix - this is the prefix that's used with the ID numbers of delivery slips. Each delivery slip has a number with which it's identified (e.g. #000001, #000002, #000003, etc.). The prefix is put in front of the number. So with the default DE prefix delivery slips will be labeled like this: #DE000001, #DE000002, etc. You can change the prefix to whatever you want, or if you don't want to use a prefix, you can delete it. Note that if you change the prefix, this will affect not only delivery slips that will be created after the change, it will also affect existing delivery slips.
If you have installed more than one language, you can set a different prefix for each language version of the site. You can select the language from the option on the right side of the Delivery prefix field. - Delivery number - as we mentioned, each delivery slip has a label/ID with which it's identified. This label includes the prefix, if there's any, and a number (e.g. #DE000003). The whole label has some zeros at the beginning, but the actual number comes after the zeros. Each new delivery slip that's generated is automatically assigned the number that comes after the one of the previous delivery slip. With this option you can set the number of the next delivery slip that's to be generated. For instance, the last delivery slip is #000014 and you want the next one to be #000017 instead of #000015. So in this case put 17 in the field for Delivery number.
If you make any changes to the options don't forget to click on the Save button.
Links to Tutorials on Managing Orders
You may find useful our tutorials related to managing orders in PrestaShop:
- how to manage orders in PrestaShop
- how to add orders manually from the admin panel in PrestaShop
- how to manage invoices in PrestaShop
- how to manage merchandise returns in PrestaShop
- how to manage credit slips in PrestaShop
- how to manage order statuses in PrestaShop
- how to manage preconfigured order messages in PrestaShop