PrestaShop 1.5/1.6 Product Manufacturers Tutorial
How to add and manage product manufacturers in PrestaShop 1.5-1.6
In the admin panel of your PrestaShop there's a separate section from which you can manage the manufacturers of the products that you sell. You can add manufacturers, delete them, edit the options of existing manufacturers and add and manage manufacturer addresses. When you add or edit a product you can associated that product with one of the manufacturers that you have added. This is done from the options of the product; it can't be done from the options of the manufacturer.
On the frontend there's a block that shows a list the enabled manufacturers. When a customer clicks on the name of a manufacturer all products associated with it are listed. On the page of the manufacturer on the frontend there's also a short and a more detailed description of the manufacturer (provided you configure the respective options for the manufacturer in the admin panel).
In this tutorial we'll go over all these things. We'll show you:
- how to add product manufacturers
- how to edit, delete and manage existing manufacturers
- how to add manufacturer addresses
- how to edit and delete manufacturer addresses
- how to associate products with manufacturers
- manufacturers block and page on the frontend
- links to tutorials and articles on managing products
In this tutorial we've used as a basic example PrestaShop 1.6. The screenshots are also from that PrestaShop version. Although the design of the admin panel is different than that of PrestaShop 1.5 the options related to product manufacturers are practically the same in both versions. If there are some differences we'll make notes about that in the tutorial.
Add Product Manufacturers
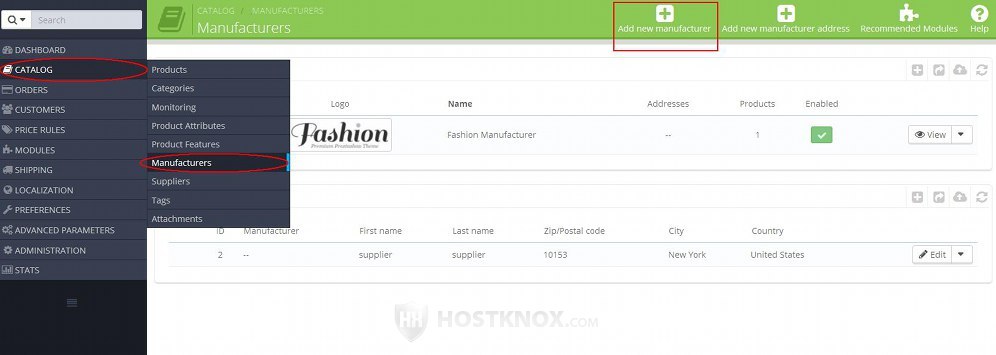
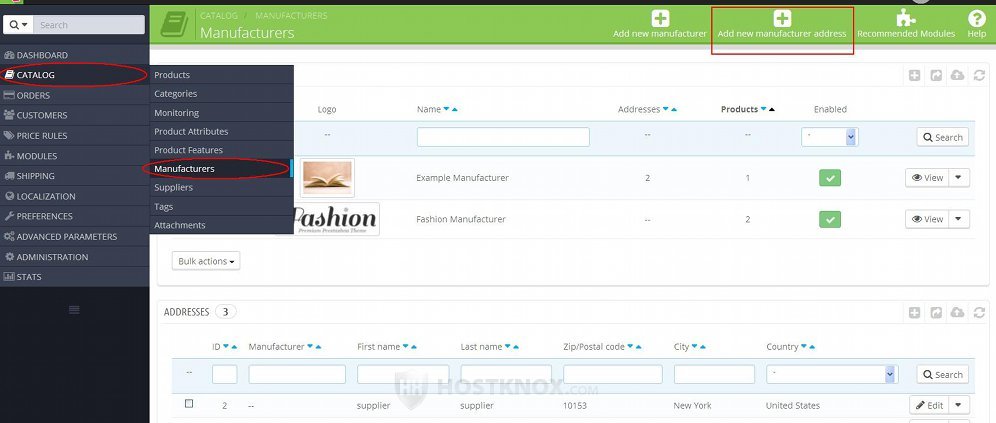
To add product manufacturers go to Catalog menu>Manufacturers sub-menu in the back office of your PrestaShop. On the page that opens there's a table that lists the existing manufacturers. Depending on the version of your PrestaShop, there's one or more example manufacturers. To add a new manufacturer click on the button Add new manufacturer that's above the table (in PrestaShop 1.5 the button is labeled just Add new):
This will open the form for adding manufacturers. At the top of the form are the options for name, description and logo:
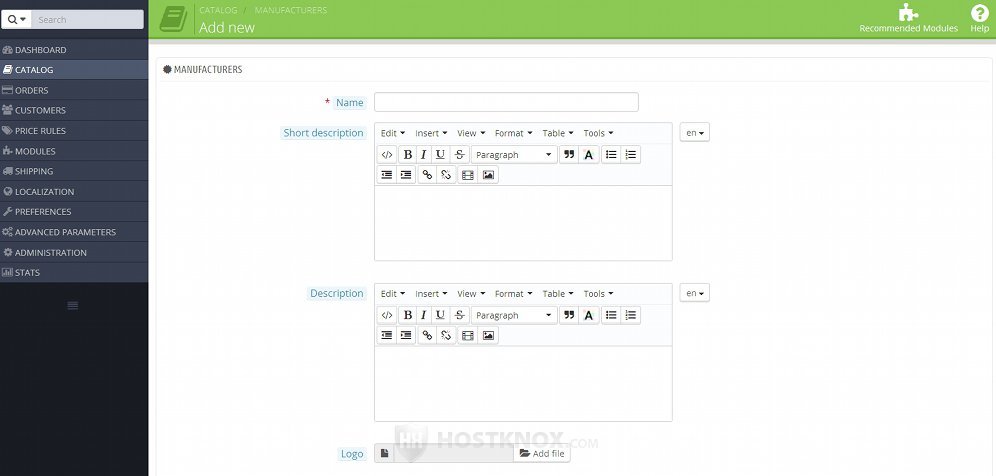
To be more precise these options are:
- Name - in this field simply type the name of the manufacturer. This is the name that will be used on the frontend and backend.
- Short description - this is optional. You can type a short description of the manufacturer. It's shown on the page of the manufacturer on the frontend of your store. If you have installed more than one language, you can add a translation of the description in each language using the option on the right side of the text editor.
- Description - you can use this text editor to type a more detailed description of the manufacturer. It's optional. Using the setting on the right side of the text editor you can provide a translation in each of the installed languages. The detailed description is shown on the page of the manufacturer on the frontend.
- Logo - you can use this option to upload the logo of the manufacturer. Click on the Add file button (in PrestaShop 1.5 it's labeled Browse) and use the window that pops out to select the image from your local computer. The image will be uploaded after you save the manufacturer. On the frontend the logo is shown on the main manufacturers page (e.g. yourdomain.com/manufacturers).
Under these options there are some more manufacturer settings. These include three meta options and the one for enabling/disabling the manufacturer:

The exact options are:
- Meta title - type the name of the manufacturer or any title that you think is appropriate. This is used as the title of the manufacturer's page. It's shown at the top of browsers and in browser tabs. It's also used by search engines and shown on search engine result pages. If you have installed more than one language, you can specify a different title in each language with the help of the option that's on the right side of the field.
- Meta description - type a short description of the manufacturer to be used by search engines and shown on search result pages. You can provide a translation in each of the installed languages.
- Meta keywords - you can type some keywords or phrases that are related to the manufacturer. After you type a word/phrase put a comma. It will be listed and you can remove it using the X symbol that appears after the phrase/word. Meta keywords are for improving search engine visibility and ranking, but in practice they have very little weight when it comes to that.
- Enable - when you add a new manufacturer this option is set to No. If you want the page of the manufacturer to be available on the frontend and if you want its link to be shown in the Manufacturers block, set this option to Yes.
After you're done with the options don't forget to click on the Save button.
Edit, Delete and Manage Existing Manufacturers
As we mentioned, when you go to Catalog menu>Manufacturers sub-menu in the admin panel there's a table that lists the existing manufacturers. Using the respective buttons in that table you can edit the settings of a manufacturer, you can view its address(es) and the products associated with it, and you can delete it.
To edit the settings of a manufacturer click on the arrow that's next to its View button and from the drop-down menu select Edit:

This will open the page with the settings for the manufacturer. They are the same as the settings on the form for adding new manufacturers. For a description of these options check the section on adding new manufacturers in this tutorial.
To delete a manufacturer, after you click on the arrow that's next to its View button in the table select Delete from the drop-down menu:
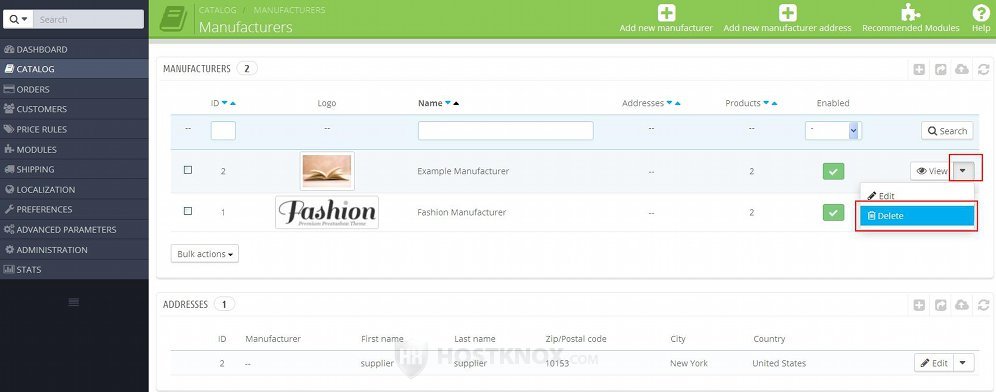
Deleting a manufacturer will not delete any addresses associated with it.
In PrestaShop 1.5 there's no such drop-down menu for each manufacturer listed in the table with the existing manufacturers. Instead of this there are two icons in the last column of the table. The one that looks like a pencil is for editing the manufacturer and the one that looks like a trash can is for deleting it.
To view the addresses and products associated with a manufacturer, after you go to Catalog menu>Manufacturers sub-menu in the table with the manufacturers click either on the name of the manufacturer or on its View button:
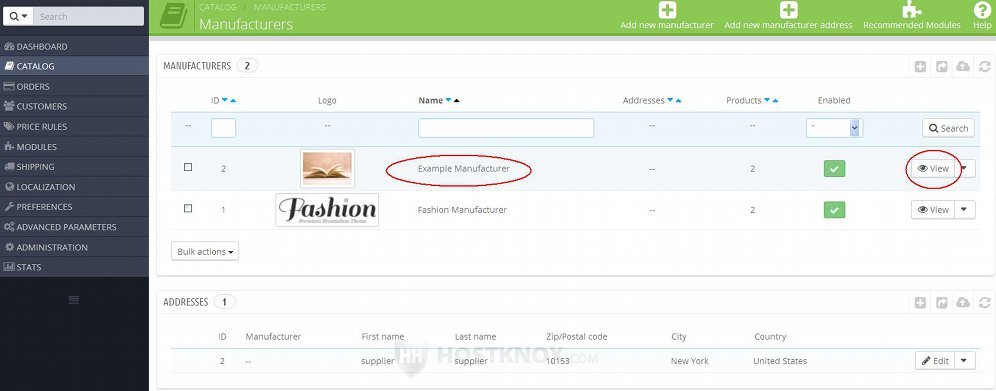
In PrestaShop 1.5 the view button is not labeled. It's an icon in the last column of the table and it looks like a magnifying glass.
After you click on the button this will open a page that lists all the addresses and products associated with the manufacturer:
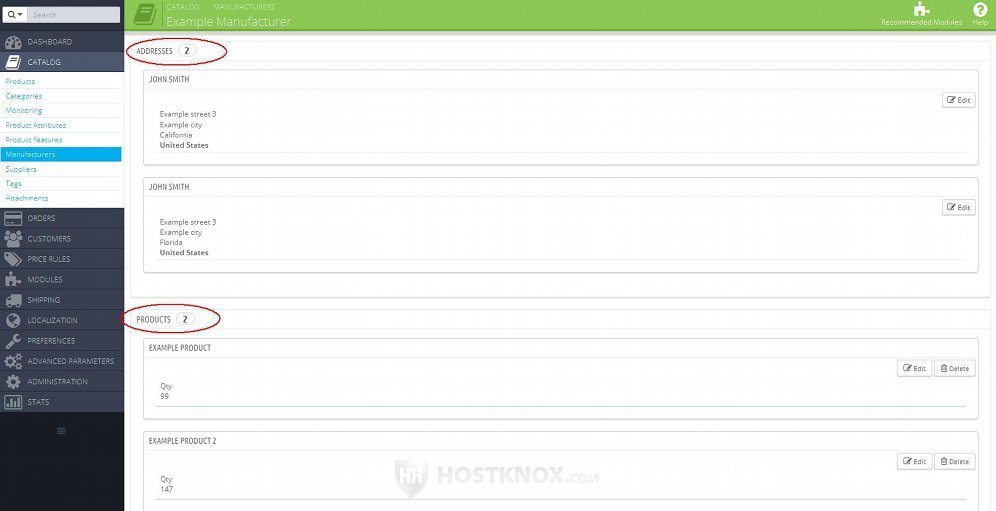
For each of the products associated with the manufacturer you'll see shown its name and quantity. For each address and product there's an Edit button. It will redirect you to the form for editing the settings of the address or product. For each product there's a Delete button. If you click on it this will remove the product from the catalog altogether.
You can associate a product with a manufacturer from the options of that product. For more information check in this tutorial the section on associating products with manufacturers.
Add Manufacturer Addresses
You can add one or more addresses for each of the manufacturers that you add. Of course, this is optional. Manufacturer addresses are not added from the form for adding/editing manufacturers. There's a separate form for that. Go to Catalog menu>Manufacturers sub-menu. On the page that opens there are a couple of tables. The top one lists the manufacturers and the bottom one the manufacturer addresses. PrestaShop comes preconfigured with an example address. To add a new address click on the button Add new manufacturer address:
In PrestaShop 1.5 the button is labeled Add new and it's just above the table with the existing addresses.
This will open the form for adding new manufacturer addresses:
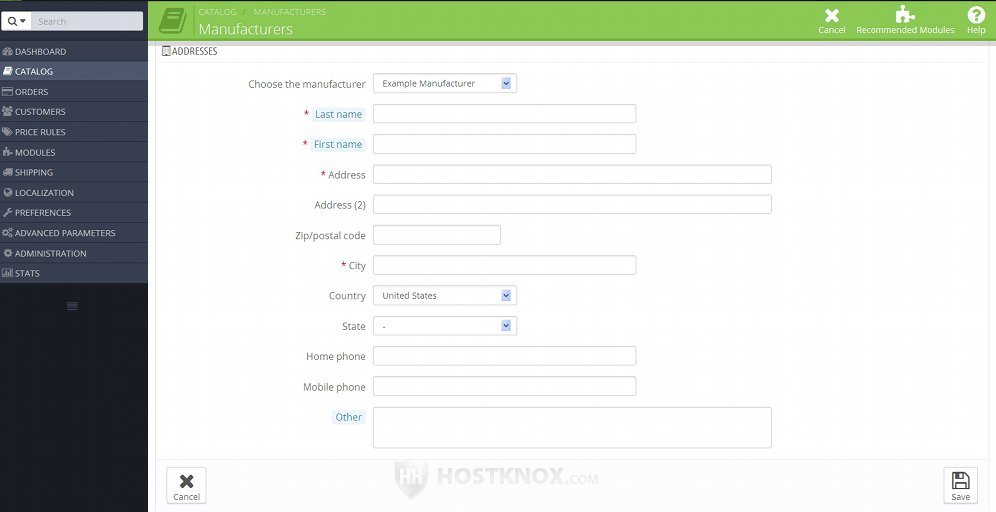
From the drop-down menu Choose the manufacturer select the manufacturer with which you want to associate the address. Note that you can choose only from enabled manufacturers. If there's an existing manufacturer that you have added but that is disabled, you won't be able to select it.
Then configure the rest of the options. There are settings for the first and last name of the person associated with the address (e.g. the owner of the company), for the street, city, state (if the country has states), country, phone numbers, ZIP/postcode, etc. At the bottom there's also an option for typing some additional information. The required fields are marked with a red asterisk (*). After you're done don't forget to click on the Save button.
Edit and Delete Manufacturer Addresses
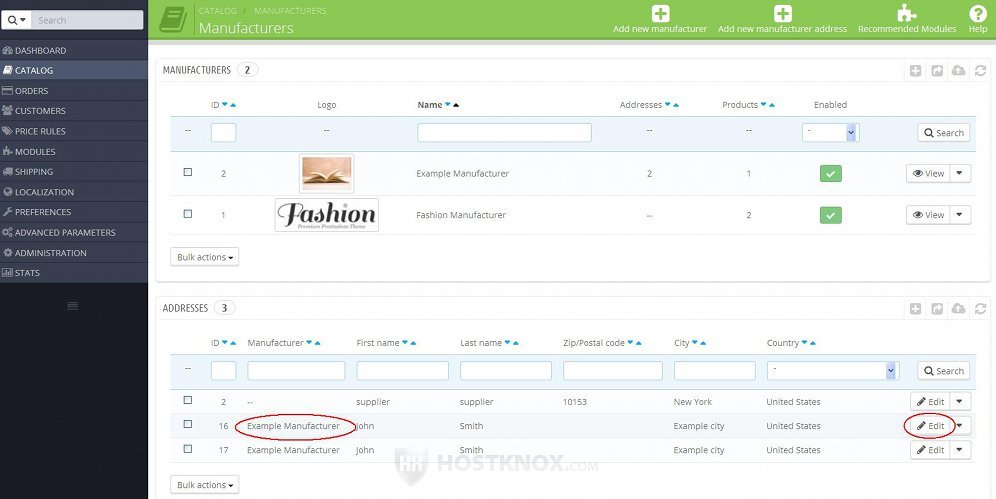
To edit manufacturer addresses, go to Catalog menu>Manufacturers sub-menu and in the table with the manufacturer addresses click on the row corresponding to the address or on its Edit button in the last column of the table:
In PrestaShop 1.5 the edit button is not labeled. It's an icon that looks like a pencil.
To delete a manufacturer address, in the table that lists the existing addresses click on the arrow that's next to the Edit button for the particular address and from the drop-down menu select Delete:
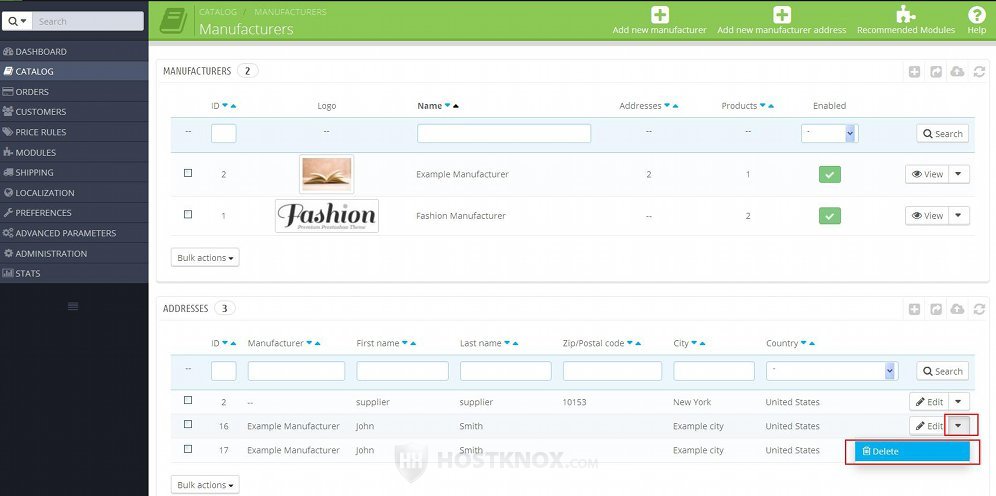
In PrestaShop 1.5 there's no such drop-down menu. The delete button is an icon in the last column of the table. It looks like a trash can.
Associate Products with Manufacturers
You can associated a product with a manufacture when you add or edit that product. So this is done per product. You can't do it from the options of the manufacturer.
On the form for adding/editing products there's an Associations tab on the left. Click on it and on the page that opens you can select the manufacturer from the Manufacturer drop-down menu:
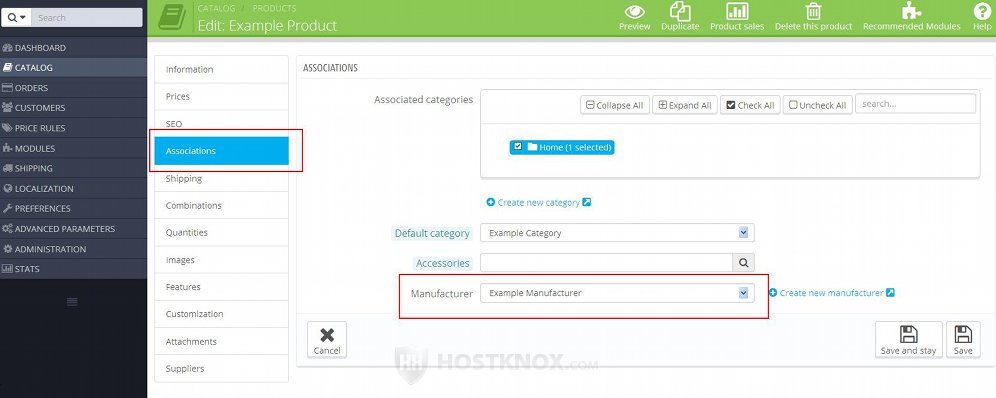
After you select it don't forget to click on the Save or on the Save and stay button.
Manufacturers Block and Manufacturer Pages on the Frontend
On the frontend there's a Manufacturers block that shows all enabled manufacturers. It's usually displayed in the left or right column; this is theme-specific:
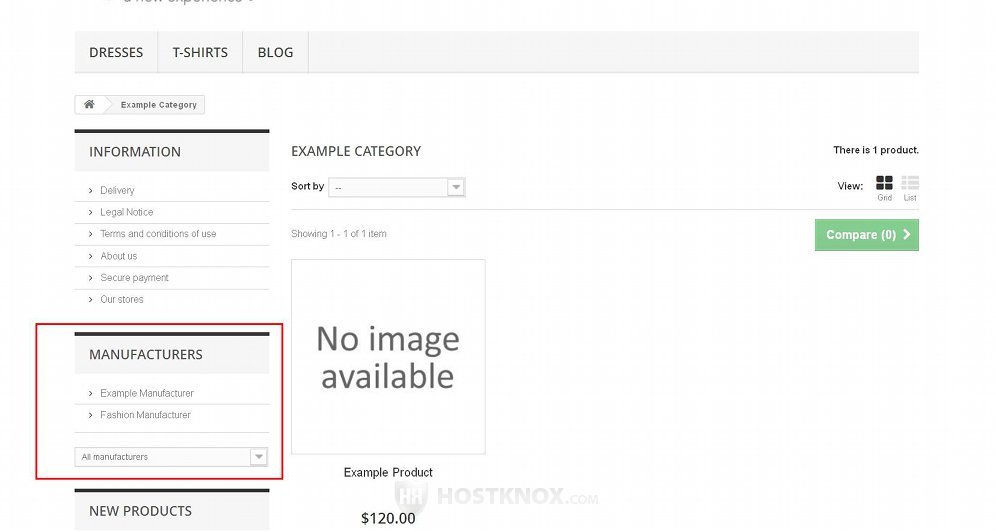
It shows the names of several of the manufacturers. Under them there's a drop-down menu from which any of the enabled manufacturers can be selected. The title of the block itself is also a link; it opens the main manufacturers page that lists all enabled manufacturers. The block is displayed and managed thanks to the Manufacturers module; it's enabled by default. The number of listed manufacturers and whether a drop-down menu is displayed in the block on the frontend depends on the settings of the module. To configure these settings, go to Modules menu>Modules sub-menu in the admin panel, find the module Manufacturers block and click on its Configure button.
In order for the block to be displayed on the frontend you also have to make sure that the module is hooked to a position. This is done from Modules menu>Positions sub-menu in the admin panel. By default, it's hooked to the left column.
When a customer clicks on the name of a manufacture in the block on the frontend or selects a manufacturer, this will open the manufacturer's page on your site. It shows the short and detailed descriptions (if any) of the manufacturer and all the products associated with the manufacturer:
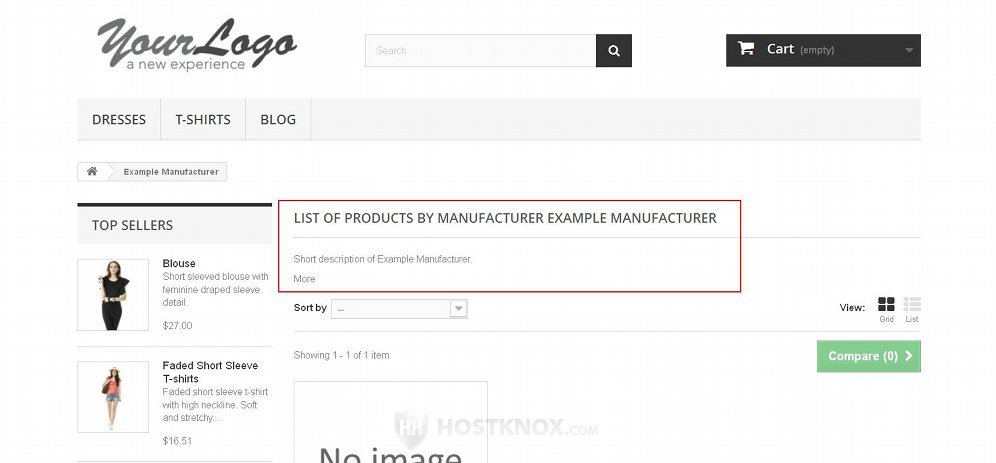
Usually only the short description is initially show, and there's a More button that displays the more detailed description. If friendly URLs are enabled and the homepage of your store is yourdomain.com, then the URL of a manufacturer's page will have the form yourdomain.com/2_manufacturer-name. The number is replaced with the actual ID number of the particular manufacturer and manufacturer-name is replaced with the actual name.
As we mentioned, the title of the Manufacturers block is a link to the main manufacturers page. That's a page that lists all enabled manufacturers:

Each manufacturer is displayed with its name, logo and short description (if any). It's also indicated how many products are associated with the manufacturer. This may also depend on the theme that you use. From this page people can visit the page of each particular manufacturer on your site by clicking on the name of the manufacturer or on the button that's provided.
If friendly URLs are enabled and the homepage of your store is yourdomain.com, then the URL of the main manufacturers page will be yourdomain.com/manufacturers.
Links to Tutorials and Articles on Managing Products
We have a bunch of tutorials on managing products. There's one general tutorial on how to add and edit products and other tutorials reviewing all the options on the form for adding/editing products. There are also some other detailed tutorials on various things related to products:
- how to add and edit products in PrestaShop
- how to add and manage product combinations in PrestaShop
- how to add and manage product features in PrestaShop
- how to add and manage product customizations in PrestaShop
- how to add and manage product attachments in PrestaShop
- how to create product packs in PrestaShop
- how to add virtual products in PrestaShop
- how to add and manage product attributes in PrestaShop
- how to add and manage product suppliers in PrestaShop
- how to add and manage product tags in PrestaShop
- how to configure and manage the options for the general product preferences in PrestaShop
In our knowledgebase there are shorter separate articles on issues related to products:
- how to change the number of products shown on category pages in PrestaShop
- how to disable the product comparison function in PrestaShop
- how to hide stock quantities from being displayed on the frontend in PrestaShop
- how to increase the allowed length of product names in PrestaShop
- how to remove the "Add to cart" button from category pages for products with attributes in PrestaShop
- how to remove the "New" text indicating newly added products in PrestaShop
- how to remove the "Sort by" menu from product category pages in PrestaShop
- how to use phpMyAdmin to move products from one category to another in PrestaShop