PrestaShop Multistore Tutorial
How to set up a multistore in PrestaShop 1.5-1.6
PrestaShop 1.5 and newer versions have options with which you can set up and manage a multishop. This means that with a single PrestaShop installation you can have two or more shops that you can manage from the same admin panel. The shops in the multistore can be set with different domain names (e.g. yourdomain1.com, yourdomain2.com, etc.), with subdomains (e.g. shop1.yourdomain.com, shop2.yourdomain.com, etc.), or with subfolders (e.g. yourdomain.com/store1, yourdomain.com/store2, etc.). Regardless of which variant you choose, the options that you have to configure in the admin panel to set the multistore are the same.
The shops in the multistore can be put into different shop groups. For each shop group you can select whether the orders, product quantities and customers should be shared between the separate shops in the group. When you create a new shop you have the choice to import all or some of the data from an existing shop. In this way once the new shop is created you don't have to add everything from scratch.
In this tutorial we'll go over all these things in details. We'll show you:
- how to enable the multistore feature
- general overview of the multistore page in the admin panel
- how to add a new shop group
- how to add a new shop
- how to use stores with different domains, subdomains or subfolders
- how to configure the URL and path options of a new shop
- how to select the scope when adding and editing information in a multistore
In this tutorial we've used as a basic example PrestaShop 1.6. The screenshots are also from that PrestaShop version. Although the design of the admin panel is different than that of PrestaShop 1.5, the options for managing a multistore are the same in both versions. If there are some differences we'll make notes about that in the tutorial.
Enable PrestaShop Multistore
By default, the options for setting up and managing a multistore are not visible in the admin panel of your PrestaShop. To view and configure them, you have to enable the multistore feature. To do this, go to Preferences menu>General sub-menu in the admin panel and on the page that opens set the option Enable Multistore to Yes:
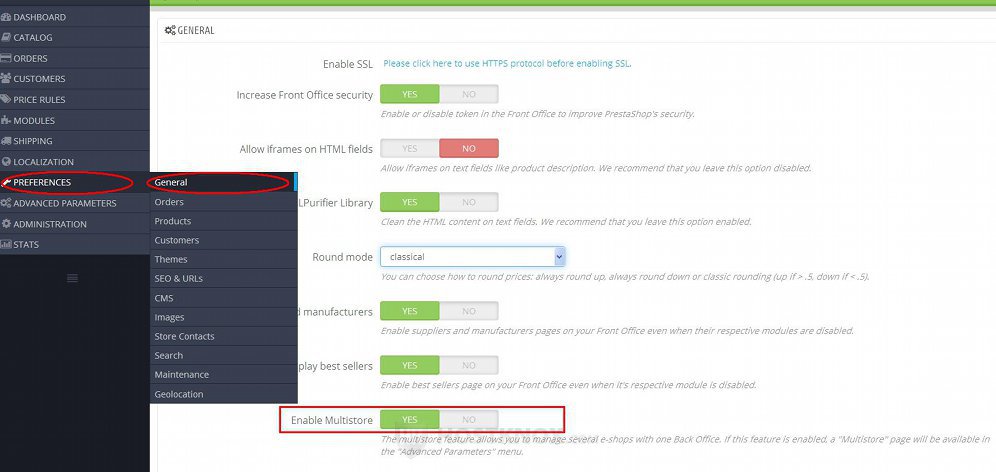
Don't forget to click on the Save button. After you do this a new sub-menu will become available. You can access it by going to Advanced Parameters menu>Multistore sub-menu in the admin panel of your PrestaShop.
Multistore Section in the Admin Panel
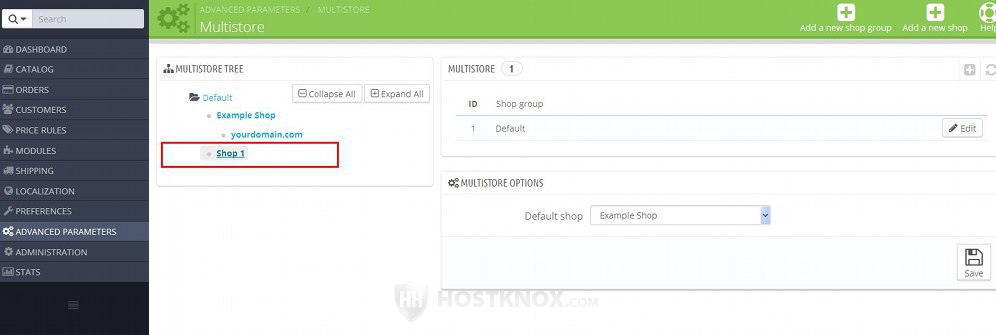
After you enable the multishop feature, you can manage the multistore options by going to Advanced Parameters menu>Multistore sub-menu. On the page that opens there are a few panels with options:
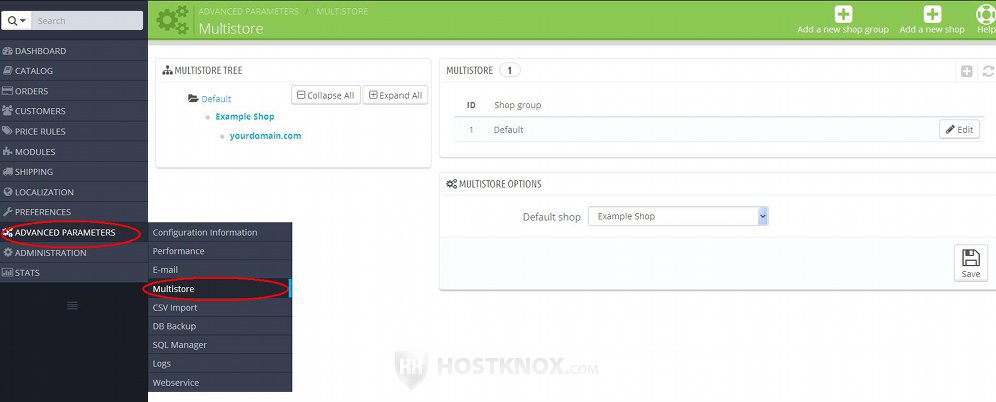
As we mentioned, the shops in a PrestaShop multistore are gathered in shop groups. In the panel Multistore Tree you'll see listed the different shop groups and the shops in each group:
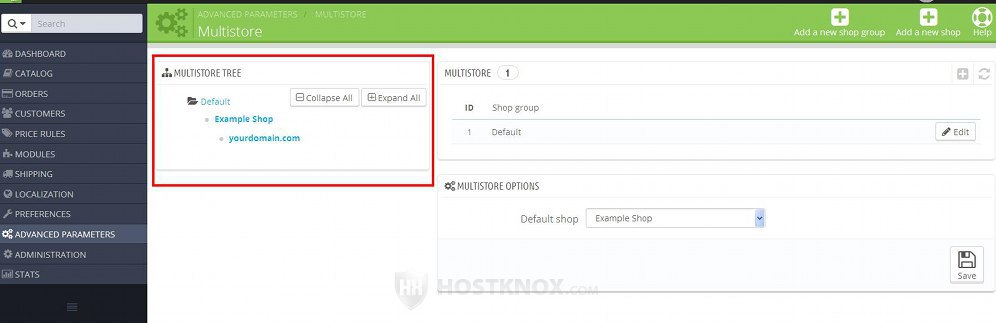
If you haven't added any groups yourself there should be one default group that's automatically available once you enable the multistore feature. This default group contains one shop. That's your original shop that was created after you installed the application (on our example screenshot it's labeled Example Shop). Under it you'll see listed the URL of that shop. You can use the buttons for collapsing and expanding to hide and show the tree. When you add a new shop and/or a group it will be listed in the tree.
If you click on the name of a shop in the tree list, this will display on the right side a table with all the shops:
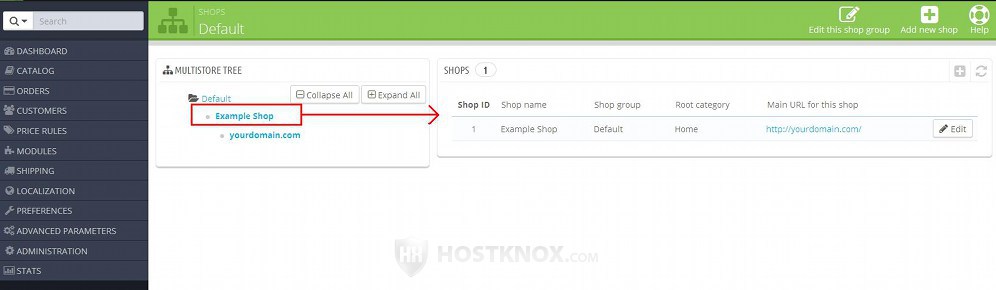
You can edit the options of a shop by clicking on its Edit button in the table. We'll describe what the exact options are in the section in this tutorial on adding shops. To remove a shop, click on the arrow next to its button for editing and from the drop-down menu select Delete. In PrestaShop 1.5 the buttons are icons that look like a pencil and a trash can.
Note that you're not allowed to delete the default shop.
Let's go back to the main page with the multistore options. Next to the panel with the multistore tree you'll see a table listing the shop groups in the multistore:
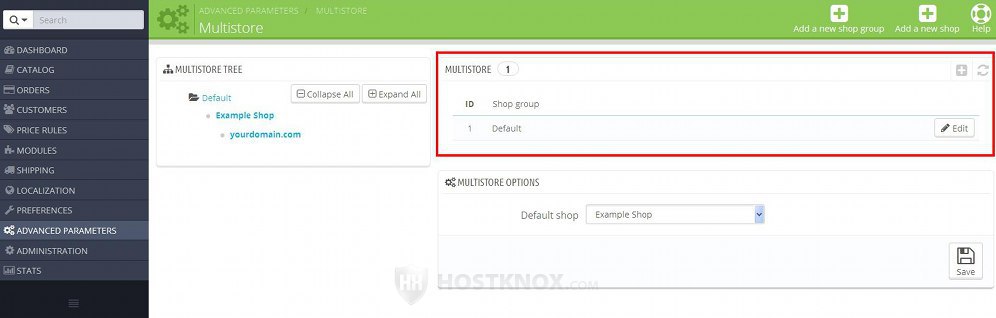
If you haven't added any additional groups it should list at least the default group. Using the respective button you can edit the settings of each of the shop groups listed in the table. We'll review the options in the section in this tutorial on adding shop groups. If a shop group doesn't contain any shops, you can also delete it. To do this, click on the arrow next to its button for editing and from the drop-down menu select Delete.
Another available panel is with the general multistore options. It contains an option for changing the default shop:
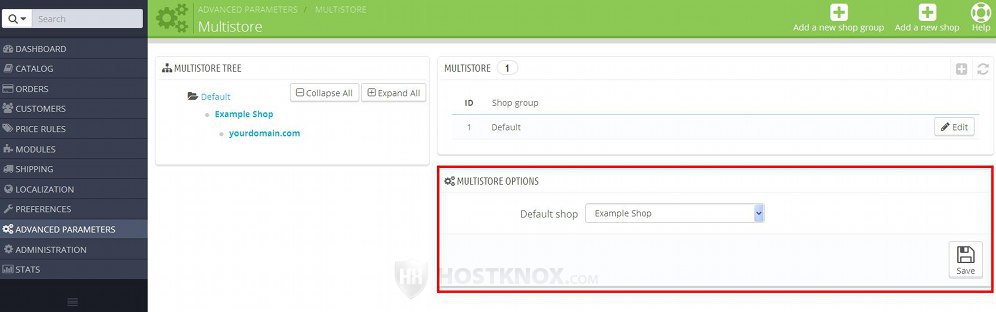
By default, it's set to the original shop of your PrestaShop installation. At some point after you add other shops you may decide to change the default shop. Select it from the drop-down menu and click on the Save button.
Add Shop Groups
Each shop that you add to a PrestaShop multistore should belong to a shop group. After you enable the multistore feature there's one default shop group that contains the original shop of the installation. The separate shops in the group can share various things such as the catalog, customers, orders, product quantities. In this way when you configure and edit shops you can apply changes more quickly. You can edit all the shops in a group simultaneously, and if needed, you can also edit only separate shops in the group.
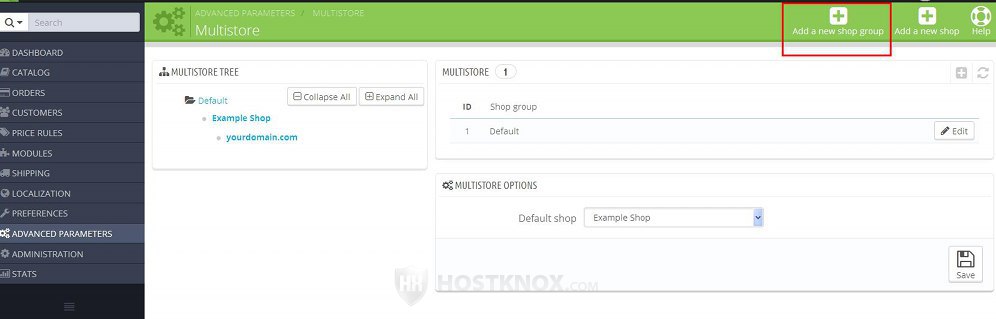
To add a new shop group, after you go to Advanced Parameters menu>Multistore sub-menu click on the button Add a new shop group:
This will open the form for adding shop groups. The options when editing an existing shop group are the same.
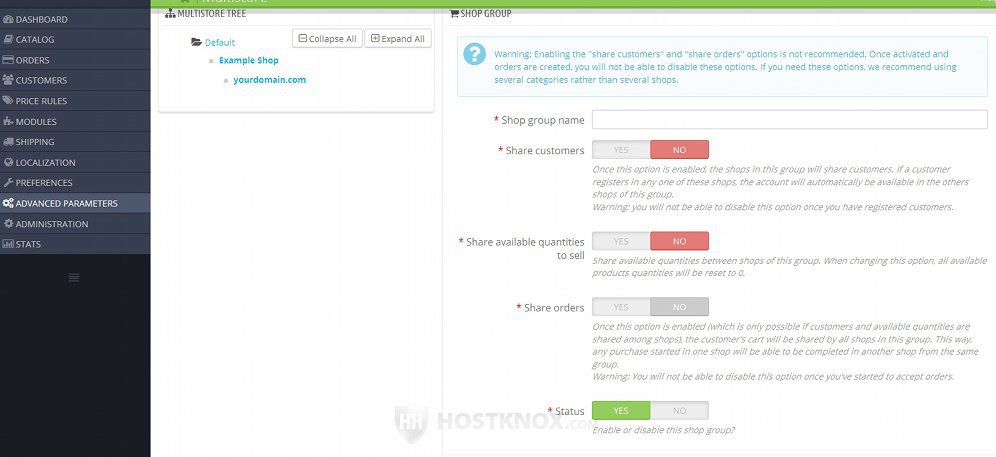
The available options on the form are:
- Shop group name - in this field type a name for the group as you want it to appear in the admin panel. This name is not visible to customers on the frontend of the site.
- Share customers - as it's written under the option itself, once you enable the option and a customer registers in any of the shops in the group, you'll not be able to disable this option. When this option is enabled and a customer registers on any of the sites in the group, the account will be available on the other sites of the group. This means that the customer will be able to log in with the same credentials in any of the shops in the group.
- Share available quantities to sell - when the option is disabled each shop in the group can have a different quantity for the same product. When a customer orders a unit from the product from a shop in the group, the quantity of the product is reduced only for that shop.
If you want the products of the shops in the group to share their quantities enable this option. If you do it, the quantity of a product will be a total quantity for all stores in the group. When a customer orders one or more items from the product, the total quantity will be reduced, regardless from which particular shop in the group the customer bought the product. This also means that when a product is out of stock, it will be shown as out of stock in every shop in the group. When this option is enabled you can edit the quantity only for the whole group; you can't specify a different quantity for each store within the group.
Note that when you enable this option, the quantities of all imported products are automatically set to 0. To be more specific, when you add a new shop to the group you have the option to import products from another shop. So when the shop group is set to share the product quantities, the quantities of the imported products in that newly added shop will be set to 0, even if they were not set to 0 in the shop from which they were imported. Note, however, that if you have already added shops to that group and you have set/increased the stock of the products in these shops, then the matching products in the newly added shop will have the same stock.
Although you can disable this option later, once it's enabled it's not recommended to disable it because if you do, the product quantities will be set to 0. - Share orders - as it's written under the option, you can enable this option only if the options Share customers and Share available quantities to sell are enabled. After you enable this option and an order is accepted on any of the sites in the group, you'll not be able to disable it.
When this option is enabled the cart of the customer is shared by all shops in the group. This means that if the customers accesses one shop and puts products in the cart and then goes to another shop in the group, the cart will contain those products and the order can be completed from there. The order history of the customer is also shared, but this happens regardless of whether this option is enabled or disabled. This means that from any of the shops in the group the customer can view all the orders placed by that customer, no matter from which shop in the group the orders were placed. - Status - by default, this option is set to Yes which means that after you create the group, you can add shops to it. If a shop group contains shops and you disable it, this doesn't mean that the shops can't be accessed. Customers will still be able to access the shops in that group. When a group is disabled and you add a new shop, you won't be able to add the shop to that particular group.
After you're done with the options don't forget to click on the Save button.
Add Shops
To add a new shop to the multistore, go to Advanced Parameters menu>Multistore sub-menu and click on the button Add a new shop:

On the form that opens there are two panels with options. The first one contains options for the name of the shop, for selecting a shop group, root category, etc.
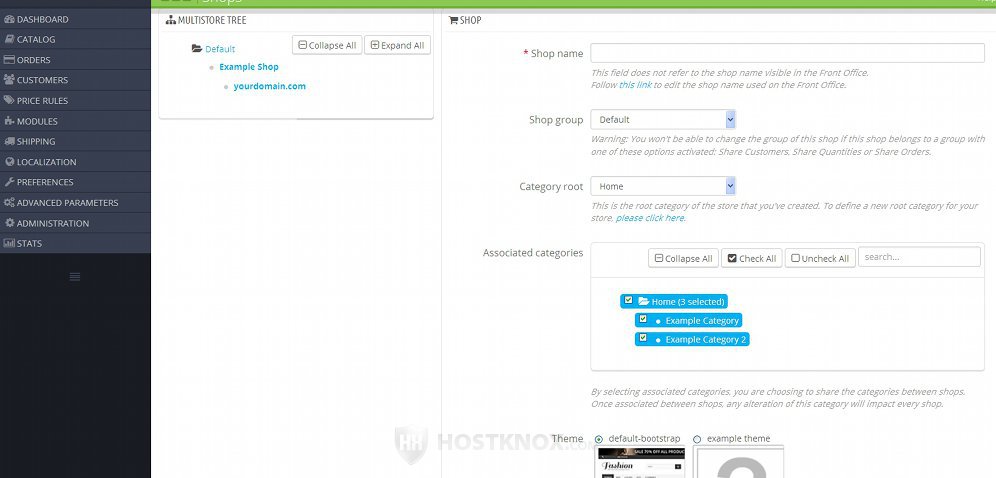
The options are:
- Shop name - type a name with which you want to refer to the shop. This name is used in the admin panel. The name will not be shown on the frontend. The frontend name shown in web-browsers for all shops that you add will be that of the original shop. You can set a different frontend name for each shop. You can do that from Preferences menu>Store Contacts sub-menu>Shop Name option in the admin panel. Before you set the name of a shop you have to select from the drop-down menu at the top of the admin page the shop to which you want the name to apply.
- Shop group - from this drop-down menu you can select the shop group to which you want the shop to belong. You can select any of the shop groups that you've created and that are enabled.
- Category root - every store should have a root category. From this drop-down menu you can select a root category. You can select any of the root categories that exist in the original PrestaShop installation. As you know, PrestaShop comes prepackaged with a default Home root category that you can select. If you have created other root categories from Catalog menu>Categories sub-menu, you'll be able to select one of these root categories.
- Associated categories - here you'll see a list of the selected root category and all its subcategories. Mark the checkboxes of the categories that you want to be shared with the shop that you're about to create, and unmark the checkboxes of those that you don't want to be shared. All subcategories of the selected root category are listed, regardless of the shop or shops with which they are associated.
- Theme - here you'll see listed the installed themes. You can select the theme that you want to be activated for the shop that you're about to create. If you want to, after the shop is created you can change its theme with another of the installed themes.
Under these options there are some setting for importing content into the shop that you're about to add:
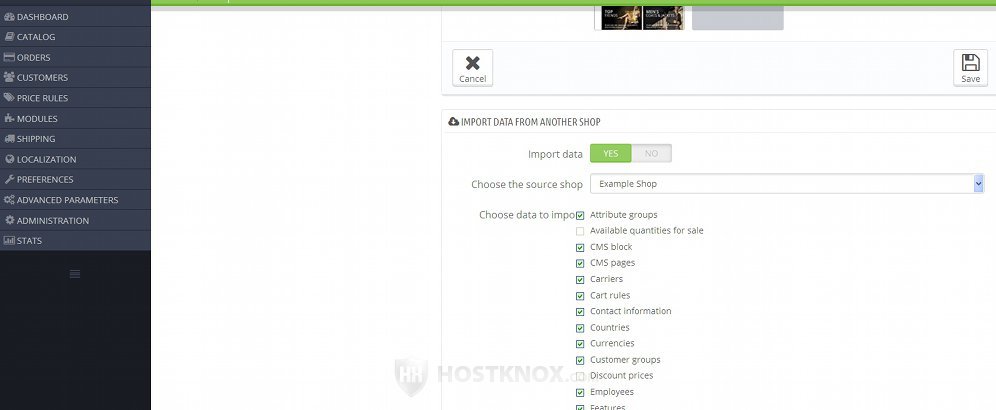
This is very useful and it can save you a lot of time when building your new shop. At the very least you should import the modules. Otherwise, the new shop will not be fully functional without the necessary modules.
You'll find the following options:
- Import data - if you want to import data, make sure that this option is set to Yes. It's enabled by default.
- Choose the source shop - from this drop-down menu you can select one of the existing shops from which you want to import data. Note that when it comes to importing products you also have to take into account the root category that you have selected from the option Category root (it's up on the same page). If you want the products from the selected shop to be imported, you should select the root category of that shop.
- Choose data to import - this is a list of the different types of data that you can import. For each type there's a checkbox. If you want to import that particular data, mark the checkbox. By default, the checkboxes are marked.
After you're ready with the general options and those for the data import click on the Save button.
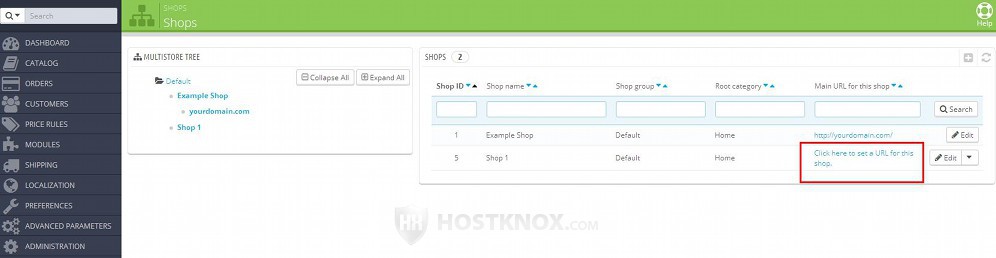
Then wait a little while the new shop is created. After it's created you'll see listed the table with the shops in the shop group to which the newly created store belongs. To make its frontend accessible the next step is to configure its URL settings. In the table you'll see button for that shop labeled Click here to set a URL for this shop:
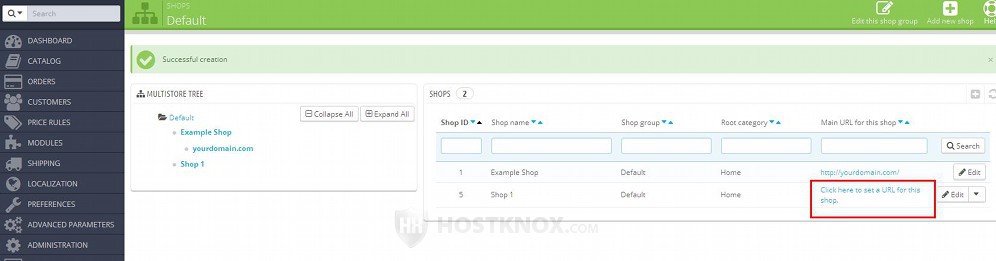
Click on it to configure the URL options for the shop. If you want to, you can do it later.
We'll describe the options in the next two sections of this tutorial.
Multistore with Different Domains, Subdomains and Subfolders
After you add a new shop to the multistore you have to configure its URL options. Before that you have to decide whether you want the URLs of your shops in the multistore to be subfolders or subdomains of the original store. You can also use different domains for each shop. There are a few additional things that you have to keep in mind depending on which option you decide to use.
- Subfolders - if you decide to use subfolders and your original shop is accessible at yourdomain.com, then the URLs of the shops in the multistore will have the form yourdomain.com/store1, yourdomain.com/clothes, etc. You can specify the exact name of the subfolder. Note that you don't have to actually create any subfolders on your PrestaShop hosting account; you don't have to copy any files, modify any files or do anything of that sort. PrestaShop will take care of everything once you configure the URL options.
If you decide to use subfolders, your PrestaShop doesn't have to be installed in the root web-accessible directory on your hosting account. It can be itself in a subfolder. This means that if your original shop is accessible, for example, at yourdomain.com/prestashop, then you can use subfolders for the new shops without any problems (e.g. yourdomain.com/prestashop/store1). - Subdomains - if you decide your new shops to be subdomains and the original store is accessible at yourdomain.com, then the URLs of the shops will have the form store1.yourdomain.com, clothes.yourdomain.com, etc. You can set the exact names of the subdomains.
You don't have to create any subdomains yourself. However, you need to make sure that your hosting account is configured to use wildcard subdomains. All HostKnox accounts can be used with wildcard subdomains.
Unlike other web applications, PrestaShop multistore with subdomains functions normally even if your PrestaShop is not installed in the root web-accessible directory on your hosting account, but in a subfolder. For example, if your original store is accessible at yourdomain.com/prestashop, you can still use subdomains for the new shops. Note however that the subfolder path will be added to the URLs of the subdomain shops. So using our example they'll have the form store1.yourdomain.com/prestashop, example.yourdomain.com/prestashop, etc. - Different domains - you can have your shops in the multistore with different domains than that of the original store. For example, if the domain of the original store is yourdomain.com, you can have a store in the multistore with the domain anotherdomain.com.
If you decide to use different domains, there are a few things you have to do. You have to make sure that the domain of the new shop is pointed to the nameservers responsible for the hosting account on which your PrestaShop is installed. You can do this from the domain name registrar with which the domain is registered.
Another thing you have to do is to add the new domain in the virtual host file of your account. You don't have to edit the file itself. You can update it by adding the domain from the control panel of your hosting account. HostKnox clients can do this from the Domain Names and DNS Settings section of the HostKnox control panel. For more information on how to do it check the tutorial on how to manage domain names and DNS settings with the HostKnox control panel, and in particular the section on adding domain names. In cPanel the equivalent is parking domain names.
Another useful thing to note is that the PrestaShop installation doesn't have to be installed in the root web-accessible folder on your hosting account. The new domain will work even if the installation is in a subfolder. However, the subfolder path will be added to the URL of the new shop. For example, if the original shop is accessible at yourdomain.com/prestashop and you add a new shop with the domain anotherdomain.com, then the full URL of the new shop will be anotherdomain.com/prestashop.
URL Options of a Shop
Before the frontend of a shop in your multistore can be accessed by customers you have to configure its URL options. Whether you decide to use subdomains, subfolders or different domains, the settings that you have to configure in the admin panel of your PrestaShop are the same. Go to Advanced Parameters menu>Multistore sub-menu and on the page that opens click on the name of the shop in the multistore tree:
One the page that opens there's a table listing all the shops. If the URL options of the shop are not set, in the table there will be a button Click here to set a URL for this shop:
If you want to edit the URL options for a shop for which you have configured these options, just click on its URL address in the table.
On the page with the URL options the settings are divided in two groups. The first panel is labeled URL Options:
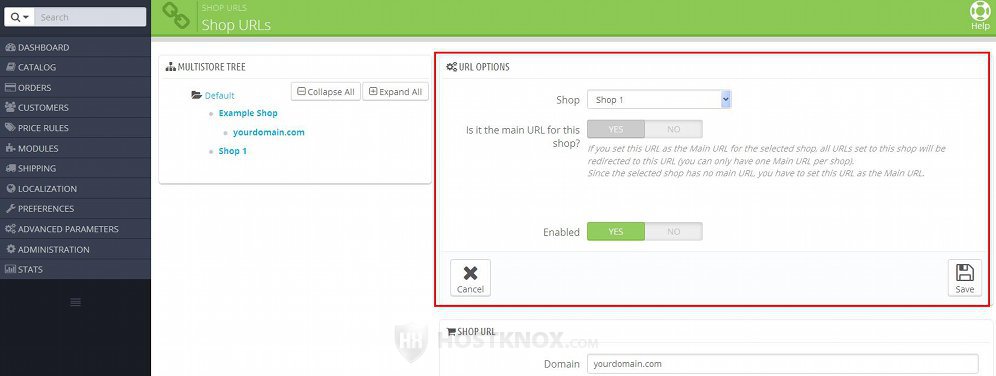
It contains the following options:
- Shop - make sure that this drop-down menu is set to the shop for which you want to configure the URL options.
- Is it the main URL for this shop? - one shop can be configured to have more than one URL. If it does, it can be accessed with any of the URLs that point to it. If the shop has more than one URL, one of these URLs is the main URL and the other URLs are redirected to it. If the shop has more than one URL and you want this one to be the main one, set this option to Yes. If the shop doesn't have other URLs, meaning that this is the first one that you configure for the shop, you'll not be allowed to configure this option; it will be enabled by default.
- Enabled - if you want the URL to be active so that the shop can be accessed with it, set this option to Yes.
The next panel with options that's available on the same page is for setting the URL of the shop:
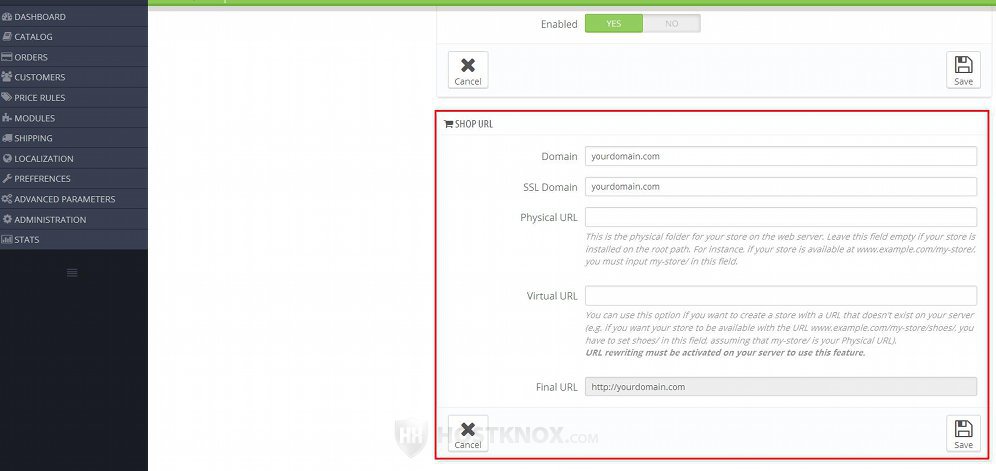
The options are:
- Domain - by default, this is set to the domain name of your original shop. You only have to edit this option if your new store will be a subdomain or a different domain. For example, if the original shop that corresponds to the PrestaShop installation is accessible at yourdomain.com and you want the new shop for which you're configuring the URL options to be accessible at store1.yourdomain.com, then in this field put store1.yourdomain.com. If you have a totally different domain name that you want to use for the new store (e.g. anotherdomain.com), then just type it in the field. Note that you have to type just the domain name, without the http:// part in front of it.
- SSL Domain - it should the same as the plain domain. If you change the domain in the Domain option, the one in the field for SSL Domain will be automatically changed to the same domain.
- Physical URL - if your PrestaShop installation is in subfolder on your hosting account, this option specifies the path to that folder. The path is relative to the root web accessible folder (e.g. public_html) on your hosting account; that's the path that's added to the domain name to form the full URL with which the original PrestaShop store is accessed. By default, this option is automatically configured to point to the folder in which PrestaShop is installed. For example, if the full URL of the original shop is yourdomain.com/prestashop, then in this field you'll see /prestashop/. If your PrestaShop is not installed in a subfolder but directly in the root web-accessible folder, then this field should be empty. In any case, you don't have to make any changes to this option.
- Virtual URL - if you want your new store that you're adding to be accessible with an URL with a subfolder, you should add the path in this field. For example, if your original store is accessible at yourdomain.com and you want the new store that you're adding to be accessible at yourdomain.com/store1, then in this field you should just type store1. As we mentioned, you don't have to create any physical subfolders on your hosting account; this is all done virtually. You only have to make sure that the option in the admin panel for URL rewritting is enabled (Preferences menu>SEO & URLs sub-menu>Friendly URL option).
In case you're going to use a subdomain or a separate domain for the new shop that you're configuring, then you should leave this option empty. - Final URL - based on the way you configure the previous options, in this field you'll see displayed the final URL with which the new shop will be accessible once you save the changes.
After you configure all the options in both panels don't forget to click on the Save button.
Manage Shops in a Multistore
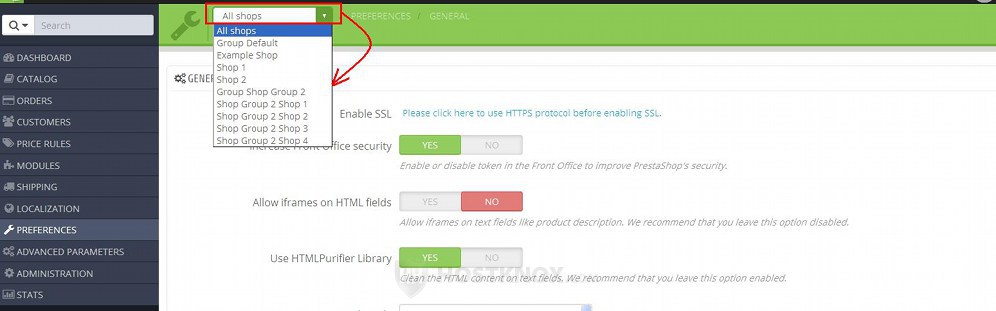
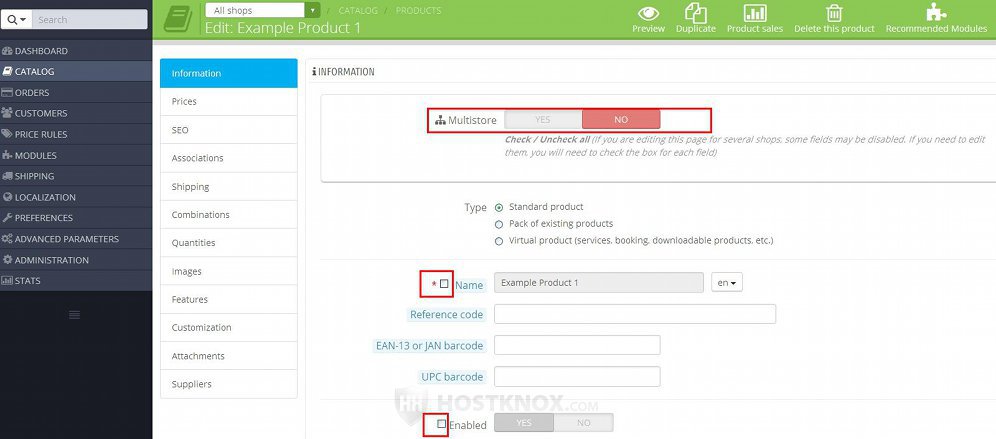
The admin panel of a multistore is the same as the one for a single-shop installation. The only difference is that you can select the scope of the changes, meaning that you can select whether the options that you're configuring or editing should be applied to all shops in the multistore, to the shops in a shop group, or to a particular shop. In fact, in a multistore this is the first thing to consider. After you enable the multistore feature and you add the shop groups and shops that you want, on each page in the admin panel you can select the scope of the changes. From a drop-down menu at the top of the page you can select a shop group, a single shop, or all shops in the multistore:
Depending on the particular settings, some options can be configured only for all shops or for a whole shop group, while others can be applied only per shop (e.g. product quantities for shops in a shop group that doesn't share quantities). If this is the case, after you select the scope the options that can't be configured will be specifically labeled, or there will be a warning message.
For example, sometimes, depending on the particular options and the selected scope, in order to be able to configure some options you may need to mark the checkbox in front of each option. An alternative will be to enable the multistore option at the top of the page (this will automatically mark the checkboxes of all such options):
If the scope is set to a particular store and changing some of the options will affect all stores, there will also be a notification for each such option. For example, when you edit a product for a specific store and changing some of the options will affect all stores to which the product is added, then these options will be marked with orange bullets:
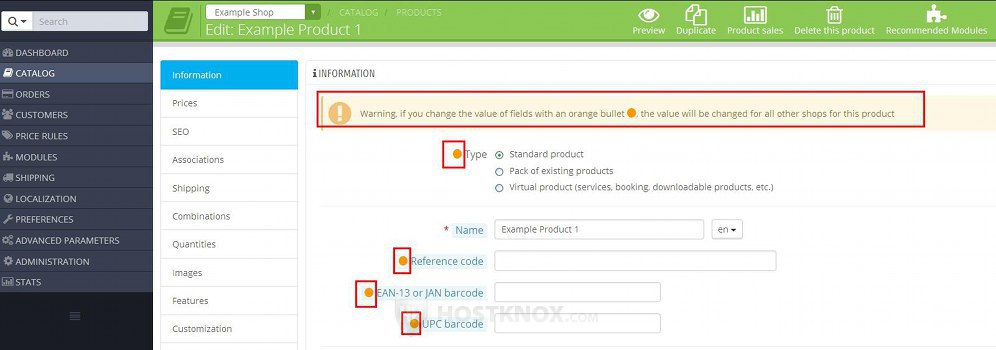
There will also be a warning message that changing these options will affect all shops.