PrestaShop 1.5/1.6 Product Attributes Tutorial
How to add and manage product attributes in PrestaShop 1.5-1.6
Attributes are used to create product combinations. A single product in your catalog can be offered in different variations; these variations are created with the help of attributes. For example, if you sell clothes, a single product can be offered in different sizes and colors. In this case the attributes are size and color. Each of these attributes can have different values (e.g. medium, large for size; green, black, etc. for color). The variations of a product are created by combining these attribute values.
The actual combinations are added from the options of each individual product. To be able to do this, however, you need to have the necessary attributes configured in advance. In this tutorial we'll go over the process of adding and managing attributes. For information on how to create product combinations check out the tutorial on how to add and manage product combinations in PrestaShop.
An attribute is actually a group of attribute values. In older PrestaShop versions an attribute is referred to as an attribute group (e.g. color) and each value in that group is a single attribute (e.g. black, green, red, blue, etc.). Since PrestaShop 1.5 this terminology has changed. So an attribute (e.g. color) is the group that has associated with it different attribute values (e.g. black, green, etc.).
In this tutorial we'll show you:
- how to add attributes
- how to add attribute values
- how to edit and delete attributes and attribute values and change their positions
- links to other tutorials and articles on managing products
In this tutorial we've used as a basic example PrestaShop 1.6. The screenshots are also from that PrestaShop version. Although the design of the admin panel is different than that of PrestaShop 1.5 the options related to product attributes are practically the same in both versions. If there are some differences we'll make notes about that in the tutorial.
Add New Product Attributes
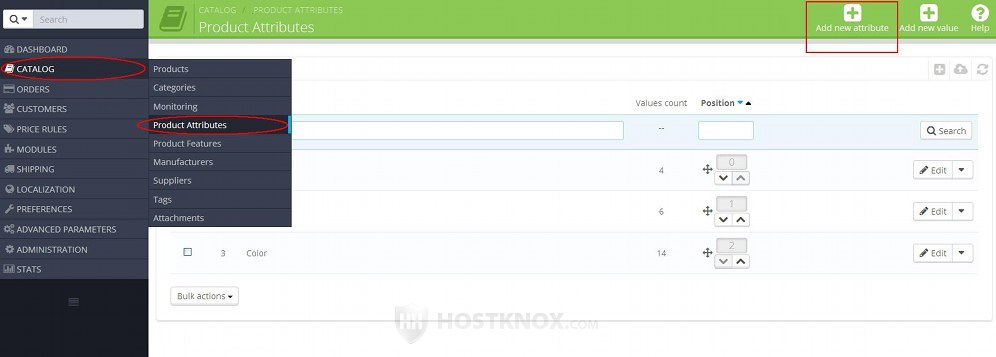
To add and manage attributes and attribute values go to Catalog menu>Product Attributes sub-menu (in PrestaShop 1.5 the corresponding location is Catalog menu>Attributes and Values sub-menu). On the page that opens there's a table with the current attributes. PrestaShop comes prepackaged with some attributes. To add a new attribute click on the button Add new attribute:
This will open the form for adding new attributes:
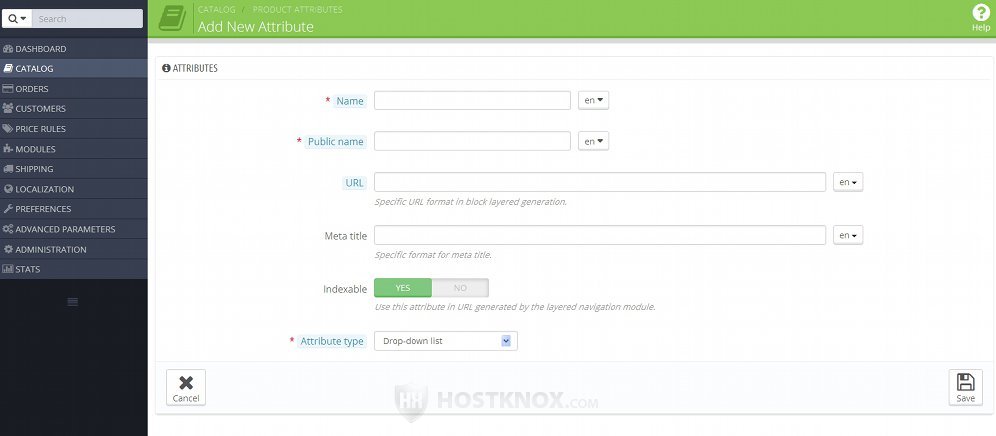
It contains the following options:
- Name - type the name of the attribute. This name is for internal use in the admin panel. If you have more than one language installed, you can use the option on the right side of the field to provide a translation in each language.
- Public name - type the name of the attribute as you want it to appear on the frontend of the site. In case you have more than one language on your site, you can specify a name in each language with help of the option that's on the right side of the field.
- Attribute type - you can use this to choose how the attribute values of the attribute can be selected by customers on product pages on the frontend of the site. By default, it's set to Drop-down list which means that customers can select the values with a drop-down menu. If you change it to Radio button, the attribute values can be selected on the frontend by marking radio buttons. The last option is Color. You can use this if the attribute is color. In this case a color picker will be shown on the frontend. When the customer clicks on the particular color it will be selected.
The next three options are only available if the Layered Navigation module is enabled:
- URL - you can use this option to specify the part of the URL that corresponds to the attribute. If you leave it blank, the name is used automatically in the URL. For example, if you type Example Attribute in the field for Name, then the URL will be example-attribute.
We'll illustrate what this option is for with an example. Let's say that the name of the attribute is Color, but you put in the field for URL primary-color. Let's further assume that you use this attribute to create product combinations of a particular product, and that the URL of the product page is yourdomain.com/14-product-name.html (the number is the ID of the product). When a customer goes to the page of the product on the frontend they will be able to select the available colors. If a customer selects green, for example, the corresponding URL will be yourdomain.com/14-product-name.html#/primary-color-green. So the primary-color part of the full URL is the one that corresponds to the attribute. If in the same situation you type color in the field for URL of the attribute, then the full URL will become yourdomain.com/14-product-name.html#/color-green.
Note that since each attribute also has values you can specify the URL part for each value (green in our example); this is done from the options of the particular attribute value. Very often a product combination consists of more than one attribute, so the full URL of that combination can be longer and more complex (e.g. yourdomain.com/14-product-name.html#/color-green/size-m). - Meta title - as the URL option, this one is available only if the Layered Navigation module is enabled. Meta titles are usually used by search engines and are shown on search result pages. If you want to, you can type some title for the attribute. If there are other languages installed, you can provide a translation in each language; you can do this with the help of the option that's on the right side of the field.
- Indexable - this option is also only available if the Layered Navigation module is enabled. The option itself is enabled by default. You can use it to specify whether the attribute should be indexed or not.
The options Name and Public name are the required ones that you have to configure to be able to save the attribute. After you're ready with the options click on the Save button.
Add Attribute Values
When you use an attribute to create product combinations you actually choose a value associated with the attribute. For example, if the attribute is color, then the attribute values will be the various colors (e.g. black, green, etc.). So an attribute (also know as an attribute group) by itself is not very useful. You need to provide values for the attribute. To do this, after you go to Catalog menu>Product Attributes sub-menu (Catalog>Attributes and Values in PrestaShop 1.5) click on the button Add new value:
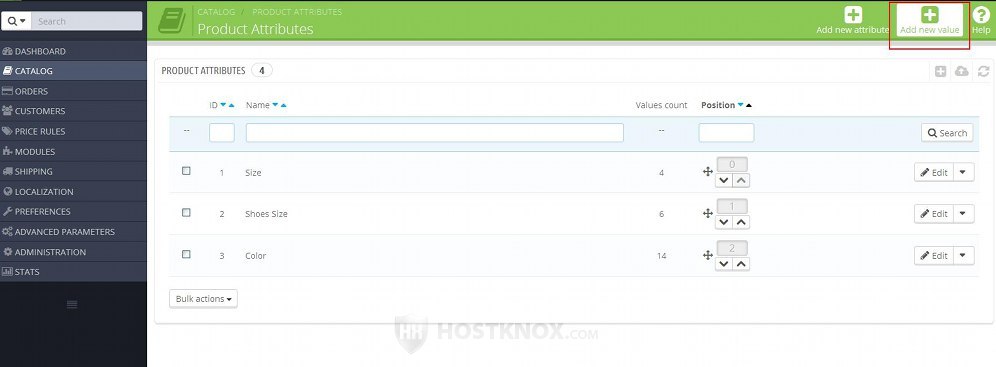
This will open the form for adding attribute values:
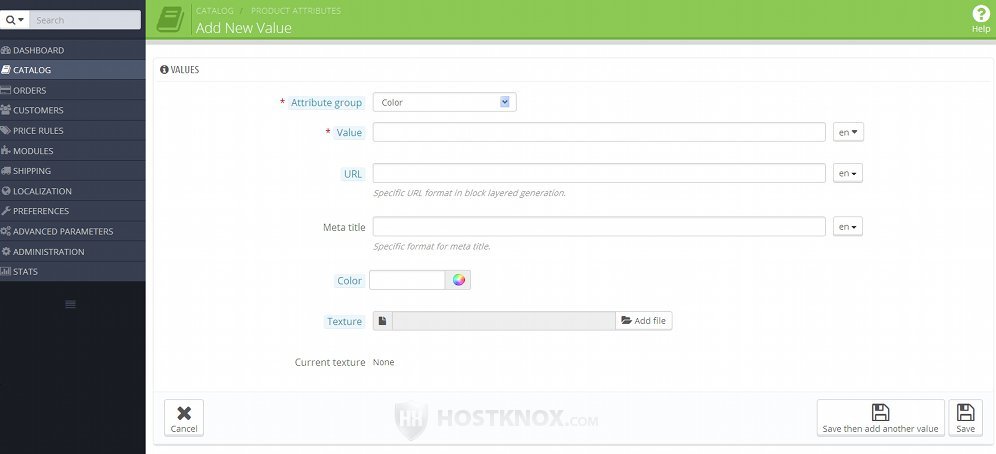
The most important options that you have to configure are Attribute group and Value:
- Attribute group - from this option select the attribute group to which you want the value to belong.
- Value - type the name of the attribute value. This is the name that will be used both on the frontend and backend. If you have installed other languages, you can translate the value in each language with the help of the option on the right side of the field.
The options URL and Meta title are present on the form only if the module Layered Navigation is enabled:
- URL - in this field you can specify the part of the full URL that corresponds to the attribute value. For example, if the full URL of a product variant that makes use of this attribute value is yourdomain.com/14-product-name.html#/color-green, the URL part that corresponds to the attribute value will be green. That's the part in the full URL that you can change with this option. Use lowercase letters, and if there's more than one word, separate them with hyphens. If you leave it blank, the name of the value is used as the URL. For some more information on this option, you can also check the description for the URL option of attributes. It's in the previous section of this tutorial (a few paragraphs up).
- Meta title - if you want to, you can type a short meta title for the attribute value. It's used by search engines and shown on search engine result pages.
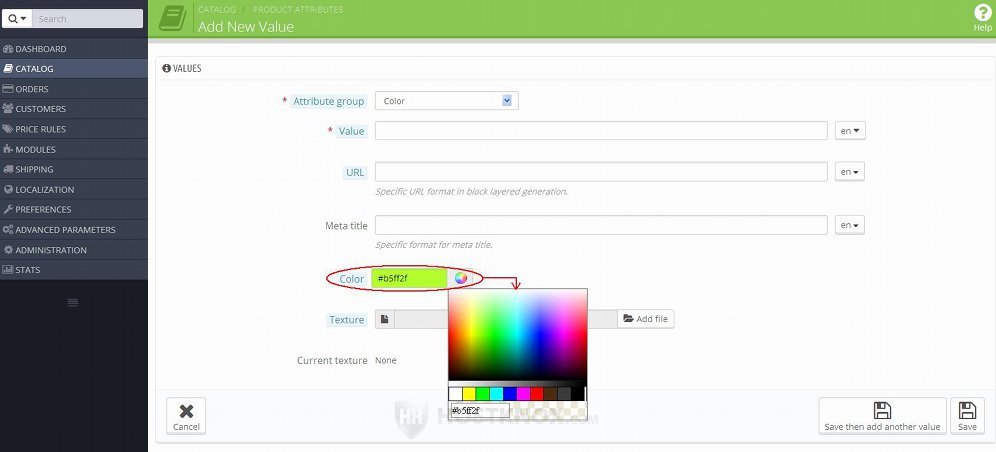
On the form for adding attribute values there are also a couple of options that can be used if the attribute value is a color. They are labeled Color and Texture:
- Color - this option is important only if the attribute value is a color, and if the attribute group to which the value belongs has its Attribute type option set to Color. When the option Attribute type of an attribute is set to Color, then on product pages on the frontend (for those products that make use of this attribute) the colors will be represented with a color picker which shows the actual colors:
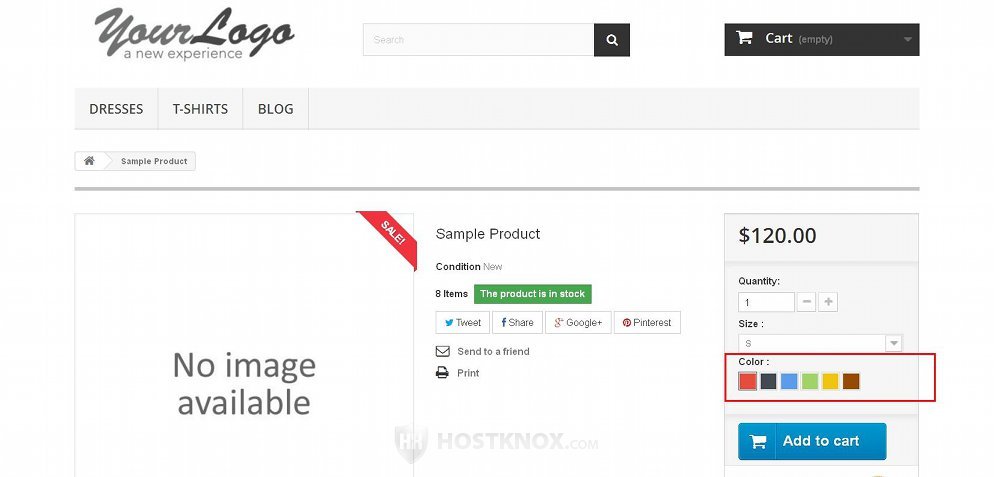
When a customer clicks on a color the product variation with that color is selected.
So by using the Color option of an attribute value you can select the actual color to be shown in the color picker on the frontend. To do this, either type in the field the corresponding hex value for the color (e.g. #964b00), or click on the small color icon that's on the right side of the field and use the color selector that pops out to choose the exact shade of the color that you want. When you select it the corresponding hex value will automatically appear in the field:
Let's continue with the other option that you can use if the attribute value is a color:
- Texture - you can use this option if the color is not a single color but some sort of a pattern or a combination of different colors (e.g. stripes, dots, squares). With this option you can upload an image of the actual texture; it's shown in the color picker on the frontend. Click on the Add file button (in PrestaShop 1.5 it's labeled Browse) and select the file from your local computer. After you save the attribute value the uploaded image will be shown next to the label Current texture:
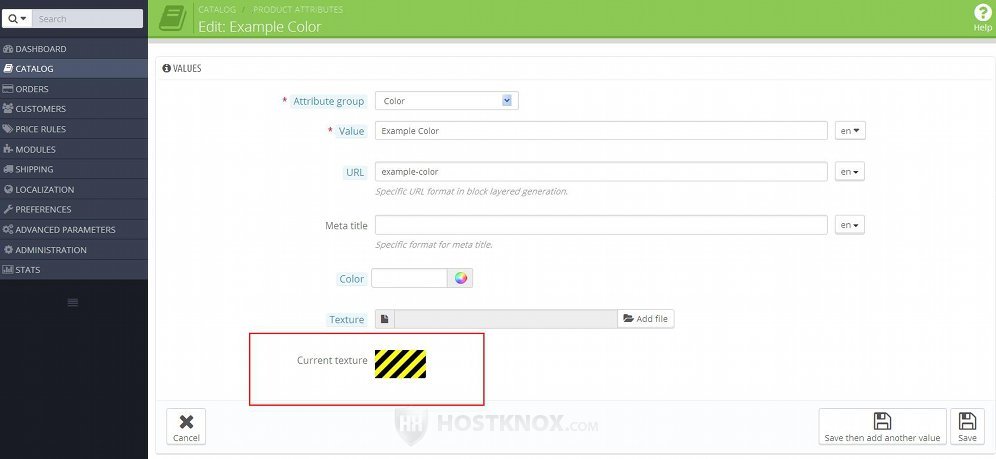
This is just to remind you of what is shown on the frontend for this color attribute value. If you select a texture it will overwrite the color selected from the Color option just above it. Make sure that the image that you upload for texture is not very big; otherwise, in the color picker on the frontend it could be very difficult or impossible to see what the exact texture is.
After you're done with the settings click on the Save button or on the button Save then add another value if you want to add more attribute values.
Edit, Change Positions and Delete Attributes and Attribute Values
To edit an attribute/attribute group, go to Catalog menu>Product Attributes sub-menu (Catalog>Attributes and Values in PrestaShop 1.5) and on the page that opens you'll see a table with the existing attributes. To edit the settings of an attribute click its Edit button in the table:
This will open the form with the attribute settings. They are the same as on the form for adding new attributes. For a detailed description of these options check the section on adding new attributes in this tutorial.
In PrestaShop 1.5 the the edit button is not labeled. It's an icon that looks like a pencil.
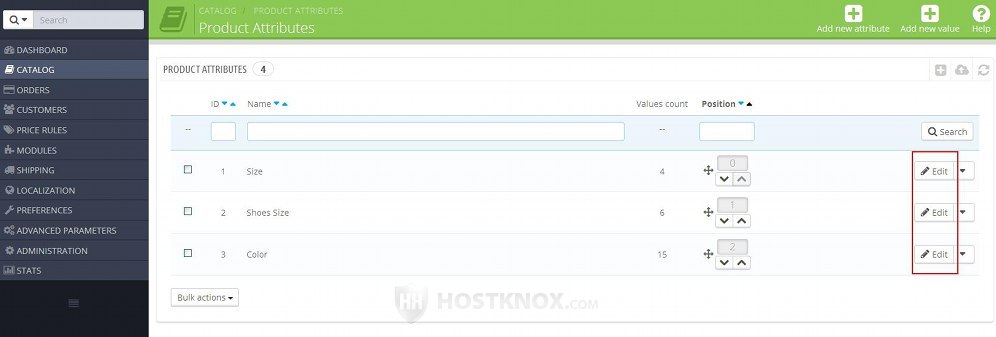
There's a column labeled Position in the table that lists the attributes:
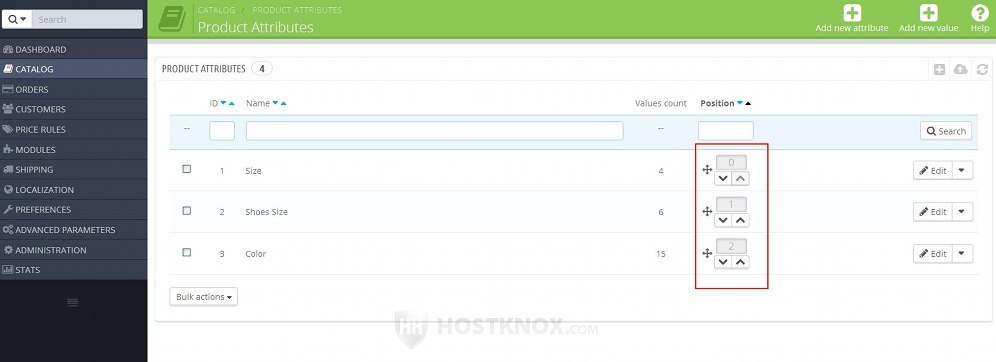
It represents the positions in which the attributes are displayed on product pages. So, for example, if the attribute size has the position 0 and the attribute color has the position 2, then on the frontend the size attribute is shown above the color attribute. If you want to, you can rearrange the positions of the attributes. To do this either click on the up or down arrow for the particular attribute until it's in the position you want, or hover the mouse pointer around the arrows until it turns into a four-arrow cursor, then click and hold the left mouse button, drag the attribute to the position and release the mouse button.
To delete an attribute, after you go to Catalog menu>Product Attributes sub-menu click on the arrow that's next to the Edit button for the particular attribute and from the drop-down menu that appears select Delete:
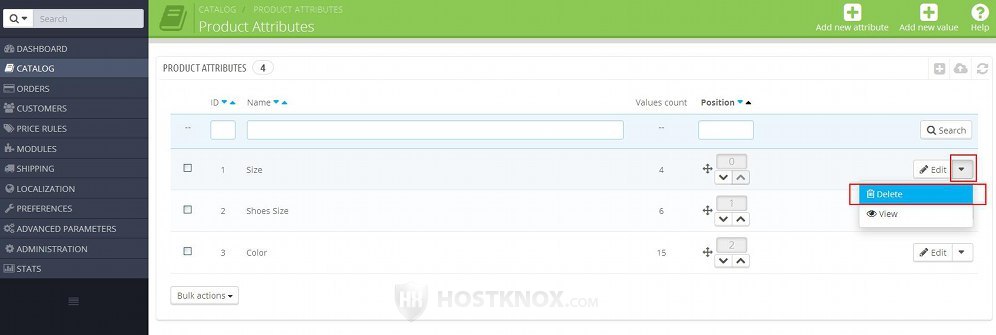
To delete more than one attribute at the same time mark the checkbox for each attribute (in the first table column) and click on Delete selected in the Bulk actions menu that's under the table.
In PrestaShop 1.5 there's no drop-down menu next to the edit button. Instead there's a delete icon that looks like a trash can.
Deleting an attribute will also delete all the attribute values associated with that attribute. All product combinations that make use of that attribute will no longer be available. Even if you create again an attribute with the same name and values associated with it, the product combinations will not be restored because the new attribute will have a new ID. In this case you have to regenerate the combinations using the new attribute and values.
To view and manage the attribute values assigned to an attribute, after you go to Catalog menu>Product Attributes sub-menu either click on the name of the attribute, or click on the arrow next to its Edit button and then select View:
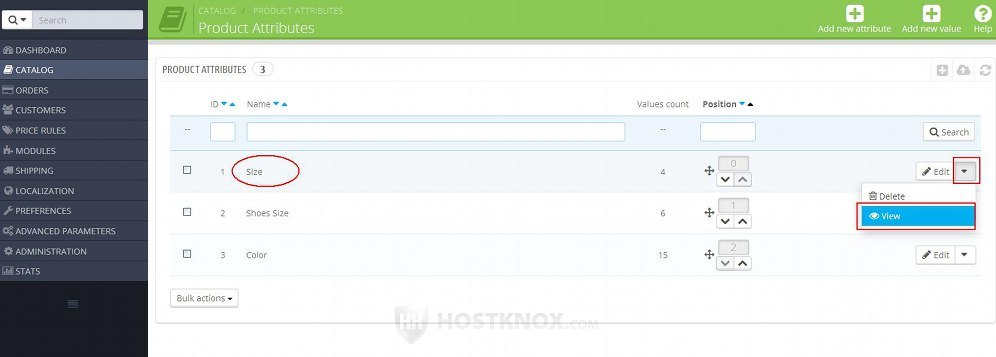
This will display a table with all the attribute values associated with the particular attribute. The table has the same action buttons and functions as the one for attributes. You can edit the values, change their positions and delete them.
In PrestaShop 1.5 viewing the attribute values assigned to an attribute is done a bit differently. If you click the name of the attribute in the table that lists the existing attributes, this will display the options of the attribute. There's no drop-down menu next to the edit button. There is a + symbol in the last column of the table. If you click on it, a panel with a table will expand. It lists all the attribute values associated with the attribute.
Links to Tutorials and Articles on Managing Products
We have a detailed general tutorial on adding and editing products, tutorials reviewing all the settings on the form for adding/editing products, and some other tutorials related to products:
- how to add and edit products in PrestaShop
- how to add and manage product combinations in PrestaShop
- how to add and manage product features in PrestaShop
- how to add and manage product customizations in PrestaShop
- how to add and manage product attachments in PrestaShop
- how to create product packs in PrestaShop
- how to add virtual products in PrestaShop
- how to add and manage product manufacturers in PrestaShop
- how to add and manage product suppliers in PrestaShop
- how to add and manage product tags in PrestaShop
- how to configure and manage the options for the general product preferences in PrestaShop
In our knowledgebase there are shorter articles on some issues related to managing products:
- how to change the number of products shown on category pages in PrestaShop
- how to disable the product comparison function in PrestaShop
- how to hide stock quantities from being displayed on the frontend in PrestaShop
- how to increase the allowed length of product names in PrestaShop
- how to remove the "Add to cart" button from category pages for products with attributes in PrestaShop
- how to remove the "New" text indicating newly added products in PrestaShop
- how to remove the "Sort by" menu from product category pages in PrestaShop
- how to use phpMyAdmin to move products from one category to another in PrestaShop