PrestaShop 1.5/1.6 Products Tutorial
How to add and manage products in PrestaShop 1.5-1.6
In this tutorial we'll show you how to add new products to your PrestaShop store. Here we'll go over the basic things that you can or need to configure to add a product: set its name, price, descriptions, category/categories and many other things. Of course, when editing an existing product, these basic options are the same. There are some additional product settings that may be useful depending on the particular product and what you want to do with it. These include various product combinations, customizations, features, etc. We have separate tutorials in which we discuss these settings. As we'll explain later in this tutorial, many of these additional settings are not initially available while you're adding and configuring a new product. You have to add/save it first and then you can edit those settings.
We have divided this tutorial in several sections corresponding to the basic product options. In addition to this we have included information about some of the options that can be configured only after the product is saved, but that are basic and people usually want to configure them for most products (e.g. product quantities and images). In the last section there are links to other tutorials and articles related to adding and managing products.
In this tutorial we'll show you:
- how to access the form for adding new products
- how to configure the general product information
- how to configure the product price options
- how to set the SEO options of a product
- how to associate a product with one or more categories
- how to configure the shipping options of a product
- how to configure the product quantity options
- how to upload product images
- links to other tutorials and articles on managing products
In this tutorial we've used as a basic example PrestaShop 1.6. The screenshots are also from that PrestaShop version. Although the design of the admin panel is different than that of PrestaShop 1.5 the options related to adding and managing products are practically the same in both versions. If there are some differences we'll make notes about that in the tutorial.
Access the Products Section in the Admin Panel and Add and Manage Products
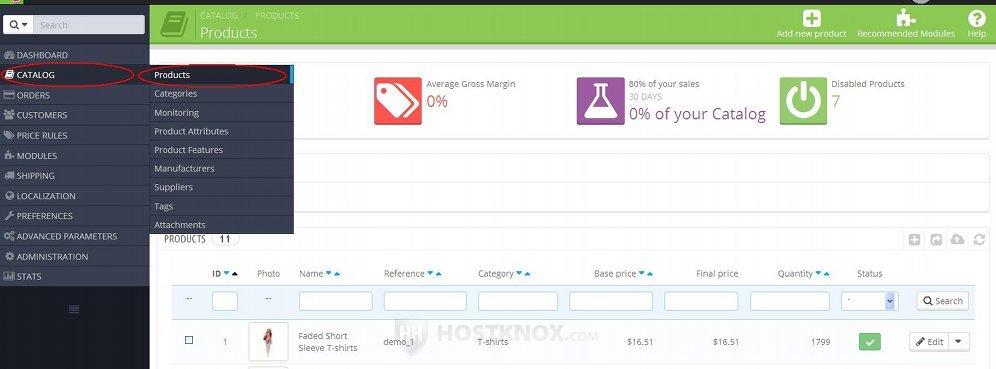
To access the section for managing products, log into the admin panel of your PrestaShop and go to Catalog menu>Products sub-menu:
On the page that opens there's a table with the existing products. PrestaShop comes with some sample products that you can use as an example and for reference. You can delete and edit any of your existing products. To edit a product simply click on its Edit button in the table. To delete or duplicate a product, click on the arrow that's next to the edit button and from the drop-down menu that appears click on the respective button:
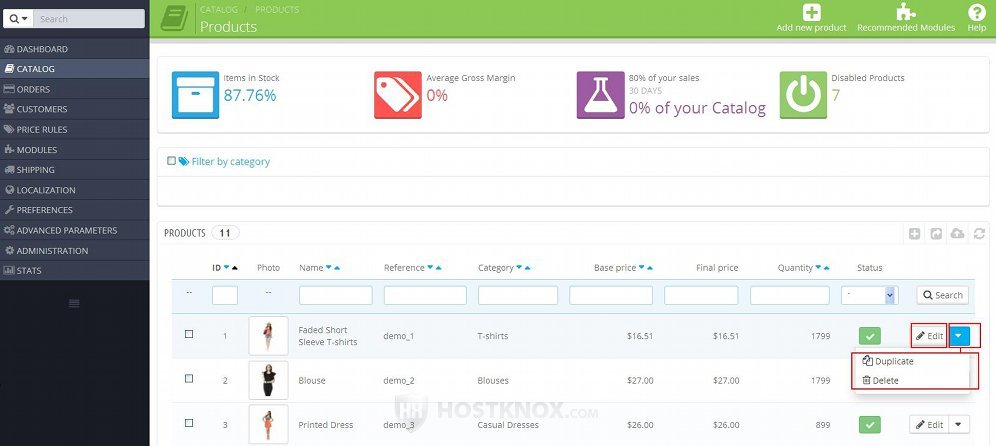
In PrestaShop 1.5 the edit button is not labeled and there's no drop-down menu next to it. All the action buttons are in the last column of the table.
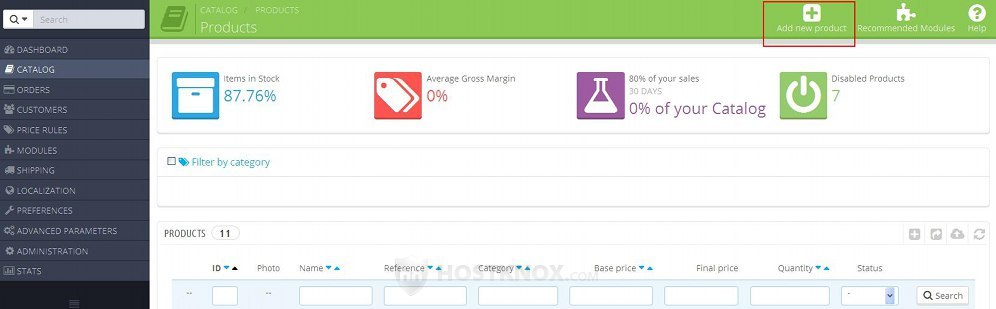
To add a new product click on the Add new product button that's in the upper right corner of the page (in PrestaShop 1.5 it's labeled Add new):
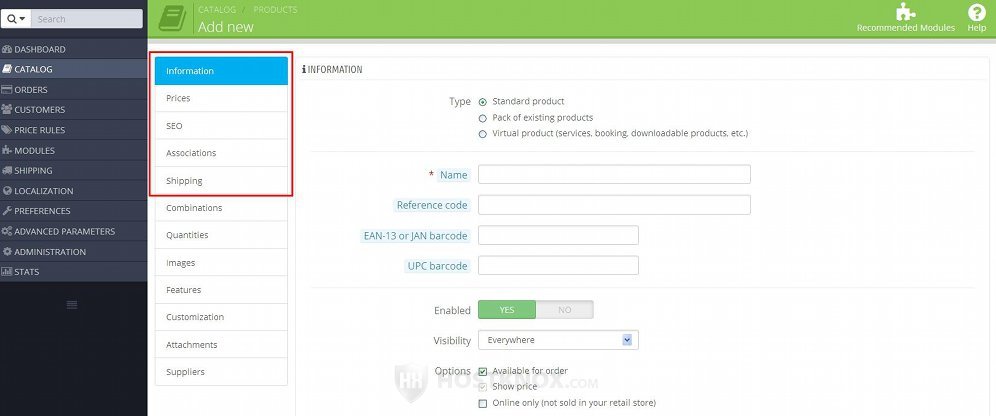
This will open the form for adding new products (the edit form is the same). The options are grouped into several separate groups and they can be accessed with the tabs on the left side. Some of the settings can only be configured after you save the product. The tabs with the settings that can initially be viewed and configured are Information, Prices, SEO, Associations, Shipping:
In this tutorial we'll go over each of these groups of product options. We'll also go over some other important options.
General Product Information
When you go to Catalog menu>Products sub-menu and you add or edit a product, the first options that appear by default on the add/edit form are for the general information of the product. If you view or edit any of the other product options using the tabs on the left, you can return to the general information of the product by clicking on the Information tab on the left side.
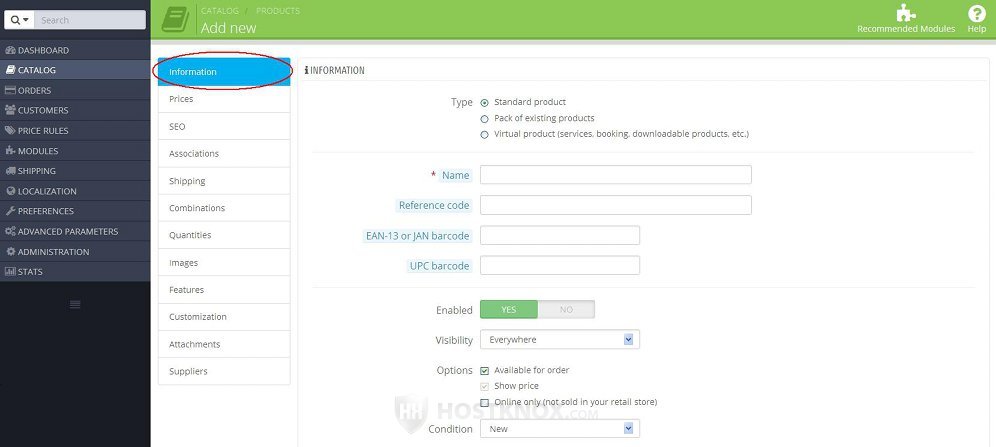
The general information of the product includes options for its name, description, visibility, status (enabled/disabled) and some others. The required fields are marked with a red asterisk. The only required option on this page is the one for the name of the product. Actually, this is the only option that you're required to configure in order to be able to save the product. Of course, you would want to configure many of the other options.
Now let's go over the general information options starting from the top of the page:
- Type - by default, this is set to standard product. The other two choices are Pack and Virtual product. If you want to combine products that you've already added into a pack, mark the radio button Pack of existing products. This will add on the left side a tab labeled Pack. When you click on it you can use the options that appear to select existing products and form a pack. The pack can contain more than two products.
If you want to add a downloadable product or some type of service, mark the radio button Virtual product. When you do this a tab labeled Virtual Product will appear on the left. If the product is a downloadable one, click on the tab and use the options that appear to select and upload the file.
Note that you can change the product type even after you save and add the product. - Name - type the name of the product as you want it to appear on the frontend. If you have installed other languages, you can specify a different name for the product in each language. You can choose the language from the drop-down menu next to the text field (in PrestaShop 1.5 it's a flag icon).
- Reference code - this is optional. It's for internal use only. You can type anything you want that will help you identify the product.
- EAN - 13 or JAN barcode - this is an optional field. It's for the digits that are under the barcode of the product. EAN-13 is an international barcoding system and JAN is the Japanese variant, but it's also worldwide compatible.
- UPC barcode - the UPC barcode is another type of barcode that's primarily used in the United States, Canada, the U.K., Australia and New Zealand. If the product's barcode is an UPC barcode, you can type its digits in this field. Of course, this is an optional field.
- Enabled - by default, this option is set to Yes which means that after you save the product, it will be visible on the frontend and people will be able to order it. If you want to disable the product so that it's not visible on the frontend and can't be ordered, set this option to No.
In PrestaShop 1.5 this option is labeled Status and you can set it respectively to Enabled and Disabled. - Visibility - with this drop-down menu you can control the visibility of the product. By default, it's set to Everywhere which means that it's visible both in the catalog and when people use the search function on your site to find products. So customers can use the search function on your site to find the product by its name, or they can browse the catalog. If you set it to Catalog only, customers can find the product only by browsing the catalog; it will not show up on search result pages. If you set it to Search only, it will be visible on search result pages but it will not be visible on category pages. If you select Nowhere, the product will not be visible in the catalog or on search result pages; people will be able to view the product only by opening the URL address of the product (provided they know it).
- Options - this consists of three checkboxes. By default, the checkbox Available for order is marked which means that customers can place the product in the cart and purchase it. If you unmark the checkbox Available for order, the product will be shown but people will not be able to order it; in this case you can also unmark the checkbox Show price which will hide the price of the product. The last checkbox is Online only. It should only concern you if in addition to your online store you have a store(s) where people can physically go and by things. If this is the case and you want the particular product to be sold only in the online store, mark this checkbox. A message Online only will appear on the product page on the frontend (not on product list/category pages).
- Condition - from this drop-down menu you can select whether the product is new, used, or refurbished. On the product page on the frontend it's specified whether the product is new, used or refurbished.
Under these options on the same page there are settings for the descriptions of the product and for the tags:
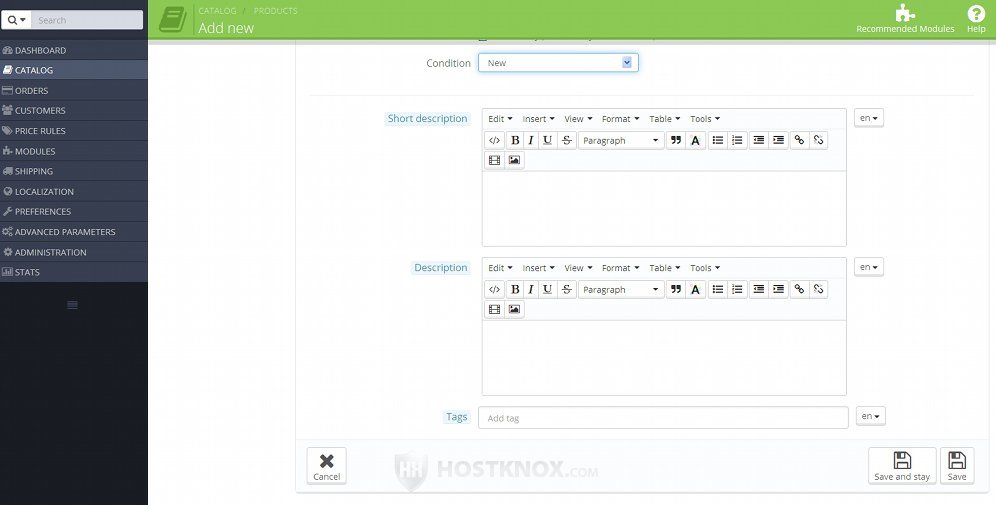
The options are:
- Short description - you can use this built-in text editor to type a short description for the product. It's shown at the top of the product's page on the frontend and usually also on the pages of categories with which the product is associated (this is theme-specific). If you have other languages installed, you can use the drop-down menu on the right side of the text editor (a flag in PrestaShop 1.5) to select another language and provide a translated description in that particular language.
- Description - you can use this text editor to provide a more detailed description of the product. It's shown on the page of the product on the frontend. You can add a different description for each of the installed languages. For this purpose use the option on the right side of the text editor.
- Tags - in this field you can type words or phrases that are related in some way to the product. After you type a tag, even if its just one, put a comma. The tag will be displayed on a blue background in the text field. A tag can consist of more than one word. After you save the changes it will be shown on the frontend. Tags are displayed on the frontend in the Tags block which is usually displayed in the left or right column. When a customer clicks on a tag all products associated with the tag will be listed.
The Tags module is responsible for the block that shows the tags. If you disable the module, the block will not be shown on the frontend.
After you're done with the settings click on the Save or on the Save and stay button. As we already mentioned, if this is a new product you won't be able to edit some of it's options until you save it. If you want to save the product and return to the page that lists the existing products click on the Save button. To save the product and remain on the same page so that you can configure other of the product options click on the Save and stay button.
Note that if you're adding a new product and you haven't configured any of the other options, the product will have no price, it won't be associated with any categories, and it will be out of stock. Check the next sections in this tutorial for a review of all the rest of these essential product options.
Product Price Options
To configure the price options of a product, on the add/edit product form click on the Prices tab on the left. Note that the basic price options can be configured even if you still haven't saved the product, but there are some more price options that can be viewed and configured only after you save the product.
The price options themselves are grouped into three sections. At the top of the page are the basic price options shown in a block labeled Product Price:
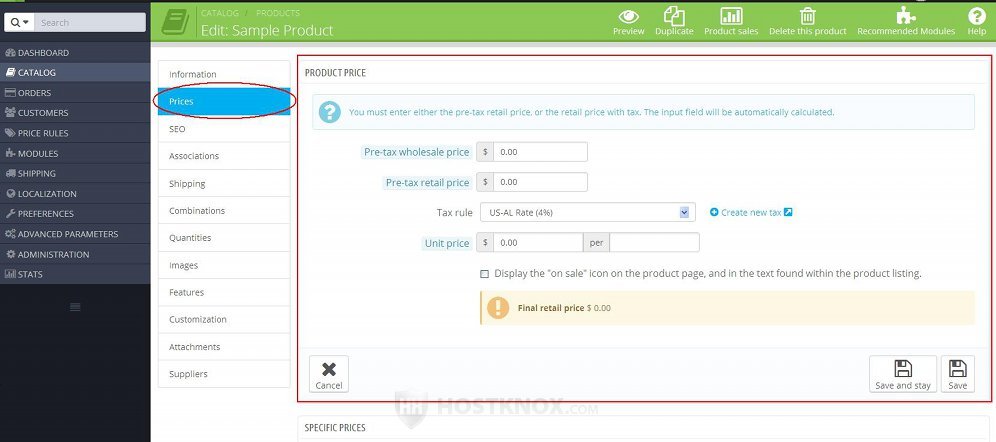
These options are:
- Pre-tax wholesale price - in this field you can type the price at which you bought the particular product. You don't have to type it. This option is there for your convenience. Of course, this is not shown on the frontend. If you don't type anything in this field or you delete the current value, it will automatically be set to 0 after you save the changes.
- Pre-tax retail price - this is the price at which you're going to sell the product. This is the price of the product before any taxes are applied.
- Tax rule - from this drop-down menu you can select the tax rule to be applied to the product. You can also select No tax, if needed. You need to have the appropriate tax rates and tax rules already configured so that you can select the tax rule from this drop-down menu. PrestaShop comes with some example tax rates and rules that are based on the default country of your store. You can add and manage tax rates from Localization menu>Taxes sub-menu in the admin panel, and you can add and manage tax rules and include/exclude tax rates in/from tax rules from Localization menu>Tax Rules sub-menu. For more information on taxes and tax rules check the respective tutorials.
- Unit price - you don't have to configure this option. In most cases you won't need it anyway. It's used if the product consists of more than one item. For example, if the whole product is a box of cigarettes, you can specify the price per pack. Type the price in the respective field and in the text field type whatever the unit is (in our example "pack").
- Display the "on sale" icon - this checkbox is unmarked by default. If you want an "on sale" icon to be shown on the frontend mark this checkbox. The exact picture and where it's displayed depends on the particular theme. With the default PrestaShop 1.6 theme it's an icon that's shown over the right corner of the product's image; it consists of the word Sale on a red background.
To save the options click on the Save or on the Save and stay button.
There are some more price options that can be configured from the Prices tab only if the product is saved. These are options related to discounts. They are listed right under the basic price options in a section labeled Specific Prices:
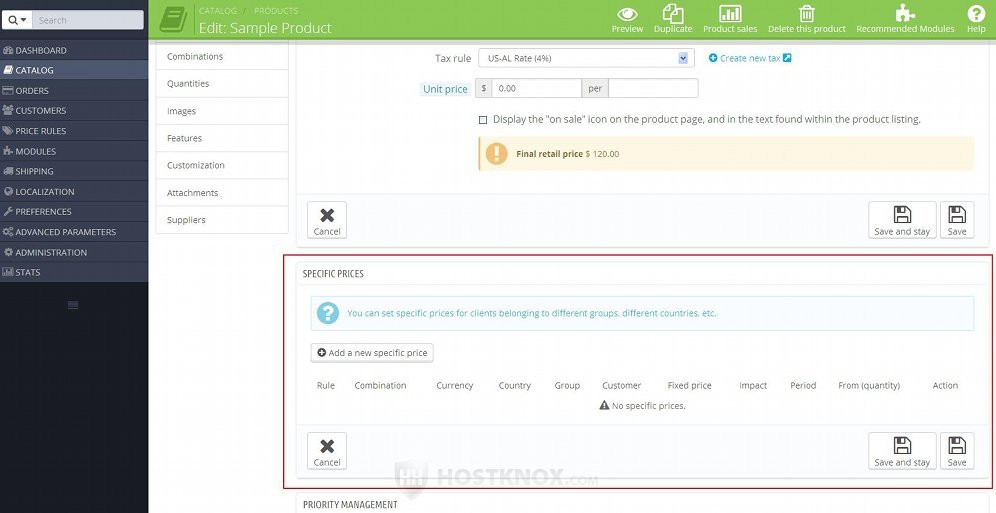
You can use the specific price options to set up discounts based on the ordered quantity, on the customer group, country, currency. You can also set a period for which the discount will be active. To do this click on the button Add a new specific price and a bunch of options will be displayed:
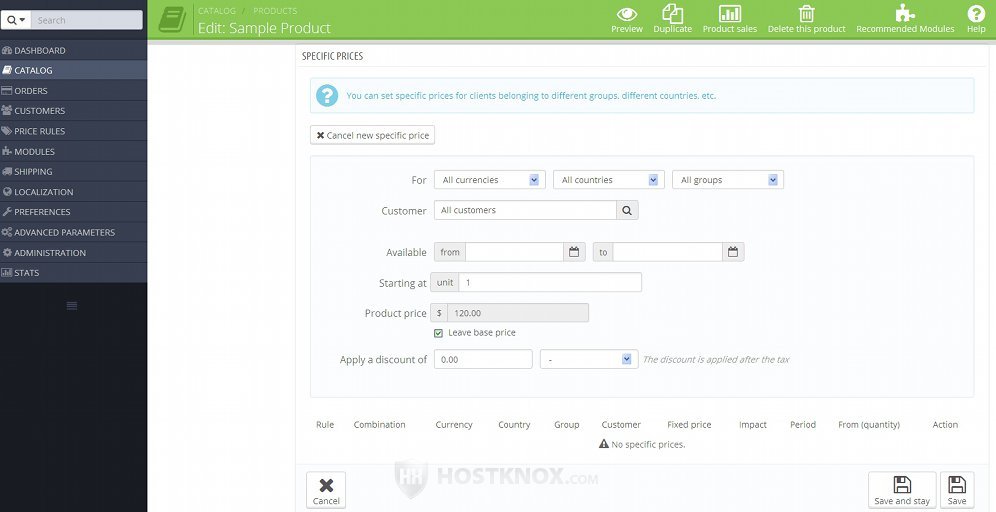
These options are:
- For - this option actually consists of three drop-down menus. The fist one is for the currencies, the second for the countries and the third for the customer groups. By default, the are set to All. You can use them respectively to select to which currency, country and user group you want the specific price to apply. Since a registered customer can have more than one address, the address that the customer chooses at the Address step of the checkout process is taken into account. A registered customer can belong to more than one user group; in this case the default group of the customer is taken into account.
- Customer - you can use this option to select a particular customer to which the specific price will apply. To do this, start typing the first or last name of the customer, or the customer's email address, and from the drop-down menu that appears select the customer. The price will apply only to that customer.
- Available - you can use these two text fields to set a period during which the price will apply. To do this just click with the left mouse button in each of the fields and use the calendar that pops out to select the date. If you don't specify any period, the specific price will be valid until you remove it.
- Starting at - with this option you can specify the minimum quantity that customers have to order so that the discount will apply. It's set to 1 by default. This means that if the customer orders one unit from the product, then the discount will apply. If, for example, you set it to 2 and the customer orders one unit, then the discount will not apply; if in the same situation the customer orders two or more units, then the discount will apply (to all units).
- Product price - by default, this is set to the base retail price. Instead of specifying a discount as a fixed amount or percentage subtracted from the base price, you can directly put the specific price for the product. The price that you put in this field will be the one which customers who meet all the criteria will have to pay for the product. You can actually put a price greater than the base one, so the specific price doesn't necessarily have to be a discounted price. To be able to use this field you have to unmark the checkbox Leave base price that's under it. Note that if you use this method to set the discount, it won't be indicated on the frontend that there is a discount. The price will just be shown as it is. So you might prefer to set a discount with the next option.
- Apply a discount of - with this option you can configure what the discount is going to be. It consists of a text field and a drop-down menu. In the text field type the number for the discount. From the drop-down menu you can select whether this number is a fixed amount that's subtracted from the base price, or whether it's a percentage that's calculated from the base price and subtracted form it.
After you're done with the options click on the Save and stay button (or the Save button) to save the specific price. It will be listed in a table on the page. To remove it click on its trash can button. You can add more than one specific price. Just click on the button Add a new specific price again and repeat the procedure:
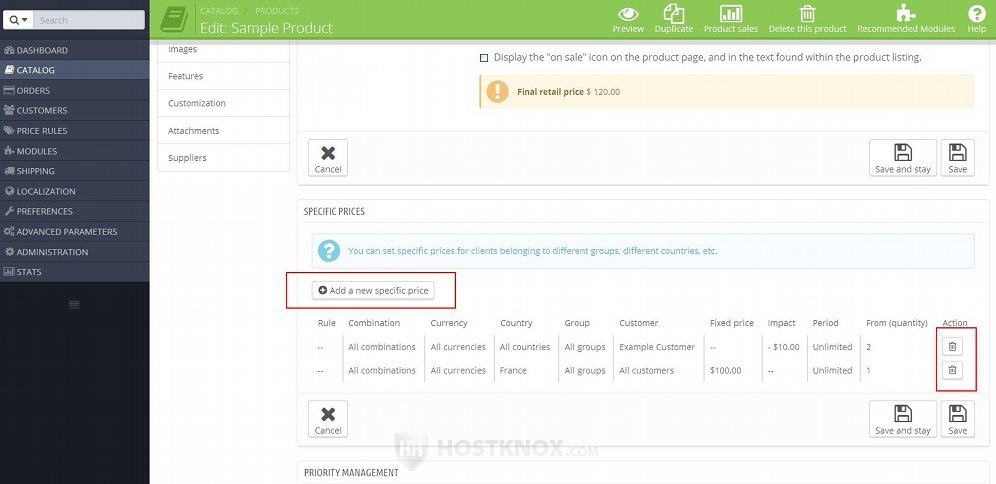
If you add more than one discount/specific price, customers may meet the criteria for more than one discount. In this case you can configure which criteria have priority. By default, for example, the currency has a greater priority than the country and the customer group. You can rearrange the priorities from the last section on this page. It's labeled Priority Management:

Use the drop-down menus to change the order of the priorities. Under them there's a checkbox Apply to all products. It's unmarked by default which means that the order of the priorities will apply only to the product you're editing. If you mark the checkbox, the specific order of the priorities will apply to all products.
Note that you can configure more complex price rules and also cart price rules. You can do this respectively from Price Rules menu>Catalog Price Rules sub-menu and Price Rules menu>Cart Rules sub-menu in the admin panel.
Product SEO Options
The search engine optimization options of a product can be configured before or after the product is saved. To do this, on the add/edit product form click on the SEO tab on the left. This will display a page with a few options:
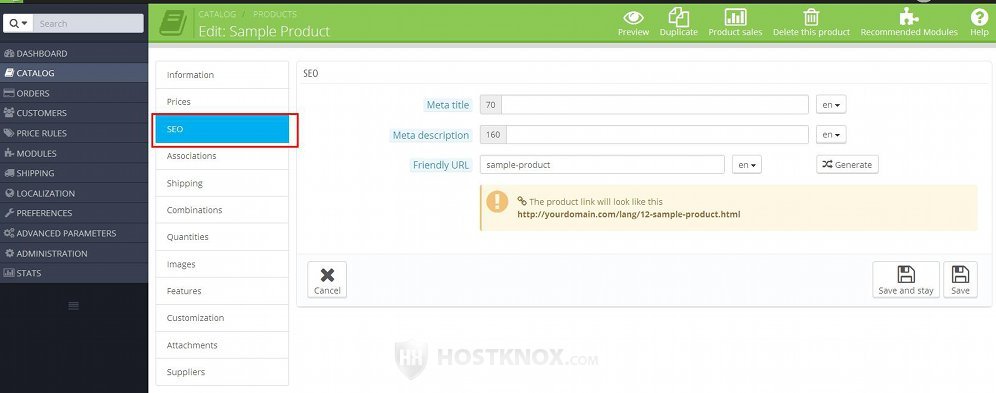
The options are:
- Meta title - type the name/title of your product. You can use up to 70 symbols. If you have installed other languages and you want to put a different title for a language, use the option on the right side of the text field to select the particular language.
- Meta description - type a short description of the product. You can use up to 160 symbols. If you have other languages, you can type a different description for each language. You can use the option on the right side of the text field to select the language.
- Friendly URL - this is the part of the URL that corresponds to the product. It's only used if friendly URLs are enabled. You can enable/disable friendly URLs from Preferences menu>SEO & URLs sub-menu. For more information check out the article on how to enable friendly URLs in PrestaShop.
By default, the name of the product is automatically used as it's friendly URL. If you want to, you can change it. Separate words with hyphens.
Both meta options are not required. They are used for improving the search engine ranking and visibility of the product page. They don't really have much weight when it comes to that but it doesn't hurt to configure them. The meta title and description are shown on search engine result pages. In PrestaShop 1.5 there's also an option Meta keywords. You can use it to type some keywords related in any way to the product.
If you make any changes don't forget to click on the Save and stay or on the Save button.
Product Associations
This is another tab on the add/edit product form that displays options which can be configured regardless of whether you have saved the product. You can use it to associate the product with one or more categories, to choose its default category, to associate any accessories with the product and to select its manufacturer. To do these things, on the form for adding/editing the product click on the Associations tab on the left:
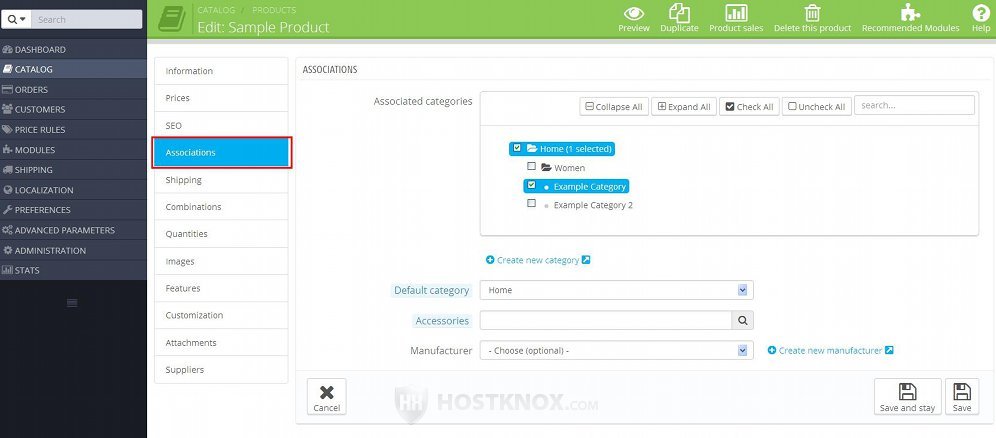
The options that can be configured on this page are:
- Associated categories - this is a list of all the categories and subcategories that you have created. To expand a category and see its subcategories click on its name. You can also use the buttons that are above the list to expand/collapse all categories, to check/uncheck them, etc. To associate the product with a category so that it's shown on the category page on the frontend mark the checkbox for the respective category. For information on categories check the tutorial on how to add and manage categories in PrestaShop.
- Default category - from this drop-down menu you can select the default category for the product. You can choose one of the categories that you have associated with the product.
- Accessories - you can use this option to associate one or more products with the product you're adding/editing. In this way you can show your customers more products that are similar in any way to the one they are viewing. The associated products are listed at the bottom of the product page on the frontend. To associate a product, start typing its name in the text field and use the drop-down menu that appears to select it. You can add as many accessories as you want.
- Manufacturer - from this drop-down menu you can select the manufacturer of the product. You can only select a manufacturer that you have already added. You can add and manage manufacturers from Catalog menu>Manufacturers sub-menu in the admin panel.
On the frontend there's a Manufacturers block that shows a list of the manufacturers that you have added. Each manufacturer in the block is a link and when a customer clicks on it, all products associated with that manufacturer are listed. In order for the block to be shown you have to make sure that the Manufacturers module is enabled and that it's hooked to a position (e.g. the left column).
After you're done with the options don't forget to click on the Save and stay or on the Save button.
Product Shipping Options
For each product you can configure some shipping options. These are not to be confused with the general shipping options and the carrier options that can be managed respectively from Shipping menu>Preferences sub-menu and Shipping menu>Carriers sub-menu in the admin panel.
To configure the shipping options of a product, on the add/edit product form click on the Shipping tab on the left:
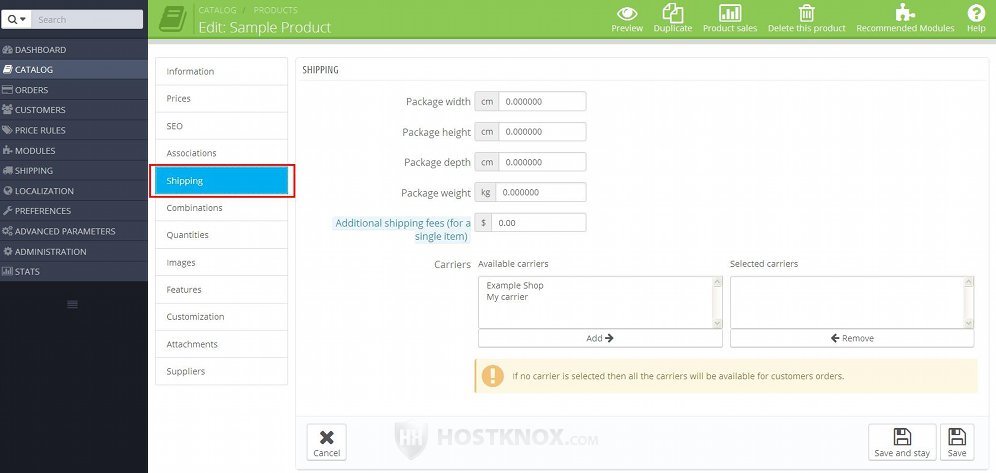
The options displayed by the Shipping tab can be viewed and configured even if you haven't saved the product yet.
The available options are:
- Package width, Package height, Package depth, Package weight - you can use these options to specify the dimensions of the product package and its weight. They are not required but may be useful in giving customers (and you) and idea of how big and heavy the product package is. This may also be important when calculating the shipping cost since the various carriers may have different fees depending on the dimensions and weight of the package. By default, the dimensions are in centimeters and the weight is in kilograms. If you want to change the default measurement and weight units for your store, go to Localization menu>Localization sub-menu, on the page that opens scroll down to the Localization section and use the options there.
- Additional shipping fees - if you have to add some additional shipping fees for the product, you can put the fee in this field. It's for a single unit of the product. This is an additional fee that's added to the carrier fees.
- Carriers - with this option you can select which of the available carriers customers will be able to use to get the product. By default, all of the existing carriers are listed in the text area Available carriers which means that customers can use any of the carriers. If you want customers to be able to choose only particular carriers when ordering the product, then mark the carrier(s) with the left mouse button and click on the Add button. The carrier will be listed in the text area Selected carriers. In PrestaShop 1.5 there's only one text area; to select the carriers which customers can use just mark them by clicking on them with the left mouse button (to mark more than one press and hold the Ctrl button on your keyboard).
Keep in mind that carriers may have limits as to the countries to which they can deliver. So it also depends on the customer's address and the particular carrier whether the customer will be able to select and use a specific carrier. Carriers can be managed from Shipping menu>Carriers sub-menu in the admin panel.
If you make any changes don't forget to click on the Save and stay or on the Save button.
Product Quantity Options
When you add a new product it's quantity is set to 0 by default. This means that it cannot be ordered (unless you have allowed backorders). So you have to set the product quantity. The quantity options of a product can only be configured after the product is added/saved. To configure the quantity options of a product, on the add/edit product form click on the Quantity tab on the left. On the page that opens there are a couple of blocks with settings. The first one is Available Quantities For Sale and it contains the option for specifying the product quantity and also some other options:
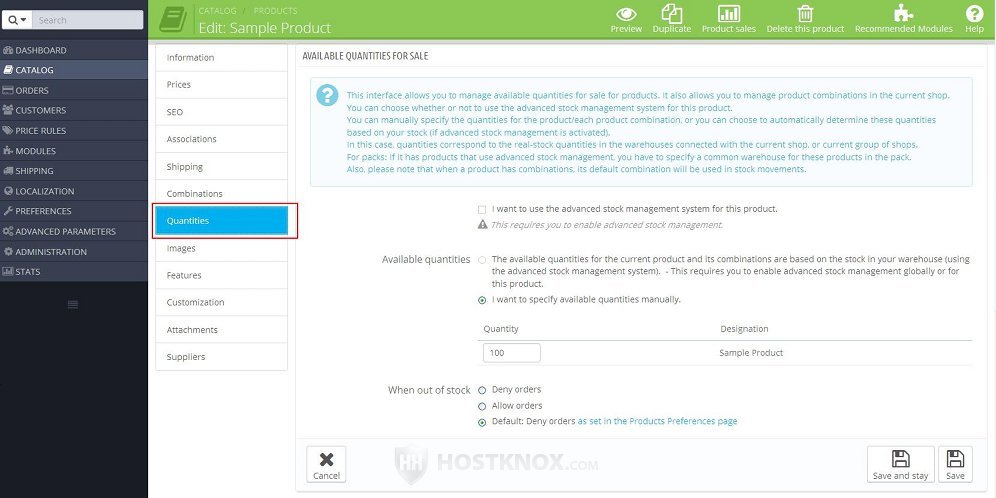
The two basic options in this block are:
- Quantity - in this text field type the quantity of the product. If you have created product combinations from the Combinations tab on the left, you can set the quantity of each combination; there will be a text field for each product combination.
- When out of stock - with this option you can set whether customers can order or not the product when it's out of stock. By default, none of the out-of-stock products can be ordered. This is set with a global setting that applies to the whole store. You can find this option by going to Preferences menu>Products sub-menu in the admin panel. However, you can overwrite that setting for each particular product. You can do this with its When out of stock option. By default, it's set to comply with the global setting. To deny or allow out-of-stock orders for that product just mark the respective radio button.
Note that in PrestaShop there are some advanced stock management options that are disabled by default. To enable advanced stock management go to Preferences menu>Products sub-menu and set the option Enable advanced stock management to Yes. This will add another menu labeled Stock in the admin panel. In addition to this you can let the advanced stock management take care of the quantity of each product. To do this, edit the product, click on its Quantities tab, mark the checkbox I want to use advanced stock management for this product, and then mark the radio button The available quantities for the current product and its combinations are based on the stock in your warehouse. There are other options that have to be configured from the Stock menu and here we won't go into more details about the advanced stock management.
When you click on the Quantities tab on the add/edit product form there are some more options. They are grouped in a block labeled Availability Settings:

The options are:
- Minimum quantity - with this option you can set a minimum quantity that customers have to order. For example, if you set it to 2, people we'll be able to buy two or more units of the product but they won't be allowed to buy just one unit. When the customer clicks on the Add to cart button for the product, the minimum quantity will be automatically put in the cart.
- Displayed text when in stock - if you want some specific message to be shown when the product is in stock, you can type the message in this field. The message is displayed on the product's page on the frontend. If you have more than one language installed, you can type a different message for each language; you can select the language from the option on the right side of the text field. Note that when the product is out of stock there's an out-of-stock message that's displayed by default; there's no need to configure any options for that.
- Displayed text when backordering is allowed - if you allow customers to backorder this product, you can use this option to type a message informing them that the product is out of stock but they can backorder it.
- Available date - if the product is out of stock and you know exactly when it will be in stock again, you can use this option to set the date. Just click with the left mouse button in the field and use the calendar that pops out to select the date. It will be shown on the product's page on the frontend so that customers are informed when the product will be available again. Of course, if you restock the product earlier, the date will be removed automatically.
If you make any changes don't forget to click on the Save and stay or on the Save button.
Product Images
Although you can save and add a product without uploading product images, and customers will be able to order it, images are very important and people usually upload images for most of their products (if not all). That's why in this tutorial that covers the basic things related to adding/editing products we have included a section on product images.
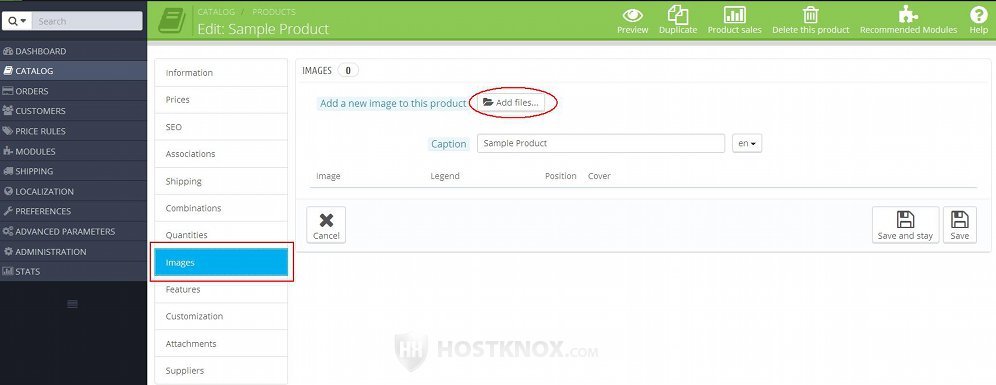
To upload images for a product, on the add/edit form of that product click on the Images tab on the left. Note that you can upload images only after you add/save the product. On the page that opens after you click on the Images tab click on the Add files button (in PrestaShop 1.5 it's labeled Upload an image) and use the window that pops out to select one or more images from your local computer:
To select more than one image, press and hold the Ctrl button on your keyboard and select the images with the left mouse button. After that the images will be listed on the page. To upload them simply click on the button Upload Files (In PrestaShop 1.5 images are automatically uploaded after you select them from the pop-out window):
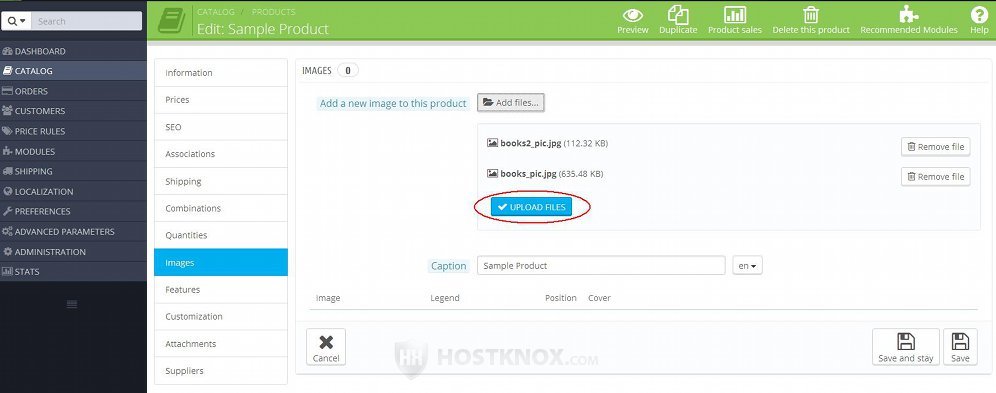
After you do this the images will be uploaded on your hosting account, and they will be visible on the product page on the frontend. Note that in addition to the original image PrestaShop automatically creates several resized copies with different dimensions. PrestaShop uses copies with different dimensions for the various places on the frontend where product images are displayed. For example, the product image on the product page is larger than the copy shown on category pages, and the one shown in the cart is even smaller. The different images sizes and what they can be used for (e.g. products, categories, etc.) can be managed from Preferences menu>Images sub-menu in the admin panel. For more information check the tutorial on how to manage the image settings in PrestaShop.
The uploaded images of the product will be listed in a table on the Images tab page in the admin panel:
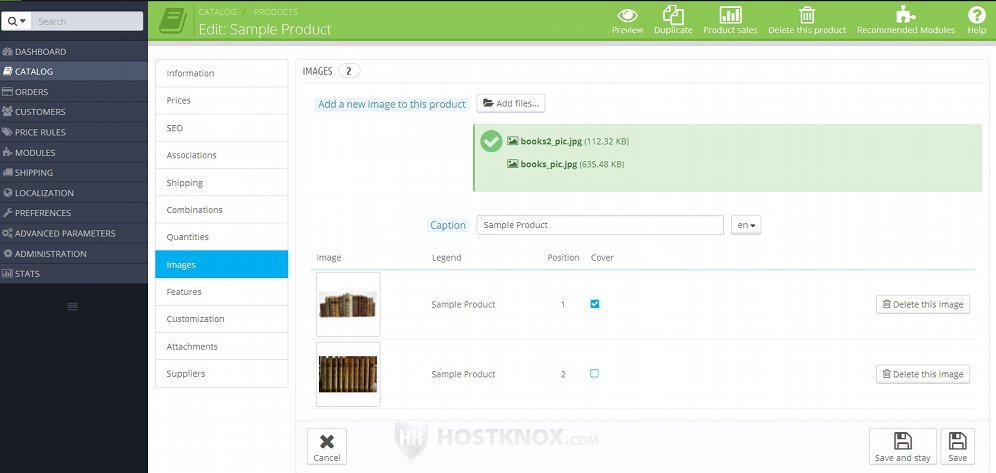
If there is more than one image, one of them is the cover image. This is the main image that's shown on category pages and on the product page on the frontend. On the page of the product the other images are shown in smaller size under the cover image. The customer can view them in a larger size, if they want to (they just have to hover the mouse pointer over the image, or click on it).
In the table the cover image is indicated with a checkmark in the Cover column. To change the cover image just click on the checkbox for that image in the Cover column. To delete an image click on its Delete this image button in the table.
You can upload more images at any time by repeating the same procedure. If you have product combinations, you can upload different image for each product variant.
Links to Other Tutorials and Articles Related to Products
In this tutorial we discussed the basic options on the form for adding and editing products. The form, however, has some more tabs with additional settings: for product features, combinations, customizations, attachments and suppliers. We have separate tutorials for these options. We also have tutorials with more information on product packs and on virtual products, and a tutorial on the general options that apply to all products and that can be managed from Preferences menu>Products sub-menu in the admin panel:
- how to add and manage product combinations in PrestaShop
- how to add and manage product features in PrestaShop
- how to add and manage product customizations in PrestaShop
- how to add and manage product attachments in PrestaShop
- how to create product packs in PrestaShop
- how to add virtual products in PrestaShop
- how to add and manage product attributes in PrestaShop
- how to add and manage product manufacturers in PrestaShop
- how to add and manage product suppliers in PrestaShop
- how to add and manage product tags in PrestaShop
- how to configure and manage the general product preference options in PrestaShop
In our knowledgebase there are some separate articles related to managing products:
- how to change the number of products shown on category pages in PrestaShop
- how to disable the product comparison function in PrestaShop
- how to hide stock quantities from being displayed on the frontend in PrestaShop
- how to increase the allowed length of product names in PrestaShop
- how to remove the "Add to cart" button from category pages for products with attributes in PrestaShop
- how to remove the "New" text indicating newly added products in PrestaShop
- how to remove the "Sort by" menu from product category pages in PrestaShop
- how to use phpMyAdmin to move products from one category to another in PrestaShop