PrestaShop 1.5/1.6 Payment Methods Tutorial
How to add and manage payment methods in PrestaShop 1.5-1.6
You can set up your PrestaShop store to work with various payment methods. This is done with the help of modules. For each payment method there's a corresponding payment module that's responsible for that method. PrestaShop comes prepackaged with some payment modules. Modules for third party payment solutions can be bought and downloaded from the addons section of the official PrestaShop site. In this tutorial we'll go over the basic things that have to be done to enable and use a payment method.
We'll explain:
- what the different types of payment modules are
- the basic steps for enabling a payment method
- how to install a payment module
- how to configure a payment module
We have also included a section with:
We've used as an example PrestaShop 1.6. The screenshots are also from that PrestaShop version. Although the design of the admin panel is different than that of PrestaShop 1.5 activating and managing payment methods is done in the same way. If there are some differences we'll make notes about that in the tutorial.
Types of Payment Modules
We'll make a distinction between the different payment modules in terms of whether they come prepackaged with PrestaShop or not. Some of those that come prepackaged with PrestaShop and are installed and enabled by default are, for example, the one for accepting payment via bank wire transfers and the one for paying with checks. The other payment modules are for third party payment solutions such as PayPal, Moneybookers, Authorize.net, etc. The modules for third party payment gateways can be subdivided into those that are listed by default in the Payment section of the admin panel (official partner modules), and those for which you have to specifically go to the addons section of the official PrestaShop site and buy and download them.
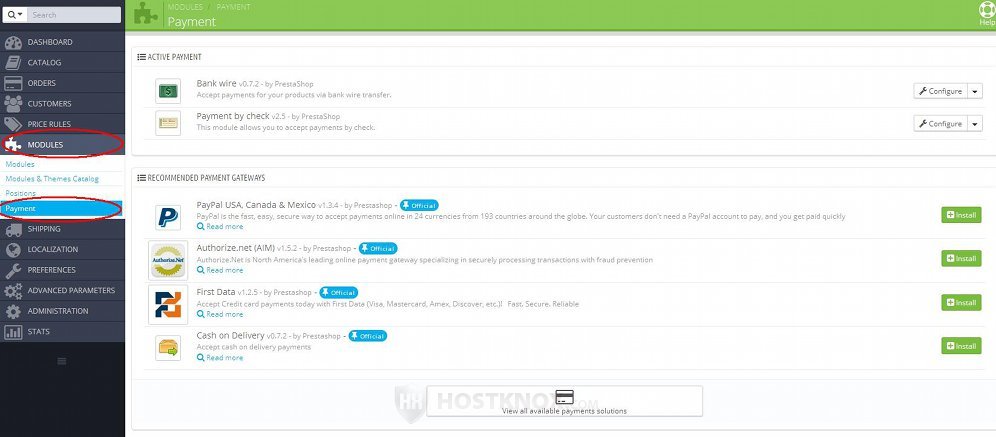
To view the payment methods that are listed by default in the admin panel, go to Modules menu>Payment sub-menu. At the top of the page that opens you'll see the active payment methods and some of the available payment solutions:
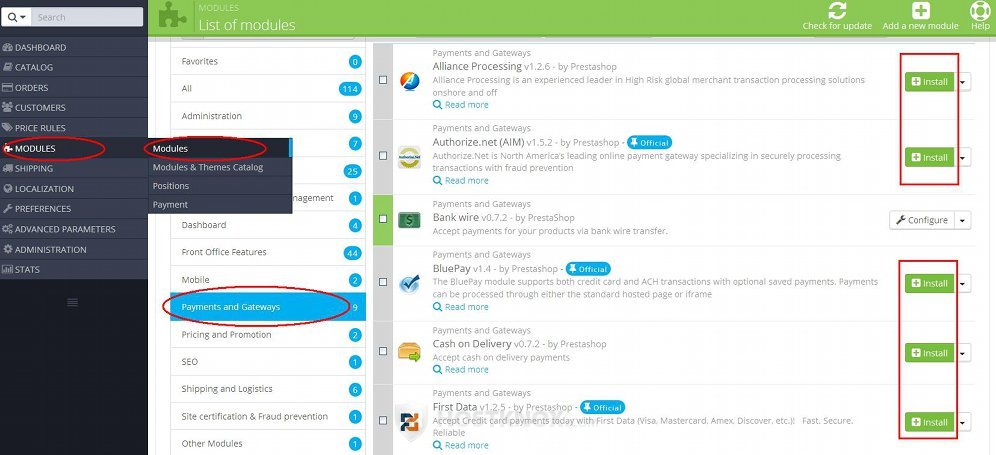
You can also view a list of the payment modules by going to Modules menu>Modules sub-menu and selecting Payments and Gateways on the page that opens:

Note that not all of these modules come prepackaged with PrestaShop. For instance, the modules Bank wire and Payment by check come prepackaged with PrestaShop and are installed by default. These are the modules for which you don't need to have a registration and an account with a third party payment gateway. To be able to use these modules as payment methods, you just have to configure their settings.
In the list you'll also see some third party payment solutions (e.g. PayPal, Authorize.net) marked with the label Official (in some earlier versions they're labeled Partner; in PrestaShop 1.5 the label is Addons). As we mentioned, these are the third party payment gateways that are listed by default in the admin panel, but the modules for these payment methods are not prepackaged with PrestaShop. However, they can be installed for free just by clicking on the Install button for the particular payment method. PrestaShop will automatically take care of the rest.
If you want to use other third party payment gateways you have to specifically search for them in the addons section of the official PrestaShop site.
Basic Steps for Enabling and Using a Payment Method
The basic steps for activating a payment method and making it accessible to customers on the frontend are pretty much the same for all payment methods:
- Install and enable the payment module. If the payment module is for a third party payment gateway that's not listed by default in PrestaShop, first you have to buy and/or download the module from the addons section of the official PrestaShop site.
- If the module is for a third party payment solution, you need to register and create an account with the particular payment gateway (e.g. PayPal, Moneybookers, etc.). You can do this on the official site of the payment gateway. When configuring the settings of the PrestaShop module for that payment gateway you'll need some of the information from your account with the payment gateway. For instance, for the PayPal module you'll need the API username, password and signature of your account with PayPal.
If the module is Bank wire or Payment by check you won't need to register anywhere. - Configure the settings of the module. In order for the payment module to work and to be able to accept payments with the particular payment method you have to configure the settings of the module. The exact settings depend on the particular module. For example, in the settings of the Bank wire module you have to specify the name of the account owner and details such as IBAN number, etc.
As we mentioned, if the module is for a third party payment solution, you'll need to use the information from some of the settings from your account with that payment gateway.
Now let's quickly review how to install and configure a payment module.
Install a Payment Module
If you want to install (or uninstall) one of the payment modules that come prepackaged with PrestaShop, or one of the third party partner modules that are listed by default, you can do this with a single click. Go to Modules menu>Modules sub-menu, select Payment and Gateways and click on the Install button for the particular module:
To uninstall or disable an installed module, click on the arrow that's next to the Configure button and from the menu that appears select the respective option.
If you want to use a module that's not prepackaged with PrestaShop or is not one of the partner modules, you'll have to do a few other things. Here we won't go into details. In short you have to:
- Find the module in the addons section of the official PrestaShop site. You can also search for modules from the admin panel; to do this, go to Modules menu>Modules & Themes Catalog sub-menu.
- Download the module on your local computer.
- Upload the module to your PrestaShop hosting account. You can do this either from the admin panel or you can do it manually. To do it from the admin panel, go to Modules menu>Modules sub-menu, click on the button Add a new module and use the settings that appear to locate the archived module on your local computer and upload it.
- Once the module is uploaded go to Modules menu>Modules sub-menu, find the module in the list and install it as shown above.
For some more details on uploading and installing a new module check out the tutorial on how to install and manage modules in PrestaShop.
Configure a Payment Module
Pretty much for any of the payment modules you have to configure its settings before the payment method corresponding to that module can actually be used by customers. If the module is for a third party payment gateway, you'll need some of the account information from the account that you have with that payment gateway.
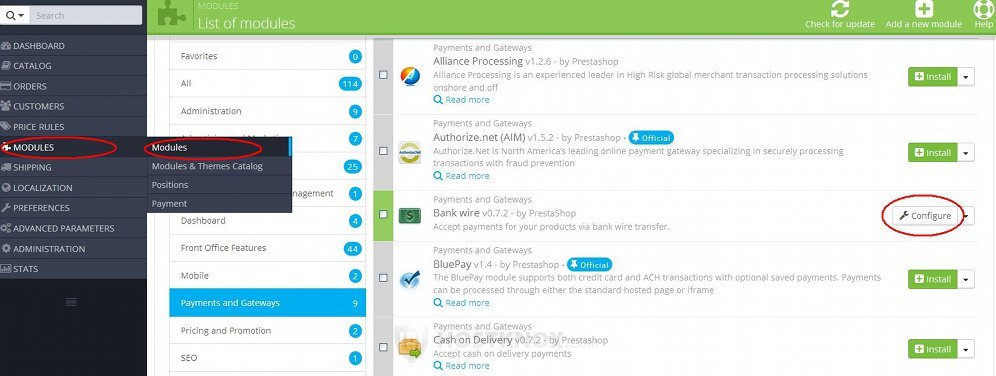
To configure the settings of a payment module, go to Modules menu>Modules sub-menu and on the page that opens select Payment and Gateways. Each of the installed modules has a Configure button. Just click on it:
This will display the page with the settings for that module. There you'll see the information that you have to provide from your account with the payment gateway. The settings that are available depend on the particular module.
Links to Tutorials Related to Payment
We have a few other tutorials related to payment: