PrestaShop 1.5/1.6 Manual Order Addition Tutorial
How to add orders from the admin panel in PrestaShop 1.5-1.6
Usually customers place the orders themselves from the frontend of your store. These orders are then listed in the back office of your PrestaShop where you or other employees can manage them. For a detailed description of how to process and manage placed orders check the tutorial on how to manage orders in PrestaShop.
However, if for whatever reason you need to add an order manually from the admin panel, PrestaShop provides you with the necessary options to do that. In this tutorial we'll go over the process of adding orders manually from the backend.
We'll describe the process step by step:
- how to access the form for adding orders
- how to associate a customer with the order
- how to use an abandoned cart for the order or reorder an existing order
- how to put products in the new order
- how to apply a voucher or a discount rule to the order
- how to select a delivery and invoice address(es) for the order
- how to manage the shipping options for the new order
- how to select a payment method and status for the new order, and create the order
At the end of the tutorial we have included a list of our other tutorials related to managing orders:
In this tutorial we've used as a basic example PrestaShop 1.6. The screenshots are also from that PrestaShop version. Although the design of the admin panel is different than that of PrestaShop 1.5 the options for adding orders are practically the same in both versions. If there are some differences we'll make notes about that in the tutorial.
Access the Form for Adding Orders
To add a new order manually from the admin panel, you need to access the Orders section of the back office and use the button that's there. Go to Orders menu>Orders sub-menu in the admin panel. There you'll see a table with all the placed orders. Click on the button Add new order that's above the table (in PrestaShop 1.5 it's labeled Add new):
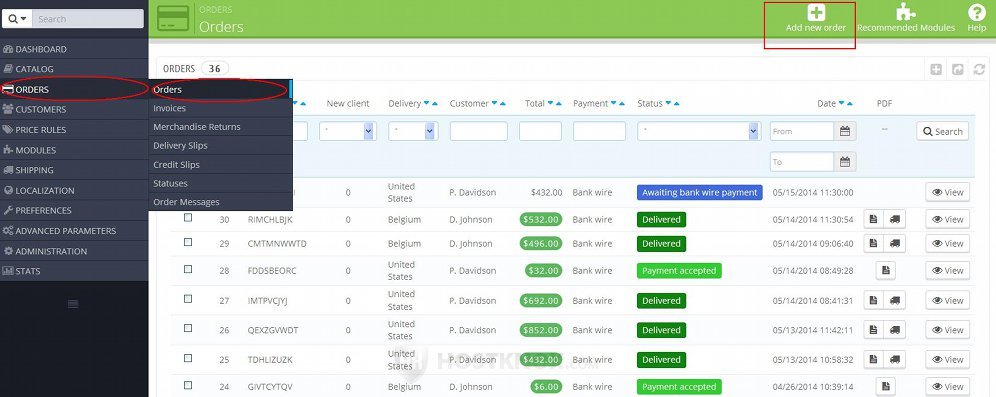
This will start the whole process of creating and placing the order. First you have to select a customer with which the orders is to be associated, and then manage the options of the actual order (e.g. the products in the order, addresses, vouchers, etc.).
Read the next sections in this tutorial for more details.
Associate a Customer with the Order
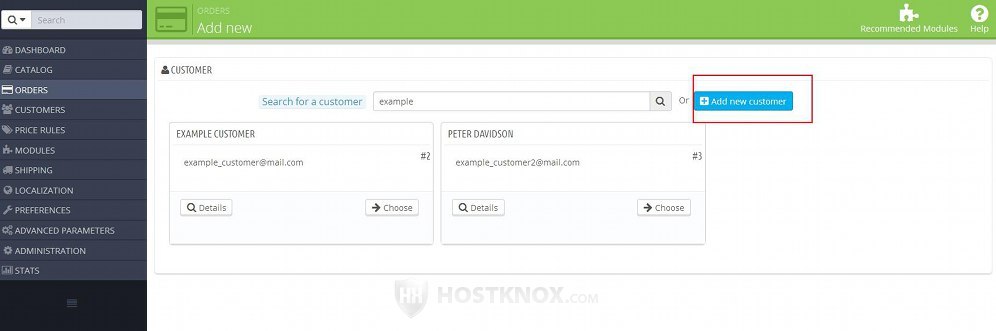
After you go to Orders menu>Orders sub-menu in the admin panel and you click on the button for adding a new order this will automatically display a new page on which you have to select a customer in whose name the order will be placed. On the page there's a field for searching for a registered customer. Just start typing either the name or the email address of the customer and blocks showing the names and email addresses of the matching customers will be displayed under the field:
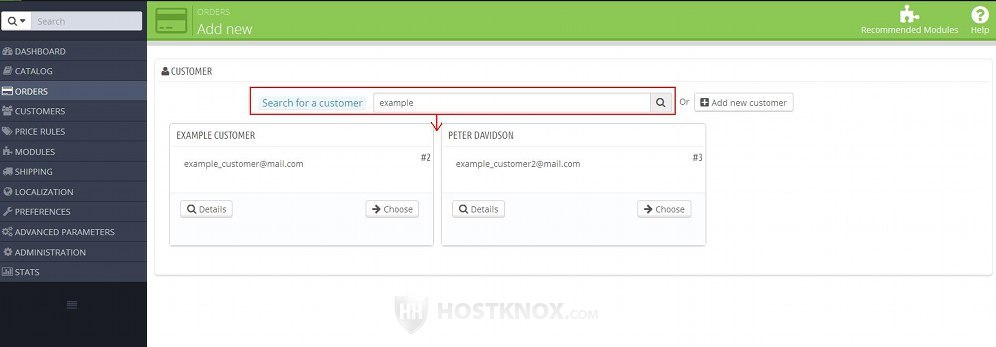
If you want to see all the details for a customer, click on the Details button that's in the block listing the particular customer (in PrestaShop 1.5 there's no such button; just click on the name of the customer):
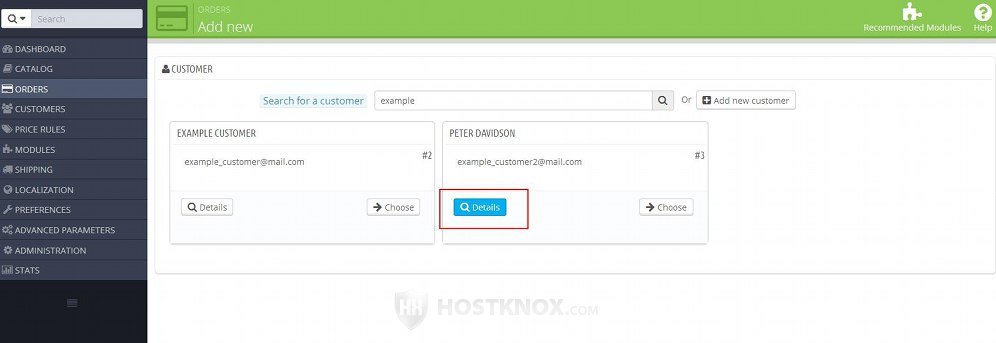
An overlay window will pop out showing all the details of the customer. You can view the details of any registered customer by going to Customers menu>Customers sub-menu and clicking on the customer in the table with the existing customers.
To associated a customer with the order that you're about to create, click on the Choose button for that customer:
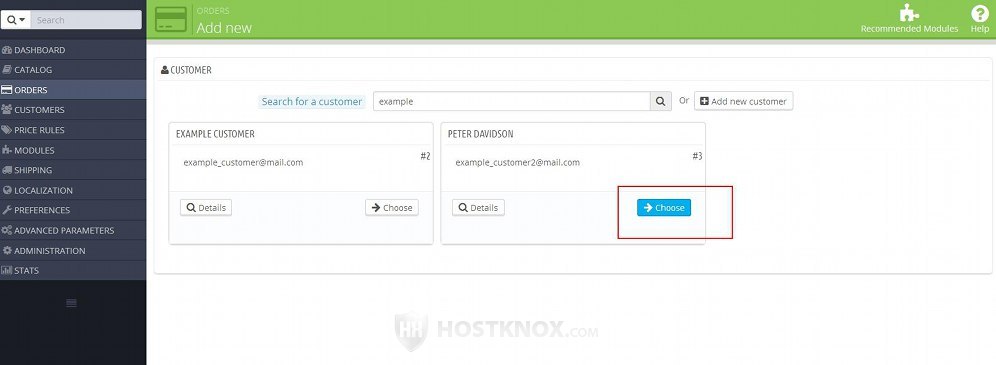
This will automatically redirect you to the page on which you can create and add the actual order. We'll discuss all the options on that page in the next sections of this tutorial.
If you are going to add an order for a customer who is not registered yet, you can register a new customer by clicking on the Add new customer button that's next to the field for searching for existing customers:
This will open a pop-out window which contains the form for adding a new customer. After you configure the options on this form and you click on the Save button. The window will automatically close and the form for adding a new order will open. The newly added customer will be automatically selected as the one to be associated with the new order. Otherwise, you can add new customers from Customers menu>Customers sub-menu. For more information check out the tutorial on how to add and manage customers in PrestaShop.
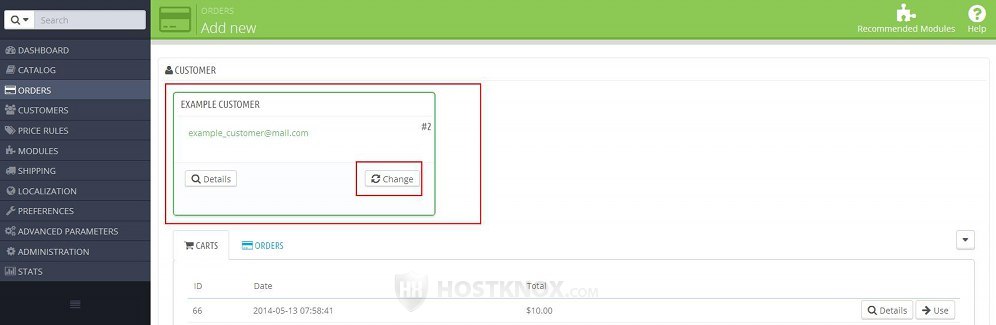
After you choose a customer to be associated with the order this will open the form for adding a new order. At the top of the page is a block that shows the selected customer whose name will be used for placing the order. You can use the Change button in that block to select a different customer:
On the form for adding a new order there are several blocks with various settings related to the order that you're going to create. We'll go over all of them.
Use an Abandoned Cart or An Existing Order to Place a New Order
On the form in the admin panel for adding a new order you'll find all the necessary options for creating the order. When it comes to the products in the order you can either select products from the catalog, or you can use one of the abandoned carts (if any) or one of the existing orders (if any) that the customer has already placed.
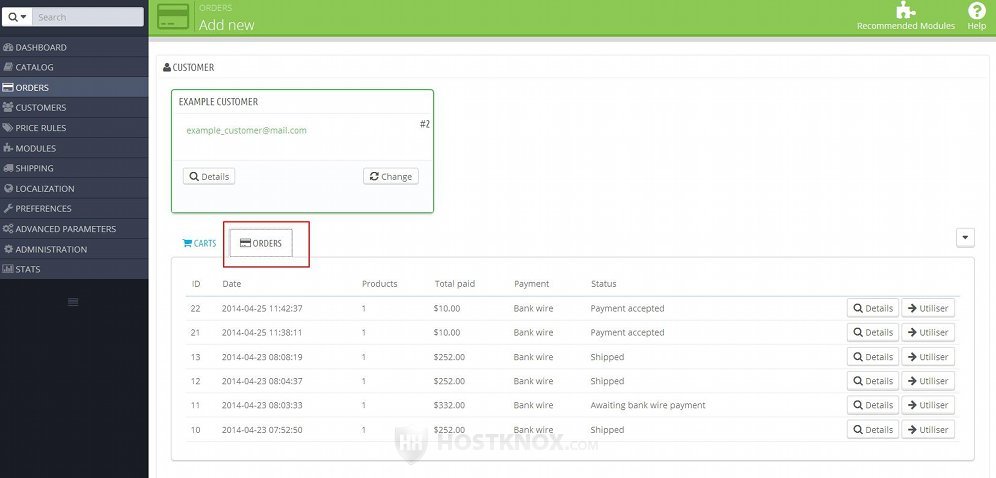
At the top of the form for adding a new order there's a block with two tabs: Carts and Orders. They show respectively the abandoned carts associated with the customer and the orders placed by the customer. In PrestaShop 1.5 these are two separate blocks that are shown under the options for selecting products to be put in the order.
In the block with the abandoned carts you'll see the date the cart was created and the total amount of the products in the cart:

When a customer puts some products in the cart and then logs out and leaves your site without checking out, the cart is considered an abandoned cart.
In the block with the abandoned carts there are a couple of buttons for each cart. Clicking on the Details button opens a pop-out window that shows a list of the products in the cart and some other information (in PrestaShop 1.5 the button is an icon that looks like a magnifying glass). To use the cart for the new order click on the Use button in the block. This will automatically place in the new order the products that are in the abandoned cart; the products will be listed in the Cart block on the form for adding a new order. We'll review the options in this block in the section in this tutorial on managing the products in the new order.
If there's an existing order placed by the customer that contains the same products that you want to put in the new order, you can use that order. Click on the Orders tab. This will show all the orders placed by the customer:
If you click on the Details button for an order this will open a pop-out window displaying the order details page for that order.
For each order in the Orders block there's a button Utiliser. Clicking on it will automatically put in the new order the products that are in the existing order. Check the next section in this tutorial for more information on how to manage the products in the new order.
Manage the Products in the New Order
On the form for adding new orders there's a block for managing the products in the order. It's labeled Cart:
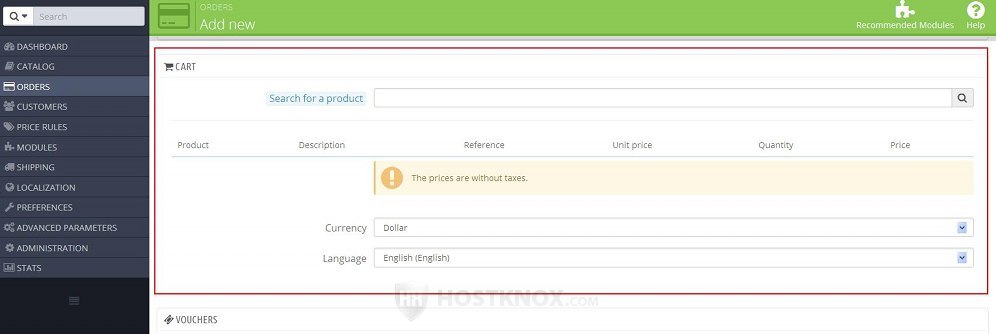
From the options in this block you can add products to the order or remove products; you can set the quantity to be ordered from each of the selected products; if the product has combinations you can select the combination to be ordered, and if it can be customized, you can configure the options for customizations; you can also change the currency.
To add a product to the order, start typing the name of the product in the field for Search for a product. A drop-down menu labeled Product will appear; it lists all the matching products. Select the product from the drop-down menu.
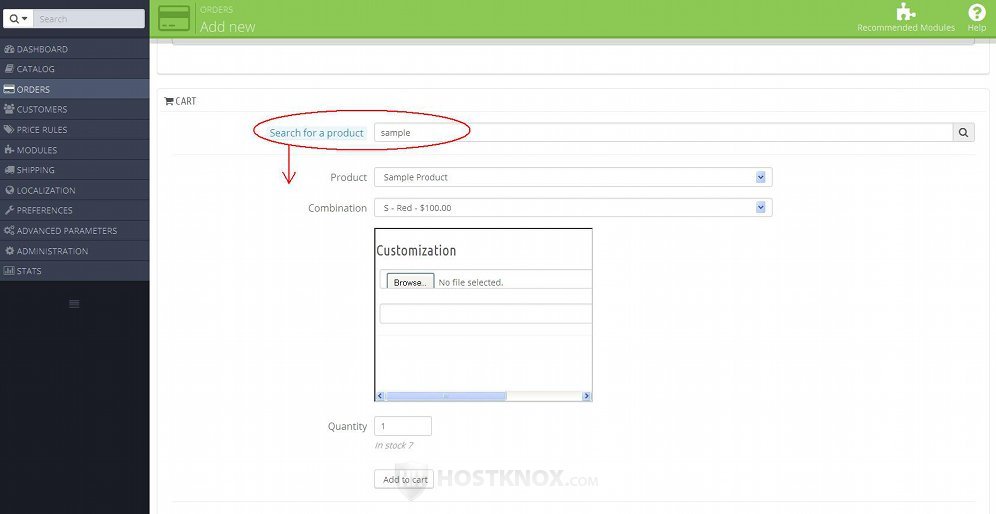
In the field for Quantity you can specify the number of units from the product that you want to put in the cart. If the product has combinations, then there will be a drop-down menu from which you can select a combination. If the product can be customized, there will be options for uploading a picture and/or adding some text for customization. After you're ready with the options click on the Add to cart button that's under them. When you do that the product will be listed under the options for adding products:
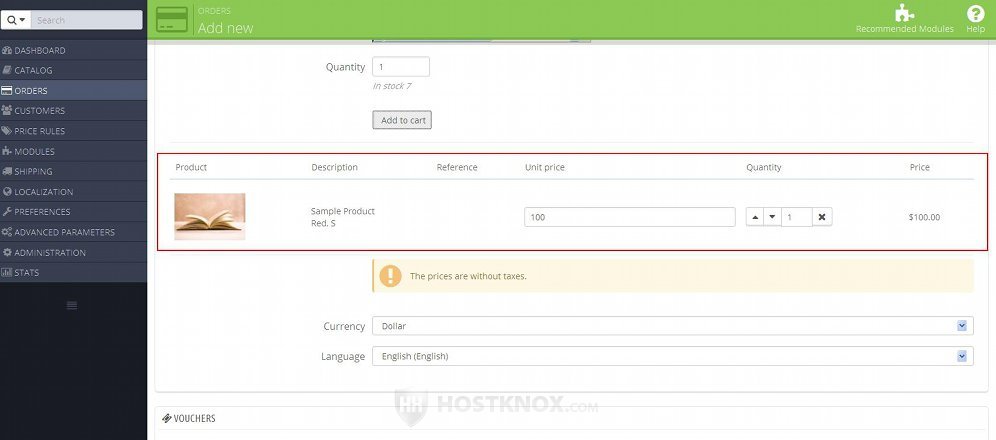
For each product that's added to the order there are a few options. You can change the price per unit and also increase or decrease the quantity to be ordered. If you want to remove the product from the cart, click on the X symbol next to the quantity (in PrestaShop 1.5 it's an icon that looks like a trash can).
Under the product list there's a drop-down menu from which you can change the currency to be used.
Apply a Voucher to the Order
If you want to, you can apply a discount to the order. On the form for adding new orders there's a block labeled Vouchers. Start typing the name of the voucher in the field for Search for a voucher and select the voucher from the drop-down menu that appears. This will display under the field the name of the voucher and the value of the discount (the amount that will be subtracted from the order):
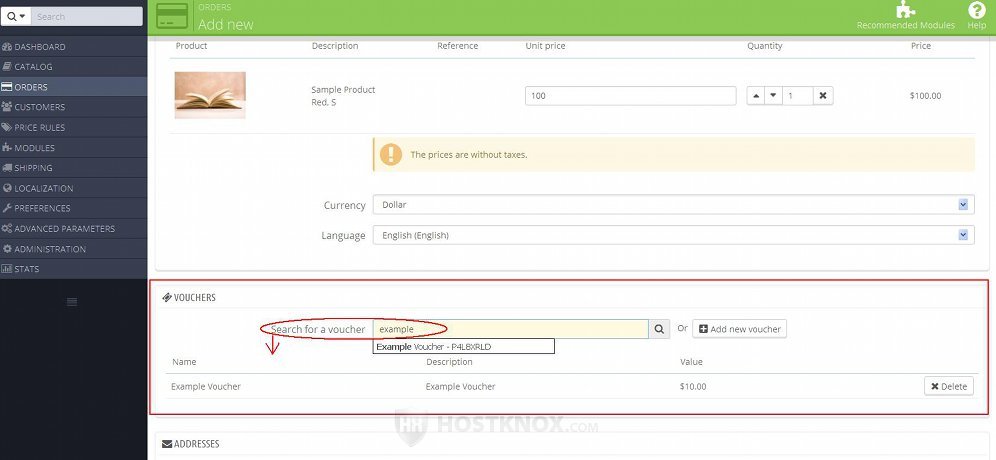
If you change your mind and you want to remove the voucher, click on the Delete button that's on the right side of the voucher (in PrestaShop 1.5 the button is not labeled; it's a trash can icon).
Of course, to be able to select a voucher you need to create it in advance. Vouchers can be created from Price Rules menu>Cart Rules sub-menu.
If there's no voucher and you want to create one without leaving the form for adding a new order, click on the button Add a new voucher that's in the Vouchers block on the form:
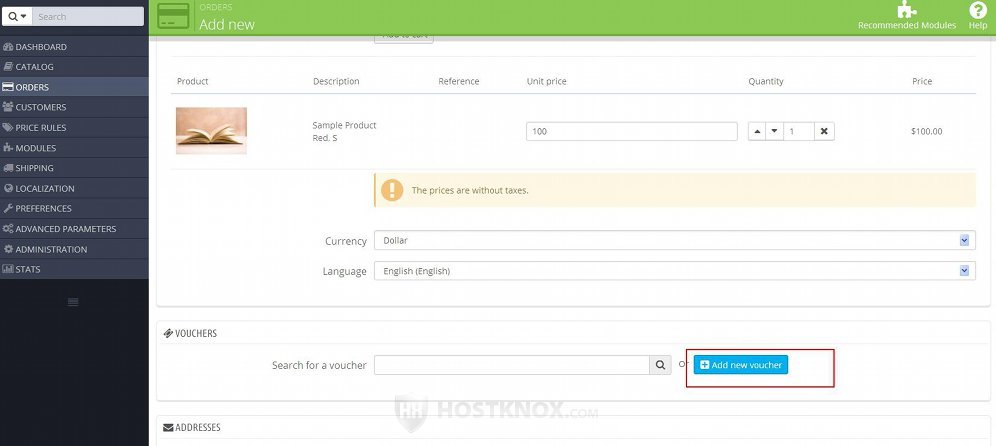
A window will pop out with the options for adding a new voucher.
Shipping and Billing Address for the Order
On the form for adding a new order there's a block Addresses from which you can select the delivery and the invoice address:
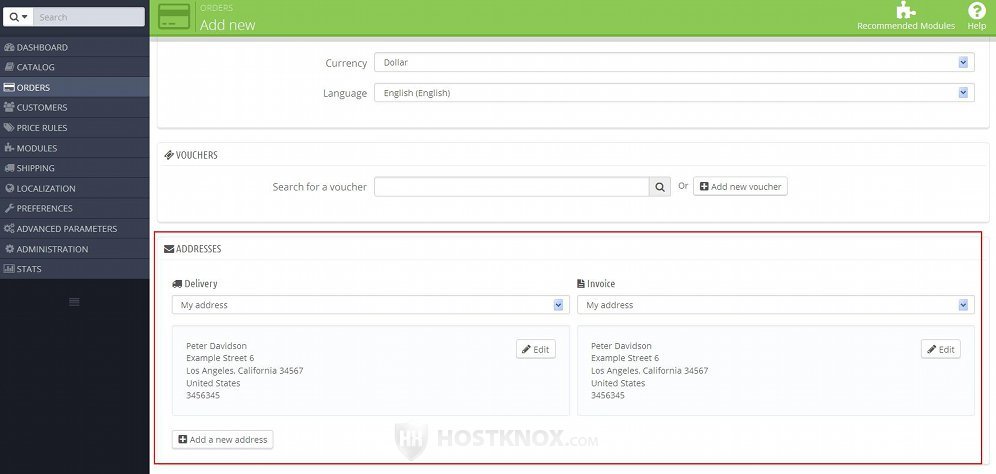
If you want to, you can choose different addresses for delivery and billing. Use the respective drop-down menu to select the address (the address alias is shown in the drop-down menu). You can select only from the existing addresses associated with the particular customer. If you want to edit the selected address, click on the Edit button for that address. A window will pop out with all the address options. If there's no address registered for the customer or you want to add a new one, click on the button Add a new address. Use the window that pops out to add the address. In this way you can add and/or edit the address(es) without leaving the form for adding an order. Otherwise, you can add new addresses and manage all existing addresses from Customers menu>Addresses sub-menu in the admin panel. For more information check out the tutorial on how to add and manage customer addresses in PrestaShop.
Shipping Options
Under the block for the addresses there's a block labeled Shipping. It becomes available only after you add products to the cart. In this block you'll find a couple of options related to shipping:
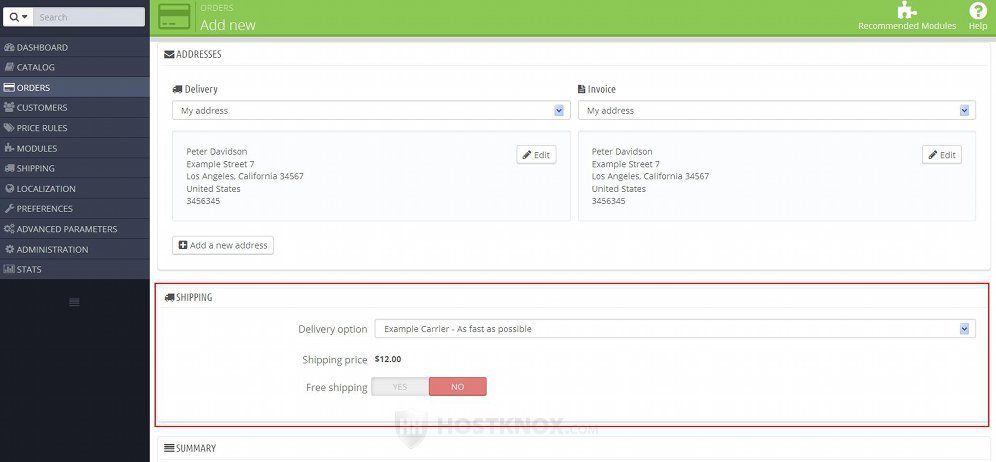
From the Delivery option drop-down menu you can select the carrier to be used for delivering this order. If you don't want to charge for shipping, enable the option Free shipping.
Select a Payment Method and Order Status and Create the Order
The last block on the form for adding new orders is called Summary. It becomes visible after you add products to the cart. It shows all the payment information. You can use it for a few things, but the main thing is that you can choose how to finalize and place the order:
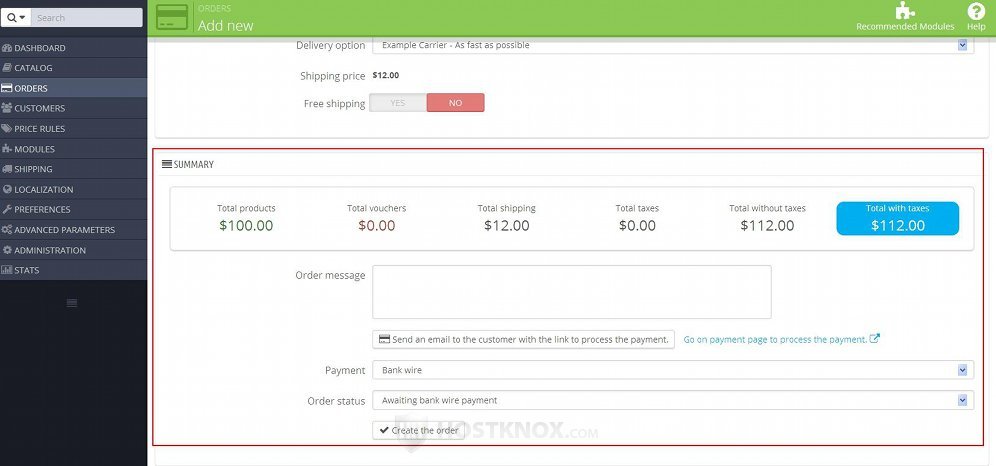
The block contains the following options:
- Order message - in this text area you can type some message about the order. An email with the message will not be sent to the email address of the customer. However, the customer can view the message from their account settings on the frontend of your site (by checking the order details). Otherwise, you can send messages to the customer regarding the order from the order details page in the admin panel. When you add a message from there you can select whether the message should be sent to the customer (both to the email address and the frontend account settings). For more details check the tutorial on how to manage orders in PrestaShop and in particular the section on messages.
- Send an email to the customer with the link to process the payment - this option is actually a button. If you want the order to be placed by the customer, click on this button. It will send an email to the email address of the customer. The email will contain a link. When the customer clicks on that link they will be redirected to the frontend of the site; the Payment step of the checkout process will be automatically displayed, and the order will contain the same products that you put. The customer just has to select the payment method and confirm the order. Note that if you click on this button you shouldn't click on the button Create the order that's at the bottom of the page. If you create the order, the link will be sent to the customer but it will be useless (they will be redirected to the Payment step of the checkout process but the order will not contain any products).
- Go on payment page to process the payment - this is a link that you can use to complete the order on the frontend. Instead of clicking on the Create the order button that's at the bottom of the form for adding a new order, you can click on this link. You'll be redirected to the Payment step of the checkout process on the frontend of the site. You'll be automatically logged in as the selected customer and the order will contain the selected products. So all you have to do on the frontend is to select the payment method and confirm the order. After you do that you don't have to click on the button Create the order that's at the bottom of the form for adding an order in the admin panel. It will be deactivated for that particular order anyway.
- Payment - provided that you didn't send a link to the customer to complete the order or you didn't complete the order on the frontend, you can select the payment method from this drop-down menu. So this options matters only if you create the order by clicking on the button Create the order at the bottom of the page.
- Order status - with this drop-down menu you can select the status of the order that you're about to place. This option only matters if you place the order by clicking on the button Create the order. If you use one of the two buttons for respectively sending a link to the customer to complete the order or for completing the order on the frontend, then this option doesn't matter.
- Create the order - with this button you can place the order. As we already mentioned, instead of using this button you can complete the order using one of the two buttons above it. One is for sending an email to the customer with a link for completing the order and the other is for completing the order on the frontend of the site. If you decide to create the order by using this button, then after you click on it the order will be created and you'll be automatically redirected to the page in the admin panel that displays all the details about the order; you can also view that page by going to Orders menu>Orders sub-menu in the admin panel and selecting the order in the table with the existing orders.
Links to Tutorials Related to Managing Orders
We have a bunch of other tutorials related to managing orders:
- how to manage orders in PrestaShop
- how to manage invoices in PrestaShop
- how to manage delivery slips in PrestaShop
- how to manage merchandise returns in PrestaShop
- how to manage credit slips in PrestaShop
- how to manage order statuses in PrestaShop
- how to manage preconfigured order messages in PrestaShop