PrestaShop 1.5/1.6 Image Settings Tutorial
How to configure and manage the image settings in PrestaShop 1.5 and 1.6
In the admin panel of your PrestaShop there's a page from which you can manage the settings of the images that are displayed on your site. You can edit the dimensions of the various image types and change the content types with which they can be used; you can also add new image sizes. On that page there are also options for selecting the image format (e.g. JPEG or PNG) that should be used and options with which you can set the quality of the images; there are some settings for the images that customers are allowed to upload for product customizations. On the same page there's also a function with which you can regenerate all thumbnails. In this tutorial we'll examine these options in more details.
You'll find out:
- how to access the image settings in PrestaShop
- what are image types and what they are used for
- how to add image types
- how to edit and delete image types
- how to enable and disable image types
- how to manage the image quality options and the options of customer images
- how to regenerate thumbnails
In this tutorial we've used as a basic example PrestaShop 1.6. The screenshots are also from that PrestaShop version. Although the design of the admin panel is different than that of PrestaShop 1.5 the image options are practically the same. If there are some differences we'll make notes about that in the tutorial.
Access Image Settings
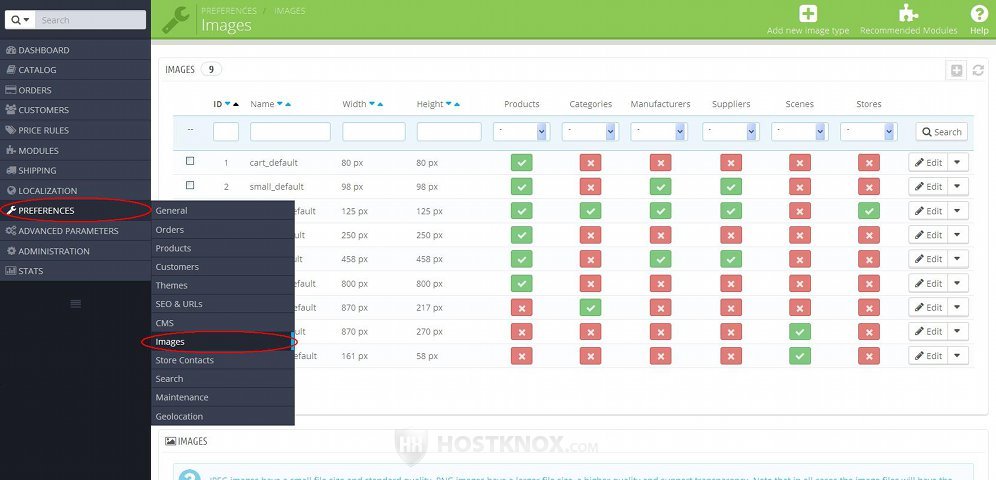
To access the image settings, log into the back office of your PrestaShop and go to Preferences menu>Images sub-menu:
At the top of the page that opens there's a table that lists all the existing image types. The image types are actually just different image sizes in terms of the dimensions for width and height. Each image type can be used for different content (e.g. products, categories, suppliers, etc.). We'll provide more details about managing image types further down in this tutorial.
Under the table there are some options for the image quality and also some about the images that customers are allowed to upload (for product customizations). At the bottom of the page are the options for regenerating thumbnails.
Image Types
In this section we'll explain a bit more about what image types/sizes are and what they are used for.
As we mentioned, image types are actually used to specify the dimensions of images used for various content on the site (e.g. products, categories, manufacturers, suppliers, etc.). When you go to Preferences menu>Images sub-menu in the admin panel there's a table with the existing image types:
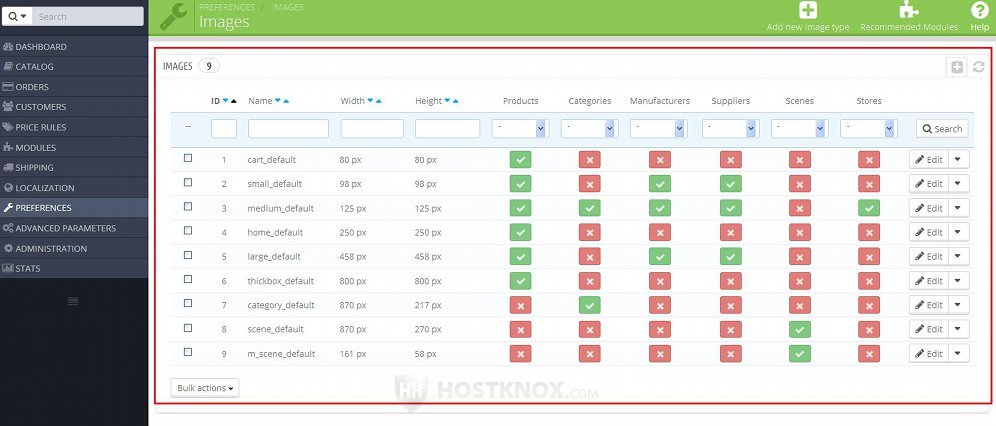
It displays the name of the image type, its dimensions and the content types with which it's used. For instance, in PrestaShop 1.6 the image type category_default has the dimensions 870 x 217 pixels (width x height) and it can be used only with categories. In the table there's a column for each content type (e.g. products, categories, etc.) and for each image type it's indicated with a green check mark or a red X mark whether respectively it is used with the particular content type or not.
So, on our example screenshot the category_default image type can be used only with categories. What this means is that when you add/edit a category and you upload an image for it, a copy of the original image will be created with the dimensions of the category_default image type (870 x 217); this is the image copy that will be shown on the category page on the frontend of the site. Note that if there are other image types enabled for the particular content type, then a copy with the dimensions of each enabled image type will be created. In our example the medium_default image type is also enabled for categories which means that a second copy of the original category image will be created with the dimensions of the medium_default image size (e.g. 125 x 125).
You can edit the dimensions of each of the existing image types and you can enable/disable the content types with which it can be used. You can also add new image types. For more information check the respective section in this tutorial.
Add Image Types
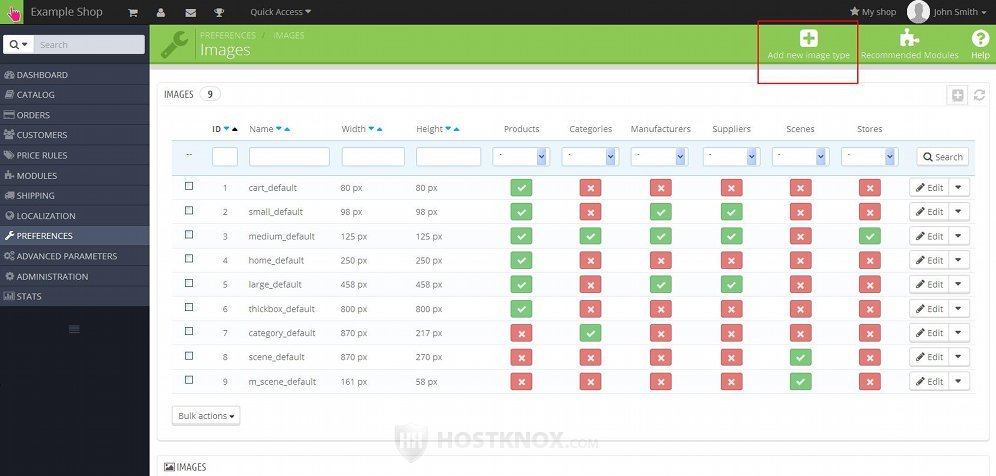
To add a new image type, go to Preferences menu>Images sub-menu in the back office and on the page that opens click on the Add new image type button (in PrestaShop 1.5 it's labeled just Add new):
This will open the form for adding image types:
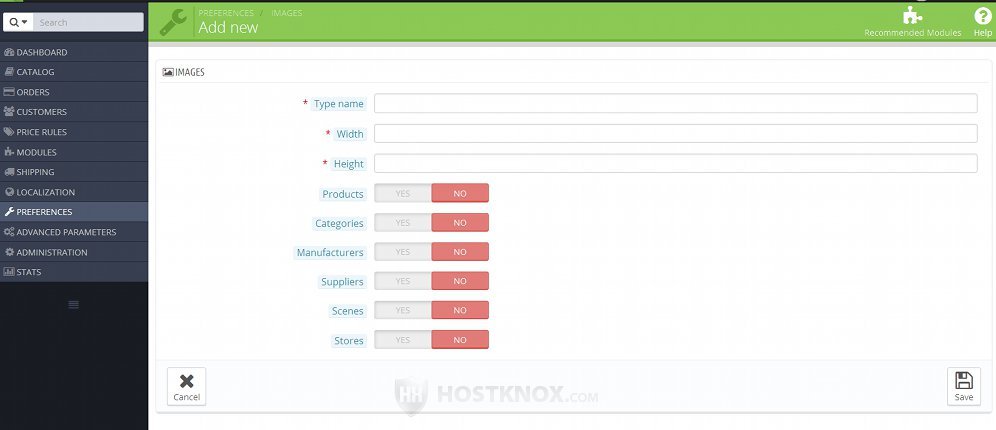
It's the same as the form for editing image types and it contains the following options:
- Type name - in this text field simply type the name of the image type.
- Width - in this field put the number for the width of the images from this type. It's in pixels.
- Height - in this text field type the number for the height of the images from this type. It's in pixels.
- Products, Categories, Manufacturers, Suppliers, Scenes, Stores - these are the available content types. When you add a new image type they are disable by default. If you want to make the image type available for a particular content type, just enable the option for the respective content type. When you add an image for a content type resized copies will be created for each of the image types that are enabled for the particular content type. For example, in PrestaShop 1.6 six image types are enabled for products by default. This means that when you add a product and you upload a product image six resized copies of the original image will be created; each copy will have the dimensions specified in the options of the particular image type.
After you're done with the settings click on the Save button. In order for copies of existing images to be created for each of the content types associated with the new image type you have to regenerate the images. For more information check the section in this tutorial on how to regenerate thumbnails.
Edit and Delete Image Types
To edit an image type, go to Preferences menu>Images sub-menu in the admin panel of your PrestaShop and in the table with the existing image types click on the Edit button for the image type that you want to edit:

The edit button in PrestaShop 1.5 is not labeled. It's just an icon that looks like a small pencil.
This will open the edit form with the image type settings. The form is the same as the one for adding image types. For more information on the settings check out the section on how to add image types in this tutorial. Keep in mind that if you change the dimensions of an image type, the images that are already uploaded and resized according to the old dimensions will not be resized with the new dimensions. The new dimensions will be applied to the new images that you upload after you edit the dimensions. If you want the existing images to be changed to the newly specified dimensions you have to regenerate them. You also have to do it if you enable/disable content types. You can do this from the Regenerate Thumbnails section on the Images page of the admin panel. For more information check out the section in this tutorial on how to regenerate images.
To delete an image type, click on the arrow that's next to the edit button for the particular image type. Then click on the Delete button in the drop-down menu that expands:

In PrestaShop 1.5 there's a separate column in the table for the delete buttons. The delete button there is an icon that looks like a trash can.
You can also use the Bulk actions drop-down menu under the table to delete more than one image type simultaneously (this function is not available in PrestaShop 1.5).
Enable and Disable Image Types
An image type can be enabled and disabled per content type. For example, you can enable an image type only for products but disable it for all the rest of the content types. You can enable/disable an image type by editing it and configuring the options for the respective content types.
When you go to Preferences menu>Images sub-menu in the back office you'll see that the table that lists the image sizes has a column for each content type. Each of these columns indicates whether the content type is enabled or not for each of the listed image types. The green check mark indicates it's enabled and the red X mark shows it's disabled:

Note that unlike other places in the admin panel where there are such status symbols, clicking on the symbol itself will not enable/disable the image type. Instead it will redirect you to the edit form for the particular image type where you can enable/disable it.
Of course, to go to the edit form you can also just click on Edit button for the image type. On the edit form you'll see the enable/disable options for the content types:

If you make any changes on the edit form don't forget to click on the Save button.
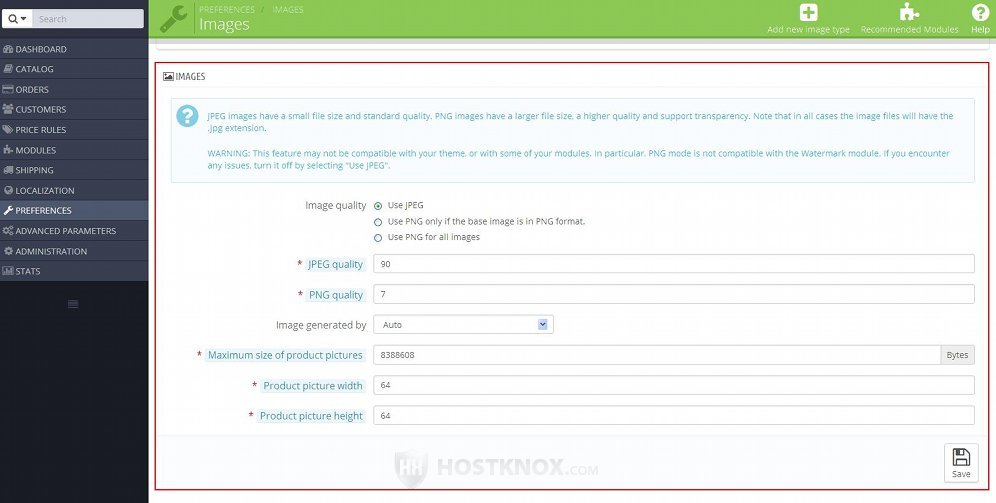
Image Quality Options and Customer Images Options
On the Images page of the admin panel under the table with the image types there are some options related to the quality of the uploaded images and some that are related to the images uploaded by customers. If you offer a customizable product, you may allow customers to upload images to be used for customizing the product; for example, you may offer customers the option to send you images to be stamped on T-shirts.
So to configure these settings, after you go to Preferences menu>Images sub-menu in the admin panel just scroll down the page to the section labeled Images:
Note that in PrestaShop 1.5 these options are divided into two sections. The one for the image quality options is labeled Images and the one for the options for images uploaded by customers is labeled Product Images. The options, however, are exactly the same as shown on the screenshot above, and as described below.
Now let's go over the actual options:
- Image quality - from this option you can select the format of the images on your site. By default, it's set to use JPEG/JPG images. It's the most widely used image format. You can switch it to use only PNG images, or you can set it so that it uses PNG format only when the base image is in that format. It's recommended that you leave this option to the default JPEG format.
As is explained in the text just above the option, JPEG images have the best balance in terms of size and quality. PNG images have a bit better quality but are larger in size, which in turn means that if you use the PNG format and you have a lot of products, this can slow down your site (e.g. the loading time of category and product pages).
The size and quality of the images in both formats also depends on how you configure the JPEG quality and PNG quality options. For example, if you increase the quality of the JPEG images to the maximum and you decrease the quality of PNG images to the minimum, then the JPEG images will actually be bigger in size and with better quality than PNG images.
Note that regardless of whether you choose to use the JPEG or PNG format, PrestaShop will automatically add the .jpg file extension to all PrestaShop images on your hosting account. Another thing useful to know is that it doesn't matter what the format of the original image that you want to upload is. What's meant by this is that if you select the JPEG format, the original images that you want to upload on your account don't necessarily have to be in the JPEG/JPG format. PrestaShop will convert them automatically. This being said, the format of the original picture(s) that is on your local computer and that you want to upload has to be in one of the following formats: JPEG/JPG, PNG, and GIF. - JPEG quality - from this option you can set the quality of the JPEG images. By default, it's set to 90. The lowest value and respectively the worst quality is 0 and the highest is 100. Note that the better the quality the bigger the file size of the images.
- PNG quality - from this option you can set the quality of PNG images. Of course, this should concern you if you decide to use the PNG image format. By default, it's set to 7. Unlike the previous option, with this a higher number means worse quality. The highest number you can put is 9 which is for the worst quality and smallest file size, and 0 is for best quality and biggest file size of the images.
- Image generated by - by default, this option is set to Auto; you can change it to Width or Height. It determines how the image is positioned in the space that's provided for that image. Whatever you select if the original image doesn't have the same ratio between width and height as the image sizes in which it's going to be resized, then the resized copies will not fit the entire space that's provided. For example, on product pages on the frontend product images are displayed with the dimensions 458 x 458 pixels (that's the image type large_default). This, of course, means that the space is square. If the original image that you upload for a product is not square (e.g. 742 x 320), it will be resized proportionately to its original dimensions and the rest of the space will be filled with white background so that it fits the space for the product image. This means it will be resized to 458 x 458 but part of it will be white background and not the image itself. So for better results it's advisable that you resize and/or crop the original image before uploading it.
The next a few options are for images uploaded by customers. Customers can be allowed to upload images for products that can be customized (e.g. images for T-shirt stamps).
- Maximum size of product pictures - you can use this to limit the maximum size of pictures uploaded by customers. It's in bytes. By default, it's set to 8388608 which equals around 8 megabytes. If a customer tries to upload a bigger image than the set limit, they'll receive an error message informing them what the limit is and that the picture they're trying to upload is too big.
- Product picture width - with this option you can set the width of pictures uploaded by customers. It's in pixels and it's set to 64 by default.
- Product picture height - the height of pictures uploaded by customers is set with this option. By default, it's set to 64 pixels.
Note that these are the width and height that will be used for the resized copies of the images uploaded by customers. Customers are actually allowed to upload bigger pictures (in terms of dimensions). For instance, if the the customer uploads a picture with the dimensions 720 x 300, it will be uploaded and a resized copy will be created.
Images uploaded by customers are kept in the upload folder in the root PrestaShop folder on your hosting account. If, for example, your PrestaShop is installed directly in the public_html folder on your PrestaShop hosting account, then the path to the upload folder on the account will be public_html/upload.
When a customer orders a product with an uploaded image, the resized copy of that image will be shown on the order page in the admin panel. If you click on it, a pop-out window will appear with which you can download or view the original image.
If you make any changes to the image quality settings or to the settings for pictures uploaded by customers don't forget to click on the Save button.
Regenerate Thumbnails
In PrestaShop there's a tool with which you can regenerate all the images that you've uploaded. If, for example, you edit the dimensions of any of the existing image types and you want the new dimensions to apply to old images that are already resized according to the old dimensions, you have to regenerate the images. You also have to do it if you enable/disable an image type for a content type/types, and also if you add new image types. To do this, go to Preferences menu>Images sub-menu and scroll down to the bottom of the page to the section Regenerate Thumbnails:
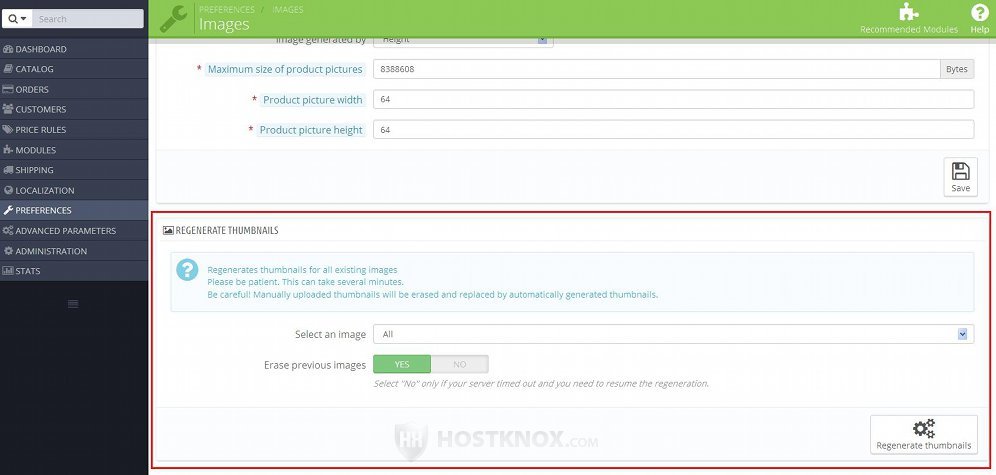
From the drop-down menu Select an image you can choose the content type (e.g. categories, products, manufacturers, etc.) for which you want images to be regenerated. By default, it's set to All. If you select a particular content type, an additional drop-down menu labeled Select a format will appear; from it you can select a specific image type (e.g. small_default, category_default, etc.); by default, it's also set to All. From the option Erase previous images you can select whether the old copies should be erased or not. After you're ready with the options click on the Regenerate thumbnails button.