PrestaShop 1.5/1.6 Shipping and Carriers Tutorial
How to manage shipping and carriers in PrestaShop 1.5-1.6
Shipping is one of the most important aspects of online stores. PrestaShop comes with options for managing shipping and carriers. In most cases you'll need to deal with third parties (e.g. postal services, shipping companies), so unless you offer only downloadable products, you'll have to configure the options for the carriers that you'll work with before you launch your store.
In PrestaShop you can configure carriers either with a module for the particular carrier or by manually adding the carrier. For most of the major carriers there are modules that you can use. Regardless of the method that you use you'll probably have to configure quite a few options. And setting up the options for the carriers your shop will work with may take quite a while.
In this tutorial we'll show you:
- how to add a carrier using a module
- how to add a carrier manually
- how to manage existing carriers
- how to configure and manage the options for shipping preferences
- how to manage product shipping options
- how customers can select from the available carriers on the frontend
In this tutorial we've used as a basic example PrestaShop 1.6. The screenshots are also from that PrestaShop version. Although the design of the admin panel is different than that of PrestaShop 1.5, the options for shipping and carriers are pretty much the same in both versions. If there are some differences we'll make notes about that in the tutorial.
Add Carriers Using Modules
For each of the major shipping carriers there's a module. Installing the module for that carrier will automatically add it to your store with all the necessary options for shipping ranges, fees and additional options that are specific to that particular carrier. In this way it's much easier for you to add and manage the carrier, and what's more, if there are some things that a specific to the particular carrier, they will be made available by the module. So if there's a module for the carrier that you want to add, it's recommended to use that module. Some of the modules for the major carriers are free, while others are paid.
PrestaShop doesn't come prepackaged with modules for carriers, but in the Modules section of your admin panel you'll see listed some modules for carriers. The list of the modules depends on the default country that you selected for your store while installing PrestaShop. These are the most popular carriers used in the particular country. To see the list of these modules go to Modules menu>Modules sub-menu in the admin panel and on the page that opens select the section Shipping and Logistics:
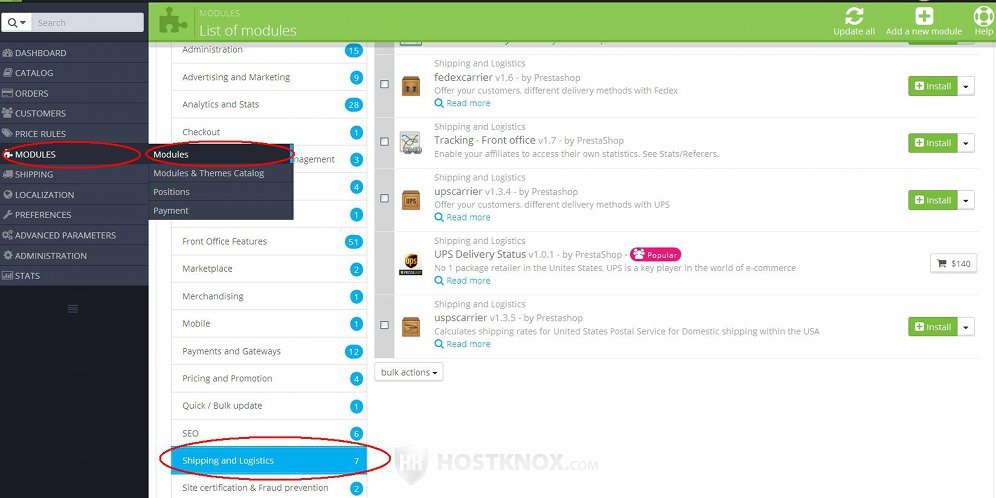
If the module is a free one there'll be simply an Install button. If you click on it, your PrestaShop will download the module, transfer it to your PrestaShop hosting account and install it.
If you don't see a module for the carrier that you need, you can also check in the addons section of the official PrestaShop site. For more information on installing modules check out the tutorial on how to install and manage modules in PrestaShop 1.5-1.6.
After you install it you can configure the options of the module (in the list with the modules find that module and click on its Configure button). In most cases, depending on the carrier, you'll need to have an account on the site of the carrier, and most likely you'll have to use some of the information from that account when configuring the module.
After you install a carrier module, in addition to its specific module settings that can be configured, it will also add carriers to the list in Shipping menu>Carriers sub-menu. It's very likely that more than one carrier will be added. To be more precise the carrier is the same, but each specific carrier service provided by that carrier is added as a separate carrier. You'll probably need to configure some of the options of these carriers because they may be configured incorrectly. Of course, you'll need to be familiar with the services provided by the carrier and the different fees and geographical zones with which these services are associated. You can check that on the site of the carrier. You'll also need to be familiar with the carrier options in PrestaShop. We'll discuss those in the next section of this tutorial.
Add Carriers Manually
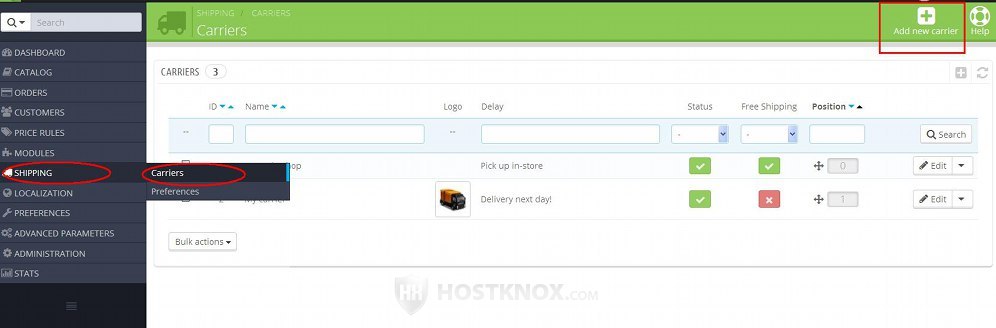
If there's no module for the carrier that you want to add, or you prefer not to use it, you can add carriers manually. To do this, go to Shipping menu>Carriers sub-menu in the admin panel. On the page that opens there's a table with the carriers that have already been added. PrestaShop comes preconfigured with some example carriers. Before you activate your shop make sure that you disable (or delete) these example carriers.
Note that a carrier usually offers different services. When you add a carrier it might be easier to add the different services of the same carrier as separate carriers.
To add a new carrier, click on the button Add new carrier (in PrestaShop 1.5 it's labeled Add new):
On the page that opens you'll be given the choice to add a carrier manually or use a module from a list of recommended modules that's provided (in PrestaShop 1.5 this page doesn't exist, and the page with the carrier options is opened straight away). To add a carrier manually, click on the button Add new carrier:

The list of the recommended modules might contain fewer modules than are actually listed when you go to Modules menu>Modules sub-menu>Shipping and Logistics in the admin panel. So if you want to use a module you should check there. And for a more complete list go to the addons section of the official PrestaShop site.
After you select to add a custom carrier, a page with some options will be displayed. The options are divided into several steps. The first step is labeled General settings:
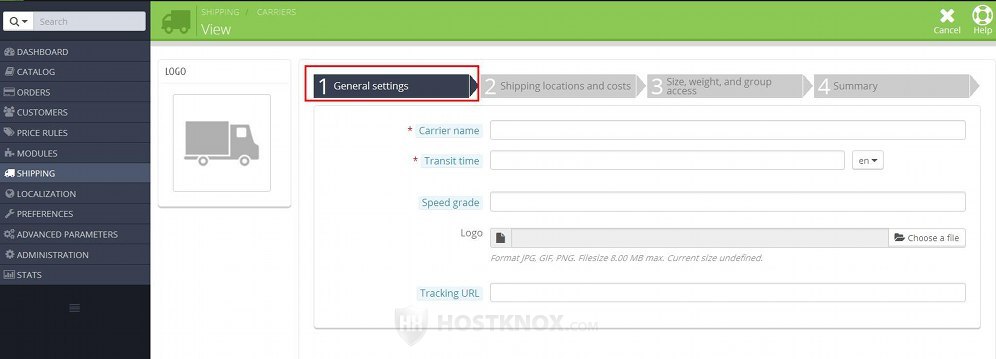
It contains the options:
- Carrier name - type the name of the carrier. That's the name that will be displayed both on the frontend and backend. If this is a particular service of a carrier, you can include the name of the service together with the carrier name (e.g. Fedex 3 day freight).
- Transit time - in this field type in words approximately how long it takes for this carrier to deliver an order (e.g. Orders are delivered within 5 working days). This information is displayed on the frontend on the page from which customers can select which of the available carriers they want to use. Of course, this transit time is just to give the customers some idea. The actual delivery time depends on the country and address of the customer. If you have more than one language installed, from the option on the right side of the field you can select the language to which you want the description for the transit time to apply; you can add a translation in each of the installed languages.
- Speed grade - this option is used to compare the speed with which the different carriers deliver orders. It's in numbers (from 0 to 9). The greater the number that you put in this field, the faster the carrier.
This grade is used, for example, when the default carrier that's automatically selected for an order is assigned by PrestaShop according to the grades of the carriers. For this to happen you need to configure the Default carrier option to Best grade. This option can be configured from Shipping menu>Preferences sub-menu. Regardless of what default carrier PrestaShop selects when a customer puts products in the shopping cart, the customer can change the carrier, provided there are other available carriers, at the Shipping step of the checkout. - Logo - you can use this option to upload the logo (if any) of the carrier. First you need to have the image on your local computer. Then click on the button Choose a file (it's labeled Browse in PrestaShop 1.5) and use the window that pops out to find the image on your local computer. The logo is shown on the frontend and backend. It's a good idea before you upload the logo to resize/crop it to the dimensions in which you want it to appear on the frontend; the logo shown on the backend will be resized automatically.
- Tracking URL - most carriers provide a URL with which the progress of the order can be tracked. You have to check with the particular carrier for more details about the URL. In any case, the URL for a particular order contains the tracking number of that order. In the URL that you put in the field for Tracking URL, the tracking number is replaced with @. So, for example, in the URL http://example_carrier/number=@, the symbol @ stands for the actual tracking number of the delivery. In the URL that's sent to the customer it's replaced with the number of the particular delivery.
After you're done with the options on this page click on the Next button that's under them. The next step is Shipping locations and costs:
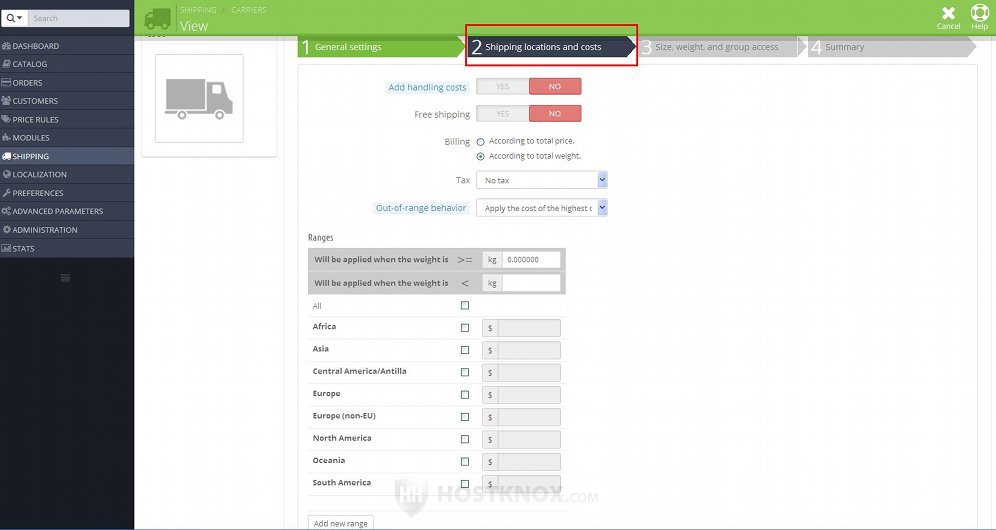
It displays the following options:
- Add handling costs (in PrestaShop 1.5 it's labeled Shipping and handling) - if you set this option to Yes, the handling charges will be added to the shipping fees for this carrier. The option for handling charges can be configured from Shipping menu>Preferences sub-menu. The amount that you configure there will be added to the shipping fees of any carrier for which you enable the option Add handling costs. On the frontend the handling charges are not specifically labeled during the checkout and in the cart block; the amount is simply added to the shipping fee.
- Free shipping (in PrestaShop 1.5 this options is labeled Apply shipping cost) - if this is a free shipping carrier, set this option to Yes. This will automatically disable the options for creating price/weight ranges that are on the same page.
- Billing - from this option you can select whether the shipping fees of the carrier are based on the weight or on the price of the order. Mark either the checkbox According to total price or According to total weight to base the shipping charges respectively on the price or weight of the order. The actual price or weight ranges are configured with the options at the bottom of the same page.
- Tax - if a tax has to be applied to the shipping fee, you can select one of the existing tax rules from this drop-down menu. If the tax rule contains taxes that match the customer's address, the corresponding tax is applied to the shipping fee. This is not specifically indicated on the fronted; the tax applied to the shipping fee is simply added to the total tax amount. For information on managing taxes and tax rules read respectively the tutorials on how to manage taxes in PrestaShop 1.5-1.6 and how to manage tax rules in PrestaShop 1.5-1.6.
- Out-of-range behavior - with this option you can set the behavior of the carrier, if the order doesn't fit into the specified weight/price ranges. For example, if you have set the carrier to base the shipping charges on the weight of the order, and the weight of a particular order is greater than the weight range(s) of the carrier, with this option you can select whether in this case the cost of the highest specified range of the carrier should be used, or whether the carrier should be disabled.
- Ranges - in this table you can set the range or ranges of the carrier. The ranges are based either on the weight or on the price of the order. The type of ranges can be selected from the Billing option on the same page (described a few paragraphs above in this tutorial). The table lists all the geographical zones. At the top of the table for each range there are a couple of fields for specifying the lower and upper limit of the range:
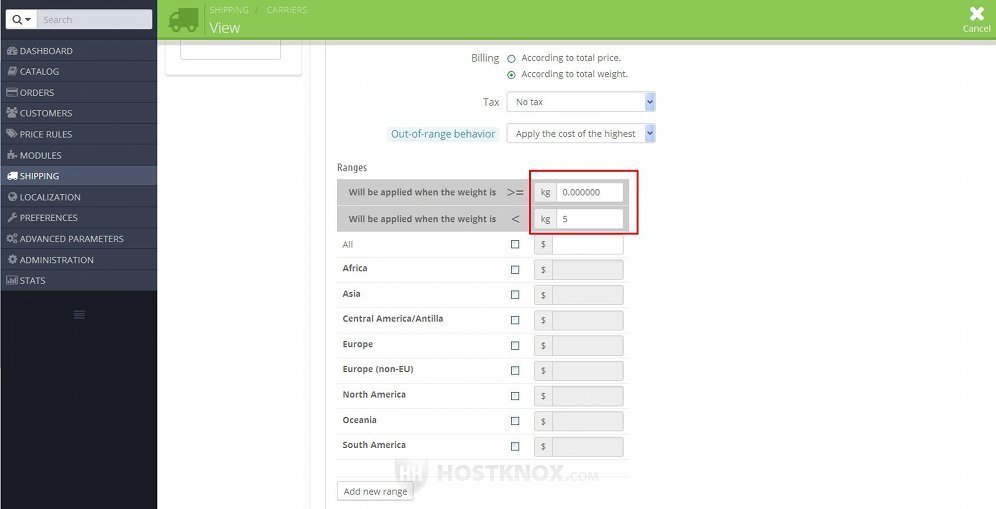
The weight and currency units that are used for the ranges are the default ones for the store. The default store units for weight and the default currency can be changed from Localization menu>Localization sub-menu. For more information check the tutorial on how to import localization packs and manage the localization settings in PrestaShop 1.5-1.6, and in particular the sections on default language, country and currency and default local units.
On our example screenshot it's a weight range for orders between 0 and 5 kilograms. Note that the lower limit is set so that the weight of the order should be greater than or equal (> =) to the specified number. This mean that the number is included in the range. While the upper limit is set in such a way so that the weight of the order should be just less than the specified number (<). This means that the number is not included in the range. For instance, if the range is 0-5 kilograms, then the shipping charge for that range will be applied if the order weighs from 0 to 4.99 kilograms. If the order weighs 5 kilograms it's out of this particular range. When you specify the next range you can simply put 5 as the lower limit (the lower limit includes the specified number). In this way you can specify the ranges using round numbers.
To add another range click on the Add new range button and configure the options that appear.
Below the ranges there are fields for each of the geographical zones. You can use them to type the shipping charges for the countries in the specific zone. If the carrier doesn't deliver orders to a particular zone, simply leave the checkbox for that zone unmarked. To set the shipping charges for a zone, mark the checkbox for that zone and type the sum in the field:
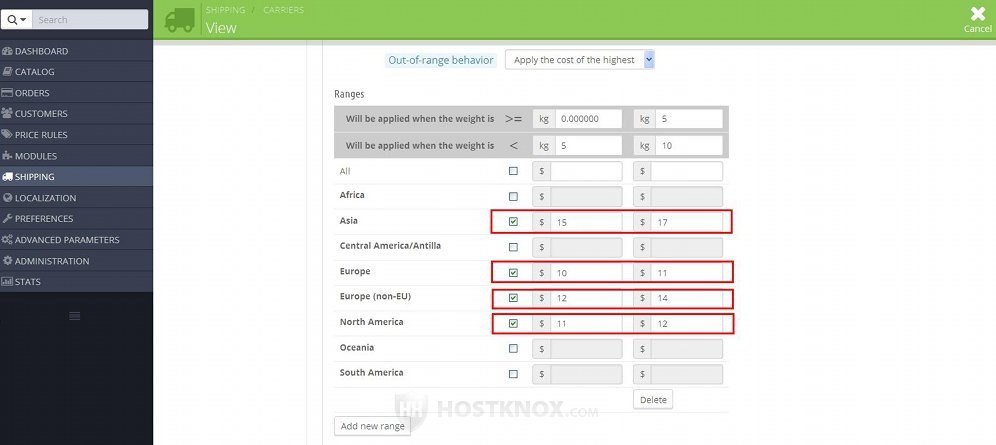
You can set a different fee for the same zone for each of the enabled ranges. On our example screenshot there are two weight ranges (0-5 and 5-10 kilograms) and the enabled zones are Asia, Europe, Europe (non-EU) and North America.
If a zone is not enabled for the particular carrier and the address of a customer is in that zone, then the carrier will not be available on the page on which the customer can select the carrier that they want to use.
For information on managing zones check the tutorial on how to manage geographical zones in PrestaShop 1.5-1.6.
After you're done with the options for shipping locations and costs, click on the Next button at the bottom of the page. The next step is labeled Size, weight, and group access:
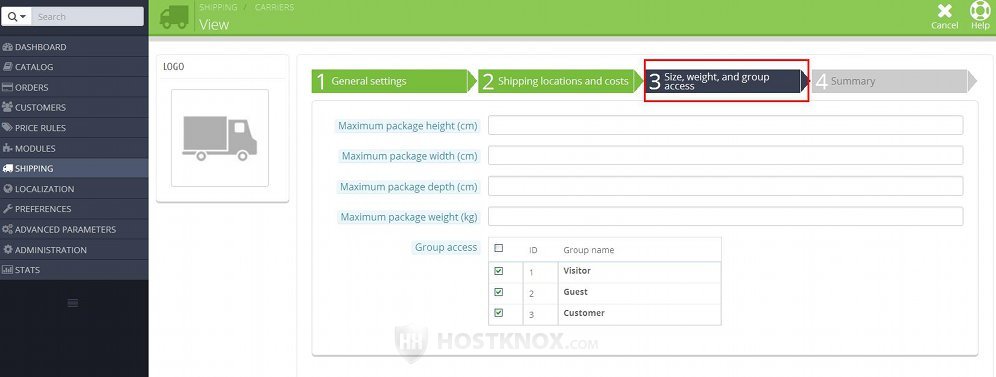
If the carrier has limits in terms of the maximum height, width, depth and/or weight of the order, you can specify them in the respective fields. If the order exceeds one of these limits, the carrier will be disabled for that order.
The limits are set in the default store units. You can change the default local units from Localization menu>Localization sub-menu in the admin panel.
From the Group access option you can select which customer groups can use the carrier. If you unmark the checkbox for a group, the customers who belong to that group will not be allowed to use the carrier.
After you're ready with the options click on the Next button. The last step is Summary and it just lists all the information that you've added for the carrier by using the available options on the previous pages:
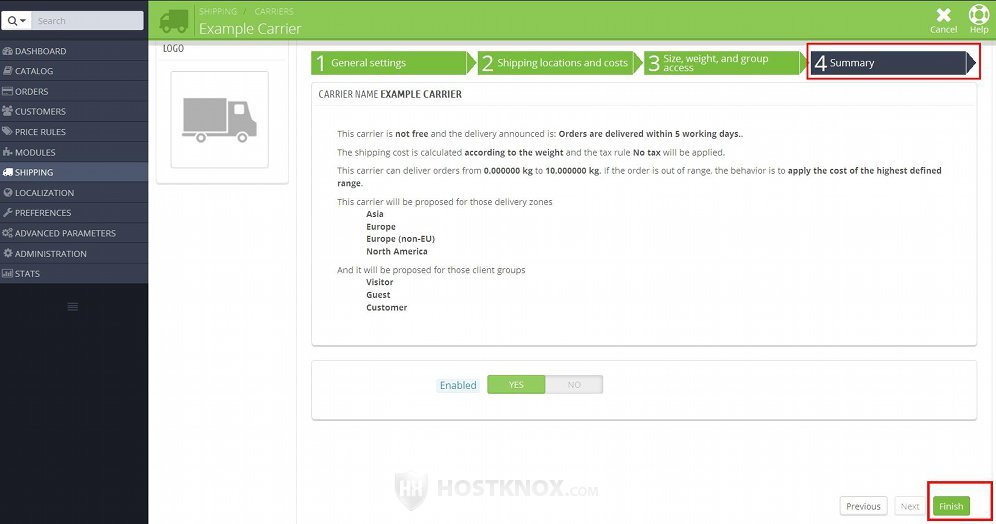
On the same page there's an option Enabled for enabling/disabling the carrier. If you want the carrier to be an active one that the customers can use, set this option to Yes. You can enable and disable carriers at any time. Then click on the Finish button at the bottom to save the carrier.
Manage Existing Carriers
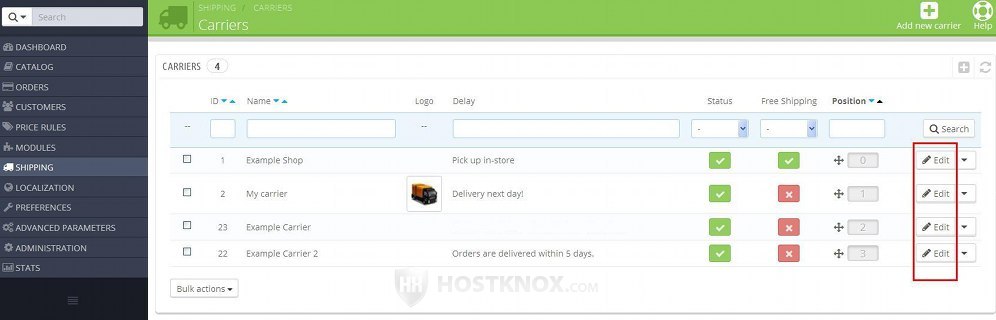
To manage the carriers that have been added go to Shipping menu>Carriers sub-menu in the admin panel. There you'll see a table with the existing carriers.
Using the respective options in the table you can edit the settings of the carriers, delete them, enable and disable them and change their positions.
To edit a carrier just click on its Edit button in the table (in PrestaShop 1.5 it's a pencil icon):
This will open the form with the settings of the carrier. It's the same as the one for adding new carriers. The options are divided into steps/pages. You can change the pages either by clicking on the tab for the particular page or by using the buttons Next and Previous at the bottom. If you make any changes don't forget to click on the Finish button. For a detailed description of the options check the previous section of this tutorial.
To delete a carrier, in the table with the existing carriers click on the arrow next to the Edit button of that carrier and from the drop-down menu select Delete:
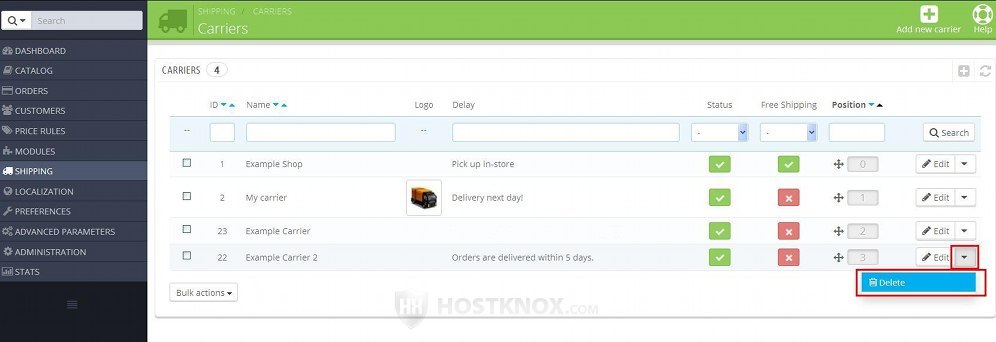
In PrestaShop 1.5 the button for deleting is a trash can icon that's next to the button for editing.
If you want to enable or disable a carrier you can either edit that carrier and configure its Enabled option, or you can do it directly in the table listing all the carriers. There's a column labeled Status:
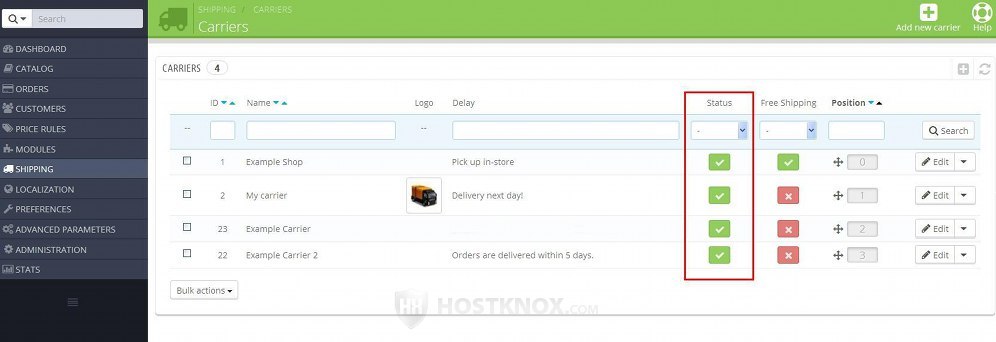
The enabled carriers have green checkmarks and the disabled ones have red X signs. To enable/disable a carrier click on its symbol in the Status column and it will change into the opposite one.
In the table there's also a column Free Shipping from which you can enable/disable free shipping for each of the carriers. Of course, you can also do that by editing the carrier and configuring the option for free shipping.
Another useful column in the table with the carriers is Position. To change the position of a carrier, hover the mouse pointer over the position number for the particular carrier until it turns into a four-arrow cursor, then click and hold the left mouse button and drag and drop the carrier in the position you want:
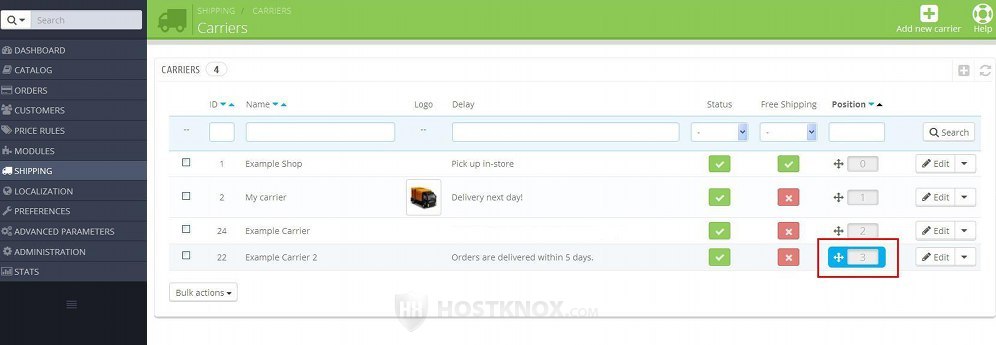
The order of the carriers may be reflected on the checkout page on the frontend that shows the customers the available carriers that they can choose from. For this to happen however, the option Sort by that's available when you go to Shipping menu>Preferences sub-menu in the admin panel has to be set to Position. If this is the case, the order in which the carriers are listed in the table in Shipping menu>Carriers sub-menu in the admin panel is the order in which they are shown on the frontend. For more information on the options for shipping preferences check the next section of this tutorial.
If you want to enable, disable or delete more than one carrier at the same time, you can use the Bulk actions drop-down menu below the table with the carriers. First mark the checkboxes of the carriers in the table and then select the action from the drop-down menu:

In PrestaShop 1.5 the buttons for bulk actions are not in a drop-down menu, they are listed directly under the table.
Options for Shipping Preferences
In PrestaShop there are some general options for shipping preferences. To configure these options, go to Shipping menu>Preferences sub-menu in the admin panel. The options there are divided into two panels:
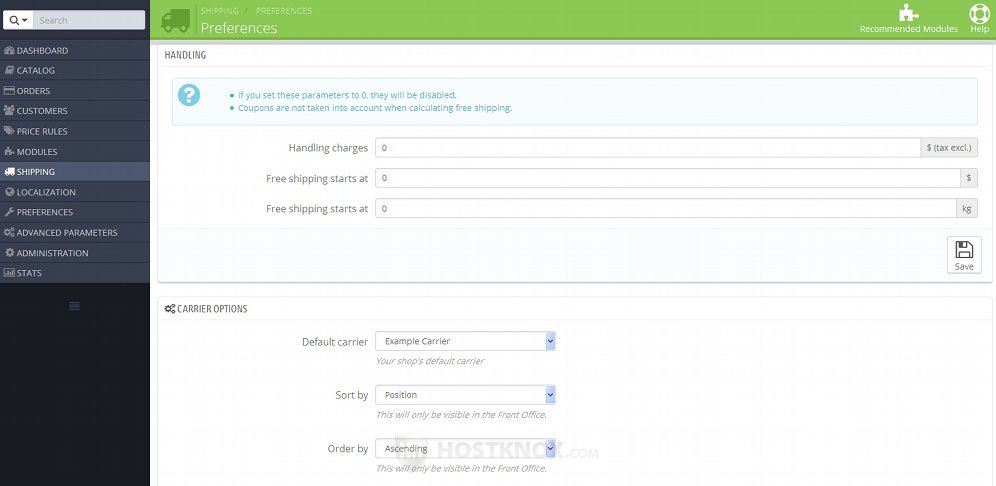
The first panel is labeled Handling and it contains the following options:
- Handling charges - if you want to add some handling charges, put the amount in this field. This is the fee per order and it's not connected with any particular carrier. This is what you and your store charge for packing, handling, shipping the order. When the customer selects the carrier that they want to use, the handling charges (if you have set any) are added to the shipping charges. However, in order for this to happen you need to enable the option Add handling costs of the carrier. You can do this by editing the carrier. The option is managed at the step Shipping locations and costs on the form for adding/editing carriers. For more information on the carrier settings check the section in this tutorial on adding carriers manually. For each carrier for which the option Add handling costs is enabled, the handling charges will be added to the carrier's fees.
- Free shipping starts at - there are a couple of fields labeled like this. The first one is for the price and the second one for the weight. If you want free shipping to be available when the price or weight of the order exceeds a specified price/weight, set the price and/or weight in the corresponding field. Setting them to 0 will disable free shipping; note that if you have specifically enabled free shipping for a certain carrier, this will not affect it.
If you make any changes, don't forget to click on the Save button.
The other panel with options on the page with the shipping preferences is labeled Carrier Options. It contains the following settings:
- Default carrier - from this drop-down menu you can select the default carrier that's automatically selected when the customer puts products in the shopping cart. From this drop-down menu you can select one of the enabled carriers (if you have more than one). In addition to the carriers you can also select Best price and Best grade. If you select Best price, the carrier that offers the cheapest shipping fee will be automatically selected. Of course, it will be selected from those carriers that can deliver to the address of the particular customer. If you set it to Best grade, the fastest carrier will be automatically selected; what's taken into account is the value for the option Speed grade of the carrier. Each carrier has such an option that you can configure.
Whatever the default carrier is, the customer can select another one, provided there are other carriers that can be used, on the checkout page that lists the available carriers. - Sort by - at the Shipping step of the checkout there's a list of the available carriers. The customer can select from these carriers. From the Sort by option you can configure how the available carriers should be listed. You can choose for them to be ordered either according to the shipping fee or according to their position in the table that's shown when you go to Shipping menu>Carriers sub-menu in the admin panel. You can rearrange their positions in that table as described in the section in this tutorial on managing existing carriers. If you set the option Sort by to Position, then this change in the table will also be reflected on the frontend.
- Order by - this option is directly related to the Sort by option. You can select the order to be either Ascending or Descending. For instance, if you set it to Ascending and the Sort by option is set to Price, then the cheapest carrier will be listed first and the most expensive one will be the last.
If you make any changes, don't forget to click on the Save button.
Product Options Related to Shipping
For each product you can configure some options related to shipping. You can do this on the form for adding/editing products. After you go to Catalog menu>Products sub-menu and you open the product form, click on the Shipping tab:
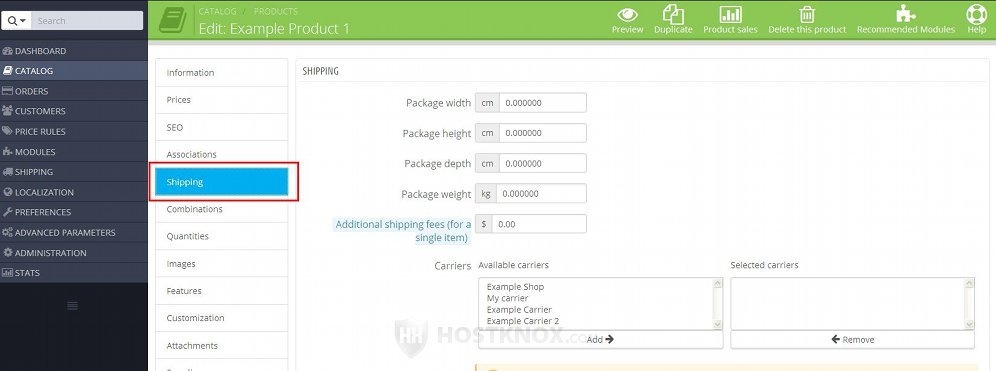
You can set the weight, width, height and depth of the product package; you can set an additional shipping fee that will be applied only to this product, regardless of the used carrier. And if you want to, you can also limit the carriers that can be used to deliver the product.
For a description of these options you can also check out the section on shipping options in the tutorial on how to add and manage products in PrestaShop 1.5-1.6.
Carrier List on the Frontend
On the frontend customers can select which carrier to use at the Shipping step of the checkout:
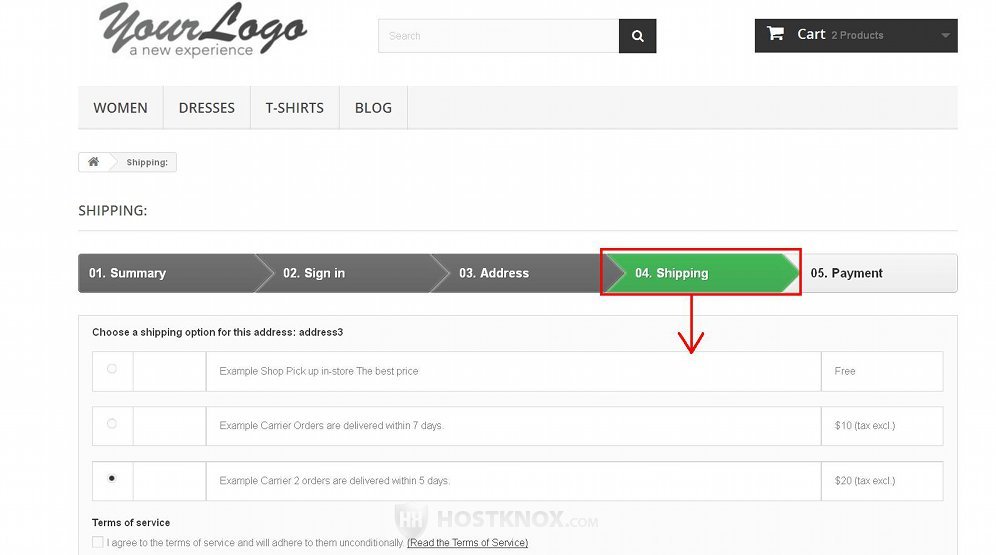
Only the available carriers for the particular order are listed. Whether a carrier is available for an order is determined by several things:
- the address of the customer - whether the carrier is configured to deliver orders to that zone (managed from the options of the carrier).
- the price/weight ranges of the carrier - if the order falls outside these ranges (e.g. it's heavier than the maximum weight the carrier can deliver), and the carrier is configured to be disabled in such a case, it will not be available (managed from the options of the carrier).
- the shipping options of the products in the order - the order might contain a product(s) which is specifically configured not to be delivered with a particular carrier (managed from the options of the product).
- the customer group to which the customer belongs - the customer might be in customer group which is not allowed to use a specific carrier (managed from the options of the carrier).