PrestaShop 1.5/1.6 General Preferences Tutorial
How to configure and manage the options for general preferences in PrestaShop 1.5-1.6
In this tutorial we'll go over the options for general preferences. To configure them, go to Preferences menu>General sub-menu in the admin panel. This will display the page with the general options:
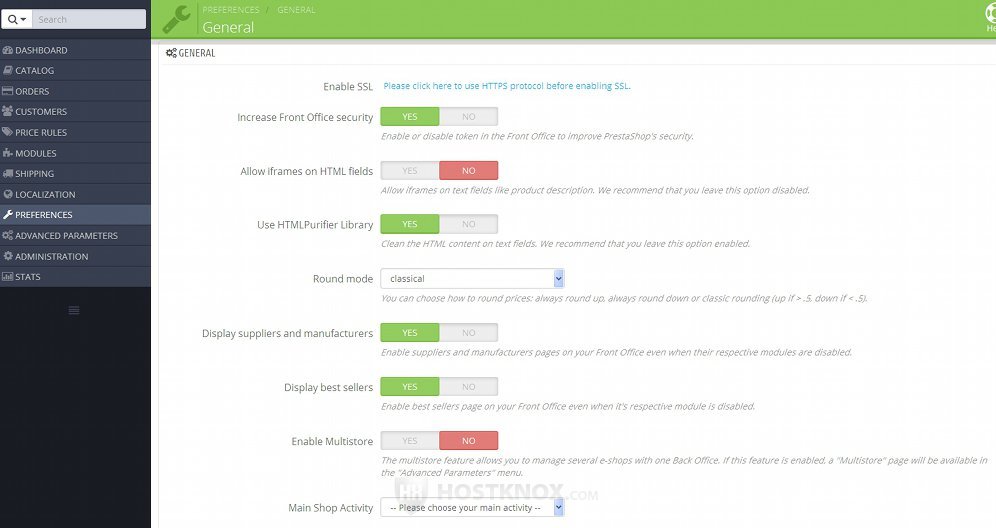
The available options are:
- Enable SSL - SSL stands for Secure Sockets Layer. This is an Internet protocol for encrypting the transfer of data. When SSL is mentioned this also includes TLS (Transport Layer Security), which is in fact the newer protocol and the one that's usually used. SSL is usually used as a generic term for both. They are used for protecting sensitive data such as credit card and payment information, login credentials, etc. So it's a good idea for an online store to make use of SSL/TLS encryption.
To be able to use SSL you need a private SSL certificate. You have to additionally purchase an SSL certificate. A certificate is used per domain name. HostKnox clients can order SSL certificates from their client area. For more information check out the tutorial on how to order web products and services.
Once you have an SSL certificate and you want to enable SSL for your store, go to Preferences menu>General sub-menu in the admin panel of your PrestaShop, click on the link next to the option Enable SSL and follow the instructions. - Increase Front Office security - this option is enabled by default. When it's enabled security tokens are used to protect each customer's session while browsing and using your store. It's recommended that you leave this option enabled.
- Allow iframes on HTML fields - this option is disabled by default, and it's recommended that you leave it disabled. These are HTML tags for displaying a page within a page. They are generally used if you want to have a small frame on your site that displays an external site. If you enable this option you can use these iframe tags in the descriptions of categories, products, in the content of CMS pages, etc. To do this, the built-in text editor in the admin panel has an option for typing/viewing the HTML source code of the description/content of whatever you're adding or editing (e.g. a product). In the window that pops out when you click on that button you can type the code for the iframes. Of course, you have to be familiar with the syntax.
If this option is disabled and you or an employee tries to add iframes to a description, CMS page, etc., they will not be allowed to save the change. - Use HTML Purifier Library - this option is enabled by default. It's highly recommended that you don't disable it. As you know on the frontend there are various text fields that customers can use to send information to your site (e.g. account information settings, text fields for product customizations, Contact us form, etc.). When this option is enabled, this prevents customers from using these fields to send malicious code to your site.
Note that this option is not available in PrestaShop 1.5 and in older 1.6 versions. - Round mode - with this option you can select how prices and taxes should be rounded. By default, it's set to classical; the other choices are superior and inferior. We'll demonstrate how these function with a simple example. Let's say that the sum is between 15 and 16. If the option is set to classical and the sum is between 15.1 and 15.4, then it will be rounded to 15; if it's between 15.5 and 15.9 it will be rounded to 16. If the option is set to superior and the price is between 15.1 and 15.9, then it will be rounded to 16; if the option is set to inferior the price will be rounded to 15, regardless of whether the exact price is 15.1 or 15.9.
- Display suppliers and manufacturers - with this option you can control whether the frontend manufacturer and supplier pages should be available when the manufacturer and supplier modules are disabled.
As you know, PrestaShop comes prepackaged with a module for manufacturers and another one for suppliers. They are enabled by default. Each of these modules displays on the frontend respectively a block listing the manufacturers and another one for suppliers. They are shown either in the left or right column. In addition to this there's a page that lists the available manufacturers (e.g. yourdomain.com/manufacturers) and one that lists the suppliers (e.g. yourdomain.com/supplier). Each manufacturer and supplier also has a page that shows the products associated with that manufacturer (e.g. yourdomain.com/2_example-manufacturer) or supplier (e.g. yourdomain.com/2__example-supplier). When the modules are disabled the blocks are automatically removed from the left/right column; if the option Display suppliers and manufacturers is enabled, then the pages with the manufacturers and suppliers will still be available.
For more information on manufacturers and suppliers check out respectively the tutorial on how to manage manufacturers in PrestaShop 1.5-1.6 and the one on how to manage suppliers in PrestaShop 1.5-1.6. - Display best sellers - similar to the previous option, but in this case it concerns the page that lists the top-sellers.
There's a prepackaged module called Top-sellers block. It displays on the frontend a block in the left or right column that displays the best sellers, and there's also a page that lists the best-sales (e.g. yourdomain.com/best-sales). If you disable the module but the option Display best sellers is enabled, then the best-sales page will still be available. Otherwise, if the option is disabled and the module is disabled, the page will not be accessible.
Note that in PrestaShop 1.5 this option is not available. - Enable Multistore - the multistore feature allows you to manage more than one store from the same admin panel. If you enable this option, this will make available the Multistore sub-menu in the Advanced Parameters menu. So after you set the Enable Multistore option to Yes and you click on the Save button, then you can go to Advanced Parameters menu>Multistore sub-menu in the admin panel. Then if you want to create a multistore you can configure the options there. Here we'll not go over that. For more information visit the respective tutorial.
- Main Shop Activity - from this drop-down menu you can select what goods or services your shop provides. The main shop activity can first be selected during the installation of the application. If you didn't configure it while installing PrestaShop, or if you want to change it, you can do it from this drop-down menu. Note that this is optional; you don't have to select anything from this drop-down menu.
If you make any changes don't forget to click on the Save button.