PrestaShop 1.5/1.6 Modules Tutorial
How to install and manage modules in PrestaShop 1.5-1.6
If you want to add more functions and features to your PrestaShop store, you can do this with the help of modules (may also be referred to as addons, extensions, etc.). The default PrestaShop installation comes prepackaged with over a hundred modules. Not all of these modules are installed and enabled by default. You can install each of these prepackaged modules from the admin panel of your PrestaShop with a few clicks. There are many more modules that you can find on the Internet for all sorts of things. Some of them are free, while others are paid. If you want to install such a module, first you have to download it to your local computer, then upload it to your hosting account and after that install it from the admin panel. In this tutorial we'll go over all these things.
We'll show you:
- how to find and download modules
- how to upload modules to your PrestaShop hosting account
- how to install uploaded modules
- how to configure the settings of installed modules and enable, disable, uninstall and delete modules
- how to update modules
- links to other tutorials and articles related to managing modules
In this tutorial we've used as a basic example PrestaShop 1.6. The screenshots are also from that PrestaShop version. Although the design of the admin panel is different than that of PrestaShop 1.5 modules are installed and managed in the same way in both versions. If there are some differences we'll make notes about that in the tutorial.
Find and Download Modules
There are different sites where you can find PrestaShop modules. The most common place to search for a module is the addons section of the official PrestaShop site. There you can browse the different module categories or just use the search function to find the module you need. There are free modules that you can download to your local computer straight away, and there are also modules for which you have to pay first.
Note that in order to be able to download modules from the addons section of the official PrestaShop site, you have to register an account there and to be logged in.
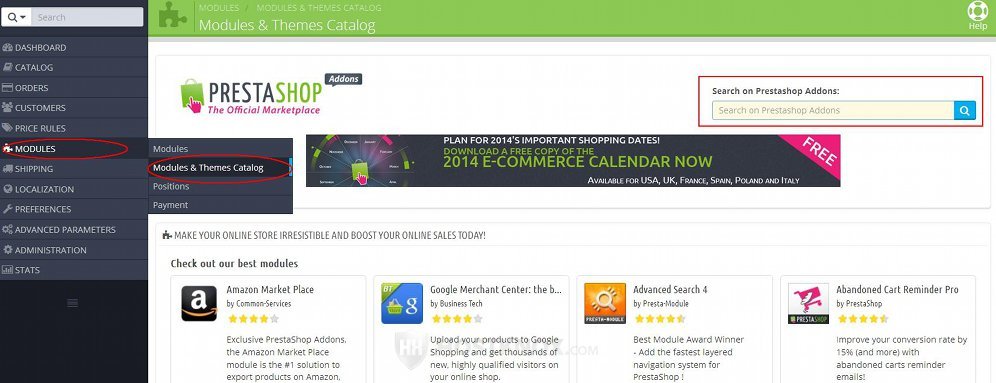
You can also search the addons section of the PrestaShop site directly from the admin panel of your PrestaShop. To do this, go to Modules menu>Modules & Themes Catalog sub-menu in the admin panel and on the page that opens use the search function to find modules:
Make sure that the module that you want to install is compatible with the PrestaShop version that you use.
It's also not a bad idea to install and test the module on a test site first.
Upload Modules to Your PrestaShop Hosting Account
Once you have the module on your local computer you have to upload it to your hosting account. There are a few ways you can do that:
- The most common and user-friendly method is to do it from the admin panel of your PrestaShop. To do this, go to Modules menu>Modules sub-menu, on the page that opens click on the button Add a new module. This will automatically display some options:
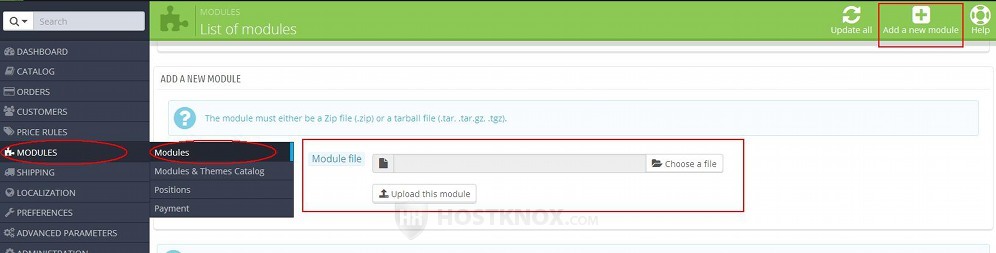
Click on the Choose a file button (in PrestaShop 1.5 it's labeled Browse) and use the window that pops out to locate the module on your local computer. Make sure that the module is archived (e.g. in ZIP format). After that click on the button Upload this module. PrestaShop will upload the file and unzip it in the modules folder on your PrestaShop hosting account.
- Another way to upload the module is with an FTP client. In this case you have the choice to unzip the module archive that's on your local computer and then upload the unzipped module to your hosting account, or you can upload the archive on your hosting account and then unzip it there. In any case you need to have the unzipped module with all its files and folders on your hosting account. You have to upload the module to the modules folder of your PrestaShop. This folder is located in the root PrestaShop directory. So, for example, if your PrestaShop is installed directly in the public_html directory on your hosting account (meaning the URL of the frontend is yourdomain.com), then you have to upload the module in public_html/modules.
For information on how to configure and use different FTP clients check our FTP tutorials. - Still another way to upload the module is with the HostKnox control panel. This is the control panel that HostKnox clients can use to manage their hosting accounts. In this case you should upload the archived module to the modules folder of your PrestaShop and then unzip it there. You can do both things with the HostKnox control panel. For more information check out the tutorial on how to manage files and folders with the file manager of the HostKnox control panel.
Whichever method you use the important thing is to have the module's files and folders in the modules directory of your PrestaShop. Then you can proceed and install and configure the module.
Install Modules
Installing a module in PrestaShop is very quick and easy. After the module is uploaded on your PrestaShop hosting account it will be listed in the Modules section in the admin panel of your PrestaShop. So go to Modules menu>Modules sub-menu and find the module. The modules are grouped into different sections depending on their function. You can either browse through them and find the module or just use the search function that's available on the same page.
For each uploaded module that's not installed there's an Install button:
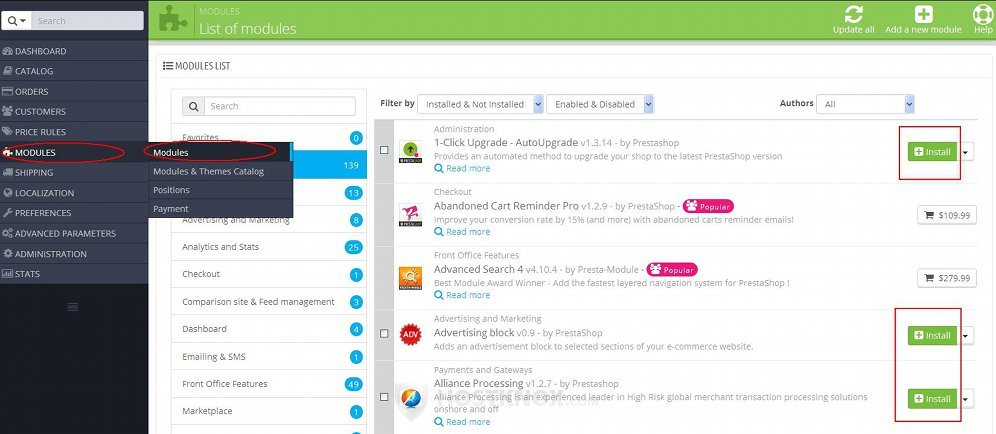
So to install a module just click on its Install button. PrestaShop will automatically install and enable the module. Depending on the module, in order for it to work after it's installed you may need to configure its settings. You can also disable/enable, uninstall and delete installed modules. For more information on how to do this check the next section of this tutorial.
You can also install and uninstall more than one module at the same time. To do this, mark the checkbox of each module and at the bottom of the module list use the Bulk actions drop-down menu and select Install the selection or Uninstall the selection.
Configure, Enable, Disable, Uninstall and Delete Modules
When you install a module it's automatically enabled which means that the function(s) that the module provides are active and accessible. This however also depends on whether there's something additional that has to be configured from the settings of the module. If the module has settings there's a Configure button with which you can configure its settings. For many of the modules the settings that can be configured are optional, but for some there are required settings that have to be configured in order for the module to be functional.
When a module is enabled there's a Disable button with which you can disable it. In this way the function(s) or features provided by the module will not be available but the configuration of the module will be saved, and if you enable it again its settings will be configured in the same way. You can actually configure the options of a module while it's disabled. If you don't want to use the module and you don't care if the settings will be kept, you can simply uninstall it. The module will still be listed in the admin panel and you can install it again. If you delete the module this will remove its files from your hosting account, and if you want to install it again you'll have to upload it to the hosting account first.
When you go to Modules menu>Modules sub-menu in the admin panel and you view the list with the modules you'll see that there's one main button for each module. What the button is depends on the particular state of the module. For example, if the module is not installed the main button will be Install. If the module is installed and enabled and it has some settings the main button will be Configure. If the module is installed but disabled, the main button will be Enable, etc. Next to the main button there's an arrow. When you click on it a drop-down menu with the buttons for the other actions will appear:
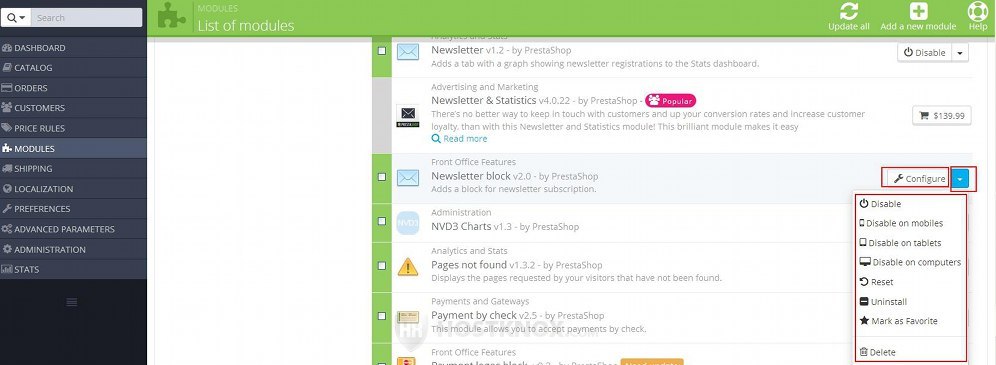
In PrestaShop 1.5 there's no such drop-down menu. Instead the buttons are under the name and the description of the module.
Update Modules
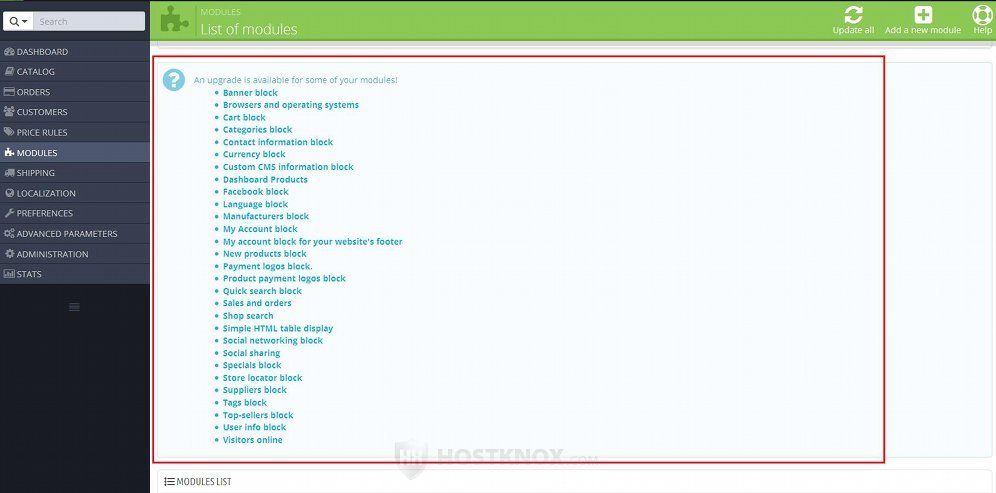
If there's an upgrade available for any of your modules, you'll see a message displayed when you go to Modules menu>Modules sub-menu in the admin panel:
When you find the particular module in the module list it will have a button Update it:
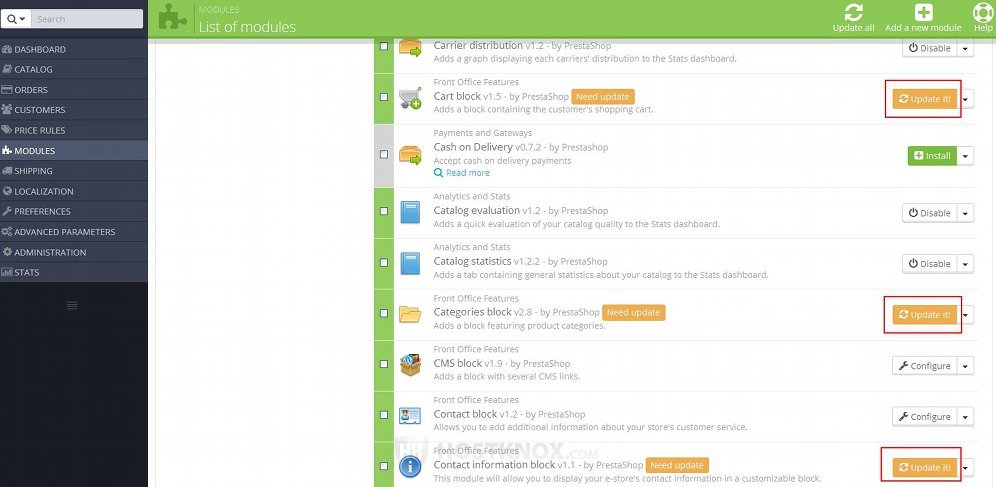
To update the module, simply click on the button.
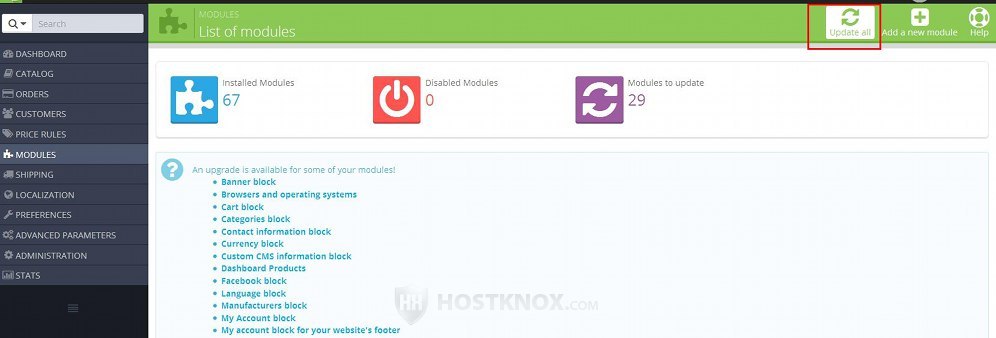
If you want to update all modules for which there are updates, click on the Update all button at the top of the page:
In PrestaShop 1.5 there's no such button.
If there are many modules that need updating you may consider updating them one by one because otherwise with the Update all button it may take too long and the connection could time out.
Links to Other Tutorials and Articles on Managing Modules
You may also find useful our other tutorials and articles related to modules: